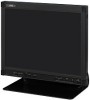
JVC LM-150AU - 15-in Tft-lcd Xga Monitor Support and Manuals
Get Help and Manuals for this JVC item
View All Support Options Below
Free JVC LM-150AU manuals!
Problems with JVC LM-150AU?
Ask a Question
Free JVC LM-150AU manuals!
Problems with JVC LM-150AU?
Ask a Question
Popular JVC LM-150AU Manual Pages
Instruction Manual - Page 4
...due to Part 15 of the FCC Rules. This equipment generates, uses and can radiate radio frequency energy and, if not installed and used in a particular installation. Increase...service. However, there is no guarantee that contains mercury.
FCC NOTICE (U.S.A. only) CAUTION: Changes or modifications not approved by JVC could void the user's authority to . • All operating instructions...
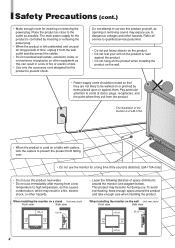
Instruction Manual - Page 6
....
• When the product is distorted. (LM-170A only)
• Do not use . To avoid overheating, keep enough space around the monitor (see diagram below). When installing the monitor on a stand Unit: mm (inch...to cords at doors, plugs, receptacles, and the point where they are not likely to qualified service personnel.
• Do not put heavy objects on the product. • Do not rest ...
Instruction Manual - Page 7
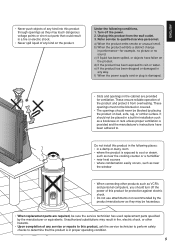
... provided and the manufacturer's instructions have fallen on the product. These ensure reliable operation of any way.
It should not be blocked by placing the product on the product. Unauthorized substitutions may be sure the service technician has used replacement parts specified by the manufacturer or equivalents. Do not install this product in the following...
Instruction Manual - Page 8
...
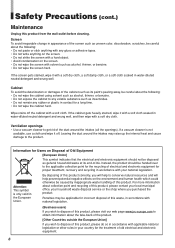
By disposing of this product correctly, you will help to dispose of this product, please visit our web page www.jvc-europe.com to obtain information about the following : • Do not paste or stick anything on the screen. ...
Unplug this product, please contact your local municipal office, your household waste disposal service or the shop where you purchased the product.
Instruction Manual - Page 9
... 12 Installing the monitor on the rack 12
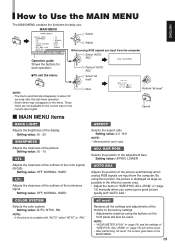
How to Use the MAIN MENU 13 MAIN MENU items 13
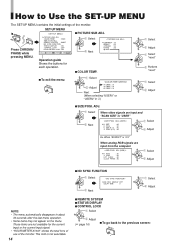
How to Use the SET-UP MENU 14 SET-UP MENU items 15
How to Use the External Control 17 About the external control 17 How to use the MAKE/TRIGGER terminal 17
Troubleshooting 18 Specifications 20...
Instruction Manual - Page 10
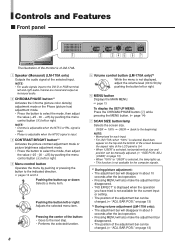
...Displays the MAIN MENU.
+ page 13
To display the SET-UP MENU: Press the CHROMA/PHASE button (2) while pressing... bars
appear on page 13)
*2 During volume adjustment (LM-170A only): • The adjustment bar will disappear in...ADJ. (USER)" on page 13)
8 on page 15) • When "100%" or "USER" is selected...The position of the adjustment bar can be manually adjusted. (+ "SIZE/POSI.
NOTE: &#...
Instruction Manual - Page 11

... SYNC" is displayed when no video signal is input. • When "COLOR SYSTEM" is set to "ON" (+ page 16), the status (information of LM-170A.
8 INPUT SELECT buttons/lamps
Select an input to the RGB
terminal.
• For LM-170A, the corresponding audio signal is on page 8
NOTE: • Not displayed for a noncompliant...
Instruction Manual - Page 12
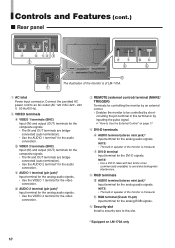
... for the video connection. NOTE: • The built-in speaker of the monitor is of LM-170A.
1
1 AC inlet Power input connector. h RGB terminal (D-sub 15-pin) Input terminal for the analog RGB signals.
6 Security slot Install a security wire to this terminal or by shortcircuiting the pin terminal in speaker of the monitor...
Instruction Manual - Page 15
...settings and adjustments of the color signals (R/G/B).
Setting value: 4:3, 16:9
NOTE: • Memorized for the current input or the current input signal.
Selects the position of
"SIZE/POSI. ADJ. (RGB)" (+ page
15) manually...from the computer. Setting value: 00 - 25
SHARPNESS
Adjusts the clearness of the luminance signal.
MAIN MENU
Select
ENGLISH
Operation guide Shows the buttons for...
Instruction Manual - Page 16
... 7 STATUS DISPLAY 7 CONTROL LOCK
Select
Adjust
(+ page 16)
7 To go back to Use the SET-UP MENU
The SET-UP MENU contains the initial settings of the monitor.
ADJ.
This item is "USER"
Next
Select Adjust
Ex. Operation guide Shows the buttons for the current input or the current input signal. • "HOUR METER...
Instruction Manual - Page 17

...40 - 00 - +40
V. ADJ. (RGB)
Adjusts the position of each signal.
15
ENGLISH
7 SET-UP MENU items
PICTURE SUB ADJ. CONTRAST*1
Adjusts the standard level for contrast adjustment.
...- +40
V. POSI.*2
Adjusts the horizontal picture position.
00 - 99
V. H. This item is set to the factory settings. SIZE*1
Adjusts the horizontal picture size.
-40 - 00 - +40
H. POSI. (4:3)*1
Adjusts ...
Instruction Manual - Page 20
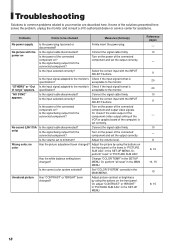
... format is
of the computer) is set to the monitor's Check if the input signal format is
specification?
Is the power of the connected ...SET-UP MENU.
Connect the signal cable firmly. Is the volume set correctly.
Adjust the picture by using the buttons on the power of the solutions presented here solves the problem, unplug the monitor and consult a JVC-authorized dealer or service...
Instruction Manual - Page 21
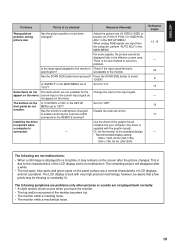
...).
- Is "CONTROL LOCK" in the effective screen area. Set it to "4:3." Disable the external control. The LCD display is not malfunction. For some signals, the picture cannot be missing or constantly lit. The buttons on the menu. Installing the driver is required when a computer is
specification? SIZE) or position (H. There is due to the...
Instruction Manual - Page 22
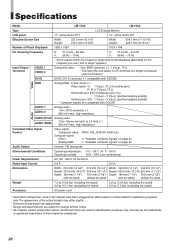
... you use ("Out of range" appears). Specifications
Model
LM-170A
LM-150A
Type
LCD Display Monitor
LCD panel
17", active matrix TFT
15", active matrix TFT
Effective Screen Size
Width:... this manual have been exaggerated, abbreviated or compounded for identification purposes only, and may differ slightly.
* Dimensions and weight are approximate. * Design and specifications are subject...
Instruction Manual - Page 24
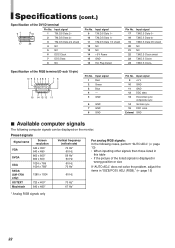
Preset signals
Signal name
VGA
SVGA
XGA SXGA (LM-170A only) US TEXT Macintosh
Screen resolution 640 x 350* 640 x 480 800 x 600* 800 x 600 ... in
this table • If the picture of the RGB terminal (D-sub 15-pin)
Pin No. Specifications (cont.)
Specification of the DVI-D terminal
9 1
8 16
Pin No. does not solve the problem, adjust the items in
wrong position or size
If "AUTO ADJ." Input...
JVC LM-150AU Reviews
We have not received any reviews for JVC yet.