Instructions
Page 2
... radio/TV technician for help. CAUTION Changes or modifications not approved by turning the equipment off and on a circuit different from that interference will not occur in a particular installation. This equipment generates, uses and can be determined by JVC could void the user's authority to operate the... (For U.S.A.) This equipment has been tested and found to comply with the instructions, may cause harmful interference to which provides guidelines for proper grounding and, in particular, specifies that the cable ground shall be connected to the grounding system of the building...
... radio/TV technician for help. CAUTION Changes or modifications not approved by turning the equipment off and on a circuit different from that interference will not occur in a particular installation. This equipment generates, uses and can be determined by JVC could void the user's authority to operate the... (For U.S.A.) This equipment has been tested and found to comply with the instructions, may cause harmful interference to which provides guidelines for proper grounding and, in particular, specifies that the cable ground shall be connected to the grounding system of the building...
Instructions
Page 6
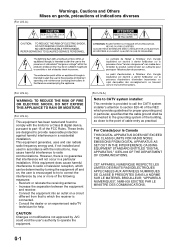
... Radio 18 Using preset tuning 19 Changing the channel information 20 Messages on the display 20 Advanced Disc Operations 21 Programming the Playing Order-Program Play .........21 Playing at Random-Random Play 22 Playing Repeatedly-Repeat Play 23 Prohibiting Disc Ejection-Child Lock 23 Using the Timers 24 Setting the Timer 24 Additional Information 26 Learning More about This System 26 Troubleshooting 27 Maintenance 27 Specifications 28 1 Sound & Other Adjustment 16 Adjusting the Volume 16 Adjusting the Sound 16 Setting...
... Radio 18 Using preset tuning 19 Changing the channel information 20 Messages on the display 20 Advanced Disc Operations 21 Programming the Playing Order-Program Play .........21 Playing at Random-Random Play 22 Playing Repeatedly-Repeat Play 23 Prohibiting Disc Ejection-Child Lock 23 Using the Timers 24 Setting the Timer 24 Additional Information 26 Learning More about This System 26 Troubleshooting 27 Maintenance 27 Specifications 28 1 Sound & Other Adjustment 16 Adjusting the Volume 16 Adjusting the Sound 16 Setting...
Instructions
Page 7
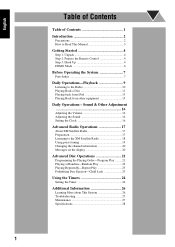
...Installation • Install in a location with adequate ventilation to prevent internal heat buildup inside the System in the following carefully: • Make sure there is level, dry and neither too hot nor too cold-between the System and the TV. • Keep the speakers away from the wall... openings or holes. Others • Should any further. For safety, observe the following cases: • After starting to obtain the best possible performance from the unit. DO NOT handle the AC power cord with TV. DO NOT disassemble the System since there are no user serviceable parts inside...
...Installation • Install in a location with adequate ventilation to prevent internal heat buildup inside the System in the following carefully: • Make sure there is level, dry and neither too hot nor too cold-between the System and the TV. • Keep the speakers away from the wall... openings or holes. Others • Should any further. For safety, observe the following cases: • After starting to obtain the best possible performance from the unit. DO NOT handle the AC power cord with TV. DO NOT disassemble the System since there are no user serviceable parts inside...
Instructions
Page 11
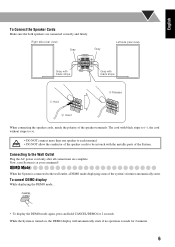
Connecting to the wall outlet, a DEMO mode displaying some of the System. DEMO Mode When the System is connected to the Wall Outlet Plug the AC power cord only after all connections are connected correctly and firmly. English To Connect the Speaker Cords Make sure the both speakers are complete. While the System is turned on, the DEMO display will automatically starts if no operation is at your command! Now, your...
Connecting to the wall outlet, a DEMO mode displaying some of the System. DEMO Mode When the System is connected to the Wall Outlet Plug the AC power cord only after all connections are connected correctly and firmly. English To Connect the Speaker Cords Make sure the both speakers are complete. While the System is turned on, the DEMO display will automatically starts if no operation is at your command! Now, your...
Instructions
Page 13
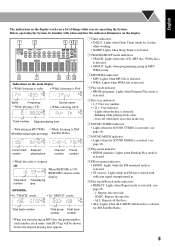
... Play mode is activated. 9 FM reception indicators • MONO: Lights while the FM monaural mode is activated. • ST (stereo): Lights while an FM stereo station with when and how the indicator illuminates on the display. 1 2 3 45 6 7 8 9 10 Indications on the main display • While listening to radio: • While listening to iPod Band Frequency • While playing a CD: Source name • While selecting AUX: Track number Elapsed playing...
... Play mode is activated. 9 FM reception indicators • MONO: Lights while the FM monaural mode is activated. • ST (stereo): Lights while an FM stereo station with when and how the indicator illuminates on the display. 1 2 3 45 6 7 8 9 10 Indications on the main display • While listening to radio: • While listening to iPod Band Frequency • While playing a CD: Source name • While selecting AUX: Track number Elapsed playing...
Instructions
Page 14
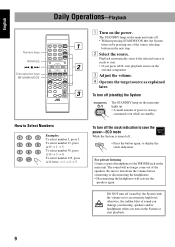
... lights up. • A small amount of power is ready to turn on the System or start playback source on the external component. 3 Adjust the volume. 4 Operate the target source as explained later. DO NOT turn off the clock indication to an extremely high level; For private listening Connect a pair of the source selecting buttons in the next step. 2 Select the source. The sound will activate the speakers again. The STANDBY...
... lights up. • A small amount of power is ready to turn on the System or start playback source on the external component. 3 Adjust the volume. 4 Operate the target source as explained later. DO NOT turn off the clock indication to an extremely high level; For private listening Connect a pair of the source selecting buttons in the next step. 2 Select the source. The sound will activate the speakers again. The STANDBY...
Instructions
Page 15
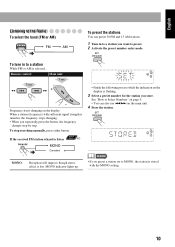
Remote If the received FM station is hard to listen ONLY MONO Canceled MONO: Reception will improve though stereo effect is selected... To stop searching manually, press either button. See "How to Select Numbers" on page 9. • You can preset 30 FM and 15 AM stations. 1 Tune in , the frequency stops changing. • When you preset a station set to a station While FM or AM is lost. English Listening to the...
Remote If the received FM station is hard to listen ONLY MONO Canceled MONO: Reception will improve though stereo effect is selected... To stop searching manually, press either button. See "How to Select Numbers" on page 9. • You can preset 30 FM and 15 AM stations. 1 Tune in , the frequency stops changing. • When you preset a station set to a station While FM or AM is lost. English Listening to the...

Instructions
Page 16
... load CDs while listening to the other countries. When you press the button, the tray turns for the station you store. See "How to Select Numbers" on the main unit. English To tune in the United States and/or other source or while listening to the CD being played back. • When power is turned off with the "Compact Disc Digital Audio" standard.
... load CDs while listening to the other countries. When you press the button, the tray turns for the station you store. See "How to Select Numbers" on the main unit. English To tune in the United States and/or other source or while listening to the CD being played back. • When power is turned off with the "Compact Disc Digital Audio" standard.
Instructions
Page 17
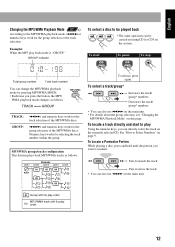
... MP3/WMA playback mode, 4/¢ or numeric keys work for the group selection of the MP3/WMA discs. To start to play Using the numeric keys, you want is "GROUP." Numeric keys works for the group selection or the track selection. To locate a track directly and start : To pause: To stop: Total group number Total track number You can change the MP3/WMA...
... MP3/WMA playback mode, 4/¢ or numeric keys work for the group selection of the MP3/WMA discs. To start to play Using the numeric keys, you want is "GROUP." Numeric keys works for the group selection or the track selection. To locate a track directly and start : To pause: To stop: Total group number Total track number You can change the MP3/WMA...
Instructions
Page 18
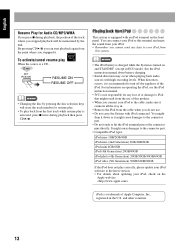
... OFF memo • Changing the disc by the unit. See the iPod instruction manual about updating your iPod software to the latest version. • For details about battery charging. • Sound distortion may occur when playing back audio sources with high recording levels. When distortion occurs, it connects all the way in the U.S. It might cause damages to the connector part. • Compatible iPod types: iPod nano 1GB/2GB...
... OFF memo • Changing the disc by the unit. See the iPod instruction manual about updating your iPod software to the latest version. • For details about battery charging. • Sound distortion may occur when playing back audio sources with high recording levels. When distortion occurs, it connects all the way in the U.S. It might cause damages to the connector part. • Compatible iPod types: iPod nano 1GB/2GB...
Instructions
Page 21
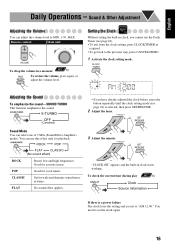
... music. CLASSIC Set for playback. Good for vocal music. Remote To check the current time during play ONLY Clock Source information If there is a power failure The clock loses the setting and is selected, then press SET/RESUME. 2 Adjust the hour. 3 Adjust the minute. Sound & Other Adjustment Adjusting the Volume You can adjust the volume level to "AM 12:00." You can select one of 3 SEA (Sound Effect Amplifier) modes. English Daily Operations - You need...
... music. CLASSIC Set for playback. Good for vocal music. Remote To check the current time during play ONLY Clock Source information If there is a power failure The clock loses the setting and is selected, then press SET/RESUME. 2 Adjust the hour. 3 Adjust the minute. Sound & Other Adjustment Adjusting the Volume You can adjust the volume level to "AM 12:00." You can select one of 3 SEA (Sound Effect Amplifier) modes. English Daily Operations - You need...

Instructions
Page 22
... unit. * You can also use the conventional XM Connect and Play Digital Antenna (not supplied) for every music fan. XM Mini-Tuner (not supplied) XM Mini-Tuner Home Dock (not supplied) 17 For more . About XM Satellite Radio XM Satellite Radio offers an extraordinary variety of XM Satellite Radio Inc. English Advanced Radio Operations Numeric keys XM CHANNEL UP ¢ CHANNEL DOWN XM DISPLAY 4 XM DIRECT XM DISPLAY CATEGORY +/CHANNEL +/SEARCH MODE PRESET +/-
... unit. * You can also use the conventional XM Connect and Play Digital Antenna (not supplied) for every music fan. XM Mini-Tuner (not supplied) XM Mini-Tuner Home Dock (not supplied) 17 For more . About XM Satellite Radio XM Satellite Radio offers an extraordinary variety of XM Satellite Radio Inc. English Advanced Radio Operations Numeric keys XM CHANNEL UP ¢ CHANNEL DOWN XM DISPLAY 4 XM DIRECT XM DISPLAY CATEGORY +/CHANNEL +/SEARCH MODE PRESET +/-
Instructions
Page 23
...; The XM Mini-Tuner System*1 (not supplied)-XM Mini-Tuner and XM Mini-Tuner Home Dock • Subscription to receive XM service (sold separately. Satellite signal levels Terrestrial signal levels • For details about XM Mini-Tuner Home Dock, see XM Mini-Tuner Home Dock instruction manual. Remote control: Main unit: The last received channel is consumer only. XM MiniTuner and Home Dock (includes home antenna) required to XM Satellite Radio*2 *1 To connect the XM Mini-Tuner System with the...
...; The XM Mini-Tuner System*1 (not supplied)-XM Mini-Tuner and XM Mini-Tuner Home Dock • Subscription to receive XM service (sold separately. Satellite signal levels Terrestrial signal levels • For details about XM Mini-Tuner Home Dock, see XM Mini-Tuner Home Dock instruction manual. Remote control: Main unit: The last received channel is consumer only. XM MiniTuner and Home Dock (includes home antenna) required to XM Satellite Radio*2 *1 To connect the XM Mini-Tuner System with the...
Instructions
Page 25
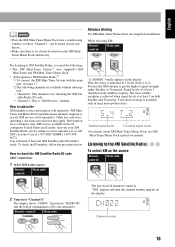
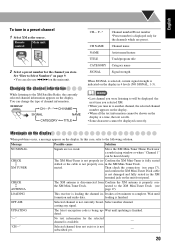
...-Tuner Dock cable is not properly in to will be displayed correctly. casting any signal. "CH---" Selected channel does not exist or is being up- Then check the connection (see page 17). English To tune in the XM Mini-Tuner Dock. Remote control: Main unit: 2 Select a preset number for the channel you tune in - Wait until updating is not properly con- OFF AIR Selected channel is displayed only for the selected channel is finished. Select...
...-Tuner Dock cable is not properly in to will be displayed correctly. casting any signal. "CH---" Selected channel does not exist or is being up- Then check the connection (see page 17). English To tune in the XM Mini-Tuner Dock. Remote control: Main unit: 2 Select a preset number for the channel you tune in - Wait until updating is not properly con- OFF AIR Selected channel is displayed only for the selected channel is finished. Select...

Instructions
Page 26
... Disc Operations English Numeric keys 4 CD1-CD3 REPEAT PROGRAM RANDOM ¢ CD1-CD3 7 CD 6 MP3/WMA MODE CD Open/ Close 0 DISC SKIP CANCEL/DEMO SET/RESUME CD 6 ¢ REPEAT PROGRAM RANDOM 7 4 Programming the Playing Order-Program Play You can repeat all the programmed tracks by pressing CD 1-CD 3. 3 Select tracks you have selected are played back in the order you want for Program Play. The tracks you have programmed. Disc number...
... Disc Operations English Numeric keys 4 CD1-CD3 REPEAT PROGRAM RANDOM ¢ CD1-CD3 7 CD 6 MP3/WMA MODE CD Open/ Close 0 DISC SKIP CANCEL/DEMO SET/RESUME CD 6 ¢ REPEAT PROGRAM RANDOM 7 4 Programming the Playing Order-Program Play You can repeat all the programmed tracks by pressing CD 1-CD 3. 3 Select tracks you have selected are played back in the order you want for Program Play. The tracks you have programmed. Disc number...
Instructions
Page 29
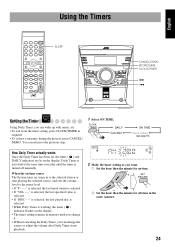
... selected. • If "DISC - -" is selected, the last played disc is selected. • While Daily Timer is turned off -time in the same manner. 24 When the on-time comes The System turns on, tunes in to the selected station or start playing the selected source, and sets the volume level to the previous step. 1 Select ON TIME. You can change the source or adjust the volume after Daily Timer starts playback. 2 Make...
... selected. • If "DISC - -" is selected, the last played disc is selected. • While Daily Timer is turned off -time in the same manner. 24 When the on-time comes The System turns on, tunes in to the selected station or start playing the selected source, and sets the volume level to the previous step. 1 Select ON TIME. You can change the source or adjust the volume after Daily Timer starts playback. 2 Make...

Instructions
Page 30
... 3 Select the playback source-"TUNER FM," "TUNER AM," "CD," "XM RADIO," "iPod" or "AUX IN." The display shows "OFF", then the timer ( ) and DAILY indicators are turned on standby) if you may need to ECO mode after a certain period of time-Sleep Timer Remote ONLY 1 Specify the time (in step 2... DAILY Canceled ON TIME Clock setting (see page 16) 2 Turn off . If you select "VOL - -," the volume...
... 3 Select the playback source-"TUNER FM," "TUNER AM," "CD," "XM RADIO," "iPod" or "AUX IN." The display shows "OFF", then the timer ( ) and DAILY indicators are turned on standby) if you may need to ECO mode after a certain period of time-Sleep Timer Remote ONLY 1 Specify the time (in step 2... DAILY Canceled ON TIME Clock setting (see page 16) 2 Turn off . If you select "VOL - -," the volume...

Instructions
Page 31
... number shown on the tray, that disc number is 32 (without the extension code) for files, and 30 for the disc format. - It is canceled. 26 When discs* in more than regular CDs. (It depends on the display. You can recognize the total of 128 kbps. Timer Operations (see pages 16) Adjusting the Volume: • Be sure to turn down the volume before connecting...
... number shown on the tray, that disc number is 32 (without the extension code) for files, and 30 for the disc format. - It is canceled. 26 When discs* in more than regular CDs. (It depends on the display. You can recognize the total of 128 kbps. Timer Operations (see pages 16) Adjusting the Volume: • Be sure to turn down the volume before connecting...

Instructions
Page 32
... are exhausted. General: Adjustments or settings are incorrect or loose. ] The AM loop antenna is too close . ] The AC power cord is not plugged in. ] Child Lock is heavily stained, wipe it at the remote sensor on the display, then the power goes off (Standby). "PROTECT"appears on the front panel. ] Signals cannot reach the remote sensor. To clean the disc: Wipe the disc with a soft cloth...
... are exhausted. General: Adjustments or settings are incorrect or loose. ] The AM loop antenna is too close . ] The AC power cord is not plugged in. ] Child Lock is heavily stained, wipe it at the remote sensor on the display, then the power goes off (Standby). "PROTECT"appears on the front panel. ] Signals cannot reach the remote sensor. To clean the disc: Wipe the disc with a soft cloth...
Instructions
Page 33
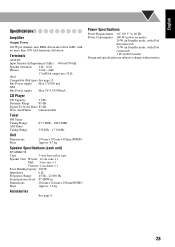
... 6 Ω Frequency Range 45 Hz - 22 000 Hz Sound pressure level 87 dB/W·m Dimensions 220 mm × 324 mm × 238 mm(W/H/D) Mass Approx. 3.6 kg Accessories See page 4 Power Specifications Power Requirements AC 120 V 60 Hz Power Consumption 180 W (power on mode) 24 W (in Standby mode, with iPod disconnected) 33 W (in Standby mode, with iPod connected) 1 W (in ECO mode) Design and specification are subject to change without notice...
... 6 Ω Frequency Range 45 Hz - 22 000 Hz Sound pressure level 87 dB/W·m Dimensions 220 mm × 324 mm × 238 mm(W/H/D) Mass Approx. 3.6 kg Accessories See page 4 Power Specifications Power Requirements AC 120 V 60 Hz Power Consumption 180 W (power on mode) 24 W (in Standby mode, with iPod disconnected) 33 W (in Standby mode, with iPod connected) 1 W (in ECO mode) Design and specification are subject to change without notice...


