
Instruction Manual
Page 1
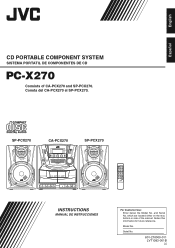
...SP-PCX270 7 POWER 1 2 3 4 5 6 7 8 9 0 +10 TUNER TAPE CD PRESET/ REPEAT PROGRAM INTRO FM MODE RANDOM HBS EQ VOL INSTRUCTIONS MANUAL DE INSTRUCCIONES For Customer Use: Enter below the Model No. Consta del CA-PCX270 el SP-PCX270. Retain this information for future reference. and Serial No. Serial No. 601-...270000-011 LVT1093-001B [J] which are located either on the rear, bottom or side of CA-PCX270 and SP-PCX270. English Español CD PORTABLE COMPONENT SYSTEM SISTEMA PORTATIL DE COMPONENTES DE CD PC-X270 Consists of the cabinet. Model...
...SP-PCX270 7 POWER 1 2 3 4 5 6 7 8 9 0 +10 TUNER TAPE CD PRESET/ REPEAT PROGRAM INTRO FM MODE RANDOM HBS EQ VOL INSTRUCTIONS MANUAL DE INSTRUCCIONES For Customer Use: Enter below the Model No. Consta del CA-PCX270 el SP-PCX270. Retain this information for future reference. and Serial No. Serial No. 601-...270000-011 LVT1093-001B [J] which are located either on the rear, bottom or side of CA-PCX270 and SP-PCX270. English Español CD PORTABLE COMPONENT SYSTEM SISTEMA PORTATIL DE COMPONENTES DE CD PC-X270 Consists of the cabinet. Model...
Instruction Manual
Page 2
... is open. CAUTION To reduce the risk of radiation when the CD tray is no user serviceable parts inside the Unit; POWER switch! Attention - Le courant peut être télécommandé. 1. Avoid direct exposure to shut the power off and on a circuit different from that interference will not occur in exposure to persons. CAUTION: The compact disc player uses invisible laser radiation and...
... is open. CAUTION To reduce the risk of radiation when the CD tray is no user serviceable parts inside the Unit; POWER switch! Attention - Le courant peut être télécommandé. 1. Avoid direct exposure to shut the power off and on a circuit different from that interference will not occur in exposure to persons. CAUTION: The compact disc player uses invisible laser radiation and...
Instruction Manual
Page 3
.... Precautions Installation • Install in a place which are used in again. If operation using the unit, it in this manual: DO NOT handle the AC power cord with TV. Before operating this unit, read this occur, the unit may condense on the unit. For instance, we do not repeat the information about turning on/off the unit, setting the volume, changing the sound effects, and...
.... Precautions Installation • Install in a place which are used in again. If operation using the unit, it in this manual: DO NOT handle the AC power cord with TV. Before operating this unit, read this occur, the unit may condense on the unit. For instance, we do not repeat the information about turning on/off the unit, setting the volume, changing the sound effects, and...
Instruction Manual
Page 4
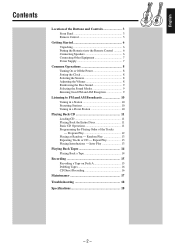
... Buttons and Controls 3 Front Panel 3 Remote Control 5 Getting Started 6 Unpacking 6 Putting the Batteries into the Remote Control 6 Connecting Speakers 6 Connecting Other Equipment 7 Power Supply 7 Common Operations 8 Turning On or Off the Power 8 Setting the Clock 8 Selecting the Sources 8 Adjusting the Volume 8 Reinforcing the Bass Sound 9 Selecting the Sound Modes 9 Ensuring Good FM and AM Reception 9 Listening to FM and AM Broadcasts 10 Tuning in a Station 10 Presetting Stations 10 Tuning in a Preset Station 10 Playing Back CD 11 Loading CD 11 Playing...
... Buttons and Controls 3 Front Panel 3 Remote Control 5 Getting Started 6 Unpacking 6 Putting the Batteries into the Remote Control 6 Connecting Speakers 6 Connecting Other Equipment 7 Power Supply 7 Common Operations 8 Turning On or Off the Power 8 Setting the Clock 8 Selecting the Sources 8 Adjusting the Volume 8 Reinforcing the Bass Sound 9 Selecting the Sound Modes 9 Ensuring Good FM and AM Reception 9 Listening to FM and AM Broadcasts 10 Tuning in a Station 10 Presetting Stations 10 Tuning in a Preset Station 10 Playing Back CD 11 Loading CD 11 Playing...
Instruction Manual
Page 6
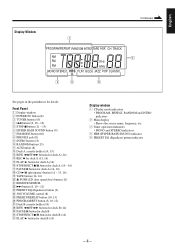
..., 16) o TAPE button (14, 16) ; 0 PUSH (CD door open/close) button (11) a REMOTE SENSOR s ¢ button (8, 10 - 12) d PRESET EQ (Equalizer) button (9) f JOG VOLUME control (8) g PRESET/REPEAT button (10, 13) h PROGRAM/SET button (8, 10, 12) j Deck B cassette holder (14) k REW 1/FF ¡ buttons for deck B (14) l PAUSE 8 button for deck B / STOP/EJECT 7/0 button for deck B (14) z PLAY 3 button for details. English Continued Display Window 1 PROGRAM REPEAT RANDOM INTRO TAPE AUX CH TRACK AM 2 FM KHz PM MHz MONO STEREO HBS...
..., 16) o TAPE button (14, 16) ; 0 PUSH (CD door open/close) button (11) a REMOTE SENSOR s ¢ button (8, 10 - 12) d PRESET EQ (Equalizer) button (9) f JOG VOLUME control (8) g PRESET/REPEAT button (10, 13) h PROGRAM/SET button (8, 10, 12) j Deck B cassette holder (14) k REW 1/FF ¡ buttons for deck B (14) l PAUSE 8 button for deck B / STOP/EJECT 7/0 button for deck B (14) z PLAY 3 button for details. English Continued Display Window 1 PROGRAM REPEAT RANDOM INTRO TAPE AUX CH TRACK AM 2 FM KHz PM MHz MONO STEREO HBS...
Instruction Manual
Page 7
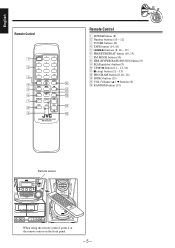
...6 7 8 9 0 +10 TUNER TAPE CD PRESET/ REPEAT PROGRAM INTRO FM MODE RANDOM HBS EQ VOL REMOTE CONTROL UNIT RM-SPCX270 J p q w e r t Remote Control 1 POWER button (8) 2 Number buttons (10 - 12) 3 TUNER button (10) 4 TAPE button (14, 16) 5 4/¢ buttons (8, 10 - 12) 6 PRESET/REPEAT button (10, 13) 7 FM MODE button (10) 8 HBS (HYPER BASS SOUND) button (9) 9 EQ (Equalizer) button (9) p CD 3¥8 button (11 - 13, 16) q 7 (stop) button (11 - 13) w PROGRAM button (8, 10, 12) e INTRO button (13) r VOL (Volume) 5 / ∞ buttons (8) t RANDOM button (13) Remote sensor 7 2 1 POWER...
...6 7 8 9 0 +10 TUNER TAPE CD PRESET/ REPEAT PROGRAM INTRO FM MODE RANDOM HBS EQ VOL REMOTE CONTROL UNIT RM-SPCX270 J p q w e r t Remote Control 1 POWER button (8) 2 Number buttons (10 - 12) 3 TUNER button (10) 4 TAPE button (14, 16) 5 4/¢ buttons (8, 10 - 12) 6 PRESET/REPEAT button (10, 13) 7 FM MODE button (10) 8 HBS (HYPER BASS SOUND) button (9) 9 EQ (Equalizer) button (9) p CD 3¥8 button (11 - 13, 16) q 7 (stop) button (11 - 13) w PROGRAM button (8, 10, 12) e INTRO button (13) r VOL (Volume) 5 / ∞ buttons (8) t RANDOM button (13) Remote sensor 7 2 1 POWER...
Instruction Manual
Page 8
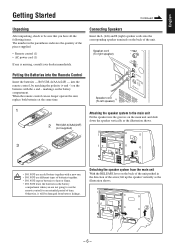
... pieces supplied. • Remote control (1) • AC power cord (1) If any is missing, consult your dealer immediately. markings on the batteries with a new one. • DO NOT use the remote control for an extended period of time. When the remote control can no longer operate the unit, replace both batteries at the same time. Speaker cord (To left ) and R (right) speaker cords into the Remote Control Insert the batteries - Detaching the speaker system from battery...
... pieces supplied. • Remote control (1) • AC power cord (1) If any is missing, consult your dealer immediately. markings on the batteries with a new one. • DO NOT use the remote control for an extended period of time. When the remote control can no longer operate the unit, replace both batteries at the same time. Speaker cord (To left ) and R (right) speaker cords into the Remote Control Insert the batteries - Detaching the speaker system from battery...
Instruction Manual
Page 9
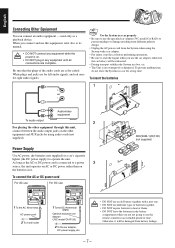
... adapter, DC power supply, etc. • DO NOT use different types of time. Use the System in a car properly • Be sure to use the specified car adapter (JVC model CA-R120) to start the engine when you use the remote control for right audio signals. As long as a playback device. Otherwise, it . Be sure that the plugs of the audio cords are color coded: White plugs and jacks are for left audio...
... adapter, DC power supply, etc. • DO NOT use different types of time. Use the System in a car properly • Be sure to use the specified car adapter (JVC model CA-R120) to start the engine when you use the remote control for right audio signals. As long as a playback device. Otherwise, it . Be sure that the plugs of the audio cords are color coded: White plugs and jacks are for left audio...
Instruction Manual
Page 10
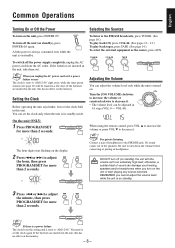
... reset to "AM 12:00" right away, while the tuner preset stations (see page 10) will be adjusted in the unit, take them out. When you unplug the AC power cord or if a power failure occurs The clock is in standby mode. AM The hour digits start playing any further, first set to adjust the minute, then press PROGRAM/SET for more than 2 seconds. If the batteries...
... reset to "AM 12:00" right away, while the tuner preset stations (see page 10) will be adjusted in the unit, take them out. When you unplug the AC power cord or if a power failure occurs The clock is in standby mode. AM The hour digits start playing any further, first set to adjust the minute, then press PROGRAM/SET for more than 2 seconds. If the batteries...
Instruction Manual
Page 11
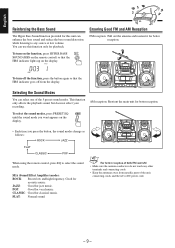
... the Bass Sound The Hyper Bass Sound function provided for classical music. HBS To turn on the function, press HYPER BASS HYPER BASS SOUND SOUND (HBS on the remote control) so that the HBS indicator goes off the function, press the button again so that the HBS indicator lights up on the display. • Each time you press the button, the sound modes change as follows: ROCK JAZZ FLAT CLASSIC POP When using the remote control...
... the Bass Sound The Hyper Bass Sound function provided for classical music. HBS To turn on the function, press HYPER BASS HYPER BASS SOUND SOUND (HBS on the remote control) so that the HBS indicator goes off the function, press the button again so that the HBS indicator lights up on the display. • Each time you press the button, the sound modes change as follows: ROCK JAZZ FLAT CLASSIC POP When using the remote control...
Instruction Manual
Page 12
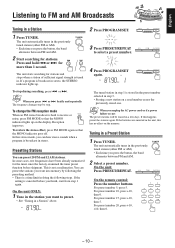
... a Station 2 Press PROGRAM/SET. 1 Press TUNER. On the unit: Press PRESET/REPEAT. 7 On the remote control: Press the number buttons. For preset number 5, press 5. English Listening to FM and AM Broadcasts Tuning in the unit, this has no effect on the memory. The unit starts searching for stations. To restore the stereo effect, press FM MODE again so that the MONO indicator lights up . You can hear stereo sounds when a program...
... a Station 2 Press PROGRAM/SET. 1 Press TUNER. On the unit: Press PRESET/REPEAT. 7 On the remote control: Press the number buttons. For preset number 5, press 5. English Listening to FM and AM Broadcasts Tuning in the unit, this has no effect on the memory. The unit starts searching for stations. To restore the stereo effect, press FM MODE again so that the MONO indicator lights up . You can hear stereo sounds when a program...
Instruction Manual
Page 13
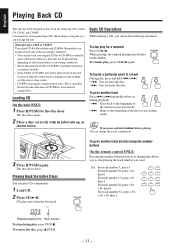
... or recording conditions.) • Before playing back CD-Rs or CD-RWs, read their instructions or cautions carefully. • Some CD-Rs or CD-RWs may require a longer readout time. (This is caused by the fact that the reflectance of irregular shape CDs (heart-shape, octagonal, etc.) can damage the unit. TRACK To go to another track directly using the number buttons On the remote control ONLY...
... or recording conditions.) • Before playing back CD-Rs or CD-RWs, read their instructions or cautions carefully. • Some CD-Rs or CD-RWs may require a longer readout time. (This is caused by the fact that the reflectance of irregular shape CDs (heart-shape, octagonal, etc.) can damage the unit. TRACK To go to another track directly using the number buttons On the remote control ONLY...
Instruction Manual
Page 14
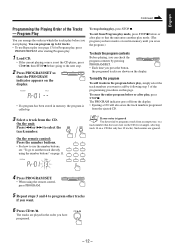
... Program play. 1 Load CD. • If the current playing source is not the CD player, press CD 3¥8, then STOP 7 before play mode. (The program you have programed. - 12 - To erase the entire program before you want to the next step. 2 Press PROGRAM/SET so that the unit enters another track directly using the remote control, press PROGRAM. 5 Repeat steps 3 and 4 to use Repeat play (see "To go to select the track number. Such entries are played...
... Program play. 1 Load CD. • If the current playing source is not the CD player, press CD 3¥8, then STOP 7 before play mode. (The program you have programed. - 12 - To erase the entire program before you want to the next step. 2 Press PROGRAM/SET so that the unit enters another track directly using the remote control, press PROGRAM. 5 Repeat steps 3 and 4 to use Repeat play (see "To go to select the track number. Such entries are played...
Instruction Manual
Page 15
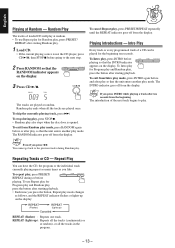
... Intro play for Random play, press PRESET/ REPEAT after starting Random play , press the button after play so that the unit enters another play . To exit from Intro play mode. To exit from Random play mode, press RANDOM again before or after starting playback. Repeating Tracks or CD - To use Repeat play for Program play and Random play, press the button after starting playback. • Each time you press the button, Repeat play . REPEAT (lights up ) Canceled REPEAT (flashes) : Repeats one track. The...
... Intro play for Random play, press PRESET/ REPEAT after starting Random play , press the button after play so that the unit enters another play . To exit from Intro play mode. To exit from Random play mode, press RANDOM again before or after starting playback. Repeating Tracks or CD - To use Repeat play for Program play and Random play, press the button after starting playback. • Each time you press the button, Repeat play . REPEAT (lights up ) Canceled REPEAT (flashes) : Repeats one track. The...
Instruction Manual
Page 16
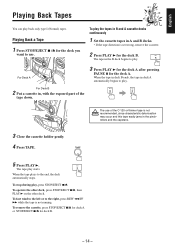
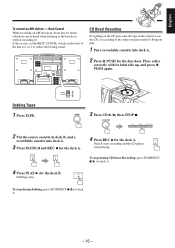
... the tape plays to play back only type I (Normal) tapes. To operate the other deck, press STOP/EJECT 7/0, then PLAY 3 on the other deck. To stop during play starts. To remove the cassette, press STOP/EJECT 7/0 for deck A or STOP/EJECT 7/0 for the deck B. PLAY The tape in the pinchrollers and the capstans. 3 Close the cassette holder gently. 4 Press TAPE. 5 Press PLAY 3. PAUSE PLAY The use...
... the tape plays to play back only type I (Normal) tapes. To operate the other deck, press STOP/EJECT 7/0, then PLAY 3 on the other deck. To stop during play starts. To remove the cassette, press STOP/EJECT 7/0 for deck A or STOP/EJECT 7/0 for the deck B. PLAY The tape in the pinchrollers and the capstans. 3 Close the cassette holder gently. 4 Press TAPE. 5 Press PLAY 3. PAUSE PLAY The use...
Instruction Manual
Page 17
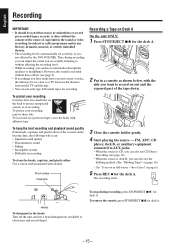
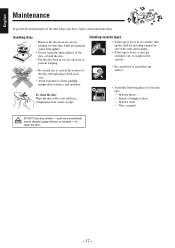
... the exposed part of copyright in the sound or video recording, broadcast or cable programme and in a cassette as shown below, with alcohol. FM, AM*, CD player, deck B, or auxiliary equipment connected to record on page 16.) * See "To record an AM station - However, the sound is deck B, you can use a head demagnetizer (available at electronics and record shops). To protect your recording Cassettes have excessive...
... the exposed part of copyright in the sound or video recording, broadcast or cable programme and in a cassette as shown below, with alcohol. FM, AM*, CD player, deck B, or auxiliary equipment connected to record on page 16.) * See "To record an AM station - However, the sound is deck B, you can use a head demagnetizer (available at electronics and record shops). To protect your recording Cassettes have excessive...
Instruction Manual
Page 18
... PLAY 3 for the disc door. REC Deck A starts recording and the CD player starts playing. To stop during dubbing, press STOP/EJECT 7/0 for the deck A. Dubbing Tapes 1 Press TAPE. BEAT CANCEL 3 Press CD 3¥8, then STOP 7. 7 2 Put the source cassette in the order it ). PLAY Dubbing...for Program play. 1 Put a recordable cassette into deck A. 3 Press PAUSE 8 and REC ¶ for deck A. - 16 - If this occurs, set the BEAT CANCEL switch on the CD, or according to reduce the beating sound. English To record an AM station - To stop during CD Direct Recording, press...
... PLAY 3 for the disc door. REC Deck A starts recording and the CD player starts playing. To stop during dubbing, press STOP/EJECT 7/0 for the deck A. Dubbing Tapes 1 Press TAPE. BEAT CANCEL 3 Press CD 3¥8, then STOP 7. 7 2 Put the source cassette in the order it ). PLAY Dubbing...for Program play. 1 Put a recordable cassette into deck A. 3 Press PAUSE 8 and REC ¶ for deck A. - 16 - If this occurs, set the BEAT CANCEL switch on the CD, or according to reduce the beating sound. English To record an AM station - To stop during CD Direct Recording, press...
Instruction Manual
Page 19
... cassette. • Be careful not to touch the tape surface. • Avoid the following places to direct sunlight, temperature extremes, and moisture. In direct sunlight or heat - such as conventional record cleaner, spray, thinner, or benzine - to scratch the surface of the disc, or bend the disc. • Put the disc back in a straight line from its case after use...
... cassette. • Be careful not to touch the tape surface. • Avoid the following places to direct sunlight, temperature extremes, and moisture. In direct sunlight or heat - such as conventional record cleaner, spray, thinner, or benzine - to scratch the surface of the disc, or bend the disc. • Put the disc back in a straight line from its case after use...
Instruction Manual
Page 20
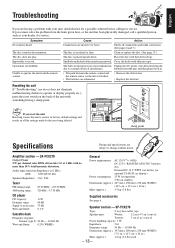
... harmonic distortion. Operations are subject to external electrical interference. Speaker section - x 10 in . Impossible to -noise ratio: Wow and flutter: 1 CD 60 dB 75 dB 0.1 % Cassette deck Frequency response Normal (type I): 50 Hz - 10 000 Hz Wow and flutter: 0.2% (WRMS) Supplied accessories See page 6. Place the disc with adhesive tape. CA-PCX270 Output Power 5 W per channel, min. SP-PCX270 Type: 2-way bass-reflex type Speaker units: Woofer...
... harmonic distortion. Operations are subject to external electrical interference. Speaker section - x 10 in . Impossible to -noise ratio: Wow and flutter: 1 CD 60 dB 75 dB 0.1 % Cassette deck Frequency response Normal (type I): 50 Hz - 10 000 Hz Wow and flutter: 0.2% (WRMS) Supplied accessories See page 6. Place the disc with adhesive tape. CA-PCX270 Output Power 5 W per channel, min. SP-PCX270 Type: 2-way bass-reflex type Speaker units: Woofer...
Instruction Manual
Page 39
PC-X270 CD PORTABLE COMPONENT SYSTEM VICTOR COMPANY OF JAPAN, LIMITED EN, SP © 2003 VICTOR COMPANY OF JAPAN, LIMITED 0503TMMMDWMTS
PC-X270 CD PORTABLE COMPONENT SYSTEM VICTOR COMPANY OF JAPAN, LIMITED EN, SP © 2003 VICTOR COMPANY OF JAPAN, LIMITED 0503TMMMDWMTS

