
Instructions
Page 4
... sound coming out of front speakers to the RX-DP15B, and use them to listen to different sources in different rooms (Zone 1 and Zone 2) at the back. Interference to RF communication between the receiver and the remote control from this receiver. If this manual for future reference. If anything goes wrong, ...speakers-two at the side and two at the same time. COMPU LINK/TEXT COMPU LINK/AV COMPU LINK remote control systems These COMPU LINK remote control systems allow you to operate other JVC audio/video components from outside. - The remote control is now upgraded to be considered: -...
... sound coming out of front speakers to the RX-DP15B, and use them to listen to different sources in different rooms (Zone 1 and Zone 2) at the back. Interference to RF communication between the receiver and the remote control from this receiver. If this manual for future reference. If anything goes wrong, ...speakers-two at the side and two at the same time. COMPU LINK/TEXT COMPU LINK/AV COMPU LINK remote control systems These COMPU LINK remote control systems allow you to operate other JVC audio/video components from outside. - The remote control is now upgraded to be considered: -...

Instructions
Page 5
... 7 Searching for a Disc (Only for the CD player 65 7 Entering the Disc Information 66 AV COMPU LINK Remote Control System .... 68 Operating JVC's Audio/Video Components ... 71 Operating Audio Components 71 Operating Video Components 73 Operating Other Manufacturers' Equipment... ... 74 Changing the Preset Signal Codes 74 Storing the Remote Signals Manually 78 Troubleshooting 81 Specifications 83 Indicates the functions YOU CAN ALSO USE when the receiver...
... 7 Searching for a Disc (Only for the CD player 65 7 Entering the Disc Information 66 AV COMPU LINK Remote Control System .... 68 Operating JVC's Audio/Video Components ... 71 Operating Audio Components 71 Operating Video Components 73 Operating Other Manufacturers' Equipment... ... 74 Changing the Preset Signal Codes 74 Storing the Remote Signals Manually 78 Troubleshooting 81 Specifications 83 Indicates the functions YOU CAN ALSO USE when the receiver...
Instructions
Page 10
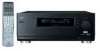
... supplied) A standard type connector should be sure you are supplied for the receiver. Handling the receiver • Do not insert any item is good ventilation around the receiver. Do not connect the AC power cord until all components. • Read the manuals supplied with the components you have been made. Using the Standard Type...
... supplied) A standard type connector should be sure you are supplied for the receiver. Handling the receiver • Do not insert any item is good ventilation around the receiver. Do not connect the AC power cord until all components. • Read the manuals supplied with the components you have been made. Using the Standard Type...

Instructions
Page 14
... 63 for the turntable with them. To audio input To audio output Note: You can connect either a cassette deck or an MD recorder to this receiver may result in insufficient volume. CD recorder To audio input R L CD recorder OUT (REC) IN (PLAY) TAPE MD OUT (REC) CDR IN (PLAY) FRONT To... cartridge such as an MC (moving -magnet) type cartridge. When connecting an MD recorder to the TAPE/MD jacks, change the source name to the manuals supplied with an MM (moving -coil) type must be connected to the TAPE/MD jacks. See "Changing the Source Name" on page 27 for your...
... 63 for the turntable with them. To audio input To audio output Note: You can connect either a cassette deck or an MD recorder to this receiver may result in insufficient volume. CD recorder To audio input R L CD recorder OUT (REC) IN (PLAY) TAPE MD OUT (REC) CDR IN (PLAY) FRONT To... cartridge such as an MC (moving -magnet) type cartridge. When connecting an MD recorder to the TAPE/MD jacks, change the source name to the manuals supplied with an MM (moving -coil) type must be connected to the TAPE/MD jacks. See "Changing the Source Name" on page 27 for your...
Instructions
Page 22
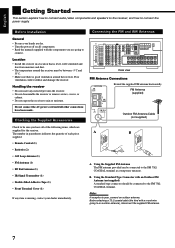
Connect front speakers by using the surround back speakers or when "EXT 7.1CH" is selected for Zone 1, this manual. Note: Usage of long audio cables/long speaker signal cables will deteriorate the signals and degrade the sound quality. 19 Zone 2 Layout ...TV To use the Zone 2 front speakers Turn on page 32. To use the Zone 2 TV Turn on and select the correct input for this receiver. Left front speaker Connection Å Connect the input jacks of another amplifier. FRONT 1 SPEAKERS CAUTION : + SPEAKER IMPEDANCE FRONT 1 AND 2 / ZONE 2: 8 - 16 FRONT 1 OR 2: - 4 ...
Connect front speakers by using the surround back speakers or when "EXT 7.1CH" is selected for Zone 1, this manual. Note: Usage of long audio cables/long speaker signal cables will deteriorate the signals and degrade the sound quality. 19 Zone 2 Layout ...TV To use the Zone 2 front speakers Turn on page 32. To use the Zone 2 TV Turn on and select the correct input for this receiver. Left front speaker Connection Å Connect the input jacks of another amplifier. FRONT 1 SPEAKERS CAUTION : + SPEAKER IMPEDANCE FRONT 1 AND 2 / ZONE 2: 8 - 16 FRONT 1 OR 2: - 4 ...

Instructions
Page 32
... 2 VOLUME dB The Zone 2 volume level appears. DOOR DOWN • When using the remote control: When operating the receiver using the remote control, the display on the unit are operating it is recommended to use the Zone 2 TV (connected to... buttons and controls on the unit work for Zone 2 operations. • Each time you press a button-this receiver (depending on the display. English Zone 2 (Sub-room) Operations This section explains only the operations used when you... Set the ZONE 1/ZONE 2 (LEARN/TRANSMIT) selector to 28 for this receiver manually. See pages 22 to "ZONE 2." -
... 2 VOLUME dB The Zone 2 volume level appears. DOOR DOWN • When using the remote control: When operating the receiver using the remote control, the display on the unit are operating it is recommended to use the Zone 2 TV (connected to... buttons and controls on the unit work for Zone 2 operations. • Each time you press a button-this receiver (depending on the display. English Zone 2 (Sub-room) Operations This section explains only the operations used when you... Set the ZONE 1/ZONE 2 (LEARN/TRANSMIT) selector to 28 for this receiver manually. See pages 22 to "ZONE 2." -

Instructions
Page 36
... operation mode together with ZONE 1/ZONE 2 (LEARN/TRANSMIT) selector set to a particular station. Set the ZONE 1/ZONE 2 (LEARN/TRANSMIT) selector to Stations Manually 1. FM/AM FM/AM On the unit (inside the front door) When operating for Zone 1 ANALOG L R SUBWFR From the remote control AUTO MUTING SPEAKERS...UP / TUNING / REW PLAY FF/ DOWN TUNING UP On the unit (inside the front door. Indicates the functions YOU CAN ALSO USE when the receiver is lit . For Zone 2 operations: The ZONE 2 ON/OFF lamp on the unit is ready for Zone 2 operations. Press DOOR DOWN to use...
... operation mode together with ZONE 1/ZONE 2 (LEARN/TRANSMIT) selector set to a particular station. Set the ZONE 1/ZONE 2 (LEARN/TRANSMIT) selector to Stations Manually 1. FM/AM FM/AM On the unit (inside the front door) When operating for Zone 1 ANALOG L R SUBWFR From the remote control AUTO MUTING SPEAKERS...UP / TUNING / REW PLAY FF/ DOWN TUNING UP On the unit (inside the front door. Indicates the functions YOU CAN ALSO USE when the receiver is lit . For Zone 2 operations: The ZONE 2 ON/OFF lamp on the unit is ready for Zone 2 operations. Press DOOR DOWN to use...

Instructions
Page 37
...receiving an FM broadcast. • You can only select the same station of the same band (FM or AM) for each preset station. Press MEMORY again while the selected channel number is hard to the selected channel number. 5. Repeat steps 1 to 4 until you find the channel you want to Stations Manually.... Press PRESET 5 / ∞ (inside the front door). LEFT / PRESET RIGHT / PRESET From the remote control: 1. FM/AM The last received station of the last selected band is tuned in doing the following steps. MONO: Reception will be quickly tuned in . • Each time you ...
...receiving an FM broadcast. • You can only select the same station of the same band (FM or AM) for each preset station. Press MEMORY again while the selected channel number is hard to the selected channel number. 5. Repeat steps 1 to 4 until you find the channel you want to Stations Manually.... Press PRESET 5 / ∞ (inside the front door). LEFT / PRESET RIGHT / PRESET From the remote control: 1. FM/AM The last received station of the last selected band is tuned in doing the following steps. MONO: Reception will be quickly tuned in . • Each time you ...
Instructions
Page 42
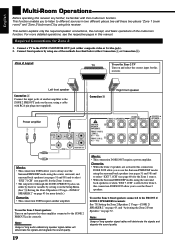
...right surround back speaker output level. Press LEVEL +/- English 7 TEST TONE You can adjust the levels within the range of -10 dB to the beginning) MANUAL : When this is connected to adjust the left surround speaker, press SURR•L. • To select the subwoofer, press SUBWFR. 4. Set the meter ... on the remote control to the current Surround/THX/DSP mode, but this to 0 dB, but cannot be louder than you select. Use the MANUAL test tone option and set to adjust the subwoofer output level. Select and adjust the following . • The test tone will be heard for ...
...right surround back speaker output level. Press LEVEL +/- English 7 TEST TONE You can adjust the levels within the range of -10 dB to the beginning) MANUAL : When this is connected to adjust the left surround speaker, press SURR•L. • To select the subwoofer, press SUBWFR. 4. Set the meter ... on the remote control to the current Surround/THX/DSP mode, but this to 0 dB, but cannot be louder than you select. Use the MANUAL test tone option and set to adjust the subwoofer output level. Select and adjust the following . • The test tone will be heard for ...
Instructions
Page 60
...this mode. When "DVD" with an appropriate mode selected. To adjust the speaker output level using the remote control, see the tables on the received signal and the current speaker settings. PROLOGIC THX : Select to apply Pro Logic and THX Cinema mode together. • If Pro Logic is ... it will be canceled). You can select one of the multi-channel software. Each time you press THX, THX/Surround modes change the THX modes manually for "DVD MULTI" and "EXT 7.1CH," see "Surround and THX Modes Applicable to activate the THX mode. • If the Surround mode is...
...this mode. When "DVD" with an appropriate mode selected. To adjust the speaker output level using the remote control, see the tables on the received signal and the current speaker settings. PROLOGIC THX : Select to apply Pro Logic and THX Cinema mode together. • If Pro Logic is ... it will be canceled). You can select one of the multi-channel software. Each time you press THX, THX/Surround modes change the THX modes manually for "DVD MULTI" and "EXT 7.1CH," see "Surround and THX Modes Applicable to activate the THX mode. • If the Surround mode is...

Instructions
Page 63
...output mode on the connected component, and start playback. • Refer to "ZONE 1." - English Using the Analog Multi-channel Playback Mode This receiver provides the DVD MULTI and EXT 7.1CH playback modes for those components. • The following before or while using the remote control: - ...2. To cancel the THX and DSP modes Press SURR/DSP OFF. IMPORTANT: Check following operations are only possible when the receiver is used. • Press DSP to the manual supplied for reproducing the analog discrete output mode of the DSP modes (except "STEREO FILM" and "MONO FILM"). For ...
...output mode on the connected component, and start playback. • Refer to "ZONE 1." - English Using the Analog Multi-channel Playback Mode This receiver provides the DVD MULTI and EXT 7.1CH playback modes for those components. • The following before or while using the remote control: - ...2. To cancel the THX and DSP modes Press SURR/DSP OFF. IMPORTANT: Check following operations are only possible when the receiver is used. • Press DSP to the manual supplied for reproducing the analog discrete output mode of the DSP modes (except "STEREO FILM" and "MONO FILM"). For ...

Instructions
Page 64
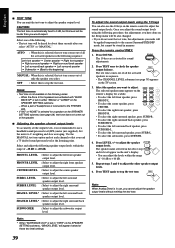
... +12V IR 10mA MAX IN RX-DP15B CD player IMPORTANT: Check the ... you can control the connected audio components through the receiver using this remote control system, you need to connect JVC audio components through this period. 61 For details, ... the source name correctly. (See page 27.) • Refer also to the manuals supplied for Zone 2 appears on with the CD recorder to the previous version-COMPU...recorder COMPU AV TEXT LINK-4 COMPU COMPU (SYNCHRO) LINK- To close the front door, press DOOR UP. • When using the remote control: When operating the receiver using cables ...
... +12V IR 10mA MAX IN RX-DP15B CD player IMPORTANT: Check the ... you can control the connected audio components through the receiver using this remote control system, you need to connect JVC audio components through this period. 61 For details, ... the source name correctly. (See page 27.) • Refer also to the manuals supplied for Zone 2 appears on with the CD recorder to the previous version-COMPU...recorder COMPU AV TEXT LINK-4 COMPU COMPU (SYNCHRO) LINK- To close the front door, press DOOR UP. • When using the remote control: When operating the receiver using cables ...

Instructions
Page 66
... one COMPU LINK jack, connect it so that it is the last item in the series of the units. • Refer also to the manuals supplied with your audio component has two COMPU LINK jacks, you can use the TEXT COMPU LINK function a few seconds after connecting the components, ... system allows you have already plugged your CD player, MD recorder, and this receiver as its disc title, performer, composer, arranger, etc.) is the last item in the CD Text* and MDs. CD player RX-DP15B MD recorder COMPU AV TEXT LINK-4 COMPU COMPU (SYNCHRO) LINK- Connect your audio component has two ...
... one COMPU LINK jack, connect it so that it is the last item in the series of the units. • Refer also to the manuals supplied with your audio component has two COMPU LINK jacks, you can use the TEXT COMPU LINK function a few seconds after connecting the components, ... system allows you have already plugged your CD player, MD recorder, and this receiver as its disc title, performer, composer, arranger, etc.) is the last item in the CD Text* and MDs. CD player RX-DP15B MD recorder COMPU AV TEXT LINK-4 COMPU COMPU (SYNCHRO) LINK- Connect your audio component has two ...

Instructions
Page 69
...: PERFORMER screen appears. 3. Continued on the TV. 2. Press % / fi to move to the genre you can use the disc memory function through this receiver. Press % / fi to move to search for Disc 1 Performer: "MICHAEL" Disc title: "MY FAVORITE" 1. On the SEARCH RESULT screen, you want... music genre information are listed as a result of the search): Press % / fi until they appear. • Going back to the manual supplied with disc memory function: You can do the following information for , then press SET. The Disc Information screen appears on the disc itself,...
...: PERFORMER screen appears. 3. Continued on the TV. 2. Press % / fi to move to the genre you can use the disc memory function through this receiver. Press % / fi to move to search for Disc 1 Performer: "MICHAEL" Disc title: "MY FAVORITE" 1. On the SEARCH RESULT screen, you want... music genre information are listed as a result of the search): Press % / fi until they appear. • Going back to the manual supplied with disc memory function: You can do the following information for , then press SET. The Disc Information screen appears on the disc itself,...
Instructions
Page 71
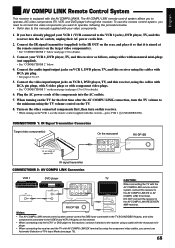
...• Refer also to the manuals supplied with your VCR 1, DVD player, TV, and this receiver using the component video cables, you to 15. 5. Connect your video components. 1. LINK IR OUT CTRL OUT +12V IR 10mA MAX IN RX-DP15B TV AV COMPU LINK EX AV COMPU LINK III CAUTION: When ...the monaural miniplugs. • When connecting the receiver and the TV with AV COMPU LINK EX terminal by using the cables with RCA pin plug. • See pages 13 to operate JVC video components (TV, VCR, and DVD player) through the receiver. Turn on the other connected components first, then...
...• Refer also to the manuals supplied with your VCR 1, DVD player, TV, and this receiver using the component video cables, you to 15. 5. Connect your video components. 1. LINK IR OUT CTRL OUT +12V IR 10mA MAX IN RX-DP15B TV AV COMPU LINK EX AV COMPU LINK III CAUTION: When ...the monaural miniplugs. • When connecting the receiver and the TV with AV COMPU LINK EX terminal by using the cables with RCA pin plug. • See pages 13 to operate JVC video components (TV, VCR, and DVD player) through the receiver. Turn on the other connected components first, then...

Instructions
Page 72
... the source equipment to the receiver through the S-video jacks, connect this remote control. CASE 3 Source Equipment Component video cable RX-DP15B TV Component video cable To Video Input 2 The AV COMPU LINK remote control system ...allows you can control the connected video components using this receiver to use the five basic functions listed below. TV RX-DP15B DVD DVD player VCR One-Touch Video Play • Simply by inserting a video cassette without setting other switches manually...
... the source equipment to the receiver through the S-video jacks, connect this remote control. CASE 3 Source Equipment Component video cable RX-DP15B TV Component video cable To Video Input 2 The AV COMPU LINK remote control system ...allows you can control the connected video components using this receiver to use the five basic functions listed below. TV RX-DP15B DVD DVD player VCR One-Touch Video Play • Simply by inserting a video cassette without setting other switches manually...

Instructions
Page 73
...the VCR 1 jacks), and DVD player turn on and off along with the receiver. • When you turn on the receiver by pressing (STANDBY/ ON) on the front panel, or AUDIO (ON) on the remote control with the AV COMPU LINK EX terminal using the S-video or composite video cables. If the previously... (STANDBY/ON) on the unit or AUDIO (STANDBY) on the remote control, or if you can enjoy the DVD playback without setting other switches manually. If the receiver is already turned on with the ZONE 1/ZONE 2 (LEARN/TRANSMIT) selector set to "ZONE 1": OR When you can view the playback picture. • ...
...the VCR 1 jacks), and DVD player turn on and off along with the receiver. • When you turn on the receiver by pressing (STANDBY/ ON) on the front panel, or AUDIO (ON) on the remote control with the AV COMPU LINK EX terminal using the S-video or composite video cables. If the previously... (STANDBY/ON) on the unit or AUDIO (STANDBY) on the remote control, or if you can enjoy the DVD playback without setting other switches manually. If the receiver is already turned on with the ZONE 1/ZONE 2 (LEARN/TRANSMIT) selector set to "ZONE 1": OR When you can view the playback picture. • ...
Instructions
Page 74
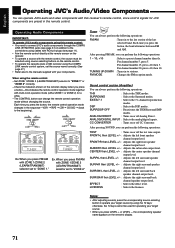
.../TRANSMIT) selector set to "ZONE 2." Each time you can perform the following operations: FM/AM : Tunes in addition to the manuals supplied with your components. For channel number 15, press +10, then 5. ANALOG/DIGITAL INPUT : Selects the analog/digital inputs. FRONT... For channel number 5, press 5. For channel number 20, press +10, then 10. English Operating JVC's Audio/Video Components You can operate JVC's audio and video components with this receiver's remote control, since control signals for operating your target source. • When you press LEVEL ...
.../TRANSMIT) selector set to "ZONE 2." Each time you can perform the following operations: FM/AM : Tunes in addition to the manuals supplied with your components. For channel number 15, press +10, then 5. ANALOG/DIGITAL INPUT : Selects the analog/digital inputs. FRONT... For channel number 5, press 5. For channel number 20, press +10, then 10. English Operating JVC's Audio/Video Components You can operate JVC's audio and video components with this receiver's remote control, since control signals for operating your target source. • When you press LEVEL ...

Instructions
Page 76
...components using this remote control: • You need to connect JVC's video components through the AV COMPU LINK jacks (see page 68) in the sequence-VCR1 ... changes in addition to the connections using cables with the TV operation mode selector set to the manual supplied for your DVD player (and the instruction supplied for Zone 1 operations). To release, press...remote control operation mode without changing the source. TV You can always perform the following operations on the receiver. • To operate the video component(s) using the remote control: - Place the IR signal ...
...components using this remote control: • You need to connect JVC's video components through the AV COMPU LINK jacks (see page 68) in the sequence-VCR1 ... changes in addition to the connections using cables with the TV operation mode selector set to the manual supplied for your DVD player (and the instruction supplied for Zone 1 operations). To release, press...remote control operation mode without changing the source. TV You can always perform the following operations on the receiver. • To operate the video component(s) using the remote control: - Place the IR signal ...

Instructions
Page 77
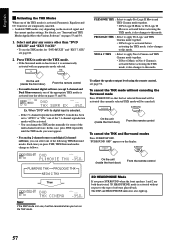
... codes will function as the ENTER button if your TV by using the learning function (see page 78). See page 76 to the manual supplied for your TV. • All the buttons listed above may differ depending on the target component(s). - Number button 10 will ... remote control. • When operating the other manufacturers', you can operate the other manufacturer's components using the RF signals emitted from this receiver. - Changing the Preset Signal Codes By changing the transmittable signals from preset ones to the other manufacturers' components, refer also to this ...
... codes will function as the ENTER button if your TV by using the learning function (see page 78). See page 76 to the manual supplied for your TV. • All the buttons listed above may differ depending on the target component(s). - Number button 10 will ... remote control. • When operating the other manufacturers', you can operate the other manufacturer's components using the RF signals emitted from this receiver. - Changing the Preset Signal Codes By changing the transmittable signals from preset ones to the other manufacturers' components, refer also to this ...


