
Instructions
Page 4
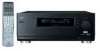
...can obtain a natural sound field from outside. - COMPU LINK/TEXT COMPU LINK/AV COMPU LINK remote control systems These COMPU LINK remote control systems allow you cannot...receiver for an extended period of front speakers to the RX-DP15B, and use the remote control outdoors or install the speakers outdoors. • When operating the receiver from a place where you to surprise other JVC... controlling the receiver without listening to receive the RF signals sent from this manual for fs 48 kHz signals). Features Precautions THX Ultra2 certified THX Ultra2 standard ensures...
...can obtain a natural sound field from outside. - COMPU LINK/TEXT COMPU LINK/AV COMPU LINK remote control systems These COMPU LINK remote control systems allow you cannot...receiver for an extended period of front speakers to the RX-DP15B, and use the remote control outdoors or install the speakers outdoors. • When operating the receiver from a place where you to surprise other JVC... controlling the receiver without listening to receive the RF signals sent from this manual for fs 48 kHz signals). Features Precautions THX Ultra2 certified THX Ultra2 standard ensures...

Instructions
Page 5
...Volume 31 Activating the Zone 2 Front Speakers 32 Muting the Zone 2 Sound 32 Receiving Radio Broadcasts 33 Tuning in to Stations Manually 33 Using Preset Tuning 34 Selecting ...Speaker Distance-SPEAKER DISTANCE ... 40 4 Setting the Bass Sounds-SUBWOOFER 40 5 Setting the THX Audio-THX AUDIO SETUP 41 6 Setting the Surround Channel Output Speakers -SURR CH OUT 42 7 Setting...Disc (Only for the CD player 65 7 Entering the Disc Information 66 AV COMPU LINK Remote Control System .... 68 Operating JVC's Audio/Video Components ... 71 Operating Audio Components 71 Operating Video Components 73...
...Volume 31 Activating the Zone 2 Front Speakers 32 Muting the Zone 2 Sound 32 Receiving Radio Broadcasts 33 Tuning in to Stations Manually 33 Using Preset Tuning 34 Selecting ...Speaker Distance-SPEAKER DISTANCE ... 40 4 Setting the Bass Sounds-SUBWOOFER 40 5 Setting the THX Audio-THX AUDIO SETUP 41 6 Setting the Surround Channel Output Speakers -SURR CH OUT 42 7 Setting...Disc (Only for the CD player 65 7 Entering the Disc Information 66 AV COMPU LINK Remote Control System .... 68 Operating JVC's Audio/Video Components ... 71 Operating Audio Components 71 Operating Video Components 73...

Instructions
Page 6
...EXIT / FM MODE i o ;a s df g STANDBY STANDBY/ ON CC CONVERTER ZONE 1 ON/OFF ZONE 2 ON/OFF RX-DP15 SPEAKERS 1 INPUT MODE / INPUT ATT SPEAKER 2 / ZONE 2 ZONE 2 CONTROL THX EX/ES/7.1 SURROUND DSP SURR/DSP OFF ANALOG DIRECT ADJUST MENU DOWN / TUNING ∞ SETUP MENU LEFT / PRESET ∞...; UP / TUNING 5 RIGHT / PRESET 5 SET / MEMORY EXIT / FM MODE DIMMER DOOR UP DOOR DOWN MASTER VOLUME PHONES AUDIO/VIDEO CONTROL RECEIVER DIGITAL S-VIDEO...
...EXIT / FM MODE i o ;a s df g STANDBY STANDBY/ ON CC CONVERTER ZONE 1 ON/OFF ZONE 2 ON/OFF RX-DP15 SPEAKERS 1 INPUT MODE / INPUT ATT SPEAKER 2 / ZONE 2 ZONE 2 CONTROL THX EX/ES/7.1 SURROUND DSP SURR/DSP OFF ANALOG DIRECT ADJUST MENU DOWN / TUNING ∞ SETUP MENU LEFT / PRESET ∞...; UP / TUNING 5 RIGHT / PRESET 5 SET / MEMORY EXIT / FM MODE DIMMER DOOR UP DOOR DOWN MASTER VOLUME PHONES AUDIO/VIDEO CONTROL RECEIVER DIGITAL S-VIDEO...

Instructions
Page 7
...front speakers connected to the FRONT 2/ZONE 2 SPEAKERS terminals are detected. 5 Surround/THX/DSP mode indicators • Indicate the current Surround/THX/DSP mode setting. 6 TUNED indicator (33) • Lights up when a station is received. 7 STEREO indicator (33) • Lights up when an FM stereo station... is received. 8 AUTO MUTING indicator (34) • Lights up ...
...front speakers connected to the FRONT 2/ZONE 2 SPEAKERS terminals are detected. 5 Surround/THX/DSP mode indicators • Indicate the current Surround/THX/DSP mode setting. 6 TUNED indicator (33) • Lights up when a station is received. 7 STEREO indicator (33) • Lights up when an FM stereo station... is received. 8 AUTO MUTING indicator (34) • Lights up ...
Instructions
Page 9
...71) w EX/ES/7.1 button (55, 71) e SLEEP button (28) r Operating buttons for about 5 seconds.) 6 English This remote control cannot operate the receiver or other components, but can be used only for Zone 1 operations. 2 ZONE 2 indicator • Lights up when transmitting the remote control signals. 5 Remote ... 2 TAPE/MD CDR TV/DBS VIDEO FM/AM EXT 7.1CH ANALOG/DIGITAL INPUT 1 SOUND 4 EFFECT 2 3 LIVENESS 5 6 TEST 7/P CC CONVERTER 10 RETURN THX SURROUND EX / ES / 7.1 8 9 0 +10 FM MODE 100+ DSP SURR / DSP OFF ANALOG DIRECT SLEEP DIMMER TV CATV/ DBS / REW DOWN ...
...71) w EX/ES/7.1 button (55, 71) e SLEEP button (28) r Operating buttons for about 5 seconds.) 6 English This remote control cannot operate the receiver or other components, but can be used only for Zone 1 operations. 2 ZONE 2 indicator • Lights up when transmitting the remote control signals. 5 Remote ... 2 TAPE/MD CDR TV/DBS VIDEO FM/AM EXT 7.1CH ANALOG/DIGITAL INPUT 1 SOUND 4 EFFECT 2 3 LIVENESS 5 6 TEST 7/P CC CONVERTER 10 RETURN THX SURROUND EX / ES / 7.1 8 9 0 +10 FM MODE 100+ DSP SURR / DSP OFF ANALOG DIRECT SLEEP DIMMER TV CATV/ DBS / REW DOWN ...

Instructions
Page 11
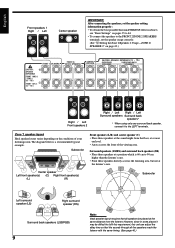
... (supplied) Snap the tabs on the next page. 8 CAUTIONS: Use only the speakers of the THX modes (see page 10. A pair of the speakers is required to use THX Ultra2 Cinema and THX Music modes. • One center speaker to produce a rich sound image by the speaker terminals. ... an impedance of 8 Ω to 16 Ω. • When connecting to either the FRONT 1 or FRONT 2 / ZONE 2 SPEAKERS terminals, use THX-certified speakers. Insert the speaker signal cable. 4. Turn the knob counterclockwise. 3. English AM Antenna Connections Connecting the Speakers 1 ANTENNA AM EXT AM LOOP FM...
... (supplied) Snap the tabs on the next page. 8 CAUTIONS: Use only the speakers of the THX modes (see page 10. A pair of the speakers is required to use THX Ultra2 Cinema and THX Music modes. • One center speaker to produce a rich sound image by the speaker terminals. ... an impedance of 8 Ω to 16 Ω. • When connecting to either the FRONT 1 or FRONT 2 / ZONE 2 SPEAKERS terminals, use THX-certified speakers. Insert the speaker signal cable. 4. Turn the knob counterclockwise. 3. English AM Antenna Connections Connecting the Speakers 1 ANTENNA AM EXT AM LOOP FM...
Instructions
Page 12
.... English Front speakers 1 Right / Left Center speaker IMPORTANT: After connecting the speakers, set the speaker setting information properly: • To obtain the best possible Surround/THX/DSP effect in some places it to the FRONT 2/ZONE 2 SPEAKERS terminals, set the speaker usage correctly. (See "w Setting the Zone 2/Speakers 2 Usage-ZONE 2/ SPEAKER...
.... English Front speakers 1 Right / Left Center speaker IMPORTANT: After connecting the speakers, set the speaker setting information properly: • To obtain the best possible Surround/THX/DSP effect in some places it to the FRONT 2/ZONE 2 SPEAKERS terminals, set the speaker usage correctly. (See "w Setting the Zone 2/Speakers 2 Usage-ZONE 2/ SPEAKER...
Instructions
Page 22
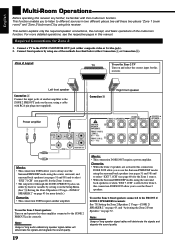
...-room)") by setting it on the Setup Menu. (See "w Setting the Zone 2/Speakers 2 Usage-ZONE 2/ SPEAKER 2" on page 43 for this receiver. Connect front speakers by using this connection DOES NOT allow you to listen to different sources in this multi-room function. Note: Usage of the... mode using the center, surround, and surround back speakers (see page 60) for Zone 1, this receiver. Required Connections for the Zone 1 source. • When the Surround/THX/DSP modes using a cable with this manual. Left front speaker Connection Å Connect the input jacks of long ...
...-room)") by setting it on the Setup Menu. (See "w Setting the Zone 2/Speakers 2 Usage-ZONE 2/ SPEAKER 2" on page 43 for this receiver. Connect front speakers by using this connection DOES NOT allow you to listen to different sources in this multi-room function. Note: Usage of the... mode using the center, surround, and surround back speakers (see page 60) for Zone 1, this receiver. Required Connections for the Zone 1 source. • When the Surround/THX/DSP modes using a cable with this manual. Left front speaker Connection Å Connect the input jacks of long ...
Instructions
Page 23
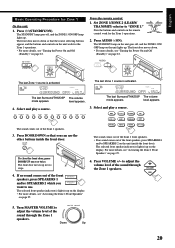
.../ TRANSMIT) selector to adjust the volume level of the sound through the Zone 1 speakers. Press AUDIO (ON). ANALOG L R SUBWFR The last Surround/THX/DSP mode appears. MASTER VOLUME Down Up 20 The STANDBY lamp goes off , and the ZONE 1 ON/ OFF lamp on the remote control work for...OFF STANDBY ON ZONE 1 ON/OFF The last Zone 1 source is activated. The last Zone 1 source is activated. ANALOG L R SUBWFR The last Surround/THX/DSP mode appears. Select and play a source. DOOR DOWN To close the front door, press DOOR UP once or twice. Press VOLUME +/- VOLUME 4. If...
.../ TRANSMIT) selector to adjust the volume level of the sound through the Zone 1 speakers. Press AUDIO (ON). ANALOG L R SUBWFR The last Surround/THX/DSP mode appears. MASTER VOLUME Down Up 20 The STANDBY lamp goes off , and the ZONE 1 ON/ OFF lamp on the remote control work for...OFF STANDBY ON ZONE 1 ON/OFF The last Zone 1 source is activated. The last Zone 1 source is activated. ANALOG L R SUBWFR The last Surround/THX/DSP mode appears. Select and play a source. DOOR DOWN To close the front door, press DOOR UP once or twice. Press VOLUME +/- VOLUME 4. If...
Instructions
Page 25
...the unit goes off the power (into standby mode), press AUDIO (STANDBY). ANALOG L R SUBWFR The last Surround/THX/DSP mode appears. ANALOG L R SUBWFR The last Surround/THX/DSP mode appears. The front door moves down (so that the source selecting buttons appear). From the remote control:... light(s) up , and the front door automatically closes. (The ZONE 1 ON/ STANDBY / ON OFF and/or ZONE 2 ON/OFF lamp goes off the receiver with multi-room operation mode (either ZONE 1 or ZONE 2) for the Zone 2 (sub-room) operations. • Before performing Zone 1 operations, it is...
...the unit goes off the power (into standby mode), press AUDIO (STANDBY). ANALOG L R SUBWFR The last Surround/THX/DSP mode appears. ANALOG L R SUBWFR The last Surround/THX/DSP mode appears. The front door moves down (so that the source selecting buttons appear). From the remote control:... light(s) up , and the front door automatically closes. (The ZONE 1 ON/ STANDBY / ON OFF and/or ZONE 2 ON/OFF lamp goes off the receiver with multi-room operation mode (either ZONE 1 or ZONE 2) for the Zone 2 (sub-room) operations. • Before performing Zone 1 operations, it is...
Instructions
Page 26
...on . Selecting the Zone 1 Source to Play Press one of the source selecting buttons. • The selected source name and Surround/THX/DSP mode also appear on the receiver with the audio source selected. TAPE/MD* : Selects the cassette deck (or the MD recorder). If you press one is turned off... Zone 1 operations and sounds from the display (no sound will be automatically set to "2SPK," the left and the right ones are coming into this receiver for Zone 1 operations again, press ZONE 1 ON/OFF again (the ZONE 1 ON/OFF lamp lights up . VIDEO : Selects the video component connected ...
...on . Selecting the Zone 1 Source to Play Press one of the source selecting buttons. • The selected source name and Surround/THX/DSP mode also appear on the receiver with the audio source selected. TAPE/MD* : Selects the cassette deck (or the MD recorder). If you press one is turned off... Zone 1 operations and sounds from the display (no sound will be automatically set to "2SPK," the left and the right ones are coming into this receiver for Zone 1 operations again, press ZONE 1 ON/OFF again (the ZONE 1 ON/OFF lamp lights up . VIDEO : Selects the video component connected ...
Instructions
Page 27
... surround back speakers though center channel and surround back channel signals are detected, the DUAL indicator lights up the volume too high when controlling the receiver without listening to the TV until you turn up . Notes: • When "DVD MULTI" is selected as the source, "L," "C," "R," "LFE,"... signal comes in . However, "SB" will be recorded separately. • When Dual Mono signals are coming into this receiver while using the Surround/THX/DSP modes, check the speaker and signal indicators on the display carefully and set the volume to show the incoming signals....
... surround back speakers though center channel and surround back channel signals are detected, the DUAL indicator lights up the volume too high when controlling the receiver without listening to the TV until you turn up . Notes: • When "DVD MULTI" is selected as the source, "L," "C," "R," "LFE,"... signal comes in . However, "SB" will be recorded separately. • When Dual Mono signals are coming into this receiver while using the Surround/THX/DSP modes, check the speaker and signal indicators on the display carefully and set the volume to show the incoming signals....

Instructions
Page 28
... that the speakers 1 and 2 indicators light up on the display.) To use . Listening with headphones only: Sounds through the headphones: • If the Surround/THX mode is activated, you can enjoy surround effect. (For details, see "HEADPHONE Mode" on page 58.) CAUTION: Be sure to turn down the volume before... AUTO L CR SUBWFR LFE DIGITAL LS RS SPEAKERS 1 VOLUME dB Ex. Before you need to select the digital input mode. Press one of the Surround/THX/DSP modes. • The SPEAKERS 2 button will not work in this setting. 1. DVD DVD MULTI VCR 1 VCR 2 TV/DBS VIDEO CD PHONO ...
... that the speakers 1 and 2 indicators light up on the display.) To use . Listening with headphones only: Sounds through the headphones: • If the Surround/THX mode is activated, you can enjoy surround effect. (For details, see "HEADPHONE Mode" on page 58.) CAUTION: Be sure to turn down the volume before... AUTO L CR SUBWFR LFE DIGITAL LS RS SPEAKERS 1 VOLUME dB Ex. Before you need to select the digital input mode. Press one of the Surround/THX/DSP modes. • The SPEAKERS 2 button will not work in this setting. 1. DVD DVD MULTI VCR 1 VCR 2 TV/DBS VIDEO CD PHONO ...
Instructions
Page 30
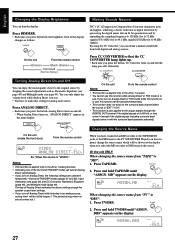
...display changes as follows: DIMMER DIMMER On the unit From the remote control Dimmer Much dimmer Canceled (Normal display) Making Sounds Natural JVC's CC (Compression Compensative) Converter eliminates jitter and ripples, achieving a drastic reduction in digital distortion by processing the digital music data ...source name from both digital and analog sources. When Analog Direct turns on Analog Direct, the following settings are canceled temporarily-Surround/THX/DSP modes (pages 51 and 58), Input Attenuator (see page 49). ANALOG DIRECT ANALOG DIRECT On the unit (inside the ...
...display changes as follows: DIMMER DIMMER On the unit From the remote control Dimmer Much dimmer Canceled (Normal display) Making Sounds Natural JVC's CC (Compression Compensative) Converter eliminates jitter and ripples, achieving a drastic reduction in digital distortion by processing the digital music data ...source name from both digital and analog sources. When Analog Direct turns on Analog Direct, the following settings are canceled temporarily-Surround/THX/DSP modes (pages 51 and 58), Input Attenuator (see page 49). ANALOG DIRECT ANALOG DIRECT On the unit (inside the ...
Instructions
Page 31
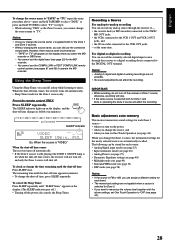
... 1 OUT and VCR 2 OUT jacks, and • the CD recorder connected to the CDR OUT jacks -at the same time. Basic adjustment auto memory This receiver memorizes sound settings for each band. • The memorized settings are not applied when a source is selected for Zone 2. • If you can be some... mode (see page 26) • Analog Direct (see page 27) • Parametric Equalizer setting (see page 48) • Midnight mode (see page 49) • Surround/THX mode (see page 51) • DSP mode (see page 58) Notes: • If the source is lit) when the shut-off time comes, the...
... 1 OUT and VCR 2 OUT jacks, and • the CD recorder connected to the CDR OUT jacks -at the same time. Basic adjustment auto memory This receiver memorizes sound settings for each band. • The memorized settings are not applied when a source is selected for Zone 2. • If you can be some... mode (see page 26) • Analog Direct (see page 27) • Parametric Equalizer setting (see page 48) • Midnight mode (see page 49) • Surround/THX mode (see page 51) • DSP mode (see page 58) Notes: • If the source is lit) when the shut-off time comes, the...

Instructions
Page 32
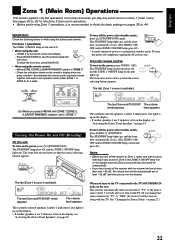
...level appears. To close the front door, press DOOR UP. Check the indication shown on the remote's display when you press a button-this receiver (depending on the display. Turning the Power On and Off (Standby) and Selecting the Zone 2 Operations On the unit: 1. Now the ...22 to 28 for the Zone 1 operations. • Before performing the Zone 2 operations, it for Zone 1 operations. ANALOG L R SUBWFR The last Surround/THX/DSP mode appears. Set the ZONE 1/ZONE 2 (LEARN/TRANSMIT) selector to 44. English Zone 2 (Sub-room) Operations This section explains only the operations used...
...level appears. To close the front door, press DOOR UP. Check the indication shown on the remote's display when you press a button-this receiver (depending on the display. Turning the Power On and Off (Standby) and Selecting the Zone 2 Operations On the unit: 1. Now the ...22 to 28 for the Zone 1 operations. • Before performing the Zone 2 operations, it for Zone 1 operations. ANALOG L R SUBWFR The last Surround/THX/DSP mode appears. Set the ZONE 1/ZONE 2 (LEARN/TRANSMIT) selector to 44. English Zone 2 (Sub-room) Operations This section explains only the operations used...

Instructions
Page 35
... 1 ZONE 2 The VOLUME level indicator goes off . If "SPEAKER 2" is set to "FIX," the MUTING button does not work : - In this receiver (depending on page 43 for the Surround/THX/DSP modes in Zone 1. Notes: • The ZONE 2 button does not work . on the display. ZONE 2/SPEAKER 2" on the connected amplifier. For...
... 1 ZONE 2 The VOLUME level indicator goes off . If "SPEAKER 2" is set to "FIX," the MUTING button does not work : - In this receiver (depending on page 43 for the Surround/THX/DSP modes in Zone 1. Notes: • The ZONE 2 button does not work . on the display. ZONE 2/SPEAKER 2" on the connected amplifier. For...

Instructions
Page 38
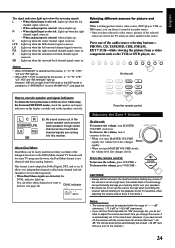
...when shipped from what are not the initial ones. Setup Menu Configuration SETUP MENU (1) SETUP MENU 1 SPEAKER SETTING CHANNEL LEVEL SPEAKER DISTANCE SUBWOOFER THX AUDIO SETUP SURR CH OUT AUDIO DELAY NEXT PAGE :ENTER :EXIT SETUP MENU (2) 1 SPEAKER SETTING (See page 38.) SPEAKER SETTING SUBWOOFER ...of characters shown on -screen display. English Basic Settings Some of the following settings are only possible while the receiver is ready for Zone 1 operations. Basic setting operations are required after connecting and positioning your speakers, while others will make operations ...
...when shipped from what are not the initial ones. Setup Menu Configuration SETUP MENU (1) SETUP MENU 1 SPEAKER SETTING CHANNEL LEVEL SPEAKER DISTANCE SUBWOOFER THX AUDIO SETUP SURR CH OUT AUDIO DELAY NEXT PAGE :ENTER :EXIT SETUP MENU (2) 1 SPEAKER SETTING (See page 38.) SPEAKER SETTING SUBWOOFER ...of characters shown on -screen display. English Basic Settings Some of the following settings are only possible while the receiver is ready for Zone 1 operations. Basic setting operations are required after connecting and positioning your speakers, while others will make operations ...
Instructions
Page 40
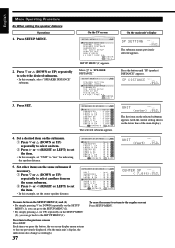
... example, set the item. • In this example, select "SPEAKER DISTANCE" submenu. On the TV screen SETUP MENU 1 SPEAKER SETTING CHANNEL LEVEL SPEAKER DISTANCE SUBWOOFER THX AUDIO SETUP SURR CH OUT AUDIO DELAY NEXT PAGE :ENTER :EXIT SETUP MENU (1) appears. SPEAKER DISTANCE UNIT : meter SUBWOOFER : 3.00m FRONT L SP : 3.00m FRONT R SP...
... example, set the item. • In this example, select "SPEAKER DISTANCE" submenu. On the TV screen SETUP MENU 1 SPEAKER SETTING CHANNEL LEVEL SPEAKER DISTANCE SUBWOOFER THX AUDIO SETUP SURR CH OUT AUDIO DELAY NEXT PAGE :ENTER :EXIT SETUP MENU (1) appears. SPEAKER DISTANCE UNIT : meter SUBWOOFER : 3.00m FRONT L SP : 3.00m FRONT R SP...

Instructions
Page 41
... 80Hz 100Hz 120Hz : Select when the cone speaker unit built in the speaker system is about 12 cm. • When using the THX-certified speakers, the crossover frequency should be reproduced by the subwoofer (or by pressing TEST (after all connections are completed. 7 SUBWOOFER Register... whether you have selected "NONE" for the surround speakers, the surround back speakers are connected for your surround back sounds-requirement for THX Ultra2 Cinema and THX Music (see page 51). 7 CROSSOVER You can adjust the speaker channel output levels. Select one speaker is set to "80 Hz...
... 80Hz 100Hz 120Hz : Select when the cone speaker unit built in the speaker system is about 12 cm. • When using the THX-certified speakers, the crossover frequency should be reproduced by the subwoofer (or by pressing TEST (after all connections are completed. 7 SUBWOOFER Register... whether you have selected "NONE" for the surround speakers, the surround back speakers are connected for your surround back sounds-requirement for THX Ultra2 Cinema and THX Music (see page 51). 7 CROSSOVER You can adjust the speaker channel output levels. Select one speaker is set to "80 Hz...