
Instructions
Page 4
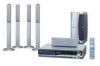
... 8 Connecting the FM and AM antennas 8 Connecting the satellite (front, center, surround) speakers ......9 Speaker layout 12 Connecting a TV 12 Connecting the powered subwoofer 13 Connecting to an analog component 13 Connecting to a digital component 13 Connecting a USB mass storage class device 13 Connecting the... power cord 13 Operating external components with the remote control 14 Operating the TV 14 Operating the DBS tuner or CATV converter 15...
... 8 Connecting the FM and AM antennas 8 Connecting the satellite (front, center, surround) speakers ......9 Speaker layout 12 Connecting a TV 12 Connecting the powered subwoofer 13 Connecting to an analog component 13 Connecting to a digital component 13 Connecting a USB mass storage class device 13 Connecting the... power cord 13 Operating external components with the remote control 14 Operating the TV 14 Operating the DBS tuner or CATV converter 15...

Instructions
Page 5
...10 m: For satellite speakers (surround left/right) (2) • Screws TH-C60: M5 x 40 mm (4) M4 x 20 mm (8) TH-C50: M5 x 40 mm (2) M4 x 20 mm (4) • Speaker cord clamps TH-C60 (4) TH-C50 (2) 2 Care of time, disconnect the power cord plugs from the wall outlet. If water gets inside . If anything... goes wrong, unplug the power cord and consult your VCR directly, the copyguard system activates and the ...
...10 m: For satellite speakers (surround left/right) (2) • Screws TH-C60: M5 x 40 mm (4) M4 x 20 mm (8) TH-C50: M5 x 40 mm (2) M4 x 20 mm (4) • Speaker cord clamps TH-C60 (4) TH-C50 (2) 2 Care of time, disconnect the power cord plugs from the wall outlet. If water gets inside . If anything... goes wrong, unplug the power cord and consult your VCR directly, the copyguard system activates and the ...

Instructions
Page 9
Power cord: 13 Rear 6 Description of parts and controls Powered subwoofer SP-PWC60/SP-PWC50 SP-PWC40 13 POWER ON 11 lamp: 16 Front Power cord: 13 Rear 13 11 POWER ON lamp: 16 Front NOTE • For safety reasons, always ensure that there is sufficient space behind the powered subwoofer. * Do not block the ventilation openings to allow proper air circulation by the cooling fan.
Power cord: 13 Rear 6 Description of parts and controls Powered subwoofer SP-PWC60/SP-PWC50 SP-PWC40 13 POWER ON 11 lamp: 16 Front Power cord: 13 Rear 13 11 POWER ON lamp: 16 Front NOTE • For safety reasons, always ensure that there is sufficient space behind the powered subwoofer. * Do not block the ventilation openings to allow proper air circulation by the cooling fan.
Instructions
Page 11
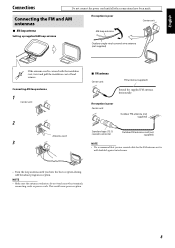
...unit 2 Antenna cord 3 7 FM antenna Center unit FM antenna (supplied) Extend the supplied FM antenna horizontally. Connections Do not connect the power cord until you have been made. Connecting the FM and AM antennas 7 AM loop antenna Setting up supplied AM loop antenna If reception is...not supplied) If the antenna cord is well-shielded against interference. • Turn the loop antenna until all other terminals, connecting cords or power cords. If reception is poor Center unit Outdoor FM antenna (not supplied) Standard type (75 Ω coaxial) connector Outdoor FM antenna cord ...
...unit 2 Antenna cord 3 7 FM antenna Center unit FM antenna (supplied) Extend the supplied FM antenna horizontally. Connections Do not connect the power cord until you have been made. Connecting the FM and AM antennas 7 AM loop antenna Setting up supplied AM loop antenna If reception is...not supplied) If the antenna cord is well-shielded against interference. • Turn the loop antenna until all other terminals, connecting cords or power cords. If reception is poor Center unit Outdoor FM antenna (not supplied) Standard type (75 Ω coaxial) connector Outdoor FM antenna cord ...

Instructions
Page 12
...power cord until all other connections have been made. Stand (or speaker directly)* Screw M4 x 20 mm (supplied)* * When assembling the speaker with the base plate. Base plate Front speaker (SP-THC60F)(2) Stand (2) Assembled speakers Base plate (2) or With stand: Refer to steps 1 to steps 2 and 3. TH-C60/TH-C50 7 For TH-C60...: Assemble front speakers and surround speakers. 7 For TH-C50: Assemble front speakers. For TH-C50 When assembling a speaker without stand: Speaker A: Use these screws (...
...power cord until all other connections have been made. Stand (or speaker directly)* Screw M4 x 20 mm (supplied)* * When assembling the speaker with the base plate. Base plate Front speaker (SP-THC60F)(2) Stand (2) Assembled speakers Base plate (2) or With stand: Refer to steps 1 to steps 2 and 3. TH-C60/TH-C50 7 For TH-C60...: Assemble front speakers and surround speakers. 7 For TH-C50: Assemble front speakers. For TH-C50 When assembling a speaker without stand: Speaker A: Use these screws (...

Instructions
Page 13
TH-C60/TH-C50 Surround speaker (SP-THC50S) (2) 1 Speaker (bottom) 2 Red White Black Black Center speaker (SP-THC60C) (1) Red White Black Black For TH-C40, the front, surround and center speakers are equipped with their speaker cords attached directly to their speaker unit instead of having ... terminals on their cabinet. Front speaker (SP-THC40F) Surround speaker (SP-THC40S) Center speaker (SP-THC40C) 10 Connections Do not connect the power cord until all other connections have been made. 7 Connecting the surround speakers - TH-C50 7 Connecting the center speaker -
TH-C60/TH-C50 Surround speaker (SP-THC50S) (2) 1 Speaker (bottom) 2 Red White Black Black Center speaker (SP-THC60C) (1) Red White Black Black For TH-C40, the front, surround and center speakers are equipped with their speaker cords attached directly to their speaker unit instead of having ... terminals on their cabinet. Front speaker (SP-THC40F) Surround speaker (SP-THC40S) Center speaker (SP-THC40C) 10 Connections Do not connect the power cord until all other connections have been made. 7 Connecting the surround speakers - TH-C50 7 Connecting the center speaker -

Instructions
Page 14
... wall by qualified personnel. otherwise, the speakers may result if the speakers installed interfere with daily activities. Powered subwoofer TH-C60: SP-PWC60 TH-C50: SP-PWC50 TH-C40: SP-PWC40 Front speakers TH-C60: SP-THC60F TH-C50: SP-THC60F TH-C40: SP-THC40F Speaker cord • Connect the black cords to the black (r) terminals. • Connect the...
... wall by qualified personnel. otherwise, the speakers may result if the speakers installed interfere with daily activities. Powered subwoofer TH-C60: SP-PWC60 TH-C50: SP-PWC50 TH-C40: SP-PWC40 Front speakers TH-C60: SP-THC60F TH-C50: SP-THC60F TH-C40: SP-THC40F Speaker cord • Connect the black cords to the black (r) terminals. • Connect the...

Instructions
Page 15
...the following when installing the speakers. - To avoid this, do not place the speakers nearby the TV or monitor. • Be sure to place the powered subwoofer to prevent the TV screen from appearing mottled. When your HDMI equipped TV with the component video input jacks • With analog video connection... select DVD or USB MEMORY as the source to send and receive signals. • When you need to set , turn off the TV's main power switch or unplug it will probably cause color distortion on your TV does not support progressive video input, connect the TV through the cable. So...
...the following when installing the speakers. - To avoid this, do not place the speakers nearby the TV or monitor. • Be sure to place the powered subwoofer to prevent the TV screen from appearing mottled. When your HDMI equipped TV with the component video input jacks • With analog video connection... select DVD or USB MEMORY as the source to send and receive signals. • When you need to set , turn off the TV's main power switch or unplug it will probably cause color distortion on your TV does not support progressive video input, connect the TV through the cable. So...

Instructions
Page 16
... to damage the cord. 13 Connecting to an analog component You can enjoy the sound of both the system and the device. • JVC bears no responsibility for progressive) • You cannot play back a file larger than 1 m in length. • This system is compatible with the USB 2.0 Full... signals input to a digital component You can enjoy the sound of files in a USB mass storage class device, do not disconnect the device. Power cord (Supplied) Power cord Plug into AC outlets. Connecting to the VIDEO jack of the VCR IN jacks will be recognized or may not work properly. •...
... to damage the cord. 13 Connecting to an analog component You can enjoy the sound of both the system and the device. • JVC bears no responsibility for progressive) • You cannot play back a file larger than 1 m in length. • This system is compatible with the USB 2.0 Full... signals input to a digital component You can enjoy the sound of files in a USB mass storage class device, do not disconnect the device. Power cord (Supplied) Power cord Plug into AC outlets. Connecting to the VIDEO jack of the VCR IN jacks will be recognized or may not work properly. •...

Instructions
Page 19
...The scan mode setting (see page 18) is linked to the center unit. If the above phenomena happen, turn off when the power is turned on. • The power supply to the subwoofer is changed. - Basic operations The buttons on the remote control are used to explain most of the operations ...; A small amount of the DVD VIDEO does not match the code the system supports. The sound comes out from the AC outlet to turn the power off (center unit only). Source selecting buttons Cursor (3/2)/ ENTER Remote control mode selector • "OPEN"/"CLOSE": Appears when opening or closing the disc ...
...The scan mode setting (see page 18) is linked to the center unit. If the above phenomena happen, turn off when the power is turned on. • The power supply to the subwoofer is changed. - Basic operations The buttons on the remote control are used to explain most of the operations ...; A small amount of the DVD VIDEO does not match the code the system supports. The sound comes out from the AC outlet to turn the power off (center unit only). Source selecting buttons Cursor (3/2)/ ENTER Remote control mode selector • "OPEN"/"CLOSE": Appears when opening or closing the disc ...

Instructions
Page 20
... you want appears on the center unit, the system automatically cancels the surround mode (see page 23) currently selected, deactivates the speakers, turns the subwoofer's power off the sound temporarily [MUTING] Press MUTING. Selecting the source to minimum level before starting any source. On the remote control: Press VOL +/-. Each time...
... you want appears on the center unit, the system automatically cancels the surround mode (see page 23) currently selected, deactivates the speakers, turns the subwoofer's power off the sound temporarily [MUTING] Press MUTING. Selecting the source to minimum level before starting any source. On the remote control: Press VOL +/-. Each time...

Instructions
Page 21
... (off) Z 10 Z 20 Z 30 Z 60 Z 90 Z 120 Z 150 Z (back to adjust bass sound. 2 Press LEVEL +/- Sleep Timer [SLEEP] The system turns off the power also cancels the Sleep Timer. To change the scan mode to 1080i or 720p. • When "1080i" or "720p" is selected, the PROGRESSIVE indicator lights...8226; When selecting "AUTO", "1080i", or "720p", the system up-convert the 480i or 480p signal to the interlace mode. • All JVC progressive TVs and High-Definition TVs are fully compatible with this to the beginning) (Unit: min.) Example: minutes To check the remaining time Press SLEEP...
... (off) Z 10 Z 20 Z 30 Z 60 Z 90 Z 120 Z 150 Z (back to adjust bass sound. 2 Press LEVEL +/- Sleep Timer [SLEEP] The system turns off the power also cancels the Sleep Timer. To change the scan mode to 1080i or 720p. • When "1080i" or "720p" is selected, the PROGRESSIVE indicator lights...8226; When selecting "AUTO", "1080i", or "720p", the system up-convert the 480i or 480p signal to the interlace mode. • All JVC progressive TVs and High-Definition TVs are fully compatible with this to the beginning) (Unit: min.) Example: minutes To check the remaining time Press SLEEP...

Instructions
Page 27
... when Dolby Digital signals come in . c: Lights when the right channel signal comes in . The surround mode is automatically recalled when you turn the power on the display window. NOTE • For ASF, MPEG-2, MPEG-1 and DivX (except DivX version 6), the surround mode takes no effects. 24 Normal... 2 channel stereo source. b: Lights when the center channel signal comes in . SW (Subwoofer): Always lights. auto memory When you turn the power off the surround mode Press SURROUND repeatedly until "OFF" appears on . i: Lights when the surround right channel signal comes in .
... when Dolby Digital signals come in . c: Lights when the right channel signal comes in . The surround mode is automatically recalled when you turn the power on the display window. NOTE • For ASF, MPEG-2, MPEG-1 and DivX (except DivX version 6), the surround mode takes no effects. 24 Normal... 2 channel stereo source. b: Lights when the center channel signal comes in . SW (Subwoofer): Always lights. auto memory When you turn the power off the surround mode Press SURROUND repeatedly until "OFF" appears on . i: Lights when the surround right channel signal comes in .
Instructions
Page 31
... be a case when 3 (play button) or DVD. • There may be stored. In this procedure using the on the display window.) • Turning off the power* (See page 16.) • Pressing 7 once * Only when playing back a DVD. NOTE • When USB MEMORY is selected as a source. • Pressing DISC (1-5) (with the...
... be a case when 3 (play button) or DVD. • There may be stored. In this procedure using the on the display window.) • Turning off the power* (See page 16.) • Pressing 7 once * Only when playing back a DVD. NOTE • When USB MEMORY is selected as a source. • Pressing DISC (1-5) (with the...

Instructions
Page 41
...DVD", only the TV will turn on the system, the TV automatically changes the input mode to the appropriate position so that you to operate JVC's video components via the video components terminals. To use this remote control system, you need to connect the video components you to use the ... the first time after the AV COMPU LINK connection, turn off . Center unit AV COMPU LINK cord (not supplied) TV VCR 3 Plug the AC power cords of the TV manually. 38 When you can enjoy video playback without manually setting other switches. One-touch DVD play Simply by starting playback...
...DVD", only the TV will turn on the system, the TV automatically changes the input mode to the appropriate position so that you to operate JVC's video components via the video components terminals. To use this remote control system, you need to connect the video components you to use the ... the first time after the AV COMPU LINK connection, turn off . Center unit AV COMPU LINK cord (not supplied) TV VCR 3 Plug the AC power cords of the TV manually. 38 When you can enjoy video playback without manually setting other switches. One-touch DVD play Simply by starting playback...

Instructions
Page 42
... wipe it with a cloth soaked in waterdiluted neutral detergent and wrung well, then wipe clean with thinner or benzine. - Connect the power cord and system cord correctly. (See page 13.) The remote control does The batteries are distorted. A HDCP-compatible TV is divided ...video input such as conventional record cleaner, spray, thinner or benzine - DO NOT apply any solvent - Troubleshooting PROBLEM POSSIBLE CAUSE SOLUTION Power does not come out through HDMI terminal. Replace the batteries. (See page 7.) Hide the remote sensor from direct sunlight. Clean the...
... wipe it with a cloth soaked in waterdiluted neutral detergent and wrung well, then wipe clean with thinner or benzine. - Connect the power cord and system cord correctly. (See page 13.) The remote control does The batteries are distorted. A HDCP-compatible TV is divided ...video input such as conventional record cleaner, spray, thinner or benzine - DO NOT apply any solvent - Troubleshooting PROBLEM POSSIBLE CAUSE SOLUTION Power does not come out through HDMI terminal. Replace the batteries. (See page 7.) Hide the remote sensor from direct sunlight. Clean the...
Instructions
Page 43
...V(p-p)/75 Ω 0.286 V(p-p)/75 Ω HDMI HDMI Output (Ver. 1.0): MONITOR OUT USB storage USB specification: Compatible device: Compatible file system: Bus power supply: Compatible with the USB 2.0 FullSpeed Mass Storage Class FAT16, FAT32 Max. 500 mA Tuner section Tuning Range FM: AM: 87.5 MHz to 108.0... MHz 530 kHz to 200 Hz Sound Pressure Level: 74 dB/W·m General Power Requirements: AC 120 V , 60 Hz Power Consumption: 180 W (at 100 Hz, with 10 % total harmonic distortion. 200 W, RMS at 3 Ω at operation) 0 W ...
...V(p-p)/75 Ω 0.286 V(p-p)/75 Ω HDMI HDMI Output (Ver. 1.0): MONITOR OUT USB storage USB specification: Compatible device: Compatible file system: Bus power supply: Compatible with the USB 2.0 FullSpeed Mass Storage Class FAT16, FAT32 Max. 500 mA Tuner section Tuning Range FM: AM: 87.5 MHz to 108.0... MHz 530 kHz to 200 Hz Sound Pressure Level: 74 dB/W·m General Power Requirements: AC 120 V , 60 Hz Power Consumption: 180 W (at 100 Hz, with 10 % total harmonic distortion. 200 W, RMS at 3 Ω at operation) 0 W ...

Instructions
Page 44
...280 mm Mass: 3.4 kg each Center speaker (SP-THC60C) Type: 1-way 2-speaker Bass reflex type (Magnetically shielded Type) Speaker: 6.5 cm cone M 2 Power Handling Capacity: 200 W Impedance: 3 Ω Frequency Range: 90 Hz to 20 000 Hz Sound Pressure Level: 81 dB/W·m Dimensions (W M H ...Speakers - SP-XTHC60 Front speakers (SP-THC60F) Type: 1-way 2-speaker Bass reflex type (Magnetically shielded Type) Speaker: 5.5 cm cone M 2 Power Handling Capacity: 200 W Impedance: 3 Ω Frequency Range: 100 Hz to 20 000 Hz Sound Pressure Level: 78 dB/W·m Dimensions (W ...
...280 mm Mass: 3.4 kg each Center speaker (SP-THC60C) Type: 1-way 2-speaker Bass reflex type (Magnetically shielded Type) Speaker: 6.5 cm cone M 2 Power Handling Capacity: 200 W Impedance: 3 Ω Frequency Range: 90 Hz to 20 000 Hz Sound Pressure Level: 81 dB/W·m Dimensions (W M H ...Speakers - SP-XTHC60 Front speakers (SP-THC60F) Type: 1-way 2-speaker Bass reflex type (Magnetically shielded Type) Speaker: 5.5 cm cone M 2 Power Handling Capacity: 200 W Impedance: 3 Ω Frequency Range: 100 Hz to 20 000 Hz Sound Pressure Level: 78 dB/W·m Dimensions (W ...

Instructions
Page 45
... mm M 85 mm M 91 mm Mass: 0.8 kg Surround speakers (SP-THC50S) Type: 1-way Bass reflex type Speaker: 8.0 cm cone M 1 Power Handling Capacity: 200 W Impedance: 3 Ω Frequency Range: 80 Hz to change without notice. • HDMI, the HDMI logo and High-Definition Multimedia... Protection, LLC. 42 SP-XTHC50 Front speakers (SP-THC60F) Type: 1-way 2-speaker Bass reflex type (Magnetically shielded Type) Speaker: 5.5 cm M 2 Power Handling Capacity: 200 W Impedance: 3 Ω Frequency Range: 100 Hz to 20 000 Hz Sound Pressure Level: 78 dB/W·m Dimensions (W M H...
... mm M 85 mm M 91 mm Mass: 0.8 kg Surround speakers (SP-THC50S) Type: 1-way Bass reflex type Speaker: 8.0 cm cone M 1 Power Handling Capacity: 200 W Impedance: 3 Ω Frequency Range: 80 Hz to change without notice. • HDMI, the HDMI logo and High-Definition Multimedia... Protection, LLC. 42 SP-XTHC50 Front speakers (SP-THC60F) Type: 1-way 2-speaker Bass reflex type (Magnetically shielded Type) Speaker: 5.5 cm M 2 Power Handling Capacity: 200 W Impedance: 3 Ω Frequency Range: 100 Hz to 20 000 Hz Sound Pressure Level: 78 dB/W·m Dimensions (W M H...


