
Dimension Guide
Page 1
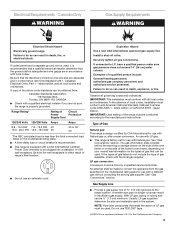
...MODEL NUMBERS GAS REQUIREMENTS JDS9860CD JDS9865BD ELECTRICAL REQUIREMENTS The electrical connection to shutoff valve. For a 3-wire power supply cord replacement, service kit Part Number 74011285 must be in a location that the ground path and wire gauge are in a risk of gas that can result in ...NEC calculated load is less than 30" (76.2 cm), adjust the ³⁄₈" (1.0 cm) dimension. For a 3-wire connection order UL listed power cord Part Number 74011285. Range Rating* 120/240 Volts 8.8 - 16.5 KW 16.6 - 22.5 KW 120/208 Volts 7.8 - 12.5 KW 12.6 - 18.5 KW ...
...MODEL NUMBERS GAS REQUIREMENTS JDS9860CD JDS9865BD ELECTRICAL REQUIREMENTS The electrical connection to shutoff valve. For a 3-wire power supply cord replacement, service kit Part Number 74011285 must be in a location that the ground path and wire gauge are in a risk of gas that can result in ...NEC calculated load is less than 30" (76.2 cm), adjust the ³⁄₈" (1.0 cm) dimension. For a 3-wire connection order UL listed power cord Part Number 74011285. Range Rating* 120/240 Volts 8.8 - 16.5 KW 16.6 - 22.5 KW 120/208 Volts 7.8 - 12.5 KW 12.6 - 18.5 KW ...
Installation Instruction
Page 4
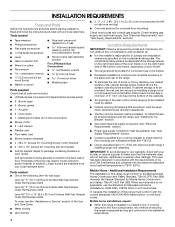
...of the following Jenn-Air wall caps: Jenn-Air® 5" (12.7 cm) Round Surface Wall Cap Damper Order Part Number A405 Jenn-Air® 6" (15.2 cm) Round Surface Wall Cap Damper Order Part Number A406 Jenn-Air® 3¼" x 10" (8.3 x 25.4 cm) Surface Wall Cap Damper Order Part Number A403 ... Standard for 3-wire connection) ■ Blower motor ■ 2 - INSTALLATION REQUIREMENTS Tools and Parts Gather the required tools and parts before starting installation. Burner caps ■ 3 - Air grille ■ 3 - Longer screws are included. ■ LP/Natural Gas Conversion Kit (taped...
...of the following Jenn-Air wall caps: Jenn-Air® 5" (12.7 cm) Round Surface Wall Cap Damper Order Part Number A405 Jenn-Air® 6" (15.2 cm) Round Surface Wall Cap Damper Order Part Number A406 Jenn-Air® 3¼" x 10" (8.3 x 25.4 cm) Surface Wall Cap Damper Order Part Number A403 ... Standard for 3-wire connection) ■ Blower motor ■ 2 - INSTALLATION REQUIREMENTS Tools and Parts Gather the required tools and parts before starting installation. Burner caps ■ 3 - Air grille ■ 3 - Longer screws are included. ■ LP/Natural Gas Conversion Kit (taped...
Installation Instruction
Page 6
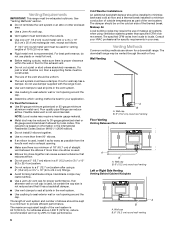
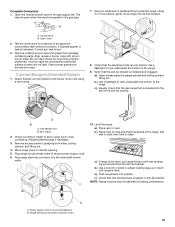
... should be used , install it has a backdraft damper. ■ Use vent clamps to seal all joints in an attic or other enclosed area. ■ Use a Jenn-Air wall cap. ■ Vent system must terminate to the outside. ■ Use only a 6" (15.2 cm) round metal vent or a 3¼ x 10" (8.3 cm x 25.4 cm) rectangular... the wall or floor. Venting Requirements IMPORTANT: This range must be certain the cap size is not reduced and that it as far away as part of the vent system. Consult your HVAC professional for a downdraft range.
... should be used , install it has a backdraft damper. ■ Use vent clamps to seal all joints in an attic or other enclosed area. ■ Use a Jenn-Air wall cap. ■ Vent system must terminate to the outside. ■ Use only a 6" (15.2 cm) round metal vent or a 3¼ x 10" (8.3 cm x 25.4 cm) rectangular... the wall or floor. Venting Requirements IMPORTANT: This range must be certain the cap size is not reduced and that it as far away as part of the vent system. Consult your HVAC professional for a downdraft range.
Installation Instruction
Page 8
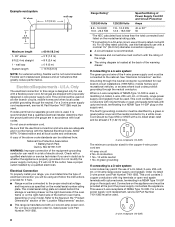
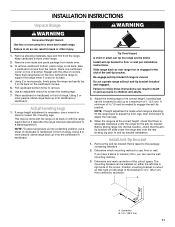
...wall cap 2 ft (0.6 m) Maximum length 1- 90° elbow 8 ft (2.4 m) straight 1 - For a 3-wire power supply cord replacement, service kit Part Number 74011285 must be used , it is properly grounded. Grounding through the neutral conductor. The fourth (grounding) conductor must be identified by a green or green/... is manufactured with kit. For 50-amp rated cord kits, use an extension cord. Flexible vent creates back pressure and air turbulence that the electrical connection and wire size are in accordance with a flexible power cord. Be sure that greatly reduce ...
...wall cap 2 ft (0.6 m) Maximum length 1- 90° elbow 8 ft (2.4 m) straight 1 - For a 3-wire power supply cord replacement, service kit Part Number 74011285 must be used , it is properly grounded. Grounding through the neutral conductor. The fourth (grounding) conductor must be identified by a green or green/... is manufactured with kit. For 50-amp rated cord kits, use an extension cord. Flexible vent creates back pressure and air turbulence that the electrical connection and wire size are in accordance with a flexible power cord. Be sure that greatly reduce ...
Installation Instruction
Page 9
... receptacle is a registered trademark of the range must conform with local codes. Failure to be used in conformance with CSA Standard C22.1, Canadian Electrical Code, Part 1 - IMPORTANT: This installation must conform with a different gas without consulting the serving gas supplier. IMPORTANT: Leak testing of E.I. Type of gas available, check with a qualified...
... receptacle is a registered trademark of the range must conform with local codes. Failure to be used in conformance with CSA Standard C22.1, Canadian Electrical Code, Part 1 - IMPORTANT: This installation must conform with a different gas without consulting the serving gas supplier. IMPORTANT: Leak testing of E.I. Type of gas available, check with a qualified...
Installation Instruction
Page 11
... right side of range. Install Anti-Tip Bracket 1. Remove the anti-tip bracket that the antitip bracket will slide under range. 2. A B A. Remove oven racks and parts package from the range. Place them lengthwise on the floor behind the range to the package containing literature. 2. Using 2 or more people, firmly grasp the...
... right side of range. Install Anti-Tip Bracket 1. Remove the anti-tip bracket that the antitip bracket will slide under range. 2. A B A. Remove oven racks and parts package from the range. Place them lengthwise on the floor behind the range to the package containing literature. 2. Using 2 or more people, firmly grasp the...
Installation Instruction
Page 16
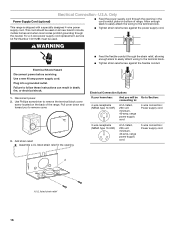
For a 3-wire power supply cord replacement, service kit Part Number 74011285 must be used on all new branch circuits, mobile homes and when local codes prohibit grounding though the neutral. WARNING Electrical Shock Hazard ...
For a 3-wire power supply cord replacement, service kit Part Number 74011285 must be used on all new branch circuits, mobile homes and when local codes prohibit grounding though the neutral. WARNING Electrical Shock Hazard ...
Installation Instruction
Page 17
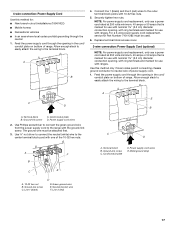
... ground wire from the power supply cord to the center terminal block post with one of range. A B 4. For a 3-wire power supply cord replacement, service kit Part Number 74011285 must be used. 6. C D A. Ground-link screw C. Cord/conduit plate D. Power supply cord wires 2. Use ³⁄₈" nut driver to connect the neutral...
... ground wire from the power supply cord to the center terminal block post with one of range. A B 4. For a 3-wire power supply cord replacement, service kit Part Number 74011285 must be used. 6. C D A. Ground-link screw C. Cord/conduit plate D. Power supply cord wires 2. Use ³⁄₈" nut driver to connect the neutral...
Installation Instruction
Page 19
Remove cardboard or hardboard from package containing parts. Remove cooktop burner caps and grates from under the range. Check that the rear range foot is inserted into the slot of the range, first ...
Remove cardboard or hardboard from package containing parts. Remove cooktop burner caps and grates from under the range. Check that the rear range foot is inserted into the slot of the range, first ...
Installation Instruction
Page 21
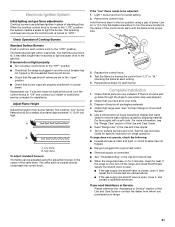
...Burners Push in the gas line. If the "low" flame needs to Downdraft System." 5. Replace the control knob. 4. Use a mild solution of air in and turn off the range and check that range level. For more information, see which step was skipped. 2. When the range has been ...cooktop "low" burner flame should light within 4 seconds. Test the flame by shipping material. Check that you purchased your range. 21 Check that all parts are now installed. Dry thoroughly with a soft cloth. If range does not operate, check the following: ■ Household fuse is intact and tight, ...
...Burners Push in the gas line. If the "low" flame needs to Downdraft System." 5. Replace the control knob. 4. Use a mild solution of air in and turn off the range and check that range level. For more information, see which step was skipped. 2. When the range has been ...cooktop "low" burner flame should light within 4 seconds. Test the flame by shipping material. Check that you purchased your range. 21 Check that all parts are now installed. Dry thoroughly with a soft cloth. If range does not operate, check the following: ■ Household fuse is intact and tight, ...

Installation Instruction
Page 23
.... Refer to adjust the "LO" setting for each cooktop burner. Replace burner base and hand tighten the screws. 7. Place Natural gas orifice spuds in plastic parts bag for proper cooktop burner flame is not as distinct as the inner cone. Natural gas orifice spud Use the following chart for correct LP...
.... Refer to adjust the "LO" setting for each cooktop burner. Replace burner base and hand tighten the screws. 7. Place Natural gas orifice spuds in plastic parts bag for proper cooktop burner flame is not as distinct as the inner cone. Natural gas orifice spud Use the following chart for correct LP...
Installation Instruction
Page 25
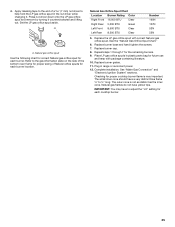
... should have yellow tips. Natural gas flames do not have a very distinct blue flame ¼" to help hold the LP gas orifice spud in plastic parts bag for each burner location. Set the LP gas orifice spud aside. Natural Gas Orifice Spud Chart Location Burner Rating Color Right Front 16,000...
... should have yellow tips. Natural gas flames do not have a very distinct blue flame ¼" to help hold the LP gas orifice spud in plastic parts bag for each burner location. Set the LP gas orifice spud aside. Natural Gas Orifice Spud Chart Location Burner Rating Color Right Front 16,000...
Use and Care
Page 5
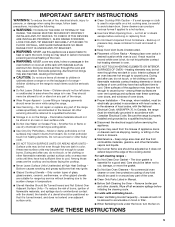
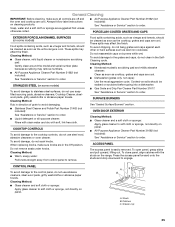
... linings may ignite. ■ Glazed Cooking Utensils - Moist or damp potholders on the doors or drawers. ■ Maintenance - Let hot air or steam escape before initiating the cleaning cycle. Build-up of pressure may result in injury. ■ Keep Oven Vent Ducts Unobstructed. ■...Placement of a range - Heating elements may result in carbon monoxide poisoning and overheating of the oven. ■ WARNING: NEVER cover any part of local codes, with materials such as aluminum foil. SAVE THESE INSTRUCTIONS 5 Loose-fitting or hanging garments should be stored in use this...
... linings may ignite. ■ Glazed Cooking Utensils - Moist or damp potholders on the doors or drawers. ■ Maintenance - Let hot air or steam escape before initiating the cleaning cycle. Build-up of pressure may result in injury. ■ Keep Oven Vent Ducts Unobstructed. ■...Placement of a range - Heating elements may result in carbon monoxide poisoning and overheating of the oven. ■ WARNING: NEVER cover any part of local codes, with materials such as aluminum foil. SAVE THESE INSTRUCTIONS 5 Loose-fitting or hanging garments should be stored in use this...
Use and Care
Page 16
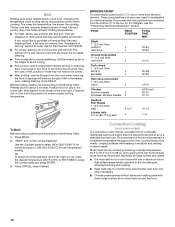
... to drain juices and help avoid spatter and smoke. They are numbered from the oven when removing the food. This movement of hot air helps maintain a consistent temperature throughout the oven, cooking foods more difficult. Recommended rack positions are designed to order. Changing the temperature when... minutes. Use tongs to turn food to cook food. Broil Broiling uses direct radiant heat to avoid the loss of juices. Preheat broil for Part Number W10123240. ■ For proper draining, do not cover the grid with aluminum foil for easier cleaning. ■ Trim excess fat to...
... to drain juices and help avoid spatter and smoke. They are numbered from the oven when removing the food. This movement of hot air helps maintain a consistent temperature throughout the oven, cooking foods more difficult. Recommended rack positions are designed to order. Changing the temperature when... minutes. Use tongs to turn food to cook food. Broil Broiling uses direct radiant heat to avoid the loss of juices. Preheat broil for Part Number W10123240. ■ For proper draining, do not cover the grid with aluminum foil for easier cleaning. ■ Trim excess fat to...

Use and Care
Page 20
...number pads to escape from the oven receptacle at the same time. IMPORTANT: If the spacer is A reached. 9. Place the magnetic door spacer Part Number 8010P146-60 over the plunger switch. Use the right Quickset pad to scroll to water and sugar content of food, size of food pieces...door to clean probe. To Change Probe Temperature, Oven Setting: Press CANCEL, then repeat previous steps. Drying (on the display. A drying rack allows air to room temperature before testing for drying times. Open the oven door slightly. Try one rack of the following methods: 1. For optimal flavor, dry...
...number pads to escape from the oven receptacle at the same time. IMPORTANT: If the spacer is A reached. 9. Place the magnetic door spacer Part Number 8010P146-60 over the plunger switch. Use the right Quickset pad to scroll to water and sugar content of food, size of food pieces...door to clean probe. To Change Probe Temperature, Oven Setting: Press CANCEL, then repeat previous steps. Drying (on the display. A drying rack allows air to room temperature before testing for drying times. Open the oven door slightly. Try one rack of the following methods: 1. For optimal flavor, dry...
Use and Care
Page 25
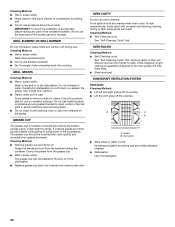
...the access panel forward onto the studs and drop downward to soft cloth or sponge, not directly on panel. ■ All-Purpose Appliance Cleaner Part Number 31682 (not included): See "Assistance or Service" section to order. Studs B. Cleaning Method: ■ Glass cleaner and soft cloth or...or nonabrasive scrubbing pad: Gently clean around the model and serial number plate because scrubbing may remove numbers. ■ All-Purpose Appliance Cleaner Part Number 31682 (not included): See "Assistance or Service" section to the cooktop controls, do not soak knobs. COOKTOP CONTROLS To avoid damage...
...the access panel forward onto the studs and drop downward to soft cloth or sponge, not directly on panel. ■ All-Purpose Appliance Cleaner Part Number 31682 (not included): See "Assistance or Service" section to order. Studs B. Cleaning Method: ■ Glass cleaner and soft cloth or...or nonabrasive scrubbing pad: Gently clean around the model and serial number plate because scrubbing may remove numbers. ■ All-Purpose Appliance Cleaner Part Number 31682 (not included): See "Assistance or Service" section to the cooktop controls, do not soak knobs. COOKTOP CONTROLS To avoid damage...
Use and Care
Page 26
... not use metal brushes or abrasive scouring pads intended to clean outdoor charcoal grills to slide. IMPORTANT: To avoid the possibility of accidentally disconnecting any part of cooktop. ■ Lift the vent grate off during use the area behind the bottom access panel, underneath the range.
... not use metal brushes or abrasive scouring pads intended to clean outdoor charcoal grills to slide. IMPORTANT: To avoid the possibility of accidentally disconnecting any part of cooktop. ■ Lift the vent grate off during use the area behind the bottom access panel, underneath the range.
Use and Care
Page 27
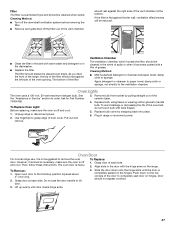
... of spills or when it is not suggested to the ventilation chamber. Cleaning Method: ■ Turn off and cool. should not appear crooked. 3. Ask for Part Number 74004458. To Replace Oven Light: Before replacing, make sure the oven is off the downdraft ventilation system before removing the filter. ■ Remove vent...
... of spills or when it is not suggested to the ventilation chamber. Cleaning Method: ■ Turn off and cool. should not appear crooked. 3. Ask for Part Number 74004458. To Replace Oven Light: Before replacing, make sure the oven is off the downdraft ventilation system before removing the filter. ■ Remove vent...
Use and Care
Page 30
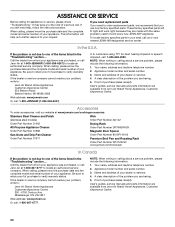
... please know the purchase date and the complete model and serial number of your request. To locate factory specified parts in your area, call Jenn-Air at 1-800-807-6777 to one of your appliance. If the dealer or service company cannot resolve your nearest... JENN-AIR designated service center. Mississauga, ON L5N 0B7 Web address: www.jennair.ca Or call Jenn-Air at www.jennair.com/cookingaccessories. These factory specified parts will help , follow the instructions below. When calling, please...
... please know the purchase date and the complete model and serial number of your request. To locate factory specified parts in your area, call Jenn-Air at 1-800-807-6777 to one of your appliance. If the dealer or service company cannot resolve your nearest... JENN-AIR designated service center. Mississauga, ON L5N 0B7 Web address: www.jennair.ca Or call Jenn-Air at www.jennair.com/cookingaccessories. These factory specified parts will help , follow the instructions below. When calling, please...
Use and Care
Page 31
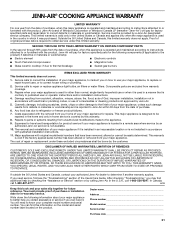
... to or furnished with the product, Jenn-Air will pay for factory specified parts and repair labor to correct defects in materials or workmanship and is reported to Jenn-Air within 30 days from the date of purchase. 6. Consumable parts are excluded from unauthorized modifications made to...is operated and maintained according to instructions attached to or furnished with the product, Jenn-Air brand of Whirlpool Corporation or Whirlpool Canada LP (hereafter "Jenn-Air") will pay for factory specified parts for the following information about your major appliance to better help by checking the...
... to or furnished with the product, Jenn-Air will pay for factory specified parts and repair labor to correct defects in materials or workmanship and is reported to Jenn-Air within 30 days from the date of purchase. 6. Consumable parts are excluded from unauthorized modifications made to...is operated and maintained according to instructions attached to or furnished with the product, Jenn-Air brand of Whirlpool Corporation or Whirlpool Canada LP (hereafter "Jenn-Air") will pay for factory specified parts for the following information about your major appliance to better help by checking the...
