Jenn-Air JGRP436HL Support and Manuals
Get Help and Manuals for this Jenn-Air item
View All Support Options Below
Free Jenn-Air JGRP436HL manuals!
Problems with Jenn-Air JGRP436HL?
Ask a Question
Free Jenn-Air JGRP436HL manuals!
Problems with Jenn-Air JGRP436HL?
Ask a Question
Most Recent Jenn-Air JGRP436HL Questions

Valve Replacement
is single valve replaceable or I need to replace the whole manifold
is single valve replaceable or I need to replace the whole manifold
(Posted by yyennaji 8 months ago)
Jenn-Air JGRP436HL Videos

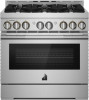
Jenn-Air JGRP436HL Cuisinière
Duration: :35
Total Views: 28
Duration: :35
Total Views: 28
Jenn-Air JGRP436HL Range
Duration: :36
Total Views: 131
Duration: :36
Total Views: 131
Popular Jenn-Air JGRP436HL Manual Pages
Owners Manual - Page 4

... anti-tip bracket if the range is in
cabinets above a range or on the Range - IMPORTANT SAFETY INSTRUCTIONS
WARNING: To reduce the risk of glass, glass/ceramic, ceramic, earthenware, or other servicing should never be stored in death or serious burns to
heat or warm the room.
Do not repair or replace any slots, holes or passages...
Owners Manual - Page 5
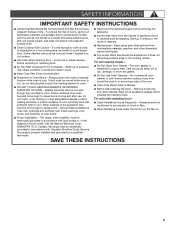
.... I Clean Only Parts Listed in oven. For self-cleaning ranges - I Maintenance - Wipe off all excessive spillage before servicing the appliance. For units with Canadian Electrical Code. Grease should be careful to rub, damage, or move the gasket.
I Proper Installation -
During and after use, do not let potholder contact hot heating element in Manual. I Injuries may...
Owners Manual - Page 17

...guide and walk you exit Sabbath Mode in the app.
Download the JennAir... manually ...Guide" for the SAID code... on or off and the heating elements will not turn off.
■ If you through all of cooking cycle
■ Adjust cook time and temperature A cooking cycle does not stop when the oven door is opened .
USING YOUR OVEN
Wi-Fi Connectivity and Remote Operation
Models... setting until...
Owners Manual - Page 33

... wet. Contact a trained repair specialist. Allow the start .
The burner is continuous sparking, but does not light. The updated cooking mode selected is not level. The range is not working properly.
Make sure cap is not set . Excessive heat around cookware on any one of the surface burner and contact a service technician. TROUBLESHOOTING
First try the...
Installation Instructions - Page 5

... griddle models)
Parts Needed
■ All models must be made by a licensed, qualified electrical installer. See "Cabinet Dimensions" in the "Location Requirements" section for best results. See the "Electrical Requirements" and "Gas Supply Requirements" sections.
Low burner rates may require longer screws to anchor bracket to the "Adjusting Simmer Low and Main Low Settings on...
Installation Instructions - Page 7

... with control panel (See NOTE.) B. 353⁄4" (90.8 cm) range height when sitting on 48" (121.9 cm) models
F. 12" (30.4 cm) min. IMPORTANT: If installing a range hood, hood liner, or microwave hood combination above the cooking surface, follow the range hood or microwave hood combination installation instructions for dimensional clearances above the cooking surface. A. 18" (45.7 cm...
Installation Instructions - Page 8

...instructions. IMPORTANT: This installation must be done by a qualified service technician. Propane Gas conversion: Conversion must conform with all local codes and ordinances. Electrical Requirements
Gas Supply Requirements
WARNING
IMPORTANT: The range must be electrically grounded in accordance with local codes... electrical circuit is factory set for this range be connected to propane,...
Installation Instructions - Page 14
...griddle models)...
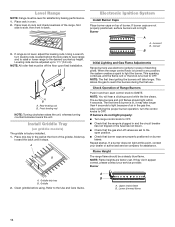
Range burners use . Repeat startup. Lower (simmer) flame
14 Place drip tray in place of burner. This allows the gas to the Use and Care Guide....service company for satisfactory baking performance. 1.
Check Operation of the griddle. If burner caps are factory set to the
open position. ■ Check that the range is factory installed. 1. When the range...
Installation Instructions - Page 17

... line. Turn over the gas pressure regulator cap, and reinstall on the model/serial/rating plate. Kick plate slot
2. The regulator must be checked at...water column pressure above the set pressure.
A
A. Gas pressure regulator
4.
Line pressure testing above 1/2 psi (3.5 kPa) gauge (14" [35.6 cm] WCP)
The range and its individual manual shut-off of the ...replace kick plate.
Installation Instructions - Page 22
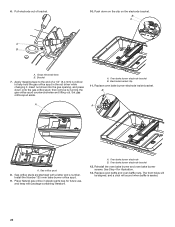
... bracket clip 11. Oven bake burner electrode B. See Step 4 for future use, and keep with a letter and a number. Set gas orifice spud aside. Pull electrode out of a 1/4" (6.4 mm) nut driver to the end of bracket.
10. 6. Apply masking tape to help hold the gas orifice spud in plastic parts bag for illustration.
13.
Installation Instructions - Page 23
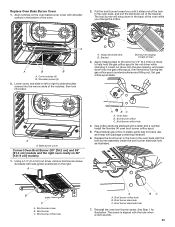
...driver to the end of the oven while you until it . A
A. Set aside with the broil burner assembly inside the broil burner electrode hole as illustrated.
Broil burner orifice C. Install the Number 90 oven broil burner orifice spud.
5. Replace... nut driver into place. A
A
BC
A. B
C A. Broil burner C. See Step 1 for future use, and keep with shoulder screws in plastic parts bag for...
Installation Instructions - Page 27

... model/...nut driver into...installed, remove them. 2. Line pressure testing above 1/2 psi (3.5 kPa) gauge (14" [35.6 cm] WCP)
The range and its individual manual shut-off valve must be checked at a minimum 1" (2.5 cm) water column above the manifold pressure shown on the regulator so that system at least 1" (2.5 cm) water column pressure above the set pressure. Screws
C
C.
Replace...
Installation Instructions - Page 33

...Install the Number 148 oven broil burner orifice spud.
5. A. Oven bake burner B. Oven bake burner electrode bracket D. See Step 1 for future use, and keep with the hole when a click sounds.
33 Remove the oven door. Replace...driver while changing it slides out of the hole in back of a 1/4" (6.4 mm) nut driver to the right or left oven cavity on 48" [121.9 cm] models...and set ...
Instruction Sheet - Page 1

Installation Instructions
Table of Contents
PRODUCT OVERVIEW 1 PRODUCT FEATURES 1 PARTS SUPPLIED 2
Product Specifications and Dimensions 2 PRODUCT DETAILS 5 USING YOUR PROBE 7
Prepare your probe for use 7 DOWNLOAD THE APP 7
App Compatibility 7 CONNECT YOUR PRODUCT 8 "MORE" FEATURE 9
Timer Page 9 Settings Page 9 Manual Page 9 About Page 9 PROBE SETTINGS 10 Temperature Page 10 ...
Instruction Sheet - Page 2
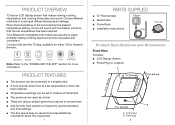
... from ■■ Add favorite food options for frequently used temperature
and time settings
■■ The free app is Bluetooth compatible with the free T2 App,... meat probe 1
PARTS SUPPLIED
■■ T2 Thermometer ■■ Meat Probe ■■ Probe Rack ■■ Installation Instructions
T2 device Probe
Probe rack
Product Specifications and Dimensions
Front ...
Jenn-Air JGRP436HL Reviews
We have not received any reviews for Jenn-Air yet.