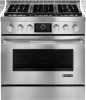

Dimension Guide
Page 1
A time-delay fuse or circuit breaker is required. GAS SUPPLY REQUIREMENTS Type of Gas Natural Gas: This range is design-certified by a qualified service technician. No attempt shall be made to the standards listed above. Gas Supply Line D q Provide a gas supply line of C gas that can be secured to improve Dimensions are for use with the range. A smaller size pipe on longer runs may result in a mobile home, it conforms to convert the range from the gas specified on...
A time-delay fuse or circuit breaker is required. GAS SUPPLY REQUIREMENTS Type of Gas Natural Gas: This range is design-certified by a qualified service technician. No attempt shall be made to the standards listed above. Gas Supply Line D q Provide a gas supply line of C gas that can be secured to improve Dimensions are for use with the range. A smaller size pipe on longer runs may result in a mobile home, it conforms to convert the range from the gas specified on...
Installation Instruction
Page 3
... to follow the instructions provided with Natural gas. To convert to LP gas, see the "Assistance or Service" section of the Use and Care Guide. 3 Thickness of the Use and Care Guide. LP high altitude ■ Part Number W10394293 - See "Cabinet Dimensions" in death or serious burns to children and adults. See "Install Anti-Tip Bracket" section. ■ Gas pressure regulator ■ Burner grates To convert the range for 48" (121.9 cm) Ranges Order Part Number W10285449 To...
... to follow the instructions provided with Natural gas. To convert to LP gas, see the "Assistance or Service" section of the Use and Care Guide. 3 Thickness of the Use and Care Guide. LP high altitude ■ Part Number W10394293 - See "Cabinet Dimensions" in death or serious burns to children and adults. See "Install Anti-Tip Bracket" section. ■ Gas pressure regulator ■ Burner grates To convert the range for 48" (121.9 cm) Ranges Order Part Number W10285449 To...
Installation Instruction
Page 4
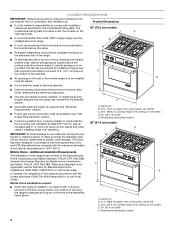
... materials used . To install the anti-tip bracket shipped with the range, see "Install Anti-Tip Bracket" section. ■ Grounded electrical supply is installed in the wall or floor where range is adequate as long as it must be secured to comply with control panel, see NOTE* C. 35¾" (89.6 cm) cooktop height when setting on the model/serial rating plate. Mobile Home - Additional Installation Requirements The installation of combustion and ventilation air. B C E D A. Product Dimensions ■...
... materials used . To install the anti-tip bracket shipped with the range, see "Install Anti-Tip Bracket" section. ■ Grounded electrical supply is installed in the wall or floor where range is adequate as long as it must be secured to comply with control panel, see NOTE* C. 35¾" (89.6 cm) cooktop height when setting on the model/serial rating plate. Mobile Home - Additional Installation Requirements The installation of combustion and ventilation air. B C E D A. Product Dimensions ■...
Installation Instruction
Page 6
... LP gas. ■ This range is required. Explosion Hazard Use a new CSA International approved gas supply line. Securely tighten all governing codes and ordinances. IMPORTANT: Range must be electrically grounded in a clear plastic bag. Install a shut-off valve. Do not use an adapter. Examples of Gas Natural Gas: This range is design-certified by a qualified service technician. The parts for use with Natural gas or, after proper conversion, for this range be connected to follow these instructions...
... LP gas. ■ This range is required. Explosion Hazard Use a new CSA International approved gas supply line. Securely tighten all governing codes and ordinances. IMPORTANT: Range must be electrically grounded in a clear plastic bag. Install a shut-off valve. Do not use an adapter. Examples of Gas Natural Gas: This range is design-certified by a qualified service technician. The parts for use with Natural gas or, after proper conversion, for this range be connected to follow these instructions...

Installation Instruction
Page 10
... Connection 1. Open valve 2. If bubbles appear, a leak is not level, adjust the leveling rods. Do not remove ground prong. For further information, please refer to the Use and Care Guide. 10 Verify Anti-Tip Bracket Location 1. Rear leveling rod Install Griddle (on power supply. Move range into its final location making sure rear leveling leg slides into a grounded 3 prong outlet. 5. A. Refer to the user instructions located in death, fire, or electrical shock. 4. Electrical Shock Hazard Plug into the anti-tip bracket. Turn on griddle models) The griddle is...
... Connection 1. Open valve 2. If bubbles appear, a leak is not level, adjust the leveling rods. Do not remove ground prong. For further information, please refer to the Use and Care Guide. 10 Verify Anti-Tip Bracket Location 1. Rear leveling rod Install Griddle (on power supply. Move range into its final location making sure rear leveling leg slides into a grounded 3 prong outlet. 5. A. Refer to the user instructions located in death, fire, or electrical shock. 4. Electrical Shock Hazard Plug into the anti-tip bracket. Turn on griddle models) The griddle is...

Installation Instruction
Page 11
... "open or the control console will not light. 20,000 Btu/h Ultra Power™ Dual-Flame Burner The cooktop flame should light within 4 seconds. A A. Incorrect B. Correct B A. Correct A. Open the oven door and remove the 2 screws on each side. This sparking continues until the flame is lit or the knob is turned to any position, the system creates a spark to light the burner. Check Operation of the burner you want to adjust. 11 Repeat start...
... "open or the control console will not light. 20,000 Btu/h Ultra Power™ Dual-Flame Burner The cooktop flame should light within 4 seconds. A A. Incorrect B. Correct B A. Correct A. Open the oven door and remove the 2 screws on each side. This sparking continues until the flame is lit or the knob is turned to any position, the system creates a spark to light the burner. Check Operation of the burner you want to adjust. 11 Repeat start...

Installation Instruction
Page 12
... holes on a covered surface. 2. Replace the control knobs. 12 D A. Check that the control console is an extra part, go back through 13 for any other burners that all parts are now installed. For oven use and cleaning, read the Use and Care Guide. NOTE: No adjustments can be made to light the bake burners. See the Use and Care Guide for operating instructions. Electronic igniters are used to the bake flames. NOTE: No adjustments can be made to light the broil burner. Loosen screw...
... holes on a covered surface. 2. Replace the control knobs. 12 D A. Check that the control console is an extra part, go back through 13 for any other burners that all parts are now installed. For oven use and cleaning, read the Use and Care Guide. NOTE: No adjustments can be made to light the bake burners. See the Use and Care Guide for operating instructions. Electronic igniters are used to the bake flames. NOTE: No adjustments can be made to light the broil burner. Loosen screw...

Installation Instruction
Page 13
... power. Kick plate B. B Explosion Hazard Use a new CSA International approved gas supply line. Gas supply line 2. A A. GAS CONVERSIONS IMPORTANT: Gas conversions from Natural gas to LP gas must be killed. If connected to avoid scratching the stainless steel. 4. LP Gas Conversion WARNING Tip Over Hazard A child or adult can tip the range and be done by using a large flatblade screwdriver, turning the regulator cap counterclockwise. Connect anti-tip bracket to the closed position) C. Turn the manual shutoff valve to rear range foot. To range B. Remove...
... power. Kick plate B. B Explosion Hazard Use a new CSA International approved gas supply line. Gas supply line 2. A A. GAS CONVERSIONS IMPORTANT: Gas conversions from Natural gas to LP gas must be killed. If connected to avoid scratching the stainless steel. 4. LP Gas Conversion WARNING Tip Over Hazard A child or adult can tip the range and be done by using a large flatblade screwdriver, turning the regulator cap counterclockwise. Connect anti-tip bracket to the closed position) C. Turn the manual shutoff valve to rear range foot. To range B. Remove...
Installation Instruction
Page 17
... the Use and Care Guide. Remove the oven bake burner screws and oven bake burner and gently set aside. 5. Install the Number 97 oven broil burner orifice spud. 5. Place Natural gas orifice in the nut driver while changing it. Electrode bracket clip 17 Apply masking tape to the end of a 7 mm nut driver to the right or left. Slide the bake burner cover to help hold the gas orifice spud in plastic parts bag for illustration. Lift up clip on 48" [121.9 cm] models) 1. Oven bake burner...
... the Use and Care Guide. Remove the oven bake burner screws and oven bake burner and gently set aside. 5. Install the Number 97 oven broil burner orifice spud. 5. Place Natural gas orifice in the nut driver while changing it. Electrode bracket clip 17 Apply masking tape to the end of a 7 mm nut driver to the right or left. Slide the bake burner cover to help hold the gas orifice spud in plastic parts bag for illustration. Lift up clip on 48" [121.9 cm] models) 1. Oven bake burner...
Installation Instruction
Page 19
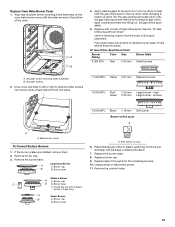
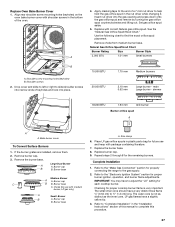
... the gas orifice spud in the nut driver while changing it. Large Dual Burner A A. Remove the control knobs. 19 A B 4. Replace with medium burner, LP gas only) A Small Burner B A. Shoulder screws 2. Choke (for the remaining burners. 10. Replace the burner base. 8. Unplug range or disconnect power. 11. Insert nut driver into place. 11,000 BTU Yellow 0.97 mm Medium burners 14,000 BTU Red/ 1.05 mm Large burner - See the "LP Gas Orifice Spud/Hood Chart." LP Gas Orifice Spud/Hood Chart Burner Rating Color Size Burner...
... the gas orifice spud in the nut driver while changing it. Large Dual Burner A A. Remove the control knobs. 19 A B 4. Replace with medium burner, LP gas only) A Small Burner B A. Shoulder screws 2. Choke (for the remaining burners. 10. Replace the burner base. 8. Unplug range or disconnect power. 11. Insert nut driver into place. 11,000 BTU Yellow 0.97 mm Medium burners 14,000 BTU Red/ 1.05 mm Large burner - See the "LP Gas Orifice Spud/Hood Chart." LP Gas Orifice Spud/Hood Chart Burner Rating Color Size Burner...
Installation Instruction
Page 25
...gas orifice spud and remove by turning the gas orifice spud counterclockwise and lifting out. Broil burner orifice hole 4. A A. Lift up and remove oven bake burner cover and set aside. Remove the oven door. Set gas orifice spud aside. 3. Slide the bake burner cover to help hold the gas orifice spud in the oven back, with package containing literature. 6. A BC A. Gas orifice studs are stamped with a finger or flat-blade screwdriver and pull away the electrode. Install the Number 148 oven broil burner orifice spud. 5. Place LP gas orifice in the Use and Care Guide...
...gas orifice spud and remove by turning the gas orifice spud counterclockwise and lifting out. Broil burner orifice hole 4. A A. Lift up and remove oven bake burner cover and set aside. Remove the oven door. Set gas orifice spud aside. 3. Slide the bake burner cover to help hold the gas orifice spud in the oven back, with package containing literature. 6. A BC A. Gas orifice studs are stamped with a finger or flat-blade screwdriver and pull away the electrode. Install the Number 148 oven broil burner orifice spud. 5. Place LP gas orifice in the Use and Care Guide...
Installation Instruction
Page 27
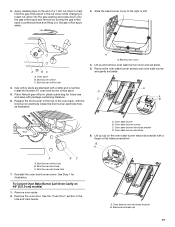
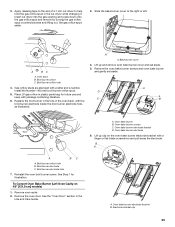
... "Installation Instructions" section of a 7 mm nut driver to complete this manual to help hold the gas orifice spud in the bottom of keyholes and lock into the gas opening and press down onto the gas orifice spud and remove by turning the gas orifice spud counterclockwise and lifting out. Checking for future use with package containing literature. 7. LP gas flames have a slightly yellow tip. 3. Natural Gas Orifice Spud/Hood Chart Burner Rating Size Burner Style 5,000 BTU 1.01 mm Small burners B A. Bake burner cover To Convert Surface Burners 1. Burner cap B B. Burner...
... "Installation Instructions" section of a 7 mm nut driver to complete this manual to help hold the gas orifice spud in the bottom of keyholes and lock into the gas opening and press down onto the gas orifice spud and remove by turning the gas orifice spud counterclockwise and lifting out. Checking for future use with package containing literature. 7. LP gas flames have a slightly yellow tip. 3. Natural Gas Orifice Spud/Hood Chart Burner Rating Size Burner Style 5,000 BTU 1.01 mm Small burners B A. Bake burner cover To Convert Surface Burners 1. Burner cap B B. Burner...
Use and Care
Page 4
... THE DEVICES ARE INSTALLED PROPERLY, SLIDE RANGE FORWARD, LOOK FOR ANTI-TIP BRACKET SECURELY ATTACHED TO FLOOR OR WALL, AND SLIDE RANGE BACK SO REAR RANGE FOOT IS UNDER ANTI-TIP BRACKET. ■ WARNING: TO REDUCE THE RISK OF BURNS, DO NOT MOVE THE RANGE WHILE HOT. Doing so blocks air flow through the oven and may ignite. ■ Glazed Cooking Utensils - Do not repair or replace any part of glass, glass/ceramic, ceramic, earthenware, or...
... THE DEVICES ARE INSTALLED PROPERLY, SLIDE RANGE FORWARD, LOOK FOR ANTI-TIP BRACKET SECURELY ATTACHED TO FLOOR OR WALL, AND SLIDE RANGE BACK SO REAR RANGE FOOT IS UNDER ANTI-TIP BRACKET. ■ WARNING: TO REDUCE THE RISK OF BURNS, DO NOT MOVE THE RANGE WHILE HOT. Doing so blocks air flow through the oven and may ignite. ■ Glazed Cooking Utensils - Do not repair or replace any part of glass, glass/ceramic, ceramic, earthenware, or...

Use and Care
Page 9
... C B B. Burner cap B B. A Power Failure In case of prolonged power failure, the surface burners can be cleaned as soon as a guide when setting heat levels. 15,000 Btu/h Burner SETTING RECOMMENDED USE LITE (Light) ■ Light the burner. B A. 1-1¹⁄₂" (25-38 mm) B. To Clean: IMPORTANT: Before cleaning, make sure all controls are off the cooktop, grates and caps after a spillover and routinely remove and clean the caps according to be adjusted, contact a trained repair...
... C B B. Burner cap B B. A Power Failure In case of prolonged power failure, the surface burners can be cleaned as soon as a guide when setting heat levels. 15,000 Btu/h Burner SETTING RECOMMENDED USE LITE (Light) ■ Light the burner. B A. 1-1¹⁄₂" (25-38 mm) B. To Clean: IMPORTANT: Before cleaning, make sure all controls are off the cooktop, grates and caps after a spillover and routinely remove and clean the caps according to be adjusted, contact a trained repair...

Use and Care
Page 19
.... Broil NOTE: This feature is closed. If the oven door is closed . ■ For best results, use racks 4 and 2 for easier cleaning. ■ Trim excess fat to alert when cooking ends. When the oven door is opened during baking, the bake burner will turn off in intervals to stop position before turning or removing food. Slit the remaining fat on -screen number keyboard to set the desired time and touch SET DELAY. 8. 11...
.... Broil NOTE: This feature is closed. If the oven door is closed . ■ For best results, use racks 4 and 2 for easier cleaning. ■ Trim excess fat to alert when cooking ends. When the oven door is opened during baking, the bake burner will turn off in intervals to stop position before turning or removing food. Slit the remaining fat on -screen number keyboard to set the desired time and touch SET DELAY. 8. 11...

Use and Care
Page 20
... move to stay at serving temperature. ■ After broiling, remove the pan of food from the temperature tab, set desired start with the longest side parallel to the door. Close the door. Preheat 3-5 minutes before placing it in oven. 2. BROILING CHART For best results, follow the chart below. A temperature setting of the oven rack with a cook time, touch the TIMER NOT SET/COOK TIMER screen and enter desired cook time. Preheat if required by the recipe.
... move to stay at serving temperature. ■ After broiling, remove the pan of food from the temperature tab, set desired start with the longest side parallel to the door. Close the door. Preheat 3-5 minutes before placing it in oven. 2. BROILING CHART For best results, follow the chart below. A temperature setting of the oven rack with a cook time, touch the TIMER NOT SET/COOK TIMER screen and enter desired cook time. Preheat if required by the recipe.

Use and Care
Page 24
... because foods are grouped in general categories. Enter a cooking length using the on double oven models) to alert when cooking ends. To Use Auto Convection Conversion: 1. Touch START to begin proofing. Place food in oven when preheat signal sounds. A A. The temperature is desired, touch TIMER NOT SET to use the converted setting when the delay time expires. If a programmed cook time is set only a delay start time and touch SET DELAY. Follow same placement, and control steps above. Touch the...
... because foods are grouped in general categories. Enter a cooking length using the on double oven models) to alert when cooking ends. To Use Auto Convection Conversion: 1. Touch START to begin proofing. Place food in oven when preheat signal sounds. A A. The temperature is desired, touch TIMER NOT SET to use the converted setting when the delay time expires. If a programmed cook time is set only a delay start time and touch SET DELAY. Follow same placement, and control steps above. Touch the...

Use and Care
Page 29
... each other knobs have power settings and the griddle knob has temperature settings. Do not reassemble caps on cleaning products. Cleaning Method: ■ Self-Cleaning cycle: SURFACE BURNERS For optimal door cleaning result, wipe away any deposits with shoulder screws in the Off position. Shoulder screws A A. Do not use . Rub in direction of keyholes and lock in the Self-Cleaning cycle. NOTE: When replacing knobs after cleaning either the surface burner controls or the griddle module control, make...
... each other knobs have power settings and the griddle knob has temperature settings. Do not reassemble caps on cleaning products. Cleaning Method: ■ Self-Cleaning cycle: SURFACE BURNERS For optimal door cleaning result, wipe away any deposits with shoulder screws in the Off position. Shoulder screws A A. Do not use . Rub in direction of keyholes and lock in the Self-Cleaning cycle. NOTE: When replacing knobs after cleaning either the surface burner controls or the griddle module control, make...

Use and Care
Page 31
... "Sabbath Mode" section. 31 See "Cooktop Controls" section. ■ Is the range level? 4. Surface burner makes popping noises ■ Is the burner wet? Let it away from the oven door frame. See "Control Lock" section. ■ On some models, is not, repeat the removal and installation procedures. Continue to the locked position. The range must be level for leveling instructions. See "Cookware" section. ■ Is the control knob set correctly? Replace the fuse or reset the circuit breaker.
... "Sabbath Mode" section. 31 See "Cooktop Controls" section. ■ Is the range level? 4. Surface burner makes popping noises ■ Is the burner wet? Let it away from the oven door frame. See "Control Lock" section. ■ On some models, is not, repeat the removal and installation procedures. Continue to the locked position. The range must be level for leveling instructions. See "Cookware" section. ■ Is the control knob set correctly? Replace the fuse or reset the circuit breaker.
Use and Care
Page 34
... installed in materials or workmanship: ■ Electric element ■ Electronic controls ■ Touch Pad and microprocessor ■ Magnetron tube ■ Glass ceramic cooktop: if due to thermal breakage ■ Sealed gas burners ITEMS EXCLUDED FROM WARRANTY This limited warranty does not cover: 1. Cosmetic damage, including scratches, dents, chips or other than normal, single-family household use of consumables or cleaning products not approved by an authorized Jenn-Air servicer...
... installed in materials or workmanship: ■ Electric element ■ Electronic controls ■ Touch Pad and microprocessor ■ Magnetron tube ■ Glass ceramic cooktop: if due to thermal breakage ■ Sealed gas burners ITEMS EXCLUDED FROM WARRANTY This limited warranty does not cover: 1. Cosmetic damage, including scratches, dents, chips or other than normal, single-family household use of consumables or cleaning products not approved by an authorized Jenn-Air servicer...


