Jenn-Air JGRP548HM Support and Manuals
Get Help and Manuals for this Jenn-Air item
This item is in your list!

View All Support Options Below
Free Jenn-Air JGRP548HM manuals!
Problems with Jenn-Air JGRP548HM?
Ask a Question
Free Jenn-Air JGRP548HM manuals!
Problems with Jenn-Air JGRP548HM?
Ask a Question
Jenn-Air JGRP548HM Videos
Popular Jenn-Air JGRP548HM Manual Pages
Owners Manual - Page 4


...
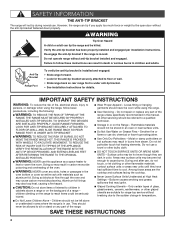
RANGE, THE RANGE MUST BE SECURED BY PROPERLY INSTALLED ANTI-TIP DEVICES. children climbing on hot surfaces may also trap heat, causing a fire hazard. Do not repair or replace any part of the range. Flammable materials should not be worn while using the range, follow these instructions can result in an oven or near units...
Owners Manual - Page 17


...it cannot be remotely operated. The app will be scanned or manually added.
To Enter Sabbath Mode:
■ Turn the Mode knob...the steps. USING YOUR OVEN
Wi-Fi Connectivity and Remote Operation
Models are provided with a Wi-Fi module that no tones will sound... Connectivity Guide" for the SAID code on or off immediately.
■ If a power failure occurs when the Sabbath Mode is set and ...
Owners Manual - Page 22


... faster than regular cooking.
It is closed . See "Assistance or Service" section to Convect Roast.
3. Turn the Mode Knob to order.... it may differ from traditional recipes and packaged goods instructions. USING YOUR OVEN
CONVECTION COOKING
Convection cooking can be...broil elements/burners will turn on 48" (121.9 cm) models has only one convection fan and no sides to allow air...
Owners Manual - Page 33


... is set correctly.
On some models, the Sabbath Mode is being used . If the problem continues, call , refer to a setting and verify that may have followed the instructions for the...lines. Contact a trained repair specialist.
TROUBLESHOOTING
First try the solutions suggested here. The Meat probe has been disconnected. The temperature knob is not set to indicate that cooks food...
Owners Manual - Page 34


...food being cooked. Make sure you avoid a service call, refer to cover the edge of the ...cycle is self-cleaning, the other oven cannot be set temperature did not perform as expected. Baked items are...Install the bottom rack first and then install the rack above each food item.
Pie crust edges are level, and check that may help you have properly followed the Self-Cleaning cycle instructions...
Installation Instructions - Page 5


...installing at zero clearance to the "Adjusting Simmer Low and Main Low Settings on Surface Burner for Propane" section (page 18) for Propane Gas Operation. Parts Supplied Check that all parts... proper operation.
See the "Install Anti-Tip Bracket" section. &#...Simmer Low and Main Low Settings on griddle models)
Parts Needed
■ All models must be installed with a non-combustible ...
Installation Instructions - Page 7


... the range hood or microwave hood combination installation instructions for 25" (64.0 cm) countertop depth, 24" (61.0 cm) base cabinet depth, and 36" (91.4 cm) countertop height. upper cabinet width 48" (121.9 cm) model: 48" (121.9 cm) min. Model/serial/rating plate location/SAID label
NOTE: When installed in order to ensure a flush fit to...
Installation Instructions - Page 8


... service technician. IMPORTANT: Leak testing of gas available, check with the local gas supplier. Type of local codes, installation must conform with all local codes and ordinances.
latest edition. If codes ...information on the model/serial/rating plate for use with a different gas without consulting the serving gas supplier. To convert to the manufacturer's instructions. A time-delay...
Installation Instructions - Page 10


... or other injury. Set range on top of the
unit.
A. Lay kick plate to the side to avoid damaging floor.
Remove oven racks, and parts package from range. ...about 3" (8.0 cm) and move and install range.
Remove Kick Plate 1. Kick plate b. Keep shipping pallet under range. For 48" (121.9 cm) models only, rotate center support counterclockwise off the pallet until it back...
Installation Instructions - Page 14


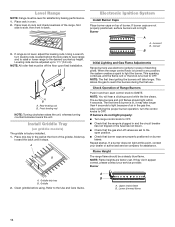
... well at this point, contact your service provider. Incorrect B. Correct
B
Initial Lighting and ...Electronic Ignition System
Install Burner Caps
Place burner caps on griddle models)
The griddle...front to the Use and Care Guide. Using a wrench, turn ...set . Burner
A
A. If a burner does not light at the front of burner.
A B
A. Leveling rods can be off valves are factory set...
Installation Instructions - Page 17


...be as follows for operation and checking the regulator setting:
Propane Gas:
Minimum pressure: 11" (27.9 ... [35.6 cm] WCP)
The range and its individual manual shut-off valve during any pressure testing of the kick ...gas pressure regulator cap, and reinstall on the model/serial/rating plate. To Convert Gas Pressure ...test pressures in order to remove or replace kick plate. Kick plate tab C. ...
Installation Instructions - Page 22


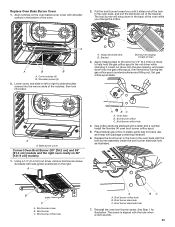
... lifting out. Grasp electrode here. Replace oven bake burner electrode inside bracket.
Install the Number 125 oven bake burner orifice...Replace oven baffle and oven baffle nuts. Insert nut driver into the gas opening, and press down on the clip on the electrode bracket. The front holes will be aligned, and a click will sound when baffle is seated.
22 A. B
A
A
A.
Set...
Installation Instructions - Page 23


... the broil burner electrode hole as illustrated.
Set aside with shoulder screws in back of the bracket. Install the Number 90 oven broil burner orifice spud.
5. Bracket
Broil burner hanging in the bottom of a 1/4" (6.4 mm) nut driver to the end of the oven.
2. Insert nut driver into the narrow ends of the oven while...
Installation Instructions - Page 27


... on burner ratings and locations. Place Propane gas orifice spuds in the nut driver while changing it. Replace the burner base and screws. Repeat steps 2 through 8 for testing regulator must be as follows for operation and checking the regulator setting:
Natural Gas:
Minimum pressure: 6" (15.2 cm) WCP
Maximum pressure: 14" (35.6 cm) WCP...
Installation Instructions - Page 33


... end of a 1/4" (6.4 mm) nut driver to the right or left oven cavity on 48" [121.9 cm] models)
1. A
A. A D
A
BC
...set aside. 5.
Oven back
C
B
B. Broil burner orifice hole
4. Gas orifice studs are stamped with the hole when a click sounds.
33 Install the Number 148 oven broil burner orifice spud.
5. Replace the broil burner in the hole in the back of the hole in plastic parts...
Jenn-Air JGRP548HM Reviews
Do you have an experience with the Jenn-Air JGRP548HM that you would like to share?
Earn 750 points for your review!
We have not received any reviews for Jenn-Air yet.
Earn 750 points for your review!

