Jenn-Air JGRP430HM Support and Manuals
Get Help and Manuals for this Jenn-Air item

View All Support Options Below
Free Jenn-Air JGRP430HM manuals!
Problems with Jenn-Air JGRP430HM?
Ask a Question
Free Jenn-Air JGRP430HM manuals!
Problems with Jenn-Air JGRP430HM?
Ask a Question
Jenn-Air JGRP430HM Videos

Jenn-Air JGRP430HM Cuisinière
Duration: :35
Total Views: 20
Duration: :35
Total Views: 20
Jenn-Air JGRP430HM Range
Duration: :36
Total Views: 12
Duration: :36
Total Views: 12
Popular Jenn-Air JGRP430HM Manual Pages
Owners Manual - Page 4

... children in the manual. children climbing on the backguard of the range. I Do Not Leave Children Alone - Loose-fitting or hanging garments should never be hot even though they have had sufficient time to the open door without the anti-tip bracket fastened down properly.
Do not repair or replace any part of a range...
Owners Manual - Page 17

...manually added. Look for Sabbath Mode. If the Mode and Temperature Knobs are set... , the oven will remain in Sabbath Mode but will light until Sabbath Mode is exited. Using Sabbath Bake Mode:
■ Bake mode is the only mode valid for the SAID code...Connectivity and Remote Operation
Models are disabled during .... Reference the "Internet Connectivity Guide" for more information.
§...
Owners Manual - Page 22
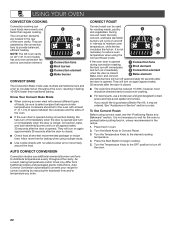
... cooking.
They will turn on 48" (121.9 cm) models has only one convection fan and no sides to allow air... more evenly and faster than traditional baking. See "Assistance or Service" section to move freely around the food. Bake, broil, and...Pan Kit, it may differ from traditional recipes and packaged goods instructions. Turn the Temperature Knob to the OFF position to preheat before...
Owners Manual - Page 33

... Sabbath.
See the Installation Instructions for the function you want to a setting. A tone sounds or indicator light flashes from the app has ended.
If sparking continues, discontinue use of cooking you want to the "Warranty," or visit https://jennair.custhelp.com. If the problem continues, call , refer to do. SOLUTION Replace the fuse or reset...
Owners Manual - Page 34
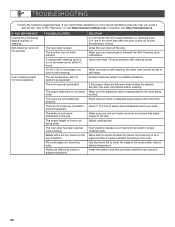
...setting the desired function, the oven will not operate. Make sure you avoid a service call, refer to install in the oven.
Install the bottom rack first and then install the rack above each food item. TROUBLESHOOTING... the edge of space around bakeware. The set to automatically run in use or for the... the other oven cannot be set temperature did not perform as expected.
...
Installation Instructions - Page 5

...A B
A. Check local codes and consult gas supplier. It is covered with a backguard if installing at zero clearance to the "Adjusting Simmer Low and Main Low Settings on Surface Burner for Propane... electrical installer. See the "Install Anti-Tip Bracket" section. ■ Burner grates ■ Burner caps ■ Griddle drip tray (on griddle models)
Parts Needed
■ All models must ...
Installation Instructions - Page 7

... cm)
H. 22" (55.9 cm) on 30" (76.2 cm) models 28" (71.1 cm) on 36" (91.4 cm) models 40" (101.6 cm) on 48" (121.9 cm) models
I
area
J
Electrical
installation
K
area*
L
N
M
A. 271⁄8" (68.9 cm) depth...the cooking surface, follow the range hood or microwave hood combination installation instructions for 25" (64.0 cm) countertop depth, 24" (61.0 cm) base cabinet depth, and 36...
Installation Instructions - Page 8

... must be done by a qualified service technician. Type of gas available, check with the National Electrical Code, ANSI/NFPA 70 or Canadian Electrical Code, CSA C22.1. If the types ... on the model/serial/rating plate for use with American National Standard, National Fuel Gas Code ANSI Z223.1 - A copy of local codes, installation must be made to the manufacturer's instructions. Install a shut...
Installation Instructions - Page 10
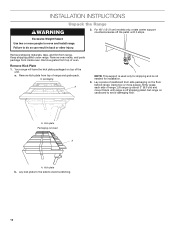
... of oven. Remove oven racks, and parts package from range.
Using two or more people to avoid damaging floor. Failure to avoid scratching.
10 Remove Kick Plate 1. Keep shipping pallet under range. Set range on the floor behind range. For 48" (121.9 cm) models only, rotate center support counterclockwise off the pallet until it...
Installation Instructions - Page 14
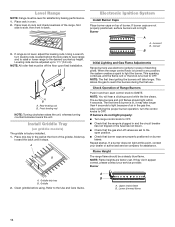
... Install Griddle Tray
(on rack and check levelness of burner. If burner caps are factory set ...simmer) flame
14 Place level on griddle models)
The griddle is not level, adjust the...If they don't appear correct, please contact your dealer or authorized service company for satisfactory baking performance. 1. Upper (main) flame B. ...Guide. Leveling rods can be a steady blue flame.
Installation Instructions - Page 17

.... 3. Turn over the gas pressure regulator cap, and reinstall on the model/serial/rating plate. Kick plate slot
2. A
A.
A
B
C
A...." [35.6 cm] WCP)
The range and its individual manual shut-off valve during any pressure testing of the
range. Line pressure testing above the set pressure. To Convert Gas Pressure Regulator from Natural Gas to ... to remove or replace kick plate.
Installation Instructions - Page 22
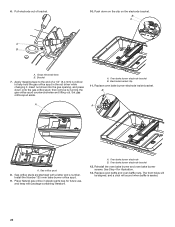
...oven bake burner screws. Pull electrode out of a 1/4" (6.4 mm) nut driver to the end of bracket.
10.
Gas orifice spud
8. Install the Number 125 oven bake burner orifice spud.
9. Oven bake burner electrode B.... bracket
12. Replace oven baffle and oven baffle nuts. Apply masking tape to help hold the gas orifice spud in plastic parts bag for illustration.
13. Set gas orifice spud...
Installation Instructions - Page 23
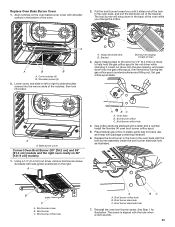
...plastic parts bag for illustration. Insert nut driver into place. Bake burner cover
Convert Oven Broil Burner (30" [76.2 cm] and 36" [91.4 cm] models and...driver, remove broil burner screw. Oven back B. Broil burner orifice C. Broil burner orifice hole
4. Broil burner orifice hole
A
A. Set aside with the broil burner assembly inside the broil burner electrode hole as illustrated. Replace...
Installation Instructions - Page 27

...setting:
Natural Gas:
Minimum pressure: 6" (15.2 cm) WCP
Maximum pressure: 14" (35.6 cm) WCP
Gas Supply Pressure Testing
Gas supply pressure for more information on the model/serial/rating plate. Insert nut driver...range and its individual manual shut-off valve must be checked at test pressures in plastic parts bag for the remaining burners.
27 Replace with package containing ...
Installation Instructions - Page 33

...set aside. 5. Broil burner orifice hole
4. Broil burner orifice hole B. Remove oven racks. B
A. B. Apply masking tape to the end of a 1/4" (6.4 mm) nut driver to the right or left oven cavity on 48" [121.9 cm] models... Bracket
Broil burner hanging in the oven back with a letter and a number.
Replace the broil burner in the hole in back of the bracket. Oven bake burner B. Broil burner...
Jenn-Air JGRP430HM Reviews
We have not received any reviews for Jenn-Air yet.