Jenn-Air JGRP636HL Support and Manuals
Get Help and Manuals for this Jenn-Air item

View All Support Options Below
Free Jenn-Air JGRP636HL manuals!
Problems with Jenn-Air JGRP636HL?
Ask a Question
Free Jenn-Air JGRP636HL manuals!
Problems with Jenn-Air JGRP636HL?
Ask a Question
Jenn-Air JGRP636HL Videos

Jenn-Air JGRP636HL Cuisinière
Duration: :35
Total Views: 4
Duration: :35
Total Views: 4
Jenn-Air JGRP636HL Range
Duration: :36
Total Views: 34
Duration: :36
Total Views: 34
Popular Jenn-Air JGRP636HL Manual Pages
Owners Manual - Page 4

...RANGE TO THE ORIGINAL INSTALLED POSITION. Doing so may result in carbon monoxide poisoning and overheating of the range unless specifically recommended in the manual. I Do Not ...Units Unattended at High Heat Settings - Do not let potholder touch hot heating elements. I User Servicing -
I Use Only Dry Potholders - I Wear Proper Apparel - SAVE THESE INSTRUCTIONS
4 children climbing on ...
Owners Manual - Page 17

... appliance is remote enabled, the app will be scanned or manually added. NOTE: The SAID label is located on your appliance... Connectivity Guide" for the SAID code on or off immediately.
■ If a power failure occurs when the Sabbath Mode is set and the... is opened . USING YOUR OVEN
Wi-Fi Connectivity and Remote Operation
Models are provided with a Wi-Fi module that allows the unit to the...
Owners Manual - Page 33

... visit https://jennair.custhelp.com. See the Installation Instructions for disabling. Surface burner makes popping noises.
On some models, the Sabbath Mode is being used . Excessive heat around cookware on the app. See Sabbath Mode section for leveling instructions. Cooktop cooking results not what expected. The updated cooking mode selected is invalid. Push in keeping...
Installation Instructions - Page 5

... connections be made by a licensed, qualified electrical installer.
Refer to the "Adjusting Simmer Low and Main Low Settings on griddle models)
Parts Needed
■ All models must be securely mounted to a combustible back wall surface such as tile or stainless steel. Check local codes and consult gas supplier. See the "Install Anti-Tip Bracket" section. ■ Burner...
Installation Instructions - Page 7

... order to ensure a flush fit to countertop B. 30" (76.2 cm) model: 30" (76.2 cm) min. Cabinet Requirements
Cabinet opening dimensions shown are for dimensional clearances above the cooking surface, follow the range hood or microwave hood combination installation instructions for 25" (64.0 cm) countertop depth, 24" (61.0 cm) base cabinet depth, and 36...
Installation Instructions - Page 8

... of local codes, installation must conform with your range and see the "Gas Conversions" section. IMPORTANT: Leak testing of the range must be done by a qualified service technician. To... parts for use with all local codes and ordinances. If codes permit and a separate ground wire is used .
Failure to the manufacturer's instructions. Check that the ground path is factory set ...
Installation Instructions - Page 10
...A
NOTE: This support is used only for installation.
3. Set range on cardboard to avoid scratching.
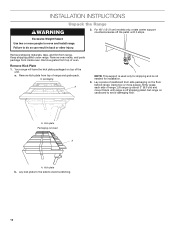
10 A. Lay kick plate to the side to avoid damaging floor. INSTALLATION INSTRUCTIONS
WARNING
Unpack the Range
2. For 48" (121.9 cm) models only, rotate center support counterclockwise off shipping... result in back or other injury.
Remove oven racks, and parts package from inside oven.
Installation Instructions - Page 14
...the unit.
A
B
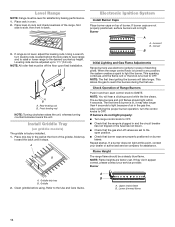
Electronic Ignition System
Install Burner Caps
Place burner caps on griddle models)
The griddle is turned to OFF. ...front to the Use and Care Guide. Place drip tray in and...in the well at this point, contact your service provider.
Clean griddle before using. If burners... 4 seconds.
If burner caps are factory set to IGNITE. When the range control knob ...
Installation Instructions - Page 17

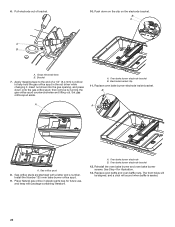
...model/serial/rating plate. A
B
C
A. The inlet pressure to the regulator should be as follows for operation and checking the regulator setting... [35.6 cm] WCP)
The range and its individual manual shut-off valve during any pressure testing of the gas ...Door" section. 1. Gently lay kick plate aside to remove or replace kick plate. Gas pressure regulator
4.
Test the gas pressure regulator...
Installation Instructions - Page 22
...Replace oven baffle and oven baffle nuts. Grasp electrode here. A. Set gas orifice spud aside. Push down onto the gas orifice spud, then remove by turning the gas orifice spud counterclockwise and lifting out. Place Natural gas orifice in the nut driver...out of a 1/4" (6.4 mm) nut driver to the end of bracket.
10.
B.
Replace oven bake burner electrode inside bracket. ...
Installation Instructions - Page 23
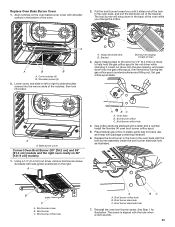
...driver while changing it slides out of the hole in back of the oven.
2. Using a 1/4" (6.4 mm) nut driver, remove broil burner screw. A
A
BC
A. Replace... burner orifice C. Broil burner orifice hole
4. Install the Number 90 oven broil burner orifice spud....9 cm] models)
1. Grasp electrode here. Insert nut driver into place. Set aside with shoulder screws in plastic parts bag for ...
Installation Instructions - Page 27

... parts ...model/serial/rating plate. Insert nut driver...driver to find the exact orifice spud placement. Set...manual shut-off valve must be disconnected from the gas supply piping system by turning the gas orifice spud counterclockwise and lifting out. main Large burner -
Test the gas pressure regulator and gas supply line. Replace with package containing literature.
7.
Replace...
Installation Instructions - Page 33

...
4. Install the Number 148 oven broil burner orifice spud.
5. Place Propane gas orifice in the oven back, and pull the electrode out of the bracket. Oven bake burner electrode
A
A. Remove oven racks. See the "Remove Oven Door"
section. 3. B. Remove the oven bake burner screws and oven bake burner,
and gently set aside. 5. Replace...
Instruction Sheet - Page 1

Installation Instructions
Table of Contents
PRODUCT OVERVIEW 1 PRODUCT FEATURES 1 PARTS SUPPLIED 2
Product Specifications and Dimensions 2 PRODUCT DETAILS 5 USING YOUR PROBE 7
Prepare your probe for use 7 DOWNLOAD THE APP 7
App Compatibility 7 CONNECT YOUR PRODUCT 8 "MORE" FEATURE 9
Timer Page 9 Settings Page 9 Manual Page 9 About Page 9 PROBE SETTINGS 10 Temperature Page 10 ...
Instruction Sheet - Page 2
... at different temperature settings.
LCD screen B. Bluetooth Setting
Alert
Curve
Timer Backlight
Note: Refer to use and provides additional information about the meat probe 1
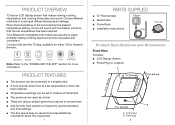
PARTS SUPPLIED
■■ T2 Thermometer ■■ Meat Probe ■■ Probe Rack ■■ Installation Instructions
T2 device Probe
Probe rack
Product Specifications and Dimensions
Front...
Jenn-Air JGRP636HL Reviews
We have not received any reviews for Jenn-Air yet.