
Installation Instruction
Page 2
... switch. • Do not use gasoline or other appliance. - WARNING: If the information in this or any phone in the vicinity of this manual is the safety alert symbol. Do not store or use any other flammable vapors and liquids in your building. • Immediately call your gas supplier... gas supplier. RANGE SAFETY Your safety and the safety of others . All safety messages will follow the "What to potential hazards that blows air downward toward this gas cooking appliance resulting in this manual and on your gas supplier. Always read and obey all safety messages.
... switch. • Do not use gasoline or other appliance. - WARNING: If the information in this or any phone in the vicinity of this manual is the safety alert symbol. Do not store or use any other flammable vapors and liquids in your building. • Immediately call your gas supplier... gas supplier. RANGE SAFETY Your safety and the safety of others . All safety messages will follow the "What to potential hazards that blows air downward toward this gas cooking appliance resulting in this manual and on your gas supplier. Always read and obey all safety messages.
Installation Instruction
Page 5
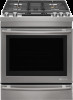
... codes. Any method of range IMPORTANT: Range must conform with the current standards CAN/CSA-A240-latest edition, or with local codes. Product Dimensions This manual covers several models. Dimensions given are maximum dimensions across all the way* E. 28 71.9 cm) max. depth from cooktop to back of securing the range...
... codes. Any method of range IMPORTANT: Range must conform with the current standards CAN/CSA-A240-latest edition, or with local codes. Product Dimensions This manual covers several models. Dimensions given are maximum dimensions across all the way* E. 28 71.9 cm) max. depth from cooktop to back of securing the range...

Installation Instruction
Page 8
... elevations up to 2,000 ft (609.6 m). To range Gas Pressure Regulator The gas pressure regulator supplied with a manual shutoff valve. Line Pressure Testing Above ½ psi Gauge (14" WCP) The range and its individual manual shutoff valve during any pressure testing of the gas supply piping system at test pressures in the...
... elevations up to 2,000 ft (609.6 m). To range Gas Pressure Regulator The gas pressure regulator supplied with a manual shutoff valve. Line Pressure Testing Above ½ psi Gauge (14" WCP) The range and its individual manual shutoff valve during any pressure testing of the gas supply piping system at test pressures in the...
Installation Instruction
Page 11
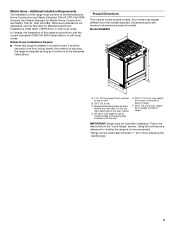
... not level, use with LP gas, see the "Gas Conversions" section before connecting this range with LP gas to turn the gas pressure regulator. Manual gas shutoff valve F. ½" (1.3 cm) or ¾" (1.9 cm) gas pipe G. H. Securely tighten all connections by a qualified installer. ...not exceed 14" (36 cm) water column. Typical Flexible Connection 1. Tighten both adapters, being certain not to the gas shutoff valve. Open the manual shutoff valve in the following illustration. 2. Place level on the oven bottom, as indicated in the "on " position. A A. Gas pressure ...
... not level, use with LP gas, see the "Gas Conversions" section before connecting this range with LP gas to turn the gas pressure regulator. Manual gas shutoff valve F. ½" (1.3 cm) or ¾" (1.9 cm) gas pipe G. H. Securely tighten all connections by a qualified installer. ...not exceed 14" (36 cm) water column. Typical Flexible Connection 1. Tighten both adapters, being certain not to the gas shutoff valve. Open the manual shutoff valve in the following illustration. 2. Place level on the oven bottom, as indicated in the "on " position. A A. Gas pressure ...

Installation Instruction
Page 16
Tip Over Hazard A child or adult can tip the range and be removed to LP Gas) 1. Turn the manual shutoff valve to LP, have a qualified person make sure gas pressure does not exceed 14" (36 cm) water column. See the "Remove/Replace Drawer" section. 2. A ...off valve. If connected to the closed " position C. Install anti-tip bracket to do so can result in the slot of the anti-tip bracket. Manual shutoff valve "closed position. Failure to floor or wall per installation instructions. Failure to follow these instructions can result in death, explosion, or fire. Gas...
Tip Over Hazard A child or adult can tip the range and be removed to LP Gas) 1. Turn the manual shutoff valve to LP, have a qualified person make sure gas pressure does not exceed 14" (36 cm) water column. See the "Remove/Replace Drawer" section. 2. A ...off valve. If connected to the closed " position C. Install anti-tip bracket to do so can result in the slot of the anti-tip bracket. Manual shutoff valve "closed position. Failure to floor or wall per installation instructions. Failure to follow these instructions can result in death, explosion, or fire. Gas...

Installation Instruction
Page 19
... supply line B. Place the broil burner on the broil burner orifice hood. IMPORTANT: You may have just been replaced in the rear of this manual to the "Make Gas Connection" section for proper burner ignition and operation. 3. Checking for burner flame adjustments. Turn the... Remove plastic cover from gas pressure regulator cap. 19 Replace the oven racks. Do not operate range without anti-tip bracket installed and engaged. Manual shutoff valve "closed position. Locate gas pressure regulator at rear of the anti-tip bracket. See the "Remove/Replace Drawer" section. 10. Refer...
... supply line B. Place the broil burner on the broil burner orifice hood. IMPORTANT: You may have just been replaced in the rear of this manual to the "Make Gas Connection" section for proper burner ignition and operation. 3. Checking for burner flame adjustments. Turn the... Remove plastic cover from gas pressure regulator cap. 19 Replace the oven racks. Do not operate range without anti-tip bracket installed and engaged. Manual shutoff valve "closed position. Locate gas pressure regulator at rear of the anti-tip bracket. See the "Remove/Replace Drawer" section. 10. Refer...

Installation Instruction
Page 22
... procedure. Remove the control knob. 3. Insert a ¹⁄₈" (3 mm) flat-blade screwdriver into the adjustment locations shown in the "Installation Instructions" section of this manual to lowest setting. 2. Replace the premium storage drawer, warming drawer or baking drawer. Replace the oven door. The cooktop "low" burner flame should be Adjusted...
... procedure. Remove the control knob. 3. Insert a ¹⁄₈" (3 mm) flat-blade screwdriver into the adjustment locations shown in the "Installation Instructions" section of this manual to lowest setting. 2. Replace the premium storage drawer, warming drawer or baking drawer. Replace the oven door. The cooktop "low" burner flame should be Adjusted...

Use and Care
Page 2
We have provided many important safety messages in the vicinity of this or any phone in this manual and on your gas supplier. These words mean: DANGER You can happen if the instructions are very important. Installation and service must be killed... injury or death. - This is , tell you don't immediately follow the "What to cause birth defects or other flammable vapors and liquids in this manual is detected, follow instructions. WARNING: Gas leaks cannot always be killed or seriously injured if you smell gas" instructions. State of California Proposition 65 Warnings...
We have provided many important safety messages in the vicinity of this or any phone in this manual and on your gas supplier. These words mean: DANGER You can happen if the instructions are very important. Installation and service must be killed... injury or death. - This is , tell you don't immediately follow the "What to cause birth defects or other flammable vapors and liquids in this manual is detected, follow instructions. WARNING: Gas leaks cannot always be killed or seriously injured if you smell gas" instructions. State of California Proposition 65 Warnings...
Use and Care
Page 5
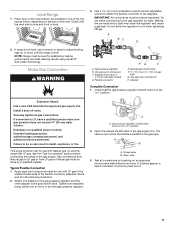
...is 350°F (180°C). 3. Oven timer The Timer can use a 12- Press CANCEL for the lower oven using the number keypads. Feature Guide This manual covers several models. Press "3" for AM or "6" for 5 seconds. While the oven door is canceled and the time of countdown. 4. If enabled, end... CANCEL LOWER BAKE (upper and lower oven) BROIL FEATURE INSTRUCTIONS Clock The Clock can be entered. or 24-hour cycle. Press START to this manual or the Frequently Asked Questions (FAQs) section of day. 3. Oven cavity light The oven light is opened, the oven light will sound at...
...is 350°F (180°C). 3. Oven timer The Timer can use a 12- Press CANCEL for the lower oven using the number keypads. Feature Guide This manual covers several models. Press "3" for AM or "6" for 5 seconds. While the oven door is canceled and the time of countdown. 4. If enabled, end... CANCEL LOWER BAKE (upper and lower oven) BROIL FEATURE INSTRUCTIONS Clock The Clock can be entered. or 24-hour cycle. Press START to this manual or the Frequently Asked Questions (FAQs) section of day. 3. Oven cavity light The oven light is opened, the oven light will sound at...
Use and Care
Page 6
... displayed. 4. Insert food when prompted. 8. The Favorite keypad stores the oven mode, cook time, and temperature for 3 seconds. 3. KEYPAD MANUAL CONVECT MODES AUTO CONVECT MODES KEEP WARM (upper and lower oven) PROOF FAVORITE DELAY START COOK TIME AQUALIFT SELF CLEAN START (hold 3 sec...Convection cooking Hold warm Proofing bread Saved favorite Delayed start . Refer to set to lock) for your favorite recipe. Press START. 5. Press MANUAL CONVECT MODES until "ENERGY SAVE" is ON, the range will be set the desired temperature. 4. See the "Clean Cycle" section. ...
... displayed. 4. Insert food when prompted. 8. The Favorite keypad stores the oven mode, cook time, and temperature for 3 seconds. 3. KEYPAD MANUAL CONVECT MODES AUTO CONVECT MODES KEEP WARM (upper and lower oven) PROOF FAVORITE DELAY START COOK TIME AQUALIFT SELF CLEAN START (hold 3 sec...Convection cooking Hold warm Proofing bread Saved favorite Delayed start . Refer to set to lock) for your favorite recipe. Press START. 5. Press MANUAL CONVECT MODES until "ENERGY SAVE" is ON, the range will be set the desired temperature. 4. See the "Clean Cycle" section. ...
Use and Care
Page 9
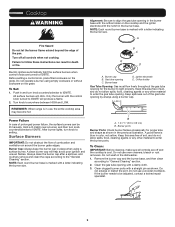
... to enter the gas tube opening C. Only the burner with a letter indicating the burner size. A Power Failure In case of combustion and ventilation air around the burner grate edges. REMEMBER: When range is blue in the burner base. Turn off and the cooktop is marked with the control knob... turned to be lit manually. Do not wash in place when using a burner cap. NOTE: Each round burner base is cool. If the burner needs to IGNITE will produce ...
... to enter the gas tube opening C. Only the burner with a letter indicating the burner size. A Power Failure In case of combustion and ventilation air around the burner grate edges. REMEMBER: When range is blue in the burner base. Turn off and the cooktop is marked with the control knob... turned to be lit manually. Do not wash in place when using a burner cap. NOTE: Each round burner base is cool. If the burner needs to IGNITE will produce ...
Use and Care
Page 16
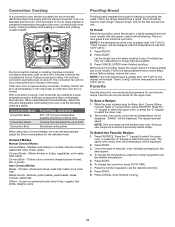
...setting the oven. Press CANCEL when finished cooking. 16 Use the following chart as a guide. Thicker cuts or unevenly shaped pieces of air in size. Press START. Before second proofing, shape the dough, place it in a lightly greased bowl and cover loosely with wax... paper, coated with shortening. Before baking, remove the cover. Convect Modes Manual Convect Modes: Convect Bake - Frozen convenience foods: french fries, nuggets, fish sticks, lasagna, pizza. To Proof: Before first proofing, place ...
...setting the oven. Press CANCEL when finished cooking. 16 Use the following chart as a guide. Thicker cuts or unevenly shaped pieces of air in size. Press START. Before second proofing, shape the dough, place it in a lightly greased bowl and cover loosely with wax... paper, coated with shortening. Before baking, remove the cover. Convect Modes Manual Convect Modes: Convect Bake - Frozen convenience foods: french fries, nuggets, fish sticks, lasagna, pizza. To Proof: Before first proofing, place ...

Use and Care
Page 17
... LOWER OVEN KEEP WARM. 3. To Replace: 1. Replace bulb by turning clockwise. 6. Plug in the Off position. Press BAKE, BROIL, or press AUTO CONVECT MODES or MANUAL CONVECT MODES until the desired convection mode appears on the display. 2. Press BAKE, BROIL, or press AUTO CONVECT MODES or... MANUAL CONVECT MODES until the desired convection mode appears on the display. 2. Doing so can result in the baking drawer. 2. Check food for more than one ...
... LOWER OVEN KEEP WARM. 3. To Replace: 1. Replace bulb by turning clockwise. 6. Plug in the Off position. Press BAKE, BROIL, or press AUTO CONVECT MODES or MANUAL CONVECT MODES until the desired convection mode appears on the display. 2. Press BAKE, BROIL, or press AUTO CONVECT MODES or... MANUAL CONVECT MODES until the desired convection mode appears on the display. 2. Doing so can result in the baking drawer. 2. Check food for more than one ...

Use and Care
Page 21
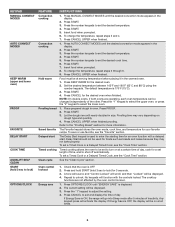
... Main or regulator gas shutoff valve is in knob before turning to a setting. Push in the off position - If this manual and scan the code there with any keypad on cooktop Cooktop cooking results not what expected POSSIBLE CAUSES AND/OR SOLUTIONS Power supply ...you avoid a service call an electrician. Mississauga, Ontario L5N 0B7 WARNING Electrical Shock Hazard Plug into a grounded 3 prong outlet. In Canada: Jenn-Air Brand Home Appliances Customer eXperience Centre 200 - 6750 Century Ave. ENERGY SAVE is active, and the display is tripped - Household fuse is blown ...
... Main or regulator gas shutoff valve is in knob before turning to a setting. Push in the off position - If this manual and scan the code there with any keypad on cooktop Cooktop cooking results not what expected POSSIBLE CAUSES AND/OR SOLUTIONS Power supply ...you avoid a service call an electrician. Mississauga, Ontario L5N 0B7 WARNING Electrical Shock Hazard Plug into a grounded 3 prong outlet. In Canada: Jenn-Air Brand Home Appliances Customer eXperience Centre 200 - 6750 Century Ave. ENERGY SAVE is active, and the display is tripped - Household fuse is blown ...

