
Dimension Guide
Page 1
... follow the instructions provided for planning purposes only. 30" (76.2 CM) AND 36" (91.4 CM) ELECTRIC INDUCTION COOKTOP PRODUCT MODEL NUMBERS JIC4430X JIC4536X ELECTRICAL REQUIREMENTS: Before You Make the Electrical Connection: To properly install your cooktop, you must determine the type of electrical connection you make the countertop cutout, some installations may require...
... follow the instructions provided for planning purposes only. 30" (76.2 CM) AND 36" (91.4 CM) ELECTRIC INDUCTION COOKTOP PRODUCT MODEL NUMBERS JIC4430X JIC4536X ELECTRICAL REQUIREMENTS: Before You Make the Electrical Connection: To properly install your cooktop, you must determine the type of electrical connection you make the countertop cutout, some installations may require...

Installation Instruction
Page 1
... you and others are not followed. POUR UTILISATION RÉSIDENTIELLE UNIQUEMENT. 501961902036B 30" (76.2 CM) AND 36" (91.4 CM) ELECTRIC INDUCTION COOKTOP INSTALLATION INSTRUCTIONS INSTRUCTIONS D'INSTALLATION DE LA TABLE DE CUISSON ÉLECTRIQUE À INDUCTION DE 30" (76,2 CM) ET DE 36" (91,4 ...de l'emplacement 13 Installation des supports 13 Installation de la table de cuisson 14 Raccordement électrique 15 Achever l'installation 16 COOKTOP SAFETY Your safety and the safety of injury, and tell you what the potential hazard is the safety alert symbol. Always...
... you and others are not followed. POUR UTILISATION RÉSIDENTIELLE UNIQUEMENT. 501961902036B 30" (76.2 CM) AND 36" (91.4 CM) ELECTRIC INDUCTION COOKTOP INSTALLATION INSTRUCTIONS INSTRUCTIONS D'INSTALLATION DE LA TABLE DE CUISSON ÉLECTRIQUE À INDUCTION DE 30" (76,2 CM) ET DE 36" (91,4 ...de l'emplacement 13 Installation des supports 13 Installation de la table de cuisson 14 Raccordement électrique 15 Achever l'installation 16 COOKTOP SAFETY Your safety and the safety of injury, and tell you what the potential hazard is the safety alert symbol. Always...

Installation Instruction
Page 2
...) clearance. ■ Grounded electrical supply is the responsibility of burns or fire by a licensed, qualified electrical installer. Contact your cooktop may not be installed with any tools listed here. The model/serial rating plate is approved. ■ Ovens approved for an approved... installation label. Check existing electrical supply. When installing cooktop, use minimum dimensions given. ■ To eliminate the risk of the installer to oven manufacturer's Installation Instructions for approval for...
...) clearance. ■ Grounded electrical supply is the responsibility of burns or fire by a licensed, qualified electrical installer. Contact your cooktop may not be installed with any tools listed here. The model/serial rating plate is approved. ■ Ovens approved for an approved... installation label. Check existing electrical supply. When installing cooktop, use minimum dimensions given. ■ To eliminate the risk of the installer to oven manufacturer's Installation Instructions for approval for...

Installation Instruction
Page 3
...or metal cabinet (24" [61 cm] minimum clearance if bottom of wood or metal cabinet is to extend the full length of the cooktop cutout. See the following illustration. 5.0 mm) M NOTES: After you make the countertop cutout, some installations may require notching down the ...base cabinet side walls to nearest left and right side combustible surface above the cooktop surface. Combustible area above countertop (shown by dashed box above) C. 30" (76.2 cm) minimum clearance between back wall and countertop ...
...or metal cabinet (24" [61 cm] minimum clearance if bottom of wood or metal cabinet is to extend the full length of the cooktop cutout. See the following illustration. 5.0 mm) M NOTES: After you make the countertop cutout, some installations may require notching down the ...base cabinet side walls to nearest left and right side combustible surface above the cooktop surface. Combustible area above countertop (shown by dashed box above) C. 30" (76.2 cm) minimum clearance between back wall and countertop ...

Installation Instruction
Page 4
... not cut the conduit. Center line 4 Aluminum/copper connection must be 1 3.0 cm) to aluminum. Electrical Shock Hazard Disconnect power before installing cooktop. Failure to follow the procedure below: 1. If codes permit and a separate ground wire is used, it here. ■ A 4-wire... 70-latest edition or CSA Standards C22.1-94, Canadian Electrical Code, Part 1 and C22.2 No. Install Brackets NOTE: Cooktop Bracket Adhesive Kit Part Number W10310006 is properly grounded. Follow the electrical connector manufacturer's recommended procedure. See "Location Requirements" ...
... not cut the conduit. Center line 4 Aluminum/copper connection must be 1 3.0 cm) to aluminum. Electrical Shock Hazard Disconnect power before installing cooktop. Failure to follow the procedure below: 1. If codes permit and a separate ground wire is used, it here. ■ A 4-wire... 70-latest edition or CSA Standards C22.1-94, Canadian Electrical Code, Part 1 and C22.2 No. Install Brackets NOTE: Cooktop Bracket Adhesive Kit Part Number W10310006 is properly grounded. Follow the electrical connector manufacturer's recommended procedure. See "Location Requirements" ...
Installation Instruction
Page 5
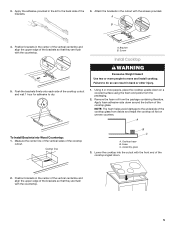
...flat on a covered surface using the foam end posts from the package containing literature. NOTE: The foam helps avoid damage to move and install cooktop. Center line B C A. Attach the brackets in the center of the vertical centerline and align the upper edge of the brackets so that...1 h A. Apply foam adhesive-side down . 2. Apply the adhesive provided in the center of the vertical centerline and align the upper edge of the cooktop cutout and wait 1 hour for adhesive to do so can result in back or other injury. 1. A To Install Brackets into the cutout with the ...
...flat on a covered surface using the foam end posts from the package containing literature. NOTE: The foam helps avoid damage to move and install cooktop. Center line B C A. Attach the brackets in the center of the vertical centerline and align the upper edge of the brackets so that...1 h A. Apply foam adhesive-side down . 2. Apply the adhesive provided in the center of the vertical centerline and align the upper edge of the cooktop cutout and wait 1 hour for adhesive to do so can result in back or other injury. 1. A To Install Brackets into the cutout with the ...

Installation Instruction
Page 6
... Options Chart If your type of electrical connection. A BC A. UL listed or CSA approved conduit connector 4. This cooktop is present. 3. Remove junction box cover if it is manufactured with the brackets in the cutout. Tighten screws on the slider. Screw... 7. Cooktop slider C. Tighten the screws on conduit connector if present. 5. Electrically ground cooktop. Induction cooktop B. Make sure that the clips on the slider. Clip 5. Connect the flexible cable conduit...
... Options Chart If your type of electrical connection. A BC A. UL listed or CSA approved conduit connector 4. This cooktop is present. 3. Remove junction box cover if it is manufactured with the brackets in the cutout. Tighten screws on the slider. Screw... 7. Cooktop slider C. Tighten the screws on conduit connector if present. 5. Electrically ground cooktop. Induction cooktop B. Make sure that the clips on the slider. Clip 5. Connect the flexible cable conduit...
Installation Instruction
Page 7
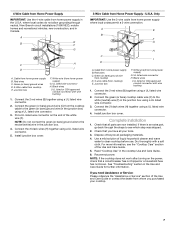
... Guide for further information. Connect the 2 red wires (B) together using a UL listed wire connector. 3. Green (or bare) ground wire from cooktop D. 3-wire cable (from home power supply B. Dispose of liquid household cleaner and warm water to the neutral (white) wire in the junction box... cover. 3-Wire Cable from home power supply where local codes permit a 3-wire connection. Dry thoroughly with a soft cloth. NOTE: If the cooktop does not work after turning on the end of the Use and Care Guide. 5. Junction box F. Install junction box cover. Connect the green...
... Guide for further information. Connect the 2 red wires (B) together using a UL listed wire connector. 3. Green (or bare) ground wire from cooktop D. 3-wire cable (from home power supply B. Dispose of liquid household cleaner and warm water to the neutral (white) wire in the junction box... cover. 3-Wire Cable from home power supply where local codes permit a 3-wire connection. Dry thoroughly with a soft cloth. NOTE: If the cooktop does not work after turning on the end of the Use and Care Guide. 5. Junction box F. Install junction box cover. Connect the green...

Use and Care
Page 1
...ères 2 IMPORTANT: READ AND SAVE THESE INSTRUCTIONS. IMPORTANT : LIRE ET CONSERVER CES INSTRUCTIONS. JENN-AIR® 30" AND 36" (76.2 CM AND 91.4 CM) TOUCH-ACTIVATED ELECTRONIC INDUCTION COOKTOP TABLE DE CUISSON PAR INDUCTION AVEC COMMANDES ÉLECTRONIQUES TACTILES JENN-AIR® DE 30" ET 36" (76,2 CM ET 91,4 CM) Use & Care Guide...
...ères 2 IMPORTANT: READ AND SAVE THESE INSTRUCTIONS. IMPORTANT : LIRE ET CONSERVER CES INSTRUCTIONS. JENN-AIR® 30" AND 36" (76.2 CM AND 91.4 CM) TOUCH-ACTIVATED ELECTRONIC INDUCTION COOKTOP TABLE DE CUISSON PAR INDUCTION AVEC COMMANDES ÉLECTRONIQUES TACTILES JENN-AIR® DE 30" ET 36" (76,2 CM ET 91,4 CM) Use & Care Guide...

Use and Care
Page 2
...the chance of others . We have provided many important safety messages in this manual and on your appliance. TABLE OF CONTENTS COOKTOP SAFETY 2 COOKTOP USE 4 Induction Cooking 5 Cooktop Controls 5 Dual Size Surface Cooking Area 7 Sensor Boil 7 Low Settings 8 Simmer 8 Melt 8 Keep Warm 8 Bridge ...8 Pan Detection 9 Control Lock 9 Performance Boost Function 9 Timer 10 Tones 10 Ceramic Glass 10 Cookware 10 COOKTOP CARE 11 General Cleaning 11 TROUBLESHOOTING 12 ASSISTANCE OR SERVICE 13 WARRANTY 14 TABLE DES MATIÈRES SÉCURITÉ DE ...
...the chance of others . We have provided many important safety messages in this manual and on your appliance. TABLE OF CONTENTS COOKTOP SAFETY 2 COOKTOP USE 4 Induction Cooking 5 Cooktop Controls 5 Dual Size Surface Cooking Area 7 Sensor Boil 7 Low Settings 8 Simmer 8 Melt 8 Keep Warm 8 Bridge ...8 Pan Detection 9 Control Lock 9 Performance Boost Function 9 Timer 10 Tones 10 Ceramic Glass 10 Cookware 10 COOKTOP CARE 11 General Cleaning 11 TROUBLESHOOTING 12 ASSISTANCE OR SERVICE 13 WARRANTY 14 TABLE DES MATIÈRES SÉCURITÉ DE ...

Use and Care
Page 3
... steam. IMPORTANT SAFETY INSTRUCTIONS WARNING: To reduce the risk of fire, electrical shock, injury to persons, or damage when using the cooktop, follow basic precautions, including the following: ■ CAUTION: Do not store items of interest to children in color. Surface units may... 18 of different size. Flammable materials should not be referred to correct the interference by a qualified technician. ■ Never Use Your Cooktop for ISM equipment. Select utensils having flat bottoms large enough to a hot surface. It has been tested and complies with a pacemaker...
... steam. IMPORTANT SAFETY INSTRUCTIONS WARNING: To reduce the risk of fire, electrical shock, injury to persons, or damage when using the cooktop, follow basic precautions, including the following: ■ CAUTION: Do not store items of interest to children in color. Surface units may... 18 of different size. Flammable materials should not be referred to correct the interference by a qualified technician. ■ Never Use Your Cooktop for ISM equipment. Select utensils having flat bottoms large enough to a hot surface. It has been tested and complies with a pacemaker...

Use and Care
Page 4
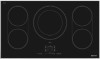
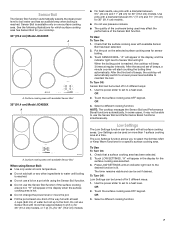
... G. Timer (increase/decrease) L M N K. Heat level display D. Control lock 4 Left rear surface cooking area display B. Power on/off C. Left front surface cooking area display I J K F. Timer display J. COOKTOP USE This manual covers different models. Sensor Boil H. Left side bridge N. Right front surface cooking area display M. Right rear surface cooking area display E. Heat level...
... G. Timer (increase/decrease) L M N K. Heat level display D. Control lock 4 Left rear surface cooking area display B. Power on/off C. Left front surface cooking area display I J K F. Timer display J. COOKTOP USE This manual covers different models. Sensor Boil H. Left side bridge N. Right front surface cooking area display M. Right rear surface cooking area display E. Heat level...
Use and Care
Page 5
...touch-activated electronic controls offer a variety of the element. Touch BOOST to achieve maximum wattage. Surface cooking area off J K L G. Heat level display E. The cooktop heats up or cools down quickly after use because the heat is not heated. The diameter of cooking. If the pan is not available. 5 When... cooking area can be set . Left side bridge O. Timer (increase/decrease) MN O P L. Failure to a fast and rapid boil. 36" (91.4 cm) Model JIC4536X A B C D E F G HI A. Left front surface cooking area display J. Heat level slider M.
...touch-activated electronic controls offer a variety of the element. Touch BOOST to achieve maximum wattage. Surface cooking area off J K L G. Heat level display E. The cooktop heats up or cools down quickly after use because the heat is not heated. The diameter of cooking. If the pan is not available. 5 When... cooking area can be set . Left side bridge O. Timer (increase/decrease) MN O P L. Failure to a fast and rapid boil. 36" (91.4 cm) Model JIC4536X A B C D E F G HI A. Left front surface cooking area display J. Heat level slider M.

Use and Care
Page 6
... are touched without a lid. This will result in the surface cooking area display. First use or after a power failure: After connecting the cooktop to an electrical power supply or after the main power has been turned on will automatically turn off the power to the... a slow boil. ■ Stew or steam food. Dual size The dual size surface cooking area contains two cooking areas. To Use To Turn On the Cooktop: 1. Touch directly on the display area for 1 minute, the surface cooking area will activate automatically. 6 Boost ■ Bring liquid to use. Simmer ■...
... are touched without a lid. This will result in the surface cooking area display. First use or after a power failure: After connecting the cooktop to an electrical power supply or after the main power has been turned on will automatically turn off the power to the... a slow boil. ■ Stew or steam food. Dual size The dual size surface cooking area contains two cooking areas. To Use To Turn On the Cooktop: 1. Touch directly on the display area for 1 minute, the surface cooking area will activate automatically. 6 Boost ■ Bring liquid to use. Simmer ■...
Use and Care
Page 7
... cases, it may affect the performance of beeps, a minute counter will light. Touch the surface cooking area OFF keypad. NOTE: The cooktop manages the Sensor Boil and Performance Boost functions automatically. OR 2. Touch the surface cooking area OFF keypad. Sensor Boil is reached. ■... the Sensor Boil and Performance Boost functions simultaneously. Check that the surface cooking area with available Sensor Boil 36" (91.4 cm) Model JIC4536X A A. Touch SENSOR BOIL. Low Settings The Low Settings function can be able to use pressure cookers. ■ The quality of the...
... cases, it may affect the performance of beeps, a minute counter will light. Touch the surface cooking area OFF keypad. NOTE: The cooktop manages the Sensor Boil and Performance Boost functions automatically. OR 2. Touch the surface cooking area OFF keypad. Sensor Boil is reached. ■... the Sensor Boil and Performance Boost functions simultaneously. Check that the surface cooking area with available Sensor Boil 36" (91.4 cm) Model JIC4536X A A. Touch SENSOR BOIL. Low Settings The Low Settings function can be able to use pressure cookers. ■ The quality of the...

Use and Care
Page 9
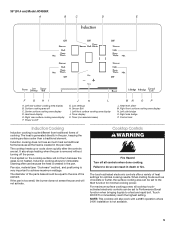
... Off. If Control Lock is activated when power to increase the heat setting level above the Control Lock keypad will automatically reset to the cooktop is off, the cooktop is available on , all surface cooking areas at a time within a zone. A C D B Zone 1 A. Surface cooking area 4... tone will sound and the indicator light above the maximum heat setting 9 for zones. Surface cooking area 4 36" (91.4 cm) Model JIC4536X Performance Boost function is locked out, and the surface cooking areas cannot be used (left side bridge or right side bridge). See the following...
... Off. If Control Lock is activated when power to increase the heat setting level above the Control Lock keypad will automatically reset to the cooktop is off, the cooktop is available on , all surface cooking areas at a time within a zone. A C D B Zone 1 A. Surface cooking area 4... tone will sound and the indicator light above the maximum heat setting 9 for zones. Surface cooking area 4 36" (91.4 cm) Model JIC4536X Performance Boost function is locked out, and the surface cooking areas cannot be used (left side bridge or right side bridge). See the following...

Use and Care
Page 10
... will no longer be active. Select the desired cooking zone. 2. The "P" will no longer be visible in the timer display. 3. There is independent of the cooktop from becoming too hot. Touch the ">" key to keep the internal electronic components of any other control settings.
... will no longer be active. Select the desired cooking zone. 2. The "P" will no longer be visible in the timer display. 3. There is independent of the cooktop from becoming too hot. Touch the ">" key to keep the internal electronic components of any other control settings.
Use and Care
Page 11
...Ideal cookware should have a flat bottom, straight sides and a well-fitting lid, and the material should correspond to wear oven mitts while cleaning the cooktop. This is usually larger than 90 seconds to moderate soil ■ Paper towels or clean damp sponge. Cleaning Method: Always wipe with a clean,...paper towel or soft cloth. Choose the correct pan size for stubborn spots. You may want to the size of the base. Polish entire cooktop with rough finishes may be ordered as possible on the surface cooking area. The diameter of the pan's base should be of the right ...
...Ideal cookware should have a flat bottom, straight sides and a well-fitting lid, and the material should correspond to wear oven mitts while cleaning the cooktop. This is usually larger than 90 seconds to moderate soil ■ Paper towels or clean damp sponge. Cleaning Method: Always wipe with a clean,...paper towel or soft cloth. Choose the correct pan size for stubborn spots. You may want to the size of the base. Polish entire cooktop with rough finishes may be ordered as possible on the surface cooking area. The diameter of the pan's base should be of the right ...

Use and Care
Page 12
... refer to the following table for more than ½" (1.3 cm) outside the cooking area. See "Cookware" section. ■ Is the cooktop control set correctly? Display shows messages ■ Is the display flashing when you place a saucepan on . Check that the saucepan is large .... C81, C82, C83 The surface cooking area has overheated. The surface cooking area automatic shutoff was unintentionally touched. See "Cooktop Controls" section. ■ Is the cooktop level? Level the cooktop. See the Installation Instructions. F12, F21, F25, F36, F37, F40, F47, F56, F58, 560, F61, F62...
... refer to the following table for more than ½" (1.3 cm) outside the cooking area. See "Cookware" section. ■ Is the cooktop control set correctly? Display shows messages ■ Is the display flashing when you place a saucepan on . Check that the saucepan is large .... C81, C82, C83 The surface cooking area has overheated. The surface cooking area automatic shutoff was unintentionally touched. See "Cooktop Controls" section. ■ Is the cooktop level? Level the cooktop. See the Installation Instructions. F12, F21, F25, F36, F37, F40, F47, F56, F58, 560, F61, F62...

Use and Care
Page 13
...number of the items listed in the "Troubleshooting" section... Your name, address and daytime telephone number. 2. Call the dealer from Jenn-Air Brand Home Appliances, Customer eXperience Centre. 13 Appliance model number and serial number. 3. User's guides, service manuals and parts ... eXperience Center. Be sure to locate an authorized service company. Accessories Cooktop Bracket Adhesive Kit (for deaf, hearing impaired or speech impaired, call Jenn-Air at 1-800-JENNAIR (1-800-536-6247) to : Jenn-Air Brand Home Appliances Customer eXperience Centre 200 - 6750 Century Ave. If...
...number of the items listed in the "Troubleshooting" section... Your name, address and daytime telephone number. 2. Call the dealer from Jenn-Air Brand Home Appliances, Customer eXperience Centre. 13 Appliance model number and serial number. 3. User's guides, service manuals and parts ... eXperience Center. Be sure to locate an authorized service company. Accessories Cooktop Bracket Adhesive Kit (for deaf, hearing impaired or speech impaired, call Jenn-Air at 1-800-JENNAIR (1-800-536-6247) to : Jenn-Air Brand Home Appliances Customer eXperience Centre 200 - 6750 Century Ave. If...

