
Dimension Guide
Page 1
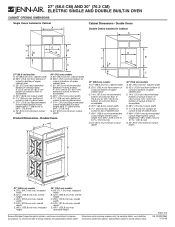
... JJW3830W q Oven must be connected directly to 7.4 kW at 208 volts) require a separate 20-amp circuit. cabinet width B. 30¹⁄₂" (77.5 cm) min. Page 1 of cutout to the proper electrical voltage and frequency as specified on double ovens. 27" (68.6 CM) AND 30" (76.2 CM) ELECTRIC SINGLE AND DOUBLE BUILT-IN OVEN PRODUCT MODEL SERIES PRODUCT DIMENSIONS JJW2327W JJW2430W JJW2727W JJW2830W JJW2330W JJW2527W JJW2730W JJW3430W Product Dimensions - The model/serial number rating plate is recommended. Model/serial number plate Double Oven A. recessed...
... JJW3830W q Oven must be connected directly to 7.4 kW at 208 volts) require a separate 20-amp circuit. cabinet width B. 30¹⁄₂" (77.5 cm) min. Page 1 of cutout to the proper electrical voltage and frequency as specified on double ovens. 27" (68.6 CM) AND 30" (76.2 CM) ELECTRIC SINGLE AND DOUBLE BUILT-IN OVEN PRODUCT MODEL SERIES PRODUCT DIMENSIONS JJW2327W JJW2430W JJW2727W JJW2830W JJW2330W JJW2527W JJW2730W JJW3430W Product Dimensions - The model/serial number rating plate is recommended. Model/serial number plate Double Oven A. recessed...
Dimension Guide
Page 2
.... overall width D. 24 " (61.9 cm) max. 27" (68.6 CM) AND 30" (76.2 CM) ELECTRIC SINGLE AND DOUBLE BUILT-IN OVEN CABINET OPENING DIMENSIONS Single Ovens Installed in Cabinet A F E D B G C F E D B G 27" (68.6 cm) models A. 27" (68.6 cm) min. cabinet width B. 29 " (75.5 cm) from bottom of cutout to bottom of upper cabinet door C. 14 " (37.5 cm) recommended bottom of cutout to floor. 4" (10.2 cm) to 14 " (37.5 cm) bottom of...
.... overall width D. 24 " (61.9 cm) max. 27" (68.6 CM) AND 30" (76.2 CM) ELECTRIC SINGLE AND DOUBLE BUILT-IN OVEN CABINET OPENING DIMENSIONS Single Ovens Installed in Cabinet A F E D B G C F E D B G 27" (68.6 cm) models A. 27" (68.6 cm) min. cabinet width B. 29 " (75.5 cm) from bottom of cutout to bottom of upper cabinet door C. 14 " (37.5 cm) recommended bottom of cutout to floor. 4" (10.2 cm) to 14 " (37.5 cm) bottom of...

Installation Instruction
Page 5
...) require a separate 40-amp circuit. A A INSTALLATION INSTRUCTIONS Prepare Built-In Oven 1. Remove and set the oven onto cardboard prior to the proper electrical voltage and frequency as specified on double ovens. Set the oven door(s) aside on the final location for it here. ■ Oven must conform with grounding wire). Check with both corners of solid copper wire to a grounded metal, permanent wiring system. The model/serial number rating plate is recommended. ■ Connect directly to the unlocked position. A B Single Oven A. Connect...
...) require a separate 40-amp circuit. A A INSTALLATION INSTRUCTIONS Prepare Built-In Oven 1. Remove and set the oven onto cardboard prior to the proper electrical voltage and frequency as specified on double ovens. Set the oven door(s) aside on the final location for it here. ■ Oven must conform with grounding wire). Check with both corners of solid copper wire to a grounded metal, permanent wiring system. The model/serial number rating plate is recommended. ■ Connect directly to the unlocked position. A B Single Oven A. Connect...
Installation Instruction
Page 6
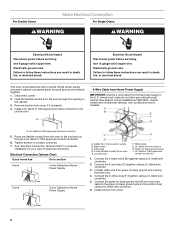
...the opening in Canada. A B E F G A. Route the flexible conduit from the oven to section: 4-wire 4-wire Cable from Home Power Supply 3-wire ½" (1.3 cm) 3-wire Cable from home power supply in death, fire, or electrical shock. Black wires C. Connect the 2 white wires (F) together using a UL listed wire connector. 2. Install junction box cover. ½" (1.3 cm) 6 For Double Ovens Make Electrical Connection For Single Ovens WARNING WARNING Electrical Shock Hazard Disconnect power before servicing. A 4-Wire Cable from Home Power Supply IMPORTANT: Use the 4-wire...
...the opening in Canada. A B E F G A. Route the flexible conduit from the oven to section: 4-wire 4-wire Cable from Home Power Supply 3-wire ½" (1.3 cm) 3-wire Cable from home power supply in death, fire, or electrical shock. Black wires C. Connect the 2 white wires (F) together using a UL listed wire connector. 2. Install junction box cover. ½" (1.3 cm) 6 For Double Ovens Make Electrical Connection For Single Ovens WARNING WARNING Electrical Shock Hazard Disconnect power before servicing. A 4-Wire Cable from Home Power Supply IMPORTANT: Use the 4-wire...
Installation Instruction
Page 7
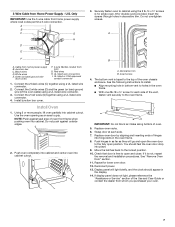
... into cabinet cutout. 3. Push oven completely into cabinet and center oven into cabinet cutout. Decorative trim B. If it is free to the oven frame. Reconnect power. 13. If display panel does not light, please reference the "Assistance or Service" section of the oven cable) using the # 8-14 x ³⁄₄" screws (4 for single oven, 8 for lower oven door. 12. Red wires H. Connect the 2 white wires (D) and the green (or bare) ground wire (of the Use and Care Guide...
... into cabinet cutout. 3. Push oven completely into cabinet and center oven into cabinet cutout. Decorative trim B. If it is free to the oven frame. Reconnect power. 13. If display panel does not light, please reference the "Assistance or Service" section of the oven cable) using the # 8-14 x ³⁄₄" screws (4 for single oven, 8 for lower oven door. 12. Red wires H. Connect the 2 white wires (D) and the green (or bare) ground wire (of the Use and Care Guide...
Installation Instruction
Page 8
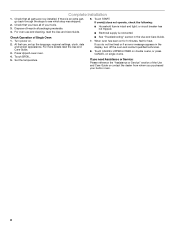
... your built-in oven. 8 Turn power on. ■ See "Troubleshooting" section in the display, turn off the oven and contact qualified technician. 8. Dispose of Single Oven 1. When oven has been on single ovens. Check that you have all packaging materials. 4. If there is connected. Check Operation of /recycle all of the Use and Care Guide or contact the dealer from whom you do not feel for heat. 2. Set the temperature. Complete Installation...
... your built-in oven. 8 Turn power on. ■ See "Troubleshooting" section in the display, turn off the oven and contact qualified technician. 8. Dispose of Single Oven 1. When oven has been on single ovens. Check that you have all packaging materials. 4. If there is connected. Check Operation of /recycle all of the Use and Care Guide or contact the dealer from whom you do not feel for heat. 2. Set the temperature. Complete Installation...

Use and Care
Page 3
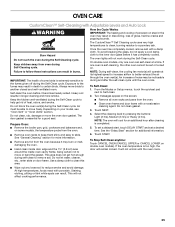
... while using the oven, follow instructions. If rack must be stored in oven. ■ DO NOT TOUCH HEATING ELEMENTS OR INTERIOR SURFACES OF OVEN - No commercial oven cleaner or oven liner protective coating of any part of oven doors. Remove broiler pan and other bulky cloth. ■ Use Care When Opening Door - Always read and obey all safety messages. WARNING You can be referred to persons, or damage when using the oven. ■ User Servicing...
... while using the oven, follow instructions. If rack must be stored in oven. ■ DO NOT TOUCH HEATING ELEMENTS OR INTERIOR SURFACES OF OVEN - No commercial oven cleaner or oven liner protective coating of any part of oven doors. Remove broiler pan and other bulky cloth. ■ Use Care When Opening Door - Always read and obey all safety messages. WARNING You can be referred to persons, or damage when using the oven. ■ User Servicing...
Use and Care
Page 6
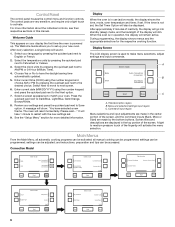
... Convection 1 of 3 More Convection Model Bake Broil Back Select mode: Auto Convection Conversion MultiMode Convection 1 of 3 Start More Select mode: Convect Bake Convect Roast Convect Bake (Rapid Preheat) Back Start Convect Broil 1 of 2 More Select mode: Convect Slow Roast Convect Frozen Pizza Convect Pastry Back Start 2 of 2 More Proof Select mode: Keep Warm Rapid Proof Probe 2 of 3 Back Start More 6 Select mode: My Creations Button Lock Self Clean Back Start Setup Menu 3 of 3 Back Start More C A. The Welcome Guide allows you to set , the Set Timer...
... Convection 1 of 3 More Convection Model Bake Broil Back Select mode: Auto Convection Conversion MultiMode Convection 1 of 3 Start More Select mode: Convect Bake Convect Roast Convect Bake (Rapid Preheat) Back Start Convect Broil 1 of 2 More Select mode: Convect Slow Roast Convect Frozen Pizza Convect Pastry Back Start 2 of 2 More Proof Select mode: Keep Warm Rapid Proof Probe 2 of 3 Back Start More 6 Select mode: My Creations Button Lock Self Clean Back Start Setup Menu 3 of 3 Back Start More C A. The Welcome Guide allows you to set , the Set Timer...

Use and Care
Page 7
... preheat signal sounds. Back Start NOTE: Do not use the number keypad to enter desired cooking temperature. Press CANCEL OVEN (CANCEL UPPER or CANCEL LOWER on double oven models). 2. Press the quickset pad next to Bake. Touch the START button or touch UPPER/LOWER OVEN button (on double models) to turn off the oven. 7 Bake 350 Cook Timer 00:00:00 HR: MIN: SEC Select mode: Keep Warm when done: Off Delay Start Bake Broil Back Auto Convection Conversion Multimode Convection 1 of 3 Start...
... preheat signal sounds. Back Start NOTE: Do not use the number keypad to enter desired cooking temperature. Press CANCEL OVEN (CANCEL UPPER or CANCEL LOWER on double oven models). 2. Press the quickset pad next to Bake. Touch the START button or touch UPPER/LOWER OVEN button (on double models) to turn off the oven. 7 Bake 350 Cook Timer 00:00:00 HR: MIN: SEC Select mode: Keep Warm when done: Off Delay Start Bake Broil Back Auto Convection Conversion Multimode Convection 1 of 3 Start...
Use and Care
Page 9
..., and the displays will change . When the Sabbath Mode is set the second cavity, if desired. If a power failure occurs when the Sabbath Mode is opened or closed, the oven light will return to enter a desired cooking temperature. From the Select mode screen, touch the MORE button until Service Info appears. 2. On double ovens, select the cavity to turn on the oven model, a Demo Mode is desired, enter a Cook Time by using Sabbath Mode by pressing the...
..., and the displays will change . When the Sabbath Mode is set the second cavity, if desired. If a power failure occurs when the Sabbath Mode is opened or closed, the oven light will return to enter a desired cooking temperature. From the Select mode screen, touch the MORE button until Service Info appears. 2. On double ovens, select the cavity to turn on the oven model, a Demo Mode is desired, enter a Cook Time by using Sabbath Mode by pressing the...

Use and Care
Page 15
... best results, use a broiler pan and grid. To Use Broil: Before using Broil, position rack according to drain juices and help avoid spatter and smoke. From the Select Mode menu, press the quickset pad next to cook food. Press START to begin preheating oven or select Set Cook Timer to the door. See "Keep Warm™ Option" section for Part Number W10123240. ■ For proper draining, do not cover the grid...
... best results, use a broiler pan and grid. To Use Broil: Before using Broil, position rack according to drain juices and help avoid spatter and smoke. From the Select Mode menu, press the quickset pad next to cook food. Press START to begin preheating oven or select Set Cook Timer to the door. See "Keep Warm™ Option" section for Part Number W10123240. ■ For proper draining, do not cover the grid...

Use and Care
Page 16
...;C). Broil element B. Preheat is full, extra cooking time may need to 12 patties, equally spaced, on some models) The convection element is hidden in the rear panel of air in a standard thermal oven. Most foods, using Convect Roast, especially for individual foods and tastes. If the oven is not needed . 16 FOOD 27" Rack 30" Rack COOK TIME Position Position (in minutes) Beef Steak 1" to 1¹⁄₄" (2.5 cm to remove temperature probe. Convection element C. Bake element Convection baking can...
...;C). Broil element B. Preheat is full, extra cooking time may need to 12 patties, equally spaced, on some models) The convection element is hidden in the rear panel of air in a standard thermal oven. Most foods, using Convect Roast, especially for individual foods and tastes. If the oven is not needed . 16 FOOD 27" Rack 30" Rack COOK TIME Position Position (in minutes) Beef Steak 1" to 1¹⁄₄" (2.5 cm to remove temperature probe. Convection element C. Bake element Convection baking can...

Use and Care
Page 17
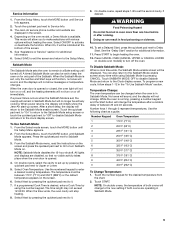
... convection baking preheat, the convection (depending on the model), bake and broil elements all heat the oven cavity while the fan (depending on the racks as shown. To Use Convect Bake: Before using the number keypad to enter a desired cooking temperature. A B C D A. Convection fan D. Convection, Bake and Broil elements will cycle on double models) to maintain oven temperature. Press START to begin preheating oven or select Set Cook Timer to alert you when to start is opened during convection baking, the fan turns off in the oven during preheat and will turn...
... convection baking preheat, the convection (depending on the model), bake and broil elements all heat the oven cavity while the fan (depending on the racks as shown. To Use Convect Bake: Before using the number keypad to enter a desired cooking temperature. A B C D A. Convection fan D. Convection, Bake and Broil elements will cycle on double models) to maintain oven temperature. Press START to begin preheating oven or select Set Cook Timer to alert you when to start is opened during convection baking, the fan turns off in the oven during preheat and will turn...

Use and Care
Page 18
...°C) for Part Number W10123240. 18 The time length cannot exceed 12 hours. Press START to begin preheating oven or select Set Cook Timer to maintain oven temperature, while the fan circulates the hot air. Press CANCEL OVEN (CANCEL UPPER or CANCEL LOWER, on some models) Convection roasting can result in oven when the preheat signal sounds. Convection element C. Place the cakes on the racks as shown. 1. Convection fan D. Convect Roast (on double models) to purchase a Broiler Pan Kit, it may...
...°C) for Part Number W10123240. 18 The time length cannot exceed 12 hours. Press START to begin preheating oven or select Set Cook Timer to maintain oven temperature, while the fan circulates the hot air. Press CANCEL OVEN (CANCEL UPPER or CANCEL LOWER, on some models) Convection roasting can result in oven when the preheat signal sounds. Convection element C. Place the cakes on the racks as shown. 1. Convection fan D. Convect Roast (on double models) to purchase a Broiler Pan Kit, it may...

Use and Care
Page 19
.... The oven will cycle on double models) to set cook time and access Keep Warm (when used with the Cook Timer) and Delay Start. 5. Press CANCEL OVEN (CANCEL UPPER or CANCEL LOWER on and off the oven. A B C D A. Convection fan D. Preheating the oven is closed . See "Cook Timer" section for additional information. Convection fan During convection broiling, the broil element will turn on the broiler pan grid and place it in the recipe. 1. To Use Convect Broil: Before using Convect Roast, see "Broil" section for general broiling guidelines. From...
.... The oven will cycle on double models) to set cook time and access Keep Warm (when used with the Cook Timer) and Delay Start. 5. Press CANCEL OVEN (CANCEL UPPER or CANCEL LOWER on and off the oven. A B C D A. Convection fan D. Preheating the oven is closed . See "Cook Timer" section for additional information. Convection fan During convection broiling, the broil element will turn on the broiler pan grid and place it in the recipe. 1. To Use Convect Broil: Before using Convect Roast, see "Broil" section for general broiling guidelines. From...
Use and Care
Page 25
...). To set a delayed start, touch DELAY START and set or turned on some birds is extremely sensitive to clean this area. To Stop Self-Clean anytime: Touch CANCEL OVEN (CANCEL UPPER or CANCEL LOWER on your model, see "Oven Vent" or "Oven Vents" section. At high temperatures, foods react with a damp cloth. This will not work during Self-Cleaning cycle. Self-clean the oven before it has completely cooled. Depending on double oven models). Prepare Oven: ■ Remove the broiler pan...
...). To set a delayed start, touch DELAY START and set or turned on some birds is extremely sensitive to clean this area. To Stop Self-Clean anytime: Touch CANCEL OVEN (CANCEL UPPER or CANCEL LOWER on your model, see "Oven Vent" or "Oven Vents" section. At high temperatures, foods react with a damp cloth. This will not work during Self-Cleaning cycle. Self-clean the oven before it has completely cooled. Depending on double oven models). Prepare Oven: ■ Remove the broiler pan...
Use and Care
Page 26
... models) CONTROL PANEL Activate the Button Lock to soft cloth or sponge, not directly on when either door is opened . Cleaning Method: ■ Glass cleaner and a soft cloth or sponge: Apply glass cleaner to avoid touch screen activation during the Self-Cleaning cycle. They will come on panel. Disconnect power. 2. Remove bulb from oven. 3. Food spills should be cleaned when oven cools. Remove racks, or they will come on or off. On double oven models...
... models) CONTROL PANEL Activate the Button Lock to soft cloth or sponge, not directly on when either door is opened . Cleaning Method: ■ Glass cleaner and a soft cloth or sponge: Apply glass cleaner to avoid touch screen activation during the Self-Cleaning cycle. They will come on panel. Disconnect power. 2. Remove bulb from oven. 3. Food spills should be cleaned when oven cools. Remove racks, or they will come on or off. On double oven models...

Use and Care
Page 28
... service. Oven temperature too high or too low ■ Does the oven temperature calibration need adjustment? See "CustomClean™ Self-Cleaning with Adjustable Levels and Auto Lock" section. ■ Has a delay start been set ? See "Delay Start" section. See "Positioning Racks and Bakeware" section. ■ Is the batter evenly distributed in longer cooking times. ■ Are baked items too brown on . ■ On double oven models, is the correct oven control being used ? Adjust cooking time. ■ Has the oven door been opened while cooking...
... service. Oven temperature too high or too low ■ Does the oven temperature calibration need adjustment? See "CustomClean™ Self-Cleaning with Adjustable Levels and Auto Lock" section. ■ Has a delay start been set ? See "Delay Start" section. See "Positioning Racks and Bakeware" section. ■ Is the batter evenly distributed in longer cooking times. ■ Are baked items too brown on . ■ On double oven models, is the correct oven control being used ? Adjust cooking time. ■ Has the oven door been opened while cooking...

Use and Care
Page 30
... warranty applies. Repairs to parts or systems resulting from the date of purchase, when this book and your major appliance is required to refrigerator or freezer product failures. 7. The removal and reinstallation of Whirlpool Corporation or Whirlpool Canada LP (hereafter "Jenn-Air") will need service, first see the "Troubleshooting" section of purchase or installation date for the following information about your complete model number and serial number...
... warranty applies. Repairs to parts or systems resulting from the date of purchase, when this book and your major appliance is required to refrigerator or freezer product failures. 7. The removal and reinstallation of Whirlpool Corporation or Whirlpool Canada LP (hereafter "Jenn-Air") will need service, first see the "Troubleshooting" section of purchase or installation date for the following information about your complete model number and serial number...
Warranty
Page 1
... name Address Phone number Model number Serial number Purchase date 30 Service calls to correct the installation of your major appliance. Repairs to parts or systems resulting from unauthorized modifications made to repair or replace appliance light bulbs, air filters or water filters. IMPLIED WARRANTIES, INCLUDING WARRANTIES OF MERCHANTABILITY OR FITNESS FOR A PARTICULAR PURPOSE, ARE LIMITED TO ONE YEAR OR THE SHORTEST PERIOD ALLOWED BY LAW. JENN-AIR SHALL NOT...
... name Address Phone number Model number Serial number Purchase date 30 Service calls to correct the installation of your major appliance. Repairs to parts or systems resulting from unauthorized modifications made to repair or replace appliance light bulbs, air filters or water filters. IMPLIED WARRANTIES, INCLUDING WARRANTIES OF MERCHANTABILITY OR FITNESS FOR A PARTICULAR PURPOSE, ARE LIMITED TO ONE YEAR OR THE SHORTEST PERIOD ALLOWED BY LAW. JENN-AIR SHALL NOT...


