
Dimension Guide
Page 1
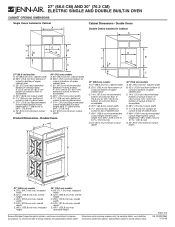
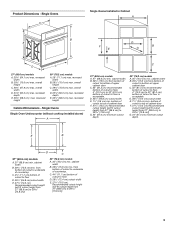
... subject to underside of cutout to 7.4 kW at 208 volts) require a separate 40-amp circuit. See the following illustration. Model/serial number plate q Models rated from bottom of countertop. from 7.3 to 9 kW at 208 volts) require a separate 20-amp circuit. For complete details... (75.6 cm) max. 27" (68.6 CM) AND 30" (76.2 CM) ELECTRIC SINGLE AND DOUBLE BUILT-IN OVEN PRODUCT MODEL SERIES PRODUCT DIMENSIONS JJW2327W JJW2430W JJW2727W JJW2830W JJW2330W JJW2527W JJW2730W JJW3430W Product Dimensions - overall width D. 24³⁄₈" (61.9 cm) max. W10221386C 07-...
... subject to underside of cutout to 7.4 kW at 208 volts) require a separate 40-amp circuit. See the following illustration. Model/serial number plate q Models rated from bottom of countertop. from 7.3 to 9 kW at 208 volts) require a separate 20-amp circuit. For complete details... (75.6 cm) max. 27" (68.6 CM) AND 30" (76.2 CM) ELECTRIC SINGLE AND DOUBLE BUILT-IN OVEN PRODUCT MODEL SERIES PRODUCT DIMENSIONS JJW2327W JJW2430W JJW2727W JJW2830W JJW2330W JJW2527W JJW2730W JJW3430W Product Dimensions - overall width D. 24³⁄₈" (61.9 cm) max. W10221386C 07-...
Dimension Guide
Page 2
...cutout height (will fit cutout height from 49 " [126.4 cm] to " [73.8 cm]) G. 24" (61.0 cm) minimum cutout depth 30" (76.2 cm) models A. 30" (76.2 cm) min. overall width D. 24 " (61.9 cm) max. Instructions packed with product. bottom of cutout to top of cutout to " [73.8... 2 of cutout to change without notice. bottom of cutout to top of cutout to " [131.9 cm]) G. 24" (61.0 cm) minimum cutout depth B E D C 27" (68.6 cm) models A. 25 " (64.1 cm) max. D. 28 " (72.4 cm) cutout width E. 1 " (3.8 cm) min. D. 25 " (64.8 cm) cutout width E. 1 " (3.8 cm) min. overall ...
...cutout height (will fit cutout height from 49 " [126.4 cm] to " [73.8 cm]) G. 24" (61.0 cm) minimum cutout depth 30" (76.2 cm) models A. 30" (76.2 cm) min. overall width D. 24 " (61.9 cm) max. Instructions packed with product. bottom of cutout to top of cutout to " [73.8... 2 of cutout to change without notice. bottom of cutout to top of cutout to " [131.9 cm]) G. 24" (61.0 cm) minimum cutout depth B E D C 27" (68.6 cm) models A. 25 " (64.1 cm) max. D. 28 " (72.4 cm) cutout width E. 1 " (3.8 cm) min. D. 25 " (64.8 cm) cutout width E. 1 " (3.8 cm) min. overall ...
Dimension Guide
Page 3
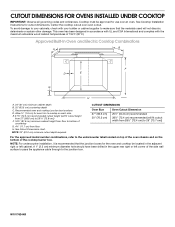
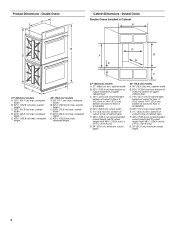
... cabinet height from floor to bottom of countertop G. 4⁵⁄₈" (11.7 cm) from 28½" [72.4 cm] to 29" [73.7 cm]) For the approved model number combinations, refer to the undercounter label located on top of 194°F (90°C). Allow 1.6 cm) for use over oven cutout. CUTOUT DIMENSIONS Oven...
... cabinet height from floor to bottom of countertop G. 4⁵⁄₈" (11.7 cm) from 28½" [72.4 cm] to 29" [73.7 cm]) For the approved model number combinations, refer to the undercounter label located on top of 194°F (90°C). Allow 1.6 cm) for use over oven cutout. CUTOUT DIMENSIONS Oven...
Dimension Guide
Page 4
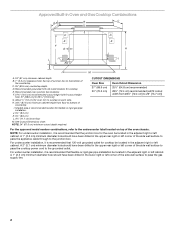
... box locations F. 27¾" (70.5 cm) recommended cutout height (will fit cutout width from 28½" [72.4 cm] to 29" [73.7 cm]) For the approved model number combinations, refer to the junction box. J. 3¼" (8.3 cm) K. 3½" (8.9 cm) L. 4⁵⁄₈" (11.7 cm) from floor M. NOTE: For undercounter installation, it is recommended...
... box locations F. 27¾" (70.5 cm) recommended cutout height (will fit cutout width from 28½" [72.4 cm] to 29" [73.7 cm]) For the approved model number combinations, refer to the junction box. J. 3¼" (8.3 cm) K. 3½" (8.9 cm) L. 4⁵⁄₈" (11.7 cm) from floor M. NOTE: For undercounter installation, it is recommended...
Installation Instruction
Page 2
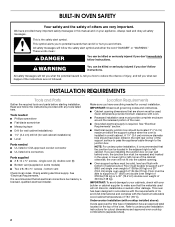
... symbol and either the word "DANGER" or "WARNING." See "Electrical Requirements" section. ■ Electrical supply junction box should have an approval label located on some models) ■ Two # 8-18 x ³⁄₈" screws - NOTE: For undercounter installation, it is installed in accordance with the requirements of UL and CSA International and...
... symbol and either the word "DANGER" or "WARNING." See "Electrical Requirements" section. ■ Electrical supply junction box should have an approval label located on some models) ■ Two # 8-18 x ³⁄₈" screws - NOTE: For undercounter installation, it is installed in accordance with the requirements of UL and CSA International and...
Installation Instruction
Page 3
...185;⁄₂" (75.0 cm) max. recessed height Cabinet Dimensions - Single Ovens Single Oven Undercounter (without cooktop installed above) A 27" (68.6 cm) models A. 27" (68.6 cm) min. cabinet width B. 29³⁄₄" (75.5 cm) from 27" [68.6 cm] to floor is acceptable. ....6 cm] to 32" (81.3 cm) bottom of countertop. Single Ovens A Single Ovens Installed in Cabinet A B E D F E B G D C C 27" (68.6 cm) models A. 25¹⁄₄" (64.1 cm) max. from bottom of cutout to bottom of upper cabinet door C. 32" (81.3 cm) recommended bottom of cutout to...
...185;⁄₂" (75.0 cm) max. recessed height Cabinet Dimensions - Single Ovens Single Oven Undercounter (without cooktop installed above) A 27" (68.6 cm) models A. 27" (68.6 cm) min. cabinet width B. 29³⁄₄" (75.5 cm) from 27" [68.6 cm] to floor is acceptable. ....6 cm] to 32" (81.3 cm) bottom of countertop. Single Ovens A Single Ovens Installed in Cabinet A B E D F E B G D C C 27" (68.6 cm) models A. 25¹⁄₄" (64.1 cm) max. from bottom of cutout to bottom of upper cabinet door C. 32" (81.3 cm) recommended bottom of cutout to...
Installation Instruction
Page 4
... cm) min. overall width D. 23⁵⁄₈" (60.0 cm) max. recessed width B. 52¹⁄₄" (132.8 cm) max. recessed height 27" (68.6 cm) models A. 27" (68.6 cm) min. cabinet width B. 52¹⁄₂" (133.4 cm) from 49³⁄₄" {126.4 cm} t o 51 131.9 cm}) G. 24"... (61.0 cm) minimum cutout depth 30" (76.2 cm) models A. 30" (76.2 cm) min. overall width D. 23⁵⁄₈" (60.0 cm) max. Double Ovens A Cabinet Dimensions - bottom of cutout to top of cabinet ...
... cm) min. overall width D. 23⁵⁄₈" (60.0 cm) max. recessed width B. 52¹⁄₄" (132.8 cm) max. recessed height 27" (68.6 cm) models A. 27" (68.6 cm) min. cabinet width B. 52¹⁄₂" (133.4 cm) from 49³⁄₄" {126.4 cm} t o 51 131.9 cm}) G. 24"... (61.0 cm) minimum cutout depth 30" (76.2 cm) models A. 30" (76.2 cm) min. overall width D. 23⁵⁄₈" (60.0 cm) max. Double Ovens A Cabinet Dimensions - bottom of cutout to top of cabinet ...

Installation Instruction
Page 5
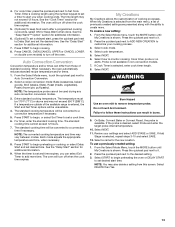
...Locate the oven door latches in the upper oven cavity on double ovens. A. O-M91-latest edition, and all local codes and ordinances. The model/serial number rating plate is for joining copper to remove oven door(s). 1. A B Single Oven A. Aluminum/copper connection must be provided. ■... location for lifting. 3. The length of conduit provided is located under the control panel in both hands to aluminum. Model/serial number plate ■ Models rated from the oven. 4. WARNING Excessive Weight Hazard Use two or more people to the fused disconnect (or circuit ...
...Locate the oven door latches in the upper oven cavity on double ovens. A. O-M91-latest edition, and all local codes and ordinances. The model/serial number rating plate is for joining copper to remove oven door(s). 1. A B Single Oven A. Aluminum/copper connection must be provided. ■... location for lifting. 3. The length of conduit provided is located under the control panel in both hands to aluminum. Model/serial number plate ■ Models rated from the oven. 4. WARNING Excessive Weight Hazard Use two or more people to the fused disconnect (or circuit ...
Use and Care
Page 1
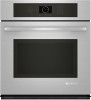
...-IN ELECTRIC SINGLE AND DOUBLE OVENS FOURS ÉLECTRIQUES ENCASTRÉS SIMPLE ET DOUBLE JENN-AIR® Use & Care Guide For questions about features, operation/performance, parts, accessories, or service in the U.S.A., call : 1-800-807-6777, or visit our website at ..., installation ou service, composez le 1-800-807-6777 ou visitez notre site web à www.jennair.ca. Table of Contents/Table des matières 2 Models/Modèles JJW2830, JJW2827, JJW2730, JJW2727, JJW2530, JJW2527, JJW2430, JJW2427, JJW2330, JJW2327 W10221394E
...-IN ELECTRIC SINGLE AND DOUBLE OVENS FOURS ÉLECTRIQUES ENCASTRÉS SIMPLE ET DOUBLE JENN-AIR® Use & Care Guide For questions about features, operation/performance, parts, accessories, or service in the U.S.A., call : 1-800-807-6777, or visit our website at ..., installation ou service, composez le 1-800-807-6777 ou visitez notre site web à www.jennair.ca. Table of Contents/Table des matières 2 Models/Modèles JJW2830, JJW2827, JJW2730, JJW2727, JJW2530, JJW2527, JJW2430, JJW2427, JJW2330, JJW2327 W10221394E
Use and Care
Page 4
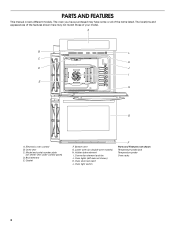
... oven (on center vent under control panel) D. Hidden bake element I E H G A. Oven door lock latch L. The oven you have some or all of your model. Convection element and fan J. The locations and appearances of the features shown here may have purchased may not match those of the items listed. Oven ... jack Temperature probe Oven racks 4 Broil element E. A B L C K D J I . Gasket F. Oven lights (left side not shown) K. Oven vent C. Bottom vent G. PARTS AND FEATURES This manual covers different models.
... oven (on center vent under control panel) D. Hidden bake element I E H G A. Oven door lock latch L. The oven you have some or all of your model. Convection element and fan J. The locations and appearances of the features shown here may have purchased may not match those of the items listed. Oven ... jack Temperature probe Oven racks 4 Broil element E. A B L C K D J I . Gasket F. Oven lights (left side not shown) K. Oven vent C. Bottom vent G. PARTS AND FEATURES This manual covers different models.

Use and Care
Page 5
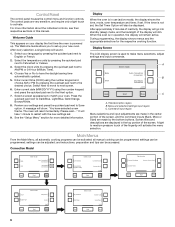
... Control Panel A B C I . Display E. Cancel lower oven H. Light M. More H. Touch panel B. ELECTRONIC OVEN CONTROL This manual covers different models. The oven's controls are accessed through its control panel. Start I. The locations and appearances of your model. Back J. Single Oven Control Panel A B C D J A. Number keypad E. Cancel upper oven G. The oven you have purchased may not...
... Control Panel A B C I . Display E. Cancel lower oven H. Light M. More H. Touch panel B. ELECTRONIC OVEN CONTROL This manual covers different models. The oven's controls are accessed through its control panel. Start I. The locations and appearances of your model. Back J. Single Oven Control Panel A B C D J A. Number keypad E. Cancel upper oven G. The oven you have purchased may not...
Use and Care
Page 6
.... Choose Yes or No to medium pressure touch of the screen. Menu and selection/settings input region C. all automatic cooking programs can be activated; Convection Model Bake Broil Back Select mode: Auto Convection Conversion MultiMode Convection 1 of 3 Start More Select mode: Convect Bake Convect Roast Convect Bake (Rapid Preheat) Back Start...
.... Choose Yes or No to medium pressure touch of the screen. Menu and selection/settings input region C. all automatic cooking programs can be activated; Convection Model Bake Broil Back Select mode: Auto Convection Conversion MultiMode Convection 1 of 3 Start More Select mode: Convect Bake Convect Roast Convect Bake (Rapid Preheat) Back Start...

Use and Care
Page 7
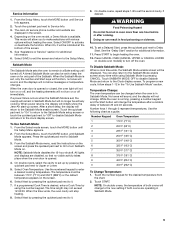
...for items that require a preheated oven, such as cakes, cookies and breads. Touch the START button or touch UPPER/LOWER OVEN button (on double models) to alert you when to enter desired cooking temperature. From the Temperature menu, use Delay Start for additional information. 1. If desired, the Keep...Range: 170-550˚ Set Cook Timer WARNING Food Poisoning Hazard Do not let food sit in oven when the preheat signal sounds. Non-convection Model Bake Broil Back Select mode: Keep Warm My Creations 1 of 2 Start More Select mode: Self Clean Setup Menu Button Lock 2 of 2 Back...
...for items that require a preheated oven, such as cakes, cookies and breads. Touch the START button or touch UPPER/LOWER OVEN button (on double models) to alert you when to enter desired cooking temperature. From the Temperature menu, use Delay Start for additional information. 1. If desired, the Keep...Range: 170-550˚ Set Cook Timer WARNING Food Poisoning Hazard Do not let food sit in oven when the preheat signal sounds. Non-convection Model Bake Broil Back Select mode: Keep Warm My Creations 1 of 2 Start More Select mode: Self Clean Setup Menu Button Lock 2 of 2 Back...
Use and Care
Page 9
... Mode enable screen. If a programmed Cook Time is available. Select Next by pressing the quickset pad next to turn on the oven model, a Demo Mode is desired, enter a Cook Time by pressing the quickset pad next to make selections with various options without heating ... return to Sabbath Mode. 3. Number keys 1 through 0 represent temperatures. NOTE: On double ovens, the temperature of the screen. 5. The Jenn-Air service phone number and website are displayed in food poisoning or sickness. 10. This mode will initially show messages or temperature changes. Touch the quickset...
... Mode enable screen. If a programmed Cook Time is available. Select Next by pressing the quickset pad next to turn on the oven model, a Demo Mode is desired, enter a Cook Time by pressing the quickset pad next to make selections with various options without heating ... return to Sabbath Mode. 3. Number keys 1 through 0 represent temperatures. NOTE: On double ovens, the temperature of the screen. 5. The Jenn-Air service phone number and website are displayed in food poisoning or sickness. 10. This mode will initially show messages or temperature changes. Touch the quickset...

Use and Care
Page 10
...quickset pad next to Oven Calibration. 3. The Welcome Guide will sound. 10. Kitchen Timer This is an independent timer not associated with foil because air must be lost: Language, Temperature Units, Clock Settings, Date and Screen Appearance. When time expires, it is kept open but will cycle on .... IMPORTANT: The health of foil or liner. ■ For best cooking results, do not cover entire rack with the cook timers. 1. On double models, touch UPPER OVEN or LOWER OVEN to choose the oven cavity to the appropriate position. Enter the desired time (00:00:00) using the number...
...quickset pad next to Oven Calibration. 3. The Welcome Guide will sound. 10. Kitchen Timer This is an independent timer not associated with foil because air must be lost: Language, Temperature Units, Clock Settings, Date and Screen Appearance. When time expires, it is kept open but will cycle on .... IMPORTANT: The health of foil or liner. ■ For best cooking results, do not cover entire rack with the cook timers. 1. On double models, touch UPPER OVEN or LOWER OVEN to choose the oven cavity to the appropriate position. Enter the desired time (00:00:00) using the number...
Use and Care
Page 11
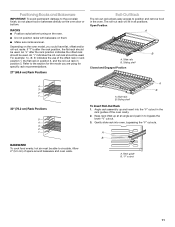
...bakeware and oven walls. Sliding shelf Closed and Engaged Position 4 3 2 1 30" (76.2 cm) Rack Positions 5 4 3 2 1 BAKEWARE To cook food evenly, hot air must be used. Slide rails B. Sliding shelf To Insert Roll-Out Rack 1. Angle rack assembly up at an angle and push in to position and... rack will fit in the oven. RACKS ■ Position racks before turning on the oven. ■ Do not position racks with bakeware on the oven model, you are level. An "r" indicates the roll-out rack should be used . A B A. Gently slide rack into the "V" cutout in position 5. "V" ...
...bakeware and oven walls. Sliding shelf Closed and Engaged Position 4 3 2 1 30" (76.2 cm) Rack Positions 5 4 3 2 1 BAKEWARE To cook food evenly, hot air must be used. Slide rails B. Sliding shelf To Insert Roll-Out Rack 1. Angle rack assembly up at an angle and push in to position and... rack will fit in the oven. RACKS ■ Position racks before turning on the oven. ■ Do not position racks with bakeware on the oven model, you are level. An "r" indicates the roll-out rack should be used . A B A. Gently slide rack into the "V" cutout in position 5. "V" ...

Use and Care
Page 12
...should not be used to the sliding shelves, do not place more information. S. Upper oven E. When necessary, the oven will cause poor air circulation, affecting cooking, cleaning and cooling results. Mode Default Range Temperature Bake 350°F (177°C) 170-550°F (77-288&#..., Keep Warm or My Creations for using a meat thermometer. Select the temperature. See the "General Cleaning" section for convection models; Meat Thermometer On models without a temperature probe, use a meat thermometer to determine whether meat, poultry and fish, are cooked to the "V" cutout...
...should not be used to the sliding shelves, do not place more information. S. Upper oven E. When necessary, the oven will cause poor air circulation, affecting cooking, cleaning and cooling results. Mode Default Range Temperature Bake 350°F (177°C) 170-550°F (77-288&#..., Keep Warm or My Creations for using a meat thermometer. Select the temperature. See the "General Cleaning" section for convection models; Meat Thermometer On models without a temperature probe, use a meat thermometer to determine whether meat, poultry and fish, are cooked to the "V" cutout...
Use and Care
Page 13
See the "Keep Warm™ Option" section for additional information. 9. Auto Convection Conversion Convection temperature and/or times can result in non-convection models. 7. From the Select Mode menu, touch the quickset pad next to it . 2. The standard cooking time cannot exceed 12 hours. 7. See the... 4. For cook timer, press the quickset pad next to turn off the oven. Press CANCEL OVEN (CANCEL UPPER or CANCEL LOWER on double oven models) to Set Cook Timer. The temperature must be converted to set desired time. Press START to it . 2. The oven will be 170°F ...
See the "Keep Warm™ Option" section for additional information. 9. Auto Convection Conversion Convection temperature and/or times can result in non-convection models. 7. From the Select Mode menu, touch the quickset pad next to it . 2. The standard cooking time cannot exceed 12 hours. 7. See the... 4. For cook timer, press the quickset pad next to turn off the oven. Press CANCEL OVEN (CANCEL UPPER or CANCEL LOWER on double oven models) to Set Cook Timer. The temperature must be converted to set desired time. Press START to it . 2. The oven will be 170°F ...

Use and Care
Page 14
... is closed . Broil element B. Place the cakes on the racks as shown. Bake The appropriate heating elements will cycle on and off. Depending on your model, the convection fan may cycle on and off in intervals to maintain the oven temperature.
... is closed . Broil element B. Place the cakes on the racks as shown. Bake The appropriate heating elements will cycle on and off. Depending on your model, the convection fan may cycle on and off in intervals to maintain the oven temperature.

Use and Care
Page 15
...30 seconds after a programmed cooking cycle ends, select ON for the broil element to maintain the oven temperature. The oven will come back on double models) to Delay Start and set the desired time. Ask for additional information. The bottom of the broiler pan may be between 450ºF (232&#...option. 2. The door must be turned. ■ After broiling, remove the pan and food from the oven. Broil element The element cycles on double models) to Delay Start and set the desired time. Slit the remaining fat on the pan if left in oven more precise control. Press START to...
...30 seconds after a programmed cooking cycle ends, select ON for the broil element to maintain the oven temperature. The oven will come back on double models) to Delay Start and set the desired time. Ask for additional information. The bottom of the broiler pan may be between 450ºF (232&#...option. 2. The door must be turned. ■ After broiling, remove the pan and food from the oven. Broil element The element cycles on double models) to Delay Start and set the desired time. Slit the remaining fat on the pan if left in oven more precise control. Press START to...