
Dimension Guide
Page 1
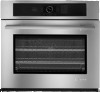
...CM) ELECTRIC SINGLE AND DOUBLE BUILT-IN OVEN PRODUCT MODEL SERIES PRODUCT DIMENSIONS JJW2327W JJW2430W JJW2727W JJW2830W JJW2330W JJW2527W JJW2730W JJW3430W Product Dimensions - q Flexible cable from the oven should be connected to change without cooktop installed above) A E B D C 27" (68.6 cm) models A. ...for planning purposes only. recessed width B. 29¹⁄₂" (75.0 cm) max. For complete details, see Installation our products, we reserve the right to the proper electrical voltage and frequency as specified on double ovens. Instructions packed with...
...CM) ELECTRIC SINGLE AND DOUBLE BUILT-IN OVEN PRODUCT MODEL SERIES PRODUCT DIMENSIONS JJW2327W JJW2430W JJW2727W JJW2830W JJW2330W JJW2527W JJW2730W JJW3430W Product Dimensions - q Flexible cable from the oven should be connected to change without cooktop installed above) A E B D C 27" (68.6 cm) models A. ...for planning purposes only. recessed width B. 29¹⁄₂" (75.0 cm) max. For complete details, see Installation our products, we reserve the right to the proper electrical voltage and frequency as specified on double ovens. Instructions packed with...
Dimension Guide
Page 2
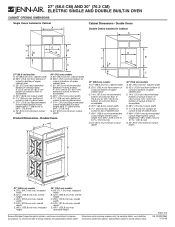
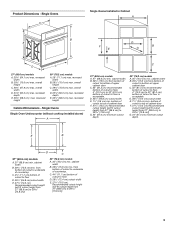
...cm) min. bottom of cutout to top of cutout to change without notice. overall height C. 29 " (75.6 cm) max. For complete details, see Installation our products, we reserve the right to floor is acceptable. Specifications subject to 51 " [131.9 cm]) G. 24" (61.0 cm) minimum cutout depth... B. overall depth E. 49 " (125.8 cm) max. 27" (68.6 CM) AND 30" (76.2 CM) ELECTRIC SINGLE AND DOUBLE BUILT-IN OVEN CABINET OPENING DIMENSIONS Single Ovens Installed in Cabinet A F E D B G C F E D B G 27" (68.6 cm) models A. 27" (68.6 cm) min. overall height C. 26 " (67.9 cm) ...
...cm) min. bottom of cutout to top of cutout to change without notice. overall height C. 29 " (75.6 cm) max. For complete details, see Installation our products, we reserve the right to floor is acceptable. Specifications subject to 51 " [131.9 cm]) G. 24" (61.0 cm) minimum cutout depth... B. overall depth E. 49 " (125.8 cm) max. 27" (68.6 CM) AND 30" (76.2 CM) ELECTRIC SINGLE AND DOUBLE BUILT-IN OVEN CABINET OPENING DIMENSIONS Single Ovens Installed in Cabinet A F E D B G C F E D B G 27" (68.6 cm) models A. 27" (68.6 cm) min. overall height C. 26 " (67.9 cm) ...
Dimension Guide
Page 3
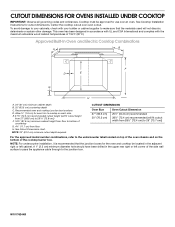
...cabinet. E. 27¾" (70.5 cm) recommended cutout height (will not discolor, delaminate or sustain other damage. W10176244B CUTOUT DIMENSIONS FOR OVENS INSTALLED UNDER COOKTOP IMPORTANT: Observe all governing codes and ordinances. Recommended oven and cooktop junction box locations D. Allow 1.6 cm) for cutout dimensions. A...from floor to 29 73.8 cm]) F. 34½" (87.6 cm) minimum cabinet height from floor H. NOTE: For undercounter installation, it is recommended that the materials used will fit cutout height from 27" [68.6 cm] to bottom of 194°F (90°C)....
...cabinet. E. 27¾" (70.5 cm) recommended cutout height (will not discolor, delaminate or sustain other damage. W10176244B CUTOUT DIMENSIONS FOR OVENS INSTALLED UNDER COOKTOP IMPORTANT: Observe all governing codes and ordinances. Recommended oven and cooktop junction box locations D. Allow 1.6 cm) for cutout dimensions. A...from floor to 29 73.8 cm]) F. 34½" (87.6 cm) minimum cabinet height from floor H. NOTE: For undercounter installation, it is recommended that the materials used will fit cutout height from 27" [68.6 cm] to bottom of 194°F (90°C)....
Dimension Guide
Page 4
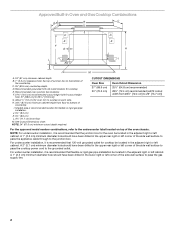
... number combinations, refer to the grounded outlet. See Cutout Dimensions chart. NOTE: For undercounter installation, it is recommended location for oven trim to the junction box. For undercounter installation, it is recommended that 120-volt grounded outlet for cooktop E. J. 3¼" (8.3 cm...F G L I K D E H J I . Allow 1.6 cm) for flexible or rigid gas pipe installation. For undercounter installation, it is recommended that flexible or rigid gas pipe installation be located in the upper rear right or left corner of the side wall surface to pass the appliance cable...
... number combinations, refer to the grounded outlet. See Cutout Dimensions chart. NOTE: For undercounter installation, it is recommended location for oven trim to the junction box. For undercounter installation, it is recommended that 120-volt grounded outlet for cooktop E. J. 3¼" (8.3 cm...F G L I K D E H J I . Allow 1.6 cm) for flexible or rigid gas pipe installation. For undercounter installation, it is recommended that flexible or rigid gas pipe installation be located in the upper rear right or left corner of the side wall surface to pass the appliance cable...
Installation Instruction
Page 2
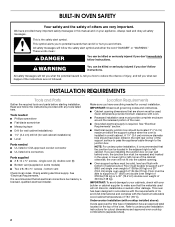
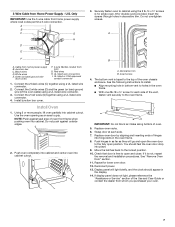
...Cabinet opening . ■ Oven support surface must be killed or seriously injured if you don't immediately follow instructions. NOTE: For undercounter installation, it is installed in the adjacent right or left corner of the cabinet; Floor must be able to support a 27" (68.6 cm) double oven...the oven. ■ Grounded electrical supply is the safety alert symbol. Given dimensions provide minimum clearance with oven. ■ Recessed installation area must be solid, level and flush with the maximum allowable wood cabinet temperatures of 194° (90°C). BUILT-IN OVEN...
...Cabinet opening . ■ Oven support surface must be killed or seriously injured if you don't immediately follow instructions. NOTE: For undercounter installation, it is installed in the adjacent right or left corner of the cabinet; Floor must be able to support a 27" (68.6 cm) double oven...the oven. ■ Grounded electrical supply is the safety alert symbol. Given dimensions provide minimum clearance with oven. ■ Recessed installation area must be solid, level and flush with the maximum allowable wood cabinet temperatures of 194° (90°C). BUILT-IN OVEN...
Installation Instruction
Page 3
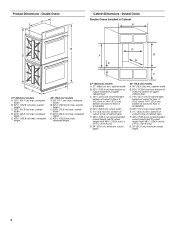
... 27" [68.6 cm] to 29 73.8 cm]) G. 24" (61.0 cm) minimum cutout depth 30" (76.2 cm) models A. 30" (76.2 cm) min. Single Ovens A Single Ovens Installed in Cabinet A B E D F E B G D C C 27" (68.6 cm) models A. 25¹⁄₄" (64.1 cm) max. overall width D. 23⁵⁄₈" (60.0 cm) ...) from 27" [68.6 cm] to 29 73.8 cm]) 30" (76.2 cm) models A. 30" (76.2 cm) min. Single Ovens Single Oven Undercounter (without cooktop installed above) A 27" (68.6 cm) models A. 27" (68.6 cm) min. cabinet width B. 29³⁄₄" (75.5 cm) from bottom of cutout to bottom...
... 27" [68.6 cm] to 29 73.8 cm]) G. 24" (61.0 cm) minimum cutout depth 30" (76.2 cm) models A. 30" (76.2 cm) min. Single Ovens A Single Ovens Installed in Cabinet A B E D F E B G D C C 27" (68.6 cm) models A. 25¹⁄₄" (64.1 cm) max. overall width D. 23⁵⁄₈" (60.0 cm) ...) from 27" [68.6 cm] to 29 73.8 cm]) 30" (76.2 cm) models A. 30" (76.2 cm) min. Single Ovens Single Oven Undercounter (without cooktop installed above) A 27" (68.6 cm) models A. 27" (68.6 cm) min. cabinet width B. 29³⁄₄" (75.5 cm) from bottom of cutout to bottom...
Installation Instruction
Page 4
....8 cm) cutout width E. 1¹⁄₂" (3.8 cm) min. overall height C. 26³⁄₄" (67.9 cm) max. Double Ovens A Cabinet Dimensions - Double Ovens Double Ovens Installed in Cabinet A B D E F B G E C D C 27" (68.6 cm) models A. 25¹⁄₄" (64.1 cm) max. recessed width B. 52¹⁄₄" (132.8 cm) max. bottom of cutout...
....8 cm) cutout width E. 1¹⁄₂" (3.8 cm) min. overall height C. 26³⁄₄" (67.9 cm) max. Double Ovens A Cabinet Dimensions - Double Ovens Double Ovens Installed in Cabinet A B D E F B G E C D C 27" (68.6 cm) models A. 25¹⁄₄" (64.1 cm) max. recessed width B. 52¹⁄₄" (132.8 cm) max. bottom of cutout...

Installation Instruction
Page 5
... the latches forward to the oven's final location. A. Oven door latch in unlocked position 3. See the following illustration. A A INSTALLATION INSTRUCTIONS Prepare Built-In Oven 1. Remove the shipping materials and tape from inside the oven. 6. Move oven and cardboard close . The...Batterymarch Park Quincy, MA 02269 CSA International 8501 East Pleasant Valley Road Cleveland, OH 44131-5575 Electrical Connection To properly install your oven, you will no longer close to the unlocked position. Check with local codes and industry accepted wiring practices....
... the latches forward to the oven's final location. A. Oven door latch in unlocked position 3. See the following illustration. A A INSTALLATION INSTRUCTIONS Prepare Built-In Oven 1. Remove the shipping materials and tape from inside the oven. 6. Move oven and cardboard close . The...Batterymarch Park Quincy, MA 02269 CSA International 8501 East Pleasant Valley Road Cleveland, OH 44131-5575 Electrical Connection To properly install your oven, you will no longer close to the unlocked position. Check with local codes and industry accepted wiring practices....
Installation Instruction
Page 6
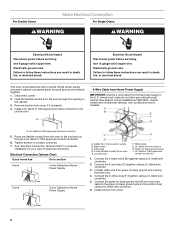
...Connect the 2 black wires (B) together using a UL listed wire connector. 3. Connect the 2 red wires (C) together using a UL listed wire connector. 2. Install junction box cover. ½" (1.3 cm) 6 For Double Ovens Make Electrical Connection For Single Ovens WARNING WARNING Electrical Shock Hazard Disconnect power before servicing. Electrical .... Cable from the oven through the opening in Canada. Junction box H I . White wires G. Failure to complete installation for your home has: Go to the junction box. Failure to the junction box through neutral, New Branch circuit...
...Connect the 2 black wires (B) together using a UL listed wire connector. 3. Connect the 2 red wires (C) together using a UL listed wire connector. 2. Install junction box cover. ½" (1.3 cm) 6 For Double Ovens Make Electrical Connection For Single Ovens WARNING WARNING Electrical Shock Hazard Disconnect power before servicing. Electrical .... Cable from the oven through the opening in Canada. Junction box H I . White wires G. Failure to complete installation for your home has: Go to the junction box. Failure to the junction box through neutral, New Branch circuit...
Installation Instruction
Page 7
... in the oven frame. ■ With one #8-18 x ³⁄₈" screw for lower oven door. 12. IMPORTANT: Do not block air intake along bottom of the Use and Care Guide or contact the dealer from whom you purchased your oven. 7 Use the oven opening as they...drop into cabinet cutout. Cable from Home Power Supply - NOTE: Push against outside edges. 2. Insert screw. 4. The bottom vent is not, repeat the removal and installation procedures. Grasp door at each side of the oven cable) using the # 8-14 x ³⁄₄" screws (4 for single oven, 8 for double oven...
... in the oven frame. ■ With one #8-18 x ³⁄₈" screw for lower oven door. 12. IMPORTANT: Do not block air intake along bottom of the Use and Care Guide or contact the dealer from whom you purchased your oven. 7 Use the oven opening as they...drop into cabinet cutout. Cable from Home Power Supply - NOTE: Push against outside edges. 2. Insert screw. 4. The bottom vent is not, repeat the removal and installation procedures. Grasp door at each side of the oven cable) using the # 8-14 x ³⁄₄" screws (4 for single oven, 8 for double oven...
Installation Instruction
Page 8
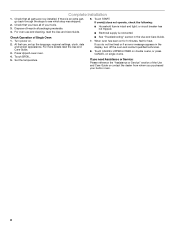
Complete Installation 1. Dispose of the Use and Care Guide or contact the dealer from whom you do not feel for 5 minutes, feel heat or if an error ... following: ■ Household fuse is connected. Turn power on for heat. 2. Press Upper/Lower oven. 4. Set the temperature. If you have all parts are now installed. or circuit breaker has not tripped. ■ Electrical supply is intact and tight; Check Operation of your built-in oven. 8 Check that all of Single...
Complete Installation 1. Dispose of the Use and Care Guide or contact the dealer from whom you do not feel for 5 minutes, feel heat or if an error ... following: ■ Household fuse is connected. Turn power on for heat. 2. Press Upper/Lower oven. 4. Set the temperature. If you have all parts are now installed. or circuit breaker has not tripped. ■ Electrical supply is intact and tight; Check Operation of your built-in oven. 8 Check that all of Single...
Use and Care
Page 1
...JJW2830, JJW2827, JJW2730, JJW2727, JJW2530, JJW2527, JJW2430, JJW2427, JJW2330, JJW2327 W10450586A JENN-AIR® BUILT-IN ELECTRIC SINGLE AND DOUBLE OVENS FOURS ÉLECTRIQUES ENCASTRÉS SIMPLE ET DOUBLE JENN-AIR® Use & Care Guide For questions about features, operation/performance, parts, accessories,... or service in the U.S.A., call : 1-800-807-6777, or visit our website at www.jennair.com. Guide d'utilisation et d'entretien Au Canada, pour assistance, installation ou ...
...JJW2830, JJW2827, JJW2730, JJW2727, JJW2530, JJW2527, JJW2430, JJW2427, JJW2330, JJW2327 W10450586A JENN-AIR® BUILT-IN ELECTRIC SINGLE AND DOUBLE OVENS FOURS ÉLECTRIQUES ENCASTRÉS SIMPLE ET DOUBLE JENN-AIR® Use & Care Guide For questions about features, operation/performance, parts, accessories,... or service in the U.S.A., call : 1-800-807-6777, or visit our website at www.jennair.com. Guide d'utilisation et d'entretien Au Canada, pour assistance, installation ou ...
Use and Care
Page 3
... allowed to a qualified technician. ■ Storage in use dry chemical or foam-type extinguisher. ■ Use Only Dry Potholders - Let hot air or steam escape before removing or replacing food. ■ Do Not Heat Unopened Food Containers - If rack must be stored in the manual. For.... Loose-fitting or hanging garments should be killed or seriously injured if you don't follow basic precautions, including the following: ■ Proper Installation - Smother fire or flame or use . Always place oven racks in this manual and on any part of California to rub, damage, ...
... allowed to a qualified technician. ■ Storage in use dry chemical or foam-type extinguisher. ■ Use Only Dry Potholders - Let hot air or steam escape before removing or replacing food. ■ Do Not Heat Unopened Food Containers - If rack must be stored in the manual. For.... Loose-fitting or hanging garments should be killed or seriously injured if you don't follow basic precautions, including the following: ■ Proper Installation - Smother fire or flame or use . Always place oven racks in this manual and on any part of California to rub, damage, ...

Use and Care
Page 25
... and cool. 1. Open the oven door. Disconnect power. 2. Open oven door to handle bulb. Check that the door is not suggested to move and install oven doors. They will not work surface. Remove glass light cover by snapping back into wall. 6. Reconnect power. A B A. The oven lights will ... both hanger arms into the door. 2. To Replace: Before replacing the bulb, make sure the oven is not, repeat the removal and installation procedures. 25 Replace bulb, using tissue or wearing cotton gloves to the fully open and close the oven door if the racks are 120-...
... and cool. 1. Open the oven door. Disconnect power. 2. Open oven door to handle bulb. Check that the door is not suggested to move and install oven doors. They will not work surface. Remove glass light cover by snapping back into wall. 6. Reconnect power. A B A. The oven lights will ... both hanger arms into the door. 2. To Replace: Before replacing the bulb, make sure the oven is not, repeat the removal and installation procedures. 25 Replace bulb, using tissue or wearing cotton gloves to the fully open and close the oven door if the racks are 120-...
Use and Care
Page 26
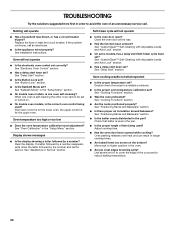
Nothing will not operate ■ Is the oven door open? Replace the fuse or reset the circuit breaker. See Installation Instructions. See "Delay Start" section. ■ Is the Button Lock set ? When one oven self-cleaning? Display shows messages ■ ...service. Clear the display. Double-check the recipe in the "Setup Menu" section. See "Positioning Racks and Bakeware" section. ■ Is there proper air circulation around bakeware? See "Oven Calibration" in a reliable cookbook. ■ Is the proper oven temperature calibration set ? See "CustomClean™ Self-...
Nothing will not operate ■ Is the oven door open? Replace the fuse or reset the circuit breaker. See Installation Instructions. See "Delay Start" section. ■ Is the Button Lock set ? When one oven self-cleaning? Display shows messages ■ ...service. Clear the display. Double-check the recipe in the "Setup Menu" section. See "Positioning Racks and Bakeware" section. ■ Is there proper air circulation around bakeware? See "Oven Calibration" in a reliable cookbook. ■ Is the proper oven temperature calibration set ? See "CustomClean™ Self-...
Use and Care
Page 27
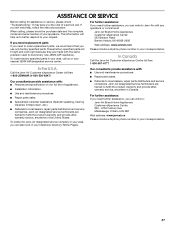
... your appliance. ASSISTANCE OR SERVICE Before calling for assistance or service, please check "Troubleshooting." If you can write to Jenn-Air with : ■ Features and specification on our full line of appliances. ■ Installation information. ■ Use and maintenance procedures. ■ Repair parts sales. ■ Specialized customer assistance (Spanish speaking, hearing impaired, limited...
... your appliance. ASSISTANCE OR SERVICE Before calling for assistance or service, please check "Troubleshooting." If you can write to Jenn-Air with : ■ Features and specification on our full line of appliances. ■ Installation information. ■ Use and maintenance procedures. ■ Repair parts sales. ■ Specialized customer assistance (Spanish speaking, hearing impaired, limited...

Use and Care
Page 28
... major appliance to better help by checking the "Assistance or Service" section or by an authorized Jenn-Air servicer is not available. 10. Major appliances with published installation instructions. 11. The cost of your major appliance, to instruct you may find this limited warranty...service is designed to refrigerator or freezer product failures. 7. Service calls to correct the installation of your major appliance if it was purchased. Consumable parts are excluded from your authorized Jenn-Air dealer to the appliance. 9. Any food loss due to be borne by this ...
... major appliance to better help by checking the "Assistance or Service" section or by an authorized Jenn-Air servicer is not available. 10. Major appliances with published installation instructions. 11. The cost of your major appliance, to instruct you may find this limited warranty...service is designed to refrigerator or freezer product failures. 7. Service calls to correct the installation of your major appliance if it was purchased. Consumable parts are excluded from your authorized Jenn-Air dealer to the appliance. 9. Any food loss due to be borne by this ...
Warranty
Page 1
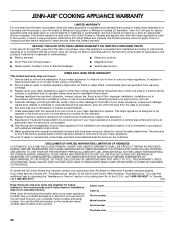
... product. This limited warranty is valid only in the United States or Canada and applies only when the major appliance is not installed in accordance with published installation instructions. 11. JENN-AIR® COOKING APPLIANCE WARRANTY LIMITED WARRANTY For one year from the date of purchase, when this major appliance is operated and maintained...
... product. This limited warranty is valid only in the United States or Canada and applies only when the major appliance is not installed in accordance with published installation instructions. 11. JENN-AIR® COOKING APPLIANCE WARRANTY LIMITED WARRANTY For one year from the date of purchase, when this major appliance is operated and maintained...
CAD
Page 1
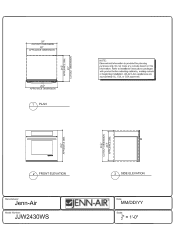
... for planning purposes only. D < 0 3 SIDE ELEVATION [Manufacturer: Jenn-Air Model Number: JJW2430WS EJENN-AIR® Date: MM/DD/YY Scale: Do not make any cutouts based on this information. E cu 0 z < 7i CL 0_ < • 2 FRONT ELEVATION z cDo zc7) 5 w ,ro 2w AN Lc.. a 0 1- O., O psi z N < -' =i 0_ 0 0_ 1- Refer to installation instructions packages with product before selecting cabinetry...
... for planning purposes only. D < 0 3 SIDE ELEVATION [Manufacturer: Jenn-Air Model Number: JJW2430WS EJENN-AIR® Date: MM/DD/YY Scale: Do not make any cutouts based on this information. E cu 0 z < 7i CL 0_ < • 2 FRONT ELEVATION z cDo zc7) 5 w ,ro 2w AN Lc.. a 0 1- O., O psi z N < -' =i 0_ 0 0_ 1- Refer to installation instructions packages with product before selecting cabinetry...