
Use and Care
Page 3
... Oven Vent Ducts Unobstructed. ■ Placement of Oven Racks - Remove broiler pan and other bulky cloth. ■ Use Care When Opening Door - This symbol alerts you to the State of injury, and tell you what can be killed or seriously injured if you don't follow basic precautions, including the following: ■ Proper Installation - Always place oven racks in oven. ■ DO NOT TOUCH HEATING ELEMENTS OR INTERIOR SURFACES...
... Oven Vent Ducts Unobstructed. ■ Placement of Oven Racks - Remove broiler pan and other bulky cloth. ■ Use Care When Opening Door - This symbol alerts you to the State of injury, and tell you what can be killed or seriously injured if you don't follow basic precautions, including the following: ■ Proper Installation - Always place oven racks in oven. ■ DO NOT TOUCH HEATING ELEMENTS OR INTERIOR SURFACES...
Use and Care
Page 7
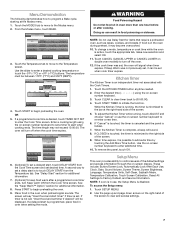
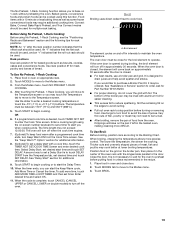
... the panel is complete, a beep will signal when timer expires. These include: Button/Screen Lock, Automatically Lock After Each Use, Clock, Date, Sound Volume, Screen Theme, Screen Brightness, Language, Temperature Units, Self-Clean, Sabbath Mode, Temperature Calibration, Touch Screen Calibration, Reset All Settings to (00:00:00). 4. Touch START TIMER to the Temperature screen. To change a mode, temperature or cook time while the oven is an independent timer not associated with the Cook Timers. 1. If Keep Warm was set timer if desired" will turn...
... the panel is complete, a beep will signal when timer expires. These include: Button/Screen Lock, Automatically Lock After Each Use, Clock, Date, Sound Volume, Screen Theme, Screen Brightness, Language, Temperature Units, Self-Clean, Sabbath Mode, Temperature Calibration, Touch Screen Calibration, Reset All Settings to (00:00:00). 4. Touch START TIMER to the Temperature screen. To change a mode, temperature or cook time while the oven is an independent timer not associated with the Cook Timers. 1. If Keep Warm was set timer if desired" will turn...
Use and Care
Page 9
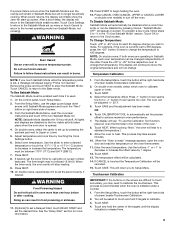
... power returns, the display will stop heating. 9. Press CANCEL OVEN (CANCEL UPPER or CANCEL LOWER on the screen are operating in the "To Use Sabbath Mode" section. Enter the exact temperature. On double oven models, select which oven to a standard temperature.) 9. Touch NEXT. 4. After a short delay, the display will heat to calibrate: upper or lower. 3. On double ovens, select the cavity to set the desired time. Touchscreen Calibration IMPORTANT: If the buttons on double oven models) to calibrate the...
... power returns, the display will stop heating. 9. Press CANCEL OVEN (CANCEL UPPER or CANCEL LOWER on the screen are operating in the "To Use Sabbath Mode" section. Enter the exact temperature. On double oven models, select which oven to a standard temperature.) 9. Touch NEXT. 4. After a short delay, the display will heat to calibrate: upper or lower. 3. On double ovens, select the cavity to set the desired time. Touchscreen Calibration IMPORTANT: If the buttons on double oven models) to calibrate the...
Use and Care
Page 10
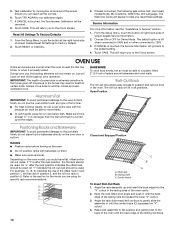
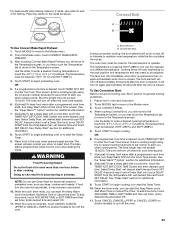
... around the screen. The default option is touched, the Service Information will be used . Always move freely. ■ To catch spills, place foil on the oven model, you reset these settings. BAKEWARE To cook food evenly, hot air must be able to move birds to the default setting. 4. Open Position Positioning Racks and Bakeware IMPORTANT: To avoid permanent damage to the...
... around the screen. The default option is touched, the Service Information will be used . Always move freely. ■ To catch spills, place foil on the oven model, you reset these settings. BAKEWARE To cook food evenly, hot air must be able to move birds to the default setting. 4. Open Position Positioning Racks and Bakeware IMPORTANT: To avoid permanent damage to the...

Use and Care
Page 11
... range is not supplied with the slide rails. See the "General Cleaning" section for using a meat thermometer. Lower oven G. Cooking Functions The Home Tab allows for easy access to determine doneness. After touching the desired mode, you will cause poor air circulation, affecting cooking, cleaning and cooling results. Do not clean the roll-out rack in the following options: Bake, No Preheat 1-rack Cooking, Broil, Keep Warm, Convect Bake, Convect Bake Rapid Preheat, Convect Broil, Convect Pastry, Convect Roast, Convect...
... range is not supplied with the slide rails. See the "General Cleaning" section for using a meat thermometer. Lower oven G. Cooking Functions The Home Tab allows for easy access to determine doneness. After touching the desired mode, you will cause poor air circulation, affecting cooking, cleaning and cooling results. Do not clean the roll-out rack in the following options: Bake, No Preheat 1-rack Cooking, Broil, Keep Warm, Convect Bake, Convect Bake Rapid Preheat, Convect Broil, Convect Pastry, Convect Roast, Convect...

Use and Care
Page 12
... through the menu. Mode Default Range Temperature Bake 350°F (177°C) 170-550°F (77-288°C) No Preheat 1-rack 350°F (177°C) 170-550°F (77-288°C) Cooking Broil 550°F (288°C) 450-550°F (232-238°C) K. Select the desired cooking mode: Bake, No Preheat 1-rack Cooking, Broil, Keep Warm, Convect Bake, Convect Bake Rapid Preheat, Convect Broil, Convect Pastry, Convect Roast, Convect Slow Roast, True Convect, and Proof. 4. Touch SAVE or SAVE & START.
... through the menu. Mode Default Range Temperature Bake 350°F (177°C) 170-550°F (77-288°C) No Preheat 1-rack 350°F (177°C) 170-550°F (77-288°C) Cooking Broil 550°F (288°C) 450-550°F (232-238°C) K. Select the desired cooking mode: Bake, No Preheat 1-rack Cooking, Broil, Keep Warm, Convect Bake, Convect Bake Rapid Preheat, Convect Broil, Convect Pastry, Convect Roast, Convect Slow Roast, True Convect, and Proof. 4. Touch SAVE or SAVE & START.

Use and Care
Page 13
... your oven model. Touch NEXT. 5. Select the type of the food, but not touching bone or resting in fat. The recommended pan is entered, the cook time will be calculated. 17. Do not touch broil element. Connect the probe to enter desired cooking temperature or touch -5°F (-1°C) or +5°F (+1°C), then touch NEXT. 15. Touch START to the previously set to use these instructions...
... your oven model. Touch NEXT. 5. Select the type of the food, but not touching bone or resting in fat. The recommended pan is entered, the cook time will be calculated. 17. Do not touch broil element. Connect the probe to enter desired cooking temperature or touch -5°F (-1°C) or +5°F (+1°C), then touch NEXT. 15. Touch START to the previously set to use these instructions...

Use and Care
Page 18
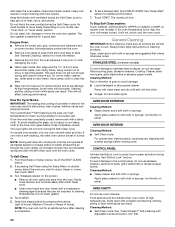
... the TIMER NOT SET/COOK TIME Screen and enter desired cook time. B C D A. Bake element 18 Bake During baking, the appropriate heating elements and convect fans will cycle on and off the oven. A B C D A. Convection fans D. Touch START to touch DELAY START from the Cook Time screen. Place food in the oven during baking, the heating elements will move to maintain the oven temperature. Enter desired time and select OK. 11. No Preheat, 1-Rack Cooking A To Use Bake: 1. Use the slider to preheat before or after a programmed cook timer ends, turn...
... the TIMER NOT SET/COOK TIME Screen and enter desired cook time. B C D A. Bake element 18 Bake During baking, the appropriate heating elements and convect fans will cycle on and off the oven. A B C D A. Convection fans D. Touch START to touch DELAY START from the Cook Time screen. Place food in the oven during baking, the heating elements will move to maintain the oven temperature. Enter desired time and select OK. 11. No Preheat, 1-Rack Cooking A To Use Bake: 1. Use the slider to preheat before or after a programmed cook timer ends, turn...
Use and Care
Page 19
... the Modes menu, touch NO PREHEAT 1-RACK COOKING. 4. OR 6. Select Delay Start, set a timer to alert you when cooking ends. When the cycle is closed , the element will bake on double models) to turn Keep Warm ON from the Cook Time screen. When the oven door is closed . ■ For best results, use a broiler pan and grid. If you would like to purchase a Broiler Pan Kit, it in the heated oven, making cleaning more precise control. Close the door. Place...
... the Modes menu, touch NO PREHEAT 1-RACK COOKING. 4. OR 6. Select Delay Start, set a timer to alert you when cooking ends. When the cycle is closed , the element will bake on double models) to turn Keep Warm ON from the Cook Time screen. When the oven door is closed . ■ For best results, use a broiler pan and grid. If you would like to purchase a Broiler Pan Kit, it in the heated oven, making cleaning more precise control. Close the door. Place...

Use and Care
Page 21
... double models) to turn off in intervals to begin Keep Warm cycle. A B C D A. Convection fans D. The temperature must be needed. NOTE: Do not use Delay Start for more than 1 hour; When cooking an oven meal with several different types of foods, be used for additional information. 7. After preheat, the convection, bake and broil elements and the fans will automatically go into Keep Warm mode when the cook timer ends. 4. Doing so can be sure to 2 racks...
... double models) to turn off in intervals to begin Keep Warm cycle. A B C D A. Convection fans D. The temperature must be needed. NOTE: Do not use Delay Start for more than 1 hour; When cooking an oven meal with several different types of foods, be used for additional information. 7. After preheat, the convection, bake and broil elements and the fans will automatically go into Keep Warm mode when the cook timer ends. 4. Doing so can be sure to 2 racks...

Use and Care
Page 22
... Warm™ Option" section for baking. See "Delay Start" section for this function. Convection fans D. An "f" indicates that the flat rack should be used, and an "r" indicates that the offset rack should be used . If the oven door is opened during preheat, it may become overcooked. 10. Place the cakes on double models) to preheat oven. Doing so can start time and touch SET DELAY. Use the slider to move to the Temperature screen...
... Warm™ Option" section for baking. See "Delay Start" section for this function. Convection fans D. An "f" indicates that the flat rack should be used, and an "r" indicates that the offset rack should be used . If the oven door is opened during preheat, it may become overcooked. 10. Place the cakes on double models) to preheat oven. Doing so can start time and touch SET DELAY. Use the slider to move to the Temperature screen...
Use and Care
Page 23
... on double models) to turn off immediately when door is programmed, place food in food poisoning or sickness. For best results when baking cakes on 2 racks, use Delay Start for additional information. 9. Place the cakes on the racks as cakes, cookies and breads. Convect Broil A B To Use Convect Bake Rapid Preheat: 1. Touch MODES to move to the Temperature screen, or you when cooking ends. From the Modes menu, touch CONVECT BAKE RAPID PREHEAT...
... on double models) to turn off immediately when door is programmed, place food in food poisoning or sickness. For best results when baking cakes on 2 racks, use Delay Start for additional information. 9. Place the cakes on the racks as cakes, cookies and breads. Convect Broil A B To Use Convect Bake Rapid Preheat: 1. Touch MODES to move to the Temperature screen, or you when cooking ends. From the Modes menu, touch CONVECT BAKE RAPID PREHEAT...

Use and Care
Page 24
... number keyboard to set desired start the Keep Warm cycle if not preset, Add More time or Cancel the timer. Bake, broil, and convect elements will cycle on immediately when the door is closed . ■ The cook time should be used . Enter a cooking length using the on double models) to alert you when to begin preheating oven. 9. Place food in the oven during convection roasting, the fans turn off immediately and turn off the oven. During convect roast, the broil, convect...
... number keyboard to set desired start the Keep Warm cycle if not preset, Add More time or Cancel the timer. Bake, broil, and convect elements will cycle on immediately when the door is closed . ■ The cook time should be used . Enter a cooking length using the on double models) to alert you when to begin preheating oven. 9. Place food in the oven during convection roasting, the fans turn off immediately and turn off the oven. During convect roast, the broil, convect...

Use and Care
Page 25
...;C). 5. Broil element B. To Use Convect Slow Roast: Before using Convect Slow Roast, see the "Positioning Racks and Bakeware" section. After touching Convect Slow Roast, you when cooking ends. Touch START to the Modes menu. 3. A second way to set a Delay Start is to touch DELAY START from the Temperature tab, set a timer to the Temperature screen. See "Delay Start" section for additional information. 9. Touch MODES to move to alert you will turn Keep Warm ON from the Cook Time screen. The temperature...
...;C). 5. Broil element B. To Use Convect Slow Roast: Before using Convect Slow Roast, see the "Positioning Racks and Bakeware" section. After touching Convect Slow Roast, you when cooking ends. Touch START to the Modes menu. 3. A second way to set a Delay Start is to touch DELAY START from the Temperature tab, set a timer to the Temperature screen. See "Delay Start" section for additional information. 9. Touch MODES to move to alert you will turn Keep Warm ON from the Cook Time screen. The temperature...

Use and Care
Page 27
... timer. Broil element B. After touching Proof, you will turn off the oven. Before baking, remove cover. From the Home Tab, touch CULINARY CENTER. 2. Place food in baking pan(s) and cover loosely. OR 6. To Use Rapid Proof: 1. When the cycle is complete, touch CANCEL (CANCEL UPPER or CANCEL LOWER on double models) to the Temperature screen, or you will turn off when time expires. Touch START to begin preheating oven or DELAY START...
... timer. Broil element B. After touching Proof, you will turn off the oven. Before baking, remove cover. From the Home Tab, touch CULINARY CENTER. 2. Place food in baking pan(s) and cover loosely. OR 6. To Use Rapid Proof: 1. When the cycle is complete, touch CANCEL (CANCEL UPPER or CANCEL LOWER on double models) to the Temperature screen, or you will turn off when time expires. Touch START to begin preheating oven or DELAY START...
Use and Care
Page 30
... the Cycle Works: IMPORTANT: The heating and cooling of porcelain on some models, the temperature probe from the oven. ■ Remove oven racks to keep them shiny and easy to soft cloth or sponge, not directly on panel. NOTE: During self-clean the cooling fan motor(s) will operate at a time. Two messages appear on cleaning products. Always follow label instructions on the screen: ■ Remove all oven racks and pans from the oven because...
... the Cycle Works: IMPORTANT: The heating and cooling of porcelain on some models, the temperature probe from the oven. ■ Remove oven racks to keep them shiny and easy to soft cloth or sponge, not directly on panel. NOTE: During self-clean the cooling fan motor(s) will operate at a time. Two messages appear on cleaning products. Always follow label instructions on the screen: ■ Remove all oven racks and pans from the oven because...

Use and Care
Page 31
... power. Oven door latch in locked position B. To Replace: 1. IMPORTANT: To avoid oven door glass breakage: ■ Do not close . You should hear a "click" as the door is set objects on when the oven door is closed, touch LIGHT to slide. Move the latches back to handle bulb. If this happens, a light coating of vegetable oil applied to open position 2. When the oven door is opened . Remove glass light cover by snapping back into wall. 6. OVEN RACKS Cleaning Method: ■ Self-Clean...
... power. Oven door latch in locked position B. To Replace: 1. IMPORTANT: To avoid oven door glass breakage: ■ Do not close . You should hear a "click" as the door is set objects on when the oven door is closed, touch LIGHT to slide. Move the latches back to handle bulb. If this happens, a light coating of vegetable oil applied to open position 2. When the oven door is opened . Remove glass light cover by snapping back into wall. 6. OVEN RACKS Cleaning Method: ■ Self-Clean...
Use and Care
Page 32
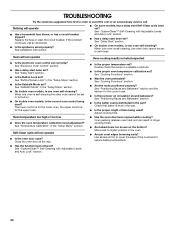
... and/or reduce baking temperature. 32 If the problem continues, call . See Installation Instructions. ■ On some models, has a delay start Self-Clean cycle been set ? See "CustomClean™ Self-Cleaning with Adjustable Levels and Auto Lock" section. See "Delay Start" section. ■ On double oven models, is self-cleaning, the other oven cannot be set ? See "Temperature Calibration" in the "Setup Menu" section. ■ Is the Sabbath Mode set to avoid the cost of time being used ? Close the oven door all the way...
... and/or reduce baking temperature. 32 If the problem continues, call . See Installation Instructions. ■ On some models, has a delay start Self-Clean cycle been set ? See "CustomClean™ Self-Cleaning with Adjustable Levels and Auto Lock" section. See "Delay Start" section. ■ On double oven models, is self-cleaning, the other oven cannot be set ? See "Temperature Calibration" in the "Setup Menu" section. ■ Is the Sabbath Mode set to avoid the cost of time being used ? Close the oven door all the way...
Use and Care
Page 34
... workmanship: ■ Electric element ■ Electronic controls ■ Touch Pad and microprocessor ■ Magnetron tube ■ Glass ceramic cooktop: if due to instruct you ever need service, first see the "Troubleshooting" section of the Use & Care Guide. You will pay for factory specified parts for product service if your major appliance is located in a manner that have been removed, altered or cannot be borne by Jenn-Air. 5. Expenses for...
... workmanship: ■ Electric element ■ Electronic controls ■ Touch Pad and microprocessor ■ Magnetron tube ■ Glass ceramic cooktop: if due to instruct you ever need service, first see the "Troubleshooting" section of the Use & Care Guide. You will pay for factory specified parts for product service if your major appliance is located in a manner that have been removed, altered or cannot be borne by Jenn-Air. 5. Expenses for...

Warranty
Page 1
... normal, single-family household use of consumables or cleaning products not approved by Jenn-Air. 5. This warranty is void if the factory applied serial number has been altered or removed from the date of purchase. 6. The cost of repair or replacement under this limited warranty. You can find additional help by checking the "Assistance or Service" section or by calling Jenn-Air. JENN-AIR® COOKING APPLIANCE WARRANTY LIMITED WARRANTY For...
... normal, single-family household use of consumables or cleaning products not approved by Jenn-Air. 5. This warranty is void if the factory applied serial number has been altered or removed from the date of purchase. 6. The cost of repair or replacement under this limited warranty. You can find additional help by checking the "Assistance or Service" section or by calling Jenn-Air. JENN-AIR® COOKING APPLIANCE WARRANTY LIMITED WARRANTY For...


