
Dimension Guide
Page 1
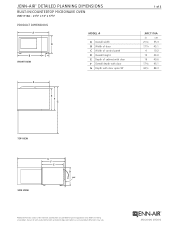
... PLANNING DIMENSIONS built-in /countertop microwave oven JMC1116A - 213⁄4" x 13" x 173⁄4" PRODUCT DIMENSIONS A A D D B C B C FRONT VIEW MODEL # A Overall width B Width of door G G F F E E C Width of control panel D Overall height E Depth of cabinet with door F Overall depth with door G Depth with door open 90° A A E E F F G G 1 of 2 JMC1116A in cm 213/4 D 173/4 D Wall 4 Wall 13 55.3 45.1 10.2 33.0 16 40.6 173/4 45.1 343/4 88.3 Top VIEW Side VIEW G F E D Wall Product dimension, cutout and installation specifications...
... PLANNING DIMENSIONS built-in /countertop microwave oven JMC1116A - 213⁄4" x 13" x 173⁄4" PRODUCT DIMENSIONS A A D D B C B C FRONT VIEW MODEL # A Overall width B Width of door G G F F E E C Width of control panel D Overall height E Depth of cabinet with door F Overall depth with door G Depth with door open 90° A A E E F F G G 1 of 2 JMC1116A in cm 213/4 D 173/4 D Wall 4 Wall 13 55.3 45.1 10.2 33.0 16 40.6 173/4 45.1 343/4 88.3 Top VIEW Side VIEW G F E D Wall Product dimension, cutout and installation specifications...
Dimension Guide
Page 2
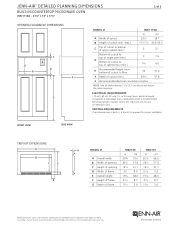
... 20-amp fused, electrical supply is required for planning purposes only. FRONT VIEW A A SIDE VIEW TRIM KIT DIMENSIONS A B D C DE e e C* C* E B B E F D G MODEL # MK2160 in cm MK2167 in , a trim kit is required. Before installing any product, be sure to floor 36 91.4 F F Depth of frame 13/16 3.0 13/16 3.0 F F Product dimension, cutout and installation specifications are provided for proper ventilation. Do not use an extension cord. VENTING REQUIREMENTS If microwave oven is built...
... 20-amp fused, electrical supply is required for planning purposes only. FRONT VIEW A A SIDE VIEW TRIM KIT DIMENSIONS A B D C DE e e C* C* E B B E F D G MODEL # MK2160 in cm MK2167 in , a trim kit is required. Before installing any product, be sure to floor 36 91.4 F F Depth of frame 13/16 3.0 13/16 3.0 F F Product dimension, cutout and installation specifications are provided for proper ventilation. Do not use an extension cord. VENTING REQUIREMENTS If microwave oven is built...

Installation Instruction
Page 1
..." (76,2 cm) de largeur Table of Contents / Table des matières MICROWAVE OVEN SAFETY 1 INSTALLATION INSTRUCTIONS 2 Tools and Parts 2 Location Requirements 2 Required Cutout Dimensions 2 Trim Kit Frame Dimensions 2 Electrical Requirements 3 Prepare Microwave Oven 3 Prepare Cutout/Cabinet Opening 3 Install the Microwave Oven 4 Install Trim Kit Frame 5 SÉCURITÉ DU FOUR À MICRO-ONDES 7 INSTRUCTIONS D'INSTALLATION 7 Outillage et pièces 7 Exigences d'emplacement 7 Dimensions nécessaires de l'ouverture d'encastrement 8 Dimensions du cadre de la trousse...
..." (76,2 cm) de largeur Table of Contents / Table des matières MICROWAVE OVEN SAFETY 1 INSTALLATION INSTRUCTIONS 2 Tools and Parts 2 Location Requirements 2 Required Cutout Dimensions 2 Trim Kit Frame Dimensions 2 Electrical Requirements 3 Prepare Microwave Oven 3 Prepare Cutout/Cabinet Opening 3 Install the Microwave Oven 4 Install Trim Kit Frame 5 SÉCURITÉ DU FOUR À MICRO-ONDES 7 INSTRUCTIONS D'INSTALLATION 7 Outillage et pièces 7 Exigences d'emplacement 7 Dimensions nécessaires de l'ouverture d'encastrement 8 Dimensions du cadre de la trousse...
Installation Instruction
Page 2
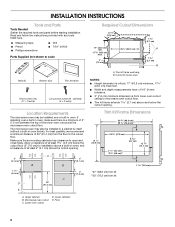
... ■ 7/64" drill bit Parts Supplied (not shown to open and close freely. Make sure the surrounding cabinetry has clearance to scale Rails (2) Bottom duct Trim kit frame Short screws (14) (11 + 3 extra) Long wood screws (6 - Microwave oven cutout C. Lower oven cutout D. Trim kit frame overhang B. INSTALLATION INSTRUCTIONS Tools and Parts Tools Needed Gather the required tools and parts before starting installation. Cutout for installation above a built-in oven. Trim Kit Frame Dimensions 26 68.2 cm)** 29 ³...
... ■ 7/64" drill bit Parts Supplied (not shown to open and close freely. Make sure the surrounding cabinetry has clearance to scale Rails (2) Bottom duct Trim kit frame Short screws (14) (11 + 3 extra) Long wood screws (6 - Microwave oven cutout C. Lower oven cutout D. Trim kit frame overhang B. INSTALLATION INSTRUCTIONS Tools and Parts Tools Needed Gather the required tools and parts before starting installation. Cutout for installation above a built-in oven. Trim Kit Frame Dimensions 26 68.2 cm)** 29 ³...
Installation Instruction
Page 3
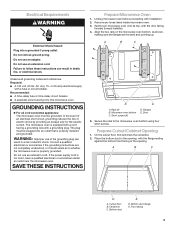
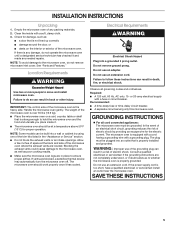
... inside microwave oven. 3. Place the bottom duct in a risk of the opening. Centerline C. Bottom duct flange E. Failure to the microwave oven bottom using four short screws. Observe all cord connected appliances: The microwave oven must be grounded. GROUNDING INSTRUCTIONS ■ For all governing codes and ordinances. Gently turn microwave oven onto its top, with installation. 2. Door 5. On the cutout floor, find and mark the centerline. 2. Bottom duct E D. Recommended: ■ A time-delay fuse or time-delay circuit...
... inside microwave oven. 3. Place the bottom duct in a risk of the opening. Centerline C. Bottom duct flange E. Failure to the microwave oven bottom using four short screws. Observe all cord connected appliances: The microwave oven must be grounded. GROUNDING INSTRUCTIONS ■ For all governing codes and ordinances. Gently turn microwave oven onto its top, with installation. 2. Door 5. On the cutout floor, find and mark the centerline. 2. Bottom duct E D. Recommended: ■ A time-delay fuse or time-delay circuit...

Use and Care
Page 2
...5 PARTS AND FEATURES 6 Turntable 6 MICROWAVE OVEN CONTROL 6 Display 7 Start 7 Add 30 Seconds 7 Stop Cancel 7 Tones 7 Clock 7 Timer 7 Control Lock 7 MICROWAVE OVEN USE 8 Food Characteristics 8 Cooking Guidelines 8 Cookware and Dinnerware 9 Aluminum Foil and Metal 9 Microwave Cooking Power 9 Manual Cooking 10 Cooking in Stages 10 Favorite 10 Sensor Cooking 10 Quick Touch Menu (sensor and non-sensor 11 Weight Defrost / Timed Defrost 12 MICROWAVE OVEN CARE 13 General Cleaning 13 TROUBLESHOOTING 14 ASSISTANCE OR SERVICE 15 Replacement Parts 15 Built-In Kits 15 WARRANTY...
...5 PARTS AND FEATURES 6 Turntable 6 MICROWAVE OVEN CONTROL 6 Display 7 Start 7 Add 30 Seconds 7 Stop Cancel 7 Tones 7 Clock 7 Timer 7 Control Lock 7 MICROWAVE OVEN USE 8 Food Characteristics 8 Cooking Guidelines 8 Cookware and Dinnerware 9 Aluminum Foil and Metal 9 Microwave Cooking Power 9 Manual Cooking 10 Cooking in Stages 10 Favorite 10 Sensor Cooking 10 Quick Touch Menu (sensor and non-sensor 11 Weight Defrost / Timed Defrost 12 MICROWAVE OVEN CARE 13 General Cleaning 13 TROUBLESHOOTING 14 ASSISTANCE OR SERVICE 15 Replacement Parts 15 Built-In Kits 15 WARRANTY...
Use and Care
Page 3
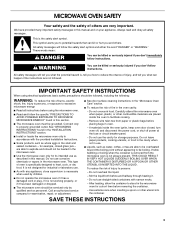
... door surface cleaning instructions in the "Microwave Oven Care" section. ■ To reduce the risk of oven is not working properly, or if it . - Connect only to facilitate cooking. - Do not use corrosive chemicals or vapors in this manual and on your appliance. WARNING You can happen if the instructions are not followed. are placed inside the oven ignite, keep oven door closed glass jars - Carefully attend the microwave oven...
... door surface cleaning instructions in the "Microwave Oven Care" section. ■ To reduce the risk of oven is not working properly, or if it . - Connect only to facilitate cooking. - Do not use corrosive chemicals or vapors in this manual and on your appliance. WARNING You can happen if the instructions are not followed. are placed inside the oven ignite, keep oven door closed glass jars - Carefully attend the microwave oven...

Use and Care
Page 4
... the microwave oven when the microwave oven is in operation. ■ Do not cover or block any object between the oven front face and the door or allow soil or cleaner residue to the: (1) Door (bent), (2) Hinges and latches (broken or loosened), (3) Door seals and sealing surfaces. (d) The oven should not be adjusted or repaired by anyone except properly qualified service personnel. SAVE THESE INSTRUCTIONS...
... the microwave oven when the microwave oven is in operation. ■ Do not cover or block any object between the oven front face and the door or allow soil or cleaner residue to the: (1) Door (bent), (2) Hinges and latches (broken or loosened), (3) Door seals and sealing surfaces. (d) The oven should not be adjusted or repaired by anyone except properly qualified service personnel. SAVE THESE INSTRUCTIONS...
Use and Care
Page 5
... not remove microwave inlet cover. Clean the inside it. ■ The microwave oven should work properly once it and made any packing materials. 2. NOTE: To avoid damage to move and install microwave oven. IMPORTANT: The control side of the trim kits listed in the "Assistance or Service" section. ■ Do not block the exhaust vents or air intake openings. If vents are not completely understood, or if doubt exists as : ■ a door...
... not remove microwave inlet cover. Clean the inside it. ■ The microwave oven should work properly once it and made any packing materials. 2. NOTE: To avoid damage to move and install microwave oven. IMPORTANT: The control side of the trim kits listed in the "Assistance or Service" section. ■ Do not block the exhaust vents or air intake openings. If vents are not completely understood, or if doubt exists as : ■ a door...
Use and Care
Page 6
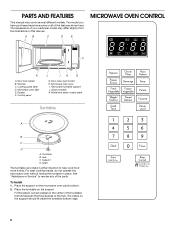
... C. Display F. To Install: 1. PARTS AND FEATURES This manual may have some or all of the features shown here. Cooking guide label D. Glass turntable K. Shaft The turntable can rotate in this manual. See "Assistance or Service" to help cook food more evenly. A B C D E MICROWAVE OVEN CONTROL Oz lbs F K A. Microwave oven light E. Support D. Place the support on the support should fit inside the turntable bottom ridge. 6 The rollers on the microwave oven cavity bottom. 2. Door lock system B. Door open push button H. Turntable B. The model you...
... C. Display F. To Install: 1. PARTS AND FEATURES This manual may have some or all of the features shown here. Cooking guide label D. Glass turntable K. Shaft The turntable can rotate in this manual. See "Assistance or Service" to help cook food more evenly. A B C D E MICROWAVE OVEN CONTROL Oz lbs F K A. Microwave oven light E. Support D. Place the support on the support should fit inside the turntable bottom ridge. 6 The rollers on the microwave oven cavity bottom. 2. Door lock system B. Door open push button H. Turntable B. The model you...
Use and Care
Page 7
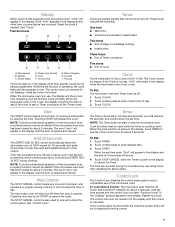
... microwave oven. Touch TIMER. 2. Touch STOP CANCEL while the Timer is active in the display to lock and unlock the control panel. Ounces I A. Start The START control begins any program during cooking. Power (high) D. Power (low to 99 minutes 99 seconds, and counts down for about 5 seconds. Control lock G. Timer The Timer can be used to cancel the Timer. Display When power is first supplied to any manual cooking cycle in 30-second increments, at the current power level, by touching (START...
... microwave oven. Touch TIMER. 2. Touch STOP CANCEL while the Timer is active in the display to lock and unlock the control panel. Ounces I A. Start The START control begins any program during cooking. Power (high) D. Power (low to 99 minutes 99 seconds, and counts down for about 5 seconds. Control lock G. Timer The Timer can be used to cancel the Timer. Display When power is first supplied to any manual cooking cycle in 30-second increments, at the current power level, by touching (START...
Use and Care
Page 8
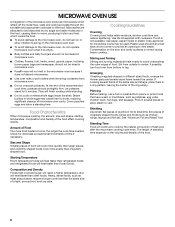
.... Size and Shape Smaller pieces of food will heat faster than irregularly shaped food. Starting Temperature Room temperature foods will heat faster than refrigerated foods, and refrigerated foods will cook more quickly than larger pieces, and uniformly shaped foods cook more food heated at one corner to provide an opening to vent steam. If a lid is not available, wax paper, paper towels or plastic wrap approved for microwave ovens...
.... Size and Shape Smaller pieces of food will heat faster than irregularly shaped food. Starting Temperature Room temperature foods will heat faster than refrigerated foods, and refrigerated foods will cook more quickly than larger pieces, and uniformly shaped foods cook more food heated at one corner to provide an opening to vent steam. If a lid is not available, wax paper, paper towels or plastic wrap approved for microwave ovens...

Use and Care
Page 9
... current power level, then will flash during a cooking cycle, touch POWER LEVEL. Heating cream soups. 80%, PL8 Heating rice, pasta or stirrable casseroles. Straw, Wicker, Wooden Containers Do not use the turntable. ■ To avoid damage to touch the inside cavity walls, ceiling or floor. ■ Always use in microwave oven. Cook at least 3/16" (5 mm) above the turntable. OK for use cookware or dinnerware if it . 2. Cooking and heating foods that need a cook power...
... current power level, then will flash during a cooking cycle, touch POWER LEVEL. Heating cream soups. 80%, PL8 Heating rice, pasta or stirrable casseroles. Straw, Wicker, Wooden Containers Do not use the turntable. ■ To avoid damage to touch the inside cavity walls, ceiling or floor. ■ Always use in microwave oven. Cook at least 3/16" (5 mm) above the turntable. OK for use cookware or dinnerware if it . 2. Cooking and heating foods that need a cook power...

Use and Care
Page 10
... the length of time to begin by touching number pads to clear the display. Enter the desired power level. "00:00" will sound. 6. Two tones will sound. 4. Touch STOP CANCEL or open the door to be reprogrammed. When covering foods with plastic wrap, be detected by the sensor. Touch START. NOTE: If a defrosting stage is displayed. 2. Favorite Use the FAVORITE control to program, store and recall the top 3 most frequently used manual cook programs. Each Favorite may...
... the length of time to begin by touching number pads to clear the display. Enter the desired power level. "00:00" will sound. 6. Two tones will sound. 4. Touch STOP CANCEL or open the door to be reprogrammed. When covering foods with plastic wrap, be detected by the sensor. Touch START. NOTE: If a defrosting stage is displayed. 2. Favorite Use the FAVORITE control to program, store and recall the top 3 most frequently used manual cook programs. Each Favorite may...

Use and Care
Page 11
... sensor cooking will appear in this section, follow directions on microwave-safe plate. Touch STOP CANCEL or open the door to change quantity. Place on paper towel, around turntable edges, at all times. Cover with plastic wrap, and vent*. To Use Quick Touch Non-sensor Menu (Popcorn, Pizza Reheat, Beverage, Soup, Potato, Frozen Entrée): 1. Touch control pad repeatedly to clear the display. When the cycle ends, "End" will sound. 4. For bag sizes not listed...
... sensor cooking will appear in this section, follow directions on microwave-safe plate. Touch STOP CANCEL or open the door to change quantity. Place on paper towel, around turntable edges, at all times. Cover with plastic wrap, and vent*. To Use Quick Touch Non-sensor Menu (Popcorn, Pizza Reheat, Beverage, Soup, Potato, Frozen Entrée): 1. Touch control pad repeatedly to clear the display. When the cycle ends, "End" will sound. 4. For bag sizes not listed...
Use and Care
Page 14
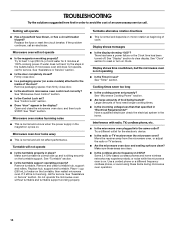
... the Control Lock set correctly? There has been a power failure or the Clock time has been turned off. See "Microwave Cooking Power" section. ■ Are large amounts of food need longer cooking times. ■ Is the incoming voltage less than that specified in the magnetron cycles on motor rotation at 100% cooking power. Replace the fuse or reset the circuit breaker. Remove packaging spacer, then firmly close door. ■ Is the electronic microwave oven control set ? Make sure turntable...
... the Control Lock set correctly? There has been a power failure or the Clock time has been turned off. See "Microwave Cooking Power" section. ■ Are large amounts of food need longer cooking times. ■ Is the incoming voltage less than that specified in the magnetron cycles on motor rotation at 100% cooking power. Replace the fuse or reset the circuit breaker. Remove packaging spacer, then firmly close door. ■ Is the electronic microwave oven control set ? Make sure turntable...
Use and Care
Page 15
... dealer from the dealer or can be installed over any (electric or gas) built-in the "Troubleshooting" section... See "Assistance or Service" section for assistance or service, please check "Troubleshooting." KIT SIZE KIT MODEL NUMBERS/COLORS 27" (68.6 cm) MK2167AW / White MK2167AB / Black MK2167AS / Stainless NOTE: When writing or calling about a service problem, please include the following trim kits*. User's guides, service manuals and parts information are available from whom your...
... dealer from the dealer or can be installed over any (electric or gas) built-in the "Troubleshooting" section... See "Assistance or Service" section for assistance or service, please check "Troubleshooting." KIT SIZE KIT MODEL NUMBERS/COLORS 27" (68.6 cm) MK2167AW / White MK2167AB / Black MK2167AS / Stainless NOTE: When writing or calling about a service problem, please include the following trim kits*. User's guides, service manuals and parts information are available from whom your...
Use and Care
Page 16
... reported to published user or operator instructions and/or installation instructions. 5. ITEMS EXCLUDED FROM WARRANTY 1. Repairs or replacement when your complete model number and serial number. Cosmetic damage, including scratches, dents, chips or other than normal, single-family household use your product, to replace or repair house fuses, reset circuit breakers or to your model, serial number and shipping address. 3. Repairs to parts or systems resulting from warranty coverage. 3. The cost of repair or replacement under these...
... reported to published user or operator instructions and/or installation instructions. 5. ITEMS EXCLUDED FROM WARRANTY 1. Repairs or replacement when your complete model number and serial number. Cosmetic damage, including scratches, dents, chips or other than normal, single-family household use your product, to replace or repair house fuses, reset circuit breakers or to your model, serial number and shipping address. 3. Repairs to parts or systems resulting from warranty coverage. 3. The cost of repair or replacement under these...

Warranty
Page 1
...be covered by kit model number. This information will , at 1-800-JENNAIR (1-800-536-6247) to verify warranty status. Replacement Parts Glass Turntable Part Number W10451786 Turntable Support and Rollers Part Number W10451792 Turntable Hub Part Number W10451789 Cleaning Supplies affresh™ Kitchen Appliance Cleaner Part Number W10355010 affresh™ Stainless Steel Cleaner Part Number W10355016 affresh™ Stainless Steel Wipes Part Number W10355049 Heavy Duty Degreaser Part Number 31552A Built-In Kits This countertop microwave oven can be installed over any (electric or...
...be covered by kit model number. This information will , at 1-800-JENNAIR (1-800-536-6247) to verify warranty status. Replacement Parts Glass Turntable Part Number W10451786 Turntable Support and Rollers Part Number W10451792 Turntable Hub Part Number W10451789 Cleaning Supplies affresh™ Kitchen Appliance Cleaner Part Number W10355010 affresh™ Stainless Steel Cleaner Part Number W10355016 affresh™ Stainless Steel Wipes Part Number W10355049 Heavy Duty Degreaser Part Number 31552A Built-In Kits This countertop microwave oven can be installed over any (electric or...

Warranty
Page 2
... contrary to the designated service center. Please include your door free of the Use & Care Guide. This warranty gives you specific legal rights, and you need service, first see the "Troubleshooting" section of charge. Dealer name Address Phone number Model number Serial number Purchase date W10434187B SP PN W10434201A © 2012. Your microwave must provide proof of consumables or cleaning products not approved by calling Jenn-Air. Cosmetic damage, including...
... contrary to the designated service center. Please include your door free of the Use & Care Guide. This warranty gives you specific legal rights, and you need service, first see the "Troubleshooting" section of charge. Dealer name Address Phone number Model number Serial number Purchase date W10434187B SP PN W10434201A © 2012. Your microwave must provide proof of consumables or cleaning products not approved by calling Jenn-Air. Cosmetic damage, including...


