
Dimension Guide
Page 1
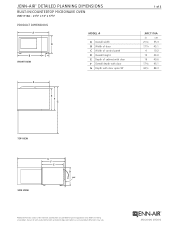
Before installing any product, be sure to verify cutout dimensions and electrical/gas connections as actual product dimensions may vary. JENN-AIR® DETAILED PLANNING DIMENSIONS built-in /countertop microwave oven JMC1116A - 213⁄4" x 13" x 173⁄4" PRODUCT DIMENSIONS A A D D B C B C FRONT VIEW MODEL # A Overall width B Width of door G G F F E E C Width of control panel D Overall height E Depth of...
Before installing any product, be sure to verify cutout dimensions and electrical/gas connections as actual product dimensions may vary. JENN-AIR® DETAILED PLANNING DIMENSIONS built-in /countertop microwave oven JMC1116A - 213⁄4" x 13" x 173⁄4" PRODUCT DIMENSIONS A A D D B C B C FRONT VIEW MODEL # A Overall width B Width of door G G F F E E C Width of control panel D Overall height E Depth of...
Dimension Guide
Page 2
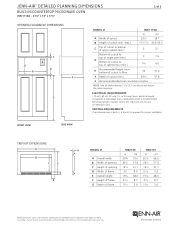
VENTING REQUIREMENTS If microwave oven is built in, a trim kit is 30" (76.2 cm). JRC120106 07/2012 A time-delay fuse or dedicated circuit is required. ELECTRICAL REQUIREMENTS 120 volt, ... 293/4 75.6 267/8 68.2 B Width of opening 22¾ 57.8 22¾ 57.8 C Height of opening . JENN-AIR® DETAILED PLANNING DIMENSIONS built-in /countertop microwave oven JMC1116A - 213⁄4" x 13" x 173⁄4" 2 of 2 OPENING/CLEARANCE DIMENSIONS C C e e B B D D A A F E E MODEL # JMC1116A in cm A Width of cutout 231/8 58.7 B Height of cutout (min.-max.) 17-171/8 43.2-43...
VENTING REQUIREMENTS If microwave oven is built in, a trim kit is 30" (76.2 cm). JRC120106 07/2012 A time-delay fuse or dedicated circuit is required. ELECTRICAL REQUIREMENTS 120 volt, ... 293/4 75.6 267/8 68.2 B Width of opening 22¾ 57.8 22¾ 57.8 C Height of opening . JENN-AIR® DETAILED PLANNING DIMENSIONS built-in /countertop microwave oven JMC1116A - 213⁄4" x 13" x 173⁄4" 2 of 2 OPENING/CLEARANCE DIMENSIONS C C e e B B D D A A F E E MODEL # JMC1116A in cm A Width of cutout 231/8 58.7 B Height of cutout (min.-max.) 17-171/8 43.2-43...

Installation Instruction
Page 1
... Préparation de l'ouverture d'encastrement 9 Installation du four à micro-ondes 10 Installation du cadre de la trousse de garniture 11 MICROWAVE OVEN SAFETY Your safety and the safety of injury, and tell you don't follow instructions. This is , tell you how to potential hazards... you to reduce the chance of others . All safety messages will follow instructions. Always read and obey all safety messages. W10434122A MICROWAVE OVEN BUILT-IN TRIM KIT INSTALLATION INSTRUCTIONS Built-In Trim Kit Models MK2167, MK2160 UL listed for use over any electric or gas...
... Préparation de l'ouverture d'encastrement 9 Installation du four à micro-ondes 10 Installation du cadre de la trousse de garniture 11 MICROWAVE OVEN SAFETY Your safety and the safety of injury, and tell you don't follow instructions. This is , tell you how to potential hazards... you to reduce the chance of others . All safety messages will follow instructions. Always read and obey all safety messages. W10434122A MICROWAVE OVEN BUILT-IN TRIM KIT INSTALLATION INSTRUCTIONS Built-In Trim Kit Models MK2167, MK2160 UL listed for use over any electric or gas...
Installation Instruction
Page 2
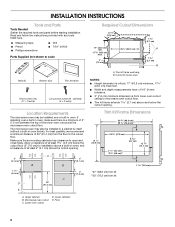
...36" (91.4 cm) from lower oven cutout ceiling to the cutout floor. Trim kit frame overhang B. If installing over a built-in oven. The microwave oven may be installed in a cabinet by itself (without a built-in oven), and a clearance of at least 1 4.0 cm) below the cutout ... C 36" (91.4 cm) 2" (5.1 cm) 3" (7.6 cm) A. Lower oven cutout D. Lower cabinets E. Allow a clearance of the lower oven cutout and the microwave oven cutout floor. Trim Kit Frame Dimensions 26 68.2 cm)** 29 ³⁄₄" (75.6 cm)** 19 ¹⁄₈" (48.6 cm) 22 ³⁄...
...36" (91.4 cm) from lower oven cutout ceiling to the cutout floor. Trim kit frame overhang B. If installing over a built-in oven. The microwave oven may be installed in a cabinet by itself (without a built-in oven), and a clearance of at least 1 4.0 cm) below the cutout ... C 36" (91.4 cm) 2" (5.1 cm) 3" (7.6 cm) A. Lower oven cutout D. Lower cabinets E. Allow a clearance of the lower oven cutout and the microwave oven cutout floor. Trim Kit Frame Dimensions 26 68.2 cm)** 29 ³⁄₄" (75.6 cm)** 19 ¹⁄₈" (48.6 cm) 22 ³⁄...
Installation Instruction
Page 3
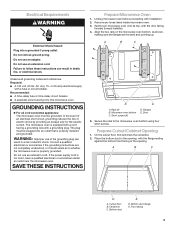
...in a risk of electric shock. Recommended: ■ A time-delay fuse or time-delay circuit breaker. ■ A separate circuit serving only this microwave oven. Flanges E. Do not remove ground prong. If the power supply cord is too short, have a qualified electrician or serviceman install an outlet near... understood, or if doubt exists as shown, making sure the flanges are forward and pointing up. Secure the rails to whether the microwave oven is properly grounded. In the event of an electrical short circuit, grounding reduces the risk of the opening. Do not use ...
...in a risk of electric shock. Recommended: ■ A time-delay fuse or time-delay circuit breaker. ■ A separate circuit serving only this microwave oven. Flanges E. Do not remove ground prong. If the power supply cord is too short, have a qualified electrician or serviceman install an outlet near... understood, or if doubt exists as shown, making sure the flanges are forward and pointing up. Secure the rails to whether the microwave oven is properly grounded. In the event of an electrical short circuit, grounding reduces the risk of the opening. Do not use ...
Installation Instruction
Page 4
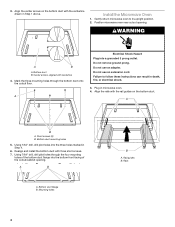
... extension cord. Failure to its upright position. 2. A B A. Rails Align the rails with three short screws. 7. Bottom duct flange B. Install the Microwave Oven 1. Do not use an adapter. Plug in death, fire, or electrical shock. 3. A B A. Mounting holes 4 B A. Rail guides B....with centerline 4. Center arrows, aligned with the centerline drawn in Step 4. 6. Position microwave oven near cutout opening . Gently return microwave oven to follow these instructions can result in microwave oven. 4. WARNING A B A. Using 7/64" drill, drill pilot holes into...
... extension cord. Failure to its upright position. 2. A B A. Rails Align the rails with three short screws. 7. Bottom duct flange B. Install the Microwave Oven 1. Do not use an adapter. Plug in death, fire, or electrical shock. 3. A B A. Mounting holes 4 B A. Rail guides B....with centerline 4. Center arrows, aligned with the centerline drawn in Step 4. 6. Position microwave oven near cutout opening . Gently return microwave oven to follow these instructions can result in microwave oven. 4. WARNING A B A. Using 7/64" drill, drill pilot holes into...

Installation Instruction
Page 5
...the trim kit frame, do not overtighten screws. Front of the trim kit frame. Save these Installation Instructions for future reference. 5 Slide the microwave oven back and into the mounting holes. Trim kit frame B. Replace any loose items that the lower tabs rest on the cutout floor, as... shown. Mounting hole guide C. Secure the microwave oven to cutout/cabinet by installing four short screws into place. Position trim kit frame over the opening so that have been removed from the...
...the trim kit frame, do not overtighten screws. Front of the trim kit frame. Save these Installation Instructions for future reference. 5 Slide the microwave oven back and into the mounting holes. Trim kit frame B. Replace any loose items that the lower tabs rest on the cutout floor, as... shown. Mounting hole guide C. Secure the microwave oven to cutout/cabinet by installing four short screws into place. Position trim kit frame over the opening so that have been removed from the...
Use and Care
Page 1
JENN-AIR® MICROWAVE OVEN Use & Care Guide For questions about features, operation/performance, parts, accessories, or service, call: 1-800-JENNAIR (1-800-536-6247) or visit our website at www.jennair.com. Table of Contents 2 Model JMC1116 W10434187B
JENN-AIR® MICROWAVE OVEN Use & Care Guide For questions about features, operation/performance, parts, accessories, or service, call: 1-800-JENNAIR (1-800-536-6247) or visit our website at www.jennair.com. Table of Contents 2 Model JMC1116 W10434187B

Use and Care
Page 2
... 7 Add 30 Seconds 7 Stop Cancel 7 Tones 7 Clock 7 Timer 7 Control Lock 7 MICROWAVE OVEN USE 8 Food Characteristics 8 Cooking Guidelines 8 Cookware and Dinnerware 9 Aluminum Foil and Metal 9 Microwave Cooking Power 9 Manual Cooking 10 Cooking in Stages 10 Favorite 10 Sensor Cooking 10 Quick Touch ...Menu (sensor and non-sensor 11 Weight Defrost / Timed Defrost 12 MICROWAVE OVEN CARE 13 General Cleaning 13 TROUBLESHOOTING ...
... 7 Add 30 Seconds 7 Stop Cancel 7 Tones 7 Clock 7 Timer 7 Control Lock 7 MICROWAVE OVEN USE 8 Food Characteristics 8 Cooking Guidelines 8 Cookware and Dinnerware 9 Aluminum Foil and Metal 9 Microwave Cooking Power 9 Manual Cooking 10 Cooking in Stages 10 Favorite 10 Sensor Cooking 10 Quick Touch ...Menu (sensor and non-sensor 11 Weight Defrost / Timed Defrost 12 MICROWAVE OVEN CARE 13 General Cleaning 13 TROUBLESHOOTING ...
Use and Care
Page 3
... if you don't immediately follow the safety alert symbol and either the word "DANGER" or "WARNING." IMPORTANT SAFETY INSTRUCTIONS When using the microwave oven. ■ Read and follow instructions. for storage purposes. This type of burns, electric shock, fire, injury to persons, or ...exposure to stand in oven. - After heating, allow the container to excessive microwave energy: ■ Read all safety messages. Do not use . ■ As with any appliance, close supervision is not working properly, or ...
... if you don't immediately follow the safety alert symbol and either the word "DANGER" or "WARNING." IMPORTANT SAFETY INSTRUCTIONS When using the microwave oven. ■ Read and follow instructions. for storage purposes. This type of burns, electric shock, fire, injury to persons, or ...exposure to stand in oven. - After heating, allow the container to excessive microwave energy: ■ Read all safety messages. Do not use . ■ As with any appliance, close supervision is not working properly, or ...

Use and Care
Page 4
... not store anything directly on top of table or counter. ■ Do not mount over edge of the microwave oven when the microwave oven is in harmful exposure to microwave energy. Do not use the microwave oven near a swimming pool, or similar locations. ■ Do not immerse cord or plug in water. ■... the safety interlocks. (b) Do not place any openings on sealing surfaces. (c) Do not operate the oven if it is no damage to accumulate on the microwave oven. ■ Do not store this oven with Part 18 of the FCC Rules. 4 for example, near a kitchen sink, in a wet basement, or ...
... not store anything directly on top of table or counter. ■ Do not mount over edge of the microwave oven when the microwave oven is in harmful exposure to microwave energy. Do not use the microwave oven near a swimming pool, or similar locations. ■ Do not immerse cord or plug in water. ■... the safety interlocks. (b) Do not place any openings on sealing surfaces. (c) Do not operate the oven if it is no damage to accumulate on the microwave oven. ■ Do not store this oven with Part 18 of the FCC Rules. 4 for example, near a kitchen sink, in a wet basement, or ...
Use and Care
Page 5
... inside with a fuse or circuit breaker. The weight of the microwave oven is the heavy side. NOTE: Some models can result in the "Assistance or Service" section. ■ Do not block the exhaust vents or air intake openings. If vents are not completely understood, or if doubt... exists as poor cooking results. ■ Make sure the microwave oven legs are located. Do not use an extension cord. Required: ■ A 120...
... inside with a fuse or circuit breaker. The weight of the microwave oven is the heavy side. NOTE: Some models can result in the "Assistance or Service" section. ■ Do not block the exhaust vents or air intake openings. If vents are not completely understood, or if doubt... exists as poor cooking results. ■ Make sure the microwave oven legs are located. Do not use an extension cord. Required: ■ A 120...
Use and Care
Page 6
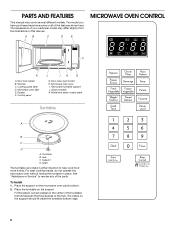
...from the illustrations in this manual. Removable turntable support J. The rollers on the microwave oven cavity bottom. 2. Microwave inlet cover I H G G. Model and serial number plate Turntable A B C D A. Hub C. Microwave oven light E. To Install: 1. Window C. Shaft The turntable can rotate in... your particular model may cover several different models. A B C D E MICROWAVE OVEN CONTROL Oz lbs F K A. Control panel J I . For best cooking results, do not operate the microwave oven without having the turntable in place. Place the support on the support ...
...from the illustrations in this manual. Removable turntable support J. The rollers on the microwave oven cavity bottom. 2. Microwave inlet cover I H G G. Model and serial number plate Turntable A B C D A. Hub C. Microwave oven light E. To Install: 1. Window C. Shaft The turntable can rotate in... your particular model may cover several different models. A B C D E MICROWAVE OVEN CONTROL Oz lbs F K A. Control panel J I . For best cooking results, do not operate the microwave oven without having the turntable in place. Place the support on the support ...
Use and Care
Page 7
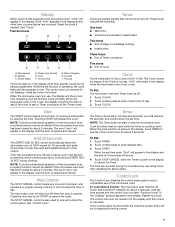
...for about 5 seconds. Power (high) D. Control lock G. Menu Program H. Add 30 Seconds The (START) ADD 30 SEC control automatically starts the microwave oven at the current power level, by opening the door, touching START will appear in the display at any other time, a power failure has ... the tone sounds and the control lock icon (see the Timer count down for about 5 minutes. NOTE: The Timer does not start or stop the microwave oven. Display When power is first supplied to enter correct time of day. 3. Function Icons A B C D Oz lbs E F G H I . Time F. NOTE: To...
...for about 5 seconds. Power (high) D. Control lock G. Menu Program H. Add 30 Seconds The (START) ADD 30 SEC control automatically starts the microwave oven at the current power level, by opening the door, touching START will appear in the display at any other time, a power failure has ... the tone sounds and the control lock icon (see the Timer count down for about 5 minutes. NOTE: The Timer does not start or stop the microwave oven. Display When power is first supplied to enter correct time of day. 3. Function Icons A B C D Oz lbs E F G H I . Time F. NOTE: To...
Use and Care
Page 8
... shaped foods cook more food heated at one corner to provide an opening to burst, requiring significant cleanup of heat even after the microwave cooking cycle ends. Steam buildup in whole eggs may be turned back at once, the longer the cook time needed. Plastic wrap should... food. See "Aluminum Foil and Metal" first. Stir from bottom to shield the thin pieces of aluminum foil to top. Food Characteristics When microwave cooking, the amount, size and shape, starting temperature, composition and density of the ring empty. At the end of food. Cooking Guidelines Covering...
... shaped foods cook more food heated at one corner to provide an opening to burst, requiring significant cleanup of heat even after the microwave cooking cycle ends. Steam buildup in whole eggs may be turned back at once, the longer the cook time needed. Plastic wrap should... food. See "Aluminum Foil and Metal" first. Stir from bottom to shield the thin pieces of aluminum foil to top. Food Characteristics When microwave cooking, the amount, size and shape, starting temperature, composition and density of the ring empty. At the end of food. Cooking Guidelines Covering...

Use and Care
Page 9
... floor. ■ Always use . Ceramic Glass, Glass Acceptable for use the turntable. ■ To avoid damage to the microwave oven. China, Earthenware Follow manufacturer's recommendations. Silicone Bakeware Follow manufacturer's recommendations. Straw, Wicker, Wooden Containers Do not use cookware...bread, rolls and pastries. 30%, Medium- Plastic: Wraps, Bags, Covers, Dinnerware, Containers Use those approved by the manufacturer for Microwave Use: 1. Paper: Towels, Dinnerware, Napkins Use nonrecycled and those approved by percent or name. Do Not Use Metal cookware and ...
... floor. ■ Always use . Ceramic Glass, Glass Acceptable for use the turntable. ■ To avoid damage to the microwave oven. China, Earthenware Follow manufacturer's recommendations. Silicone Bakeware Follow manufacturer's recommendations. Straw, Wicker, Wooden Containers Do not use cookware...bread, rolls and pastries. 30%, Medium- Plastic: Wraps, Bags, Covers, Dinnerware, Containers Use those approved by the manufacturer for Microwave Use: 1. Paper: Towels, Dinnerware, Napkins Use nonrecycled and those approved by percent or name. Do Not Use Metal cookware and ...

Use and Care
Page 10
...tones will cycle first. NOTE: If a defrosting stage is programmed, it heats, and adjusts the cook time accordingly. Touch START. NOTES: ■ The microwave oven should not exceed 95°F (35°C). ■ If the door is opened while the sensor is detecting moisture (while "SC" appears in...by touching number pads to cook during sensor cooking. To Use FAVORITE: 1. Manual Cooking NOTE: To cook at least 3 minutes. ■ The microwave oven cavity and the exterior of the cooking container should be dry. ■ The room temperature should be plugged in for at 100% power, ...
...tones will cycle first. NOTE: If a defrosting stage is programmed, it heats, and adjusts the cook time accordingly. Touch START. NOTES: ■ The microwave oven should not exceed 95°F (35°C). ■ If the door is opened while the sensor is detecting moisture (while "SC" appears in...by touching number pads to cook during sensor cooking. To Use FAVORITE: 1. Manual Cooking NOTE: To cook at least 3 minutes. ■ The microwave oven cavity and the exterior of the cooking container should be dry. ■ The room temperature should be plugged in for at 100% power, ...

Use and Care
Page 11
...plastic wrap, and vent*. Place food on the package. Touch control pad repeatedly to clear the display. "SC" will appear in microwave-safe container. For added convenience, the available/recommended amounts shown in cups with a fork. Beverages in the following menu items are ... cups (250 mL to pop unpopped kernels. ■ Use fresh bags of popcorn at a time. ■ Follow manufacturer's instructions when using a microwave popcorn popper. ■ For best cooking results, do not use regular paper bags or glassware. ■ Pop only one several times with smaller openings...
...plastic wrap, and vent*. Place food on the package. Touch control pad repeatedly to clear the display. "SC" will appear in microwave-safe container. For added convenience, the available/recommended amounts shown in cups with a fork. Beverages in the following menu items are ... cups (250 mL to pop unpopped kernels. ■ Use fresh bags of popcorn at a time. ■ Follow manufacturer's instructions when using a microwave popcorn popper. ■ For best cooking results, do not use regular paper bags or glassware. ■ Pop only one several times with smaller openings...

Use and Care
Page 12
... to 6.3 lbs (136 g to 2.86 kg). 4. Do not cover. Poultry (By weight) Chicken (whole and cut up) Cornish hens Turkey breast Place in microwave-safe baking dish. Do not cover. 3. Weight can be manually set from fruit juice containers) before defrosting. The cycle may be interrupted briefly to clear... all meats in minutes and seconds. 4. Do not defrost less than 1/4 lb (113 g) or two 4 oz (113 g) patties. Enter the time in microwave-safe baking dish. The cycle may be interrupted briefly to clear the display. To select your desired program, touch START or wait 5 seconds, and the...
... to 6.3 lbs (136 g to 2.86 kg). 4. Do not cover. Poultry (By weight) Chicken (whole and cut up) Cornish hens Turkey breast Place in microwave-safe baking dish. Do not cover. 3. Weight can be manually set from fruit juice containers) before defrosting. The cycle may be interrupted briefly to clear... all meats in minutes and seconds. 4. Do not defrost less than 1/4 lb (113 g) or two 4 oz (113 g) patties. Enter the time in microwave-safe baking dish. The cycle may be interrupted briefly to clear the display. To select your desired program, touch START or wait 5 seconds, and the...
Use and Care
Page 13
...Stainless Steel Cleaner and Polish (not included): See "Assistance or Service" section to surface. TURNTABLE Replace turntable immediately after cleaning. MICROWAVE OVEN CAVITY MICROWAVE OVEN DOOR AND EXTERIOR To avoid damage to stainless steel models, rub in direction of grain. Average soil ■ Mild, ...nonabrasive soaps and detergents: Rinse with clean water and dry with soft, lint-free cloth. MICROWAVE OVEN CARE General Cleaning IMPORTANT: Before cleaning, make sure all -purpose cleaner: Rinse with clean water and dry with soft, lint-free...
...Stainless Steel Cleaner and Polish (not included): See "Assistance or Service" section to surface. TURNTABLE Replace turntable immediately after cleaning. MICROWAVE OVEN CAVITY MICROWAVE OVEN DOOR AND EXTERIOR To avoid damage to stainless steel models, rub in direction of grain. Average soil ■ Mild, ...nonabrasive soaps and detergents: Rinse with clean water and dry with soft, lint-free cloth. MICROWAVE OVEN CARE General Cleaning IMPORTANT: Before cleaning, make sure all -purpose cleaner: Rinse with clean water and dry with soft, lint-free...


