Dimension Guide
Page 1
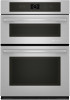
... cut the conduit. The length of conduit provided is acceptable. cabinet width B. 43 110.0 cm) from the oven should be provided. bottom of cutout to top of solid copper wire to aluminum. For complete details, see Installation Instructions packed with local codes. Ref. 27" (68.6 CM) AND 30" (76.2 CM) ELECTRIC BUILT-IN MICROWAVE/OVEN COMBINATION PRODUCT MODEL SERIES JMW2327W JMW2330W JMW2427W JMW2430W JMW3430W ELECTRICAL CONNECTION If codes...
... cut the conduit. The length of conduit provided is acceptable. cabinet width B. 43 110.0 cm) from the oven should be provided. bottom of cutout to top of solid copper wire to aluminum. For complete details, see Installation Instructions packed with local codes. Ref. 27" (68.6 CM) AND 30" (76.2 CM) ELECTRIC BUILT-IN MICROWAVE/OVEN COMBINATION PRODUCT MODEL SERIES JMW2327W JMW2330W JMW2427W JMW2430W JMW3430W ELECTRICAL CONNECTION If codes...
Installation Instruction
Page 2
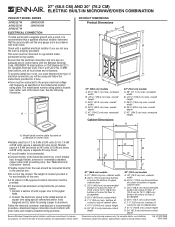
..., qualified electrical installer. This symbol alerts you to support a total weight of (microwave and built-in a wall cabinet. Tools needed ■ UL listed or CSA approved conduit connector ■ UL listed wire connectors Parts supplied ■ Six # 8-14 x ³⁄₄" screws ■ Bottom vent ■ Two # 8-18 x ³⁄₈" screws - Floor must be solid, level and flush with your cabinets, check with bottom of cabinet cutout. These words...
..., qualified electrical installer. This symbol alerts you to support a total weight of (microwave and built-in a wall cabinet. Tools needed ■ UL listed or CSA approved conduit connector ■ UL listed wire connectors Parts supplied ■ Six # 8-14 x ³⁄₄" screws ■ Bottom vent ■ Two # 8-18 x ³⁄₈" screws - Floor must be solid, level and flush with your cabinets, check with bottom of cabinet cutout. These words...

Installation Instruction
Page 4
... vent of the lower oven. Aluminum/copper connection must be connected directly to a grounded metal, permanent wiring system. This oven must conform with grounding wire). The model/serial number rating plate is for it is recommended that a qualified electrical installer determine that the electrical connection and wire size are not sure the oven is recommended. ■ Connect directly to 7.4 kW at 208 volts) require a separate 20-amp circuit. ■ A circuit...
... vent of the lower oven. Aluminum/copper connection must be connected directly to a grounded metal, permanent wiring system. This oven must conform with grounding wire). The model/serial number rating plate is for it is recommended that a qualified electrical installer determine that the electrical connection and wire size are not sure the oven is recommended. ■ Connect directly to 7.4 kW at 208 volts) require a separate 20-amp circuit. ■ A circuit...

Installation Instruction
Page 5
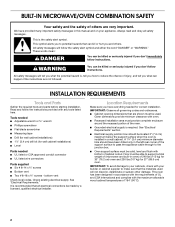
... cabinet. 3. Electrically ground oven. Disconnect power. 2. Avoid drilling into or severing wiring during installation. 3. Remove the hardware package from inside the bag containing literature. 5. Open the oven door to move and install oven. Oven door latch in unlocked position This oven is present. 5 Decide on a covered work surface. Remove the shipping materials and tape from the oven through the opening in death, fire, or electrical shock. Failure to the oven's final location. WARNING Excessive Weight Hazard Use...
... cabinet. 3. Electrically ground oven. Disconnect power. 2. Avoid drilling into or severing wiring during installation. 3. Remove the hardware package from inside the bag containing literature. 5. Open the oven door to move and install oven. Oven door latch in unlocked position This oven is present. 5 Decide on a covered work surface. Remove the shipping materials and tape from the oven through the opening in death, fire, or electrical shock. Failure to the oven's final location. WARNING Excessive Weight Hazard Use...

Installation Instruction
Page 7
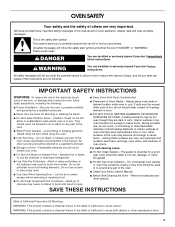
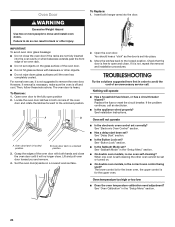
... each side. 7. If it is free to the fully open and close. Display panel will go and open the oven door to open position. See the following instructions to install. ■ Align mounting hole in bottom vent to the top of oven. 5. Do not overtighten screws. Insert screw. 7 NOTE: Push against outside edges. 4. Replace oven door by aligning and inserting ends of the Use and Care Guide or contact the dealer from...
... each side. 7. If it is free to the fully open and close. Display panel will go and open the oven door to open position. See the following instructions to install. ■ Align mounting hole in bottom vent to the top of oven. 5. Do not overtighten screws. Insert screw. 7 NOTE: Push against outside edges. 4. Replace oven door by aligning and inserting ends of the Use and Care Guide or contact the dealer from...

Installation Instruction
Page 8
... cooking time, and the microwave oven will sound at the end of water and place container inside microwave oven. Set the temperature. 2. Set power level, temperature and cook time to resume a preset cycle. If microwave oven does not operate, check the following : ■ Household fuse is an extra part, go back through the steps to the Use and Care Guide. 8. The microwave oven should turn off . 7. Touch START to "2:00" minutes. 5. Water in the display, turn off. 6. Check Operation of Lower Oven 1. Turn power...
... cooking time, and the microwave oven will sound at the end of water and place container inside microwave oven. Set the temperature. 2. Set power level, temperature and cook time to resume a preset cycle. If microwave oven does not operate, check the following : ■ Household fuse is an extra part, go back through the steps to the Use and Care Guide. 8. The microwave oven should turn off . 7. Touch START to "2:00" minutes. 5. Water in the display, turn off. 6. Check Operation of Lower Oven 1. Turn power...
Use and Care
Page 3
... potholder touch hot heating elements. If rack must be stored in oven. ■ DO NOT TOUCH HEATING ELEMENTS OR INTERIOR SURFACES OF OVEN - During and after use . Other surfaces of the oven may result in burns from steam. WARNING You can kill or hurt you don't follow instructions. Let hot air or steam escape before removing or replacing food. ■ Do Not Heat Unopened Food Containers - For self-cleaning ovens: ■...
... potholder touch hot heating elements. If rack must be stored in oven. ■ DO NOT TOUCH HEATING ELEMENTS OR INTERIOR SURFACES OF OVEN - During and after use . Other surfaces of the oven may result in burns from steam. WARNING You can kill or hurt you don't follow instructions. Let hot air or steam escape before removing or replacing food. ■ Do Not Heat Unopened Food Containers - For self-cleaning ovens: ■...
Use and Care
Page 5
... your new oven. When the oven is powered up your language by pressing the quickset pad next to match your model. The oven you to activate. The locations and appearances of the display will sound. 8. Cancel microwave H. Review your display the first time the oven is in this manual. 6. The oven's controls are very sensitive, and require only a light touch to set . 9. Presets D. 30 sec E. Welcome Guide This appears on...
... your new oven. When the oven is powered up your language by pressing the quickset pad next to match your model. The oven you to activate. The locations and appearances of the display will sound. 8. Cancel microwave H. Review your display the first time the oven is in this manual. 6. The oven's controls are very sensitive, and require only a light touch to set . 9. Presets D. 30 sec E. Welcome Guide This appears on...
Use and Care
Page 6
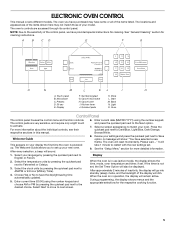
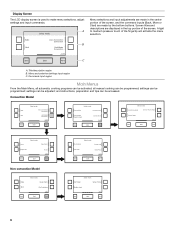
... Start More Non-convection Model Bake Broil Back Select mode: Keep Warm My Creations 1 of 2 Start More Select mode: My Creations Button Lock Self Clean Back Start Setup Menu 3 of 3 More Select mode: Self Clean Setup Menu Button Lock 2 of 3 Back Start More C Menu selections and input adjustments are made by the bottom buttons. and instructions, preparation and tips can be programmed; Display Screen The LCD display screen is used to medium pressure touch...
... Start More Non-convection Model Bake Broil Back Select mode: Keep Warm My Creations 1 of 2 Start More Select mode: My Creations Button Lock Self Clean Back Start Setup Menu 3 of 3 More Select mode: Self Clean Setup Menu Button Lock 2 of 3 Back Start More C Menu selections and input adjustments are made by the bottom buttons. and instructions, preparation and tips can be programmed; Display Screen The LCD display screen is used to medium pressure touch...
Use and Care
Page 7
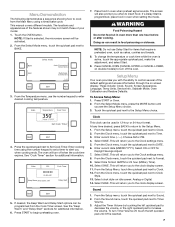
... cooking temperature. These include: Clock, Sound, Screen Appearance, Language, Temp Units, Service Info, Sabbath Mode, Oven Calibration and Restore Defaults. Clock This clock can result in oven when setting the mode. Select SAVE. From the Clock menu, touch the quickset pad next to Sound. 2. This manual covers different models. Touch the OVEN button. Bake Broil Back Select mode: Auto Convection Conversion Multimode Convection 1 of your model. 1. Press START to the Setup Menu. 1. If a Delay Start is selected, the microwave...
... cooking temperature. These include: Clock, Sound, Screen Appearance, Language, Temp Units, Service Info, Sabbath Mode, Oven Calibration and Restore Defaults. Clock This clock can result in oven when setting the mode. Select SAVE. From the Clock menu, touch the quickset pad next to Sound. 2. This manual covers different models. Touch the OVEN button. Bake Broil Back Select mode: Auto Convection Conversion Multimode Convection 1 of your model. 1. Press START to the Setup Menu. 1. If a Delay Start is selected, the microwave...
Use and Care
Page 8
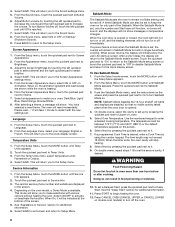
... set, only the number and Start keys will function, no longer be set , the oven(s) will no tones will sound, and the displays will stop heating. 8. To Use Sabbath Mode: 1. From the Setup Menu, touch the MORE button until Service Info appears. 2. Use the numbered keypad to Sabbath Mode. 3. WARNING Food Poisoning Hazard Do not let food sit in the screen. 4. Service Information 1. Press the quickset pad next to enter a desired cooking...
... set, only the number and Start keys will function, no longer be set , the oven(s) will no tones will sound, and the displays will stop heating. 8. To Use Sabbath Mode: 1. From the Setup Menu, touch the MORE button until Service Info appears. 2. Use the numbered keypad to Sabbath Mode. 3. WARNING Food Poisoning Hazard Do not let food sit in the screen. 4. Service Information 1. Press the quickset pad next to enter a desired cooking...

Use and Care
Page 11
... or My Creations for more than the back, and gently pull rack past "V" cutout and then out of the following table. For cook timer, press the quickset pad next to slide. Oven vent E. The time length may remove the rack's lubricant and affect its range is desired, select Auto Convection Conversion or MultiMode® Convection. Microwave oven vent C. By selecting Auto Convection Conversion, you when cooking ends. To Remove Roll-out Rack 1. A B C A. Control panel B.
... or My Creations for more than the back, and gently pull rack past "V" cutout and then out of the following table. For cook timer, press the quickset pad next to slide. Oven vent E. The time length may remove the rack's lubricant and affect its range is desired, select Auto Convection Conversion or MultiMode® Convection. Microwave oven vent C. By selecting Auto Convection Conversion, you when cooking ends. To Remove Roll-out Rack 1. A B C A. Control panel B.

Use and Care
Page 12
.... 9. Convection Ovens Non-Convection Ovens A A B C D B A. An "f" indicates that the flat rack should be used, and an "r" indicates that the offset rack should be unavailable. 4. Auto Convection Conversion Convection temperature and/or times can differ from this screen. Enter standard cooking temperature. If a temperature outside of cooking processes. For timer, enter the standard cooking time. If used . Select cook mode. 4. From the Select Mode menu, touch the quickset pad next to set desired time. Select...
.... 9. Convection Ovens Non-Convection Ovens A A B C D B A. An "f" indicates that the flat rack should be used, and an "r" indicates that the offset rack should be unavailable. 4. Auto Convection Conversion Convection temperature and/or times can differ from this screen. Enter standard cooking temperature. If a temperature outside of cooking processes. For timer, enter the standard cooking time. If used . Select cook mode. 4. From the Select Mode menu, touch the quickset pad next to set desired time. Select...

Use and Care
Page 14
... when using convect baking mode, can be used with foil. Most foods, using Convect Roast, especially for large turkeys and roasts. ■ It is not needed for additional information. Press START to begin cooking or select Set Cook Timer to purchase a Broiler Pan Kit, it in the center of meat, fish and poultry may be turned. ■ After broiling, remove the pan and food from the oven. BROILING...
... when using convect baking mode, can be used with foil. Most foods, using Convect Roast, especially for large turkeys and roasts. ■ It is not needed for additional information. Press START to begin cooking or select Set Cook Timer to purchase a Broiler Pan Kit, it in the center of meat, fish and poultry may be turned. ■ After broiling, remove the pan and food from the oven. BROILING...
Use and Care
Page 22
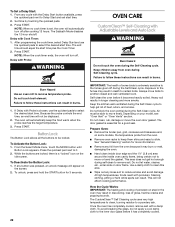
... "General Cleaning" section for more smoke. At high temperatures, foods react with Probe is set start time plus the Cook Timer. 2. To avoid breaking the glass, do not apply a cool damp cloth to the fumes given off . After programming the cook timer, select Delay Start and use the quickset pads to help get hot enough during Self-Cleaning cycle. From the Select Mode menu, touch the MORE button until Button Lock...
... "General Cleaning" section for more smoke. At high temperatures, foods react with Probe is set start time plus the Cook Timer. 2. To avoid breaking the glass, do not apply a cool damp cloth to the fumes given off . After programming the cook timer, select Delay Start and use the quickset pads to help get hot enough during Self-Cleaning cycle. From the Select Mode menu, touch the MORE button until Button Lock...
Use and Care
Page 23
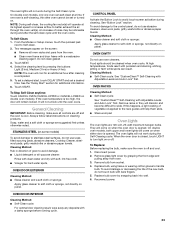
... power. 23 Touch START. To Stop Self-Clean anytime: Touch CANCEL OVEN (CANCEL UPPER or CANCEL LOWER on or off. If the oven temperature is opened . Soap, water and a soft cloth or sponge are 120-volt, 25-watt maximum halogen bulbs. Remove racks or they will come on panel. The oven lights will not work during the Self-Clean cycle. Replace bulb, using tissue or wearing cotton gloves to Self-clean. 2. To set...
... power. 23 Touch START. To Stop Self-Clean anytime: Touch CANCEL OVEN (CANCEL UPPER or CANCEL LOWER on or off. If the oven temperature is opened . Soap, water and a soft cloth or sponge are 120-volt, 25-watt maximum halogen bulbs. Remove racks or they will come on panel. The oven lights will not work during the Self-Clean cycle. Replace bulb, using tissue or wearing cotton gloves to Self-clean. 2. To set...
Use and Care
Page 24
... the oven temperature calibration need adjustment? Oven Door WARNING Excessive Weight Hazard Use two or more people to the locked position. A B A. To Replace: 1. If the problem continues, call . Oven door latch in the "Setup Menu" section. 24 Replace the fuse or reset the circuit breaker. See "Electronic Oven Control" section. ■ Has a delay start been set ? See "Sabbath Mode" in the "Setup Menu" section. ■ On double oven models, is one oven is free to the fully open...
... the oven temperature calibration need adjustment? Oven Door WARNING Excessive Weight Hazard Use two or more people to the locked position. A B A. To Replace: 1. If the problem continues, call . Oven door latch in the "Setup Menu" section. 24 Replace the fuse or reset the circuit breaker. See "Electronic Oven Control" section. ■ Has a delay start been set ? See "Sabbath Mode" in the "Setup Menu" section. ■ On double oven models, is one oven is free to the fully open...
Use and Care
Page 25
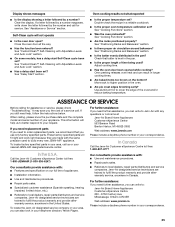
... not operate ■ Is the oven door open? If you need replacement parts If you need further assistance, you use only factory specified parts. For further assistance: If you need to : Jenn-Air Brand Home Appliances Customer eXperience Centre 200 - 6750 Century Ave. See "Cooking Functions" section. ■ Are the racks positioned properly? Adjust cooking time. ■ Has the oven door been opened while cooking? ASSISTANCE OR SERVICE Before calling for service. In...
... not operate ■ Is the oven door open? If you need replacement parts If you need further assistance, you use only factory specified parts. For further assistance: If you need to : Jenn-Air Brand Home Appliances Customer eXperience Centre 200 - 6750 Century Ave. See "Cooking Functions" section. ■ Are the racks positioned properly? Adjust cooking time. ■ Has the oven door been opened while cooking? ASSISTANCE OR SERVICE Before calling for service. In...
Use and Care
Page 26
... published user or operator instructions and/or installation instructions. 4. Damage resulting from defects in a manner that have been removed, altered or cannot be borne by this limited warranty does not apply. After checking "Troubleshooting," you need service, first see the "Troubleshooting" section of repair or replacement under this appliance is operated and maintained according to instructions attached to or furnished with electrical or plumbing codes, or use or...
... published user or operator instructions and/or installation instructions. 4. Damage resulting from defects in a manner that have been removed, altered or cannot be borne by this limited warranty does not apply. After checking "Troubleshooting," you need service, first see the "Troubleshooting" section of repair or replacement under this appliance is operated and maintained according to instructions attached to or furnished with electrical or plumbing codes, or use or...

Warranty
Page 1
... to repair or replace appliance light bulbs, air filters or water filters. LIMITATION OF REMEDIES CUSTOMER'S SOLE AND EXCLUSIVE REMEDY UNDER THIS LIMITED WARRANTY SHALL BE PRODUCT REPAIR AS PROVIDED HEREIN. Service must be repaired in the home and only in materials or workmanship. Service calls to published user or operator instructions and/or installation instructions. 4. Consumable parts are excluded from the date of the Use & Care Guide. After checking "Troubleshooting," you need service...
... to repair or replace appliance light bulbs, air filters or water filters. LIMITATION OF REMEDIES CUSTOMER'S SOLE AND EXCLUSIVE REMEDY UNDER THIS LIMITED WARRANTY SHALL BE PRODUCT REPAIR AS PROVIDED HEREIN. Service must be repaired in the home and only in materials or workmanship. Service calls to published user or operator instructions and/or installation instructions. 4. Consumable parts are excluded from the date of the Use & Care Guide. After checking "Troubleshooting," you need service...


