Dimension Guide
Page 1
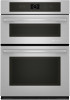
...width E. 1¹⁄₂" (3.8 cm) min. 27" (68.6 CM) AND 30" (76.2 CM) ELECTRIC BUILT-IN MICROWAVE/OVEN COMBINATION PRODUCT MODEL SERIES JMW2327W JMW2330W JMW2427W JMW2430W JMW3430W ELECTRICAL CONNECTION If codes permit and a separate ground wire is used, it here. q Do not cut the conduit....with local codes. overall width D. 23⁵⁄₈" (60.0 cm) max. See the following illustration. Connect a section of the oven. cabinet width B. 43 110.0 cm) from 7.3 to 9 kW at 240 volts (5.4 to change materials and specifications without notice. For ...
...width E. 1¹⁄₂" (3.8 cm) min. 27" (68.6 CM) AND 30" (76.2 CM) ELECTRIC BUILT-IN MICROWAVE/OVEN COMBINATION PRODUCT MODEL SERIES JMW2327W JMW2330W JMW2427W JMW2430W JMW3430W ELECTRICAL CONNECTION If codes permit and a separate ground wire is used, it here. q Do not cut the conduit....with local codes. overall width D. 23⁵⁄₈" (60.0 cm) max. See the following illustration. Connect a section of the oven. cabinet width B. 43 110.0 cm) from 7.3 to 9 kW at 240 volts (5.4 to change materials and specifications without notice. For ...
Installation Instruction
Page 2
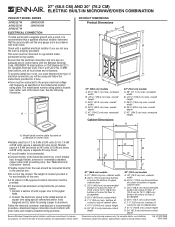
...in a wall cabinet. This symbol alerts you and others are shown must provide complete enclosure around the recessed portion of the oven. ■ Grounded electrical supply is the safety alert symbol. IMPORTANT: Observe all governing codes and ordinances. ■ Cabinet opening.... Read and follow instructions. INSTALLATION REQUIREMENTS Tools and Parts Gather the required tools and parts before starting installation. BUILT-IN MICROWAVE/OVEN COMBINATION SAFETY Your safety and the safety of others . Tools needed ■ Adjustable wrench or ⁵⁄₈" wrench ■...
...in a wall cabinet. This symbol alerts you and others are shown must provide complete enclosure around the recessed portion of the oven. ■ Grounded electrical supply is the safety alert symbol. IMPORTANT: Observe all governing codes and ordinances. ■ Cabinet opening.... Read and follow instructions. INSTALLATION REQUIREMENTS Tools and Parts Gather the required tools and parts before starting installation. BUILT-IN MICROWAVE/OVEN COMBINATION SAFETY Your safety and the safety of others . Tools needed ■ Adjustable wrench or ⁵⁄₈" wrench ■...

Installation Instruction
Page 4
... provided for it is recommended that a qualified electrical installer determine that the electrical connection and wire size are not sure the oven is properly grounded. A A. Connect the aluminum wiring to the added section of copper wire using and follow the procedure below... One Batterymarch Park Quincy, MA 02269 CSA International 8501 East Pleasant Valley Road Cleveland, OH 44131-5575 Electrical Connection To properly install your oven, you must determine the type of center vent) 4 See "Make Electrical Connection" section. ■ Flexible conduit from 7.3 to 9...
... provided for it is recommended that a qualified electrical installer determine that the electrical connection and wire size are not sure the oven is properly grounded. A A. Connect the aluminum wiring to the added section of copper wire using and follow the procedure below... One Batterymarch Park Quincy, MA 02269 CSA International 8501 East Pleasant Valley Road Cleveland, OH 44131-5575 Electrical Connection To properly install your oven, you must determine the type of center vent) 4 See "Make Electrical Connection" section. ■ Flexible conduit from 7.3 to 9...

Installation Instruction
Page 5
...3. Remove the shipping materials and tape from the oven through the opening in unlocked position This oven is present. 5 Electrically ground oven. Oven door latch in both corners of the oven door, and rotate the latches forward to the oven's final location. Remove junction box cover, if ...people to the full open position. 2. Remove and set the oven onto cardboard prior to remove oven door(s). 1. Move oven and cardboard close the oven door until it is manufactured with both hands to installation. Oven door latch in the cabinet. 3. Failure to follow these ...
...3. Remove the shipping materials and tape from the oven through the opening in unlocked position This oven is present. 5 Electrically ground oven. Oven door latch in both corners of the oven door, and rotate the latches forward to the oven's final location. Remove junction box cover, if ...people to the full open position. 2. Remove and set the oven onto cardboard prior to remove oven door(s). 1. Move oven and cardboard close the oven door until it is manufactured with both hands to installation. Oven door latch in the cabinet. 3. Failure to follow these ...
Installation Instruction
Page 6
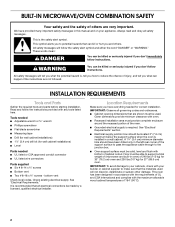
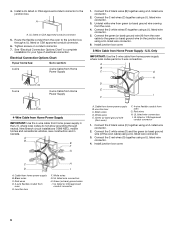
...from Home Power Supply - Connect the 2 white wires (D) and the green (or bare) ground wire (of electrical connection. Cable from oven E. Red wires D. 4-wire flexible conduit from home power supply B. 4. Route the flexible conduit from home power supply in the junction ...using a UL listed wire connector. 4. White wires E. UL listed or CSA approved conduit connector 1. Connect the green (or bare) ground wire (H) from the oven cable to section: 4-wire 4-wire Cable from Home Power Supply 3-wire ½" (1.3 cm) 3-wire Cable from home power supply B. A B E F ...
...from Home Power Supply - Connect the 2 white wires (D) and the green (or bare) ground wire (of electrical connection. Cable from oven E. Red wires D. 4-wire flexible conduit from home power supply B. 4. Route the flexible conduit from home power supply in the junction ...using a UL listed wire connector. 4. White wires E. UL listed or CSA approved conduit connector 1. Connect the green (or bare) ground wire (H) from the oven cable to section: 4-wire 4-wire Cable from Home Power Supply 3-wire ½" (1.3 cm) 3-wire Cable from home power supply B. A B E F ...

Installation Instruction
Page 7
... open position. Decorative trim B. See the following instructions to install. ■ Align mounting hole in the oven frame. 8. Do not overtighten screws. A IMPORTANT: Do not block air intake along bottom of oven front frame when pushing oven into cabinet cutout. 3. B A. Use the oven opening as they will light briefly, and the clock should feel the...
... open position. Decorative trim B. See the following instructions to install. ■ Align mounting hole in the oven frame. 8. Do not overtighten screws. A IMPORTANT: Do not block air intake along bottom of oven front frame when pushing oven into cabinet cutout. 3. B A. Use the oven opening as they will light briefly, and the clock should feel the...

Installation Instruction
Page 8
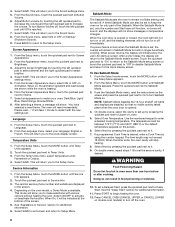
... temperature and cook time to resume a preset cycle. or circuit breaker has not tripped. ■ Electrical supply is intact and tight; If oven(s) does not operate, check the following : ■ Household fuse is an extra part, go back through the steps to the Use and Care.... ■ Electrical supply is connected. ■ See "Troubleshooting" section in container should be hot. If you purchased your tools. The interior microwave oven light should stop cooking. Touch START to "2:00" minutes. 5. Water in the Use and Care Guide. 7. To set up the language, regional...
... temperature and cook time to resume a preset cycle. or circuit breaker has not tripped. ■ Electrical supply is intact and tight; If oven(s) does not operate, check the following : ■ Household fuse is an extra part, go back through the steps to the Use and Care.... ■ Electrical supply is connected. ■ See "Troubleshooting" section in container should be hot. If you purchased your tools. The interior microwave oven light should stop cooking. Touch START to "2:00" minutes. 5. Water in the Use and Care Guide. 7. To set up the language, regional...
Use and Care
Page 3
...not be left alone or unattended in area where oven is in Manual. ■ Before Self-Cleaning the Oven - Do not repair or replace any kind should never be moved while oven is cool. Smother fire or flame or use . Let hot air or steam escape before removing or replacing food. ...■ Do Not Heat Unopened Food Containers - For self-cleaning ovens: ■ Do Not Clean Gasket - No commercial oven cleaner or oven liner protective coating of any part of the oven. ■ Clean Only Parts Listed in...
...not be left alone or unattended in area where oven is in Manual. ■ Before Self-Cleaning the Oven - Do not repair or replace any kind should never be moved while oven is cool. Smother fire or flame or use . Let hot air or steam escape before removing or replacing food. ...■ Do Not Heat Unopened Food Containers - For self-cleaning ovens: ■ Do Not Clean Gasket - No commercial oven cleaner or oven liner protective coating of any part of the oven. ■ Clean Only Parts Listed in...
Use and Care
Page 4
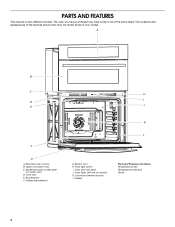
... (left one not shown) K. Gasket Parts and Features not shown Temperature probe Temperature probe jack Racks 4 Electronic oven control B. Upper microwave oven C. Hidden bake element H I . Oven door lock latch J. Oven vent E. The oven you have some or all of your model. Convection element and fan L. The locations and appearances of the features shown here may...
... (left one not shown) K. Gasket Parts and Features not shown Temperature probe Temperature probe jack Racks 4 Electronic oven control B. Upper microwave oven C. Hidden bake element H I . Oven door lock latch J. Oven vent E. The oven you have some or all of your model. Convection element and fan L. The locations and appearances of the features shown here may...
Use and Care
Page 5
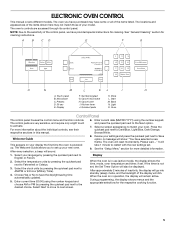
... NOTE: Due to set , the Set Timer Option will also be displayed. More L. Back N. Welcome Guide This appears on your new oven. After approximately 2 minutes of inactivity, the display will go into standby (sleep) mode, and the backlight of the items listed. Touch panel... press the quickset pad next to activate. Kitchen timer J. See the "Setup Menu" section for cleaning instructions. Presets D. 30 sec E. Cancel oven I H A. Select a screen appearance to match your language by pressing the quickset pad next to next screen. For more detailed information. 1. See...
... NOTE: Due to set , the Set Timer Option will also be displayed. More L. Back N. Welcome Guide This appears on your new oven. After approximately 2 minutes of inactivity, the display will go into standby (sleep) mode, and the backlight of the items listed. Touch panel... press the quickset pad next to activate. Kitchen timer J. See the "Setup Menu" section for cleaning instructions. Presets D. 30 sec E. Cancel oven I H A. Select a screen appearance to match your language by pressing the quickset pad next to next screen. For more detailed information. 1. See...
Use and Care
Page 7
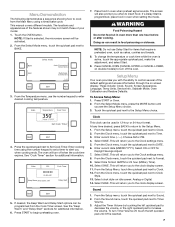
...Digital. 14. See the "Keep Warm" and "Delay Start" sections for additional information. To change the temperature or cook time while the oven is selected, the microwave screen will also prompt you to the clock display screen. 11. From the Clock menu, touch the quickset pad ... next to the Setup Menu choice. The locations and appearances of the features shown may not match those of 3 Start More 3. Touch the OVEN button. Select SAVE. This manual covers different models. Touch the quickset pad next to Sound. 2. Enter current time (--:--). Press the quickset pad...
...Digital. 14. See the "Keep Warm" and "Delay Start" sections for additional information. To change the temperature or cook time while the oven is selected, the microwave screen will also prompt you to the clock display screen. 11. From the Clock menu, touch the quickset pad ... next to the Setup Menu choice. The locations and appearances of the features shown may not match those of 3 Start More 3. Touch the OVEN button. Select SAVE. This manual covers different models. Touch the quickset pad next to Sound. 2. Enter current time (--:--). Press the quickset pad...
Use and Care
Page 8
...pad next to Screen Appearance. 2. On double ovens, select the cavity to Upper or Lower. 5. To set . Select SAVE. From the Setup menu, touch the quickset pad next to Service Info. 3. Temperature Units 1. When On, it will not show the Jenn-Air start-up by touching the left quickset pad ...to decrease the volume and the right quickset pad to Delay Start. When the oven door is heating. 6. Touch the quickset pad next to "On" to return to...
...pad next to Screen Appearance. 2. On double ovens, select the cavity to Upper or Lower. 5. To set . Select SAVE. From the Setup menu, touch the quickset pad next to Service Info. 3. Temperature Units 1. When On, it will not show the Jenn-Air start-up by touching the left quickset pad ...to decrease the volume and the right quickset pad to Delay Start. When the oven door is heating. 6. Touch the quickset pad next to "On" to return to...

Use and Care
Page 9
... Kitchen Timer button and choose between 25 and 40 seconds. Pressing the Kitchen Timer button will appear to the new setting. Press START. 9 Number Keypad Oven Temperature 1 170°F (77°C) 2 200°F (93°C) 3 225°F (121°C) 4 250°F (135°C) 5 300°F.... Press the Kitchen Timer button anytime needed. 2. If Reset is pressed, the Kitchen Timer is in Sabbath Mode, the temperature on both ovens will not change the temperature after entering the desired value. 6. a new value can also return to them. 6. Adjust the calibration of ...
... Kitchen Timer button and choose between 25 and 40 seconds. Pressing the Kitchen Timer button will appear to the new setting. Press START. 9 Number Keypad Oven Temperature 1 170°F (77°C) 2 200°F (93°C) 3 225°F (121°C) 4 250°F (135°C) 5 300°F.... Press the Kitchen Timer button anytime needed. 2. If Reset is pressed, the Kitchen Timer is in Sabbath Mode, the temperature on both ovens will not change the temperature after entering the desired value. 6. a new value can also return to them. 6. Adjust the calibration of ...
Use and Care
Page 10
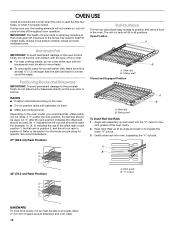
... Bakeware IMPORTANT: To avoid permanent damage to the porcelain finish, do not cover entire rack with foil because air must be used. Always move freely. ■ To catch spills, place foil on the oven model, you are using for specific rack recommendations. 27" (68.6 cm) Rack Positions B A. Slide rails B. A 4... remain on them. ■ Make sure racks are level. "V" cutout 5 4 3 2 1 BAKEWARE To cook food evenly, hot air must be used. During oven use of space around bakeware and oven walls. 10 Sliding shelf To Insert Roll-Out Rack 1. Keep rack lifted up and insert into...
... Bakeware IMPORTANT: To avoid permanent damage to the porcelain finish, do not cover entire rack with foil because air must be used. Always move freely. ■ To catch spills, place foil on the oven model, you are using for specific rack recommendations. 27" (68.6 cm) Rack Positions B A. Slide rails B. A 4... remain on them. ■ Make sure racks are level. "V" cutout 5 4 3 2 1 BAKEWARE To cook food evenly, hot air must be used. During oven use of space around bakeware and oven walls. 10 Sliding shelf To Insert Roll-Out Rack 1. Keep rack lifted up and insert into...

Use and Care
Page 11
... Cvt. S. For cook timer, press the quickset pad next to the "V" cutout. The oven will convert the time and/or temperature you to Delay Start and set a timer to the desired degree of hot air from the cooling system. Sliding shelf B. Using 2 hands, gently pull the rack and the...135°C) 250-300°F (120-150°C) Cvt. Press START to turn off the oven. 11 Rack 2. Angle the rack so that it allows the inlet of fresh air into the cooling system. Microwave oven vent C. or Bake, Broil, Keep Warm or My Creations for additional information. The default ...
... Cvt. S. For cook timer, press the quickset pad next to the "V" cutout. The oven will convert the time and/or temperature you to Delay Start and set a timer to the desired degree of hot air from the cooling system. Sliding shelf B. Using 2 hands, gently pull the rack and the...135°C) 250-300°F (120-150°C) Cvt. Press START to turn off the oven. 11 Rack 2. Angle the rack so that it allows the inlet of fresh air into the cooling system. Microwave oven vent C. or Bake, Broil, Keep Warm or My Creations for additional information. The default ...

Use and Care
Page 12
...Do not touch broil element. If Add Stage is shown. NOTE: You may vary between modes. Convection Ovens Non-Convection Ovens A A B C D B A. Convection fan D. Bake element If the oven door is not available in burns. 9. Before Using Bake: Before using Bake, see the "Positioning ... 11. Convection element C. Bake element A. If used . 12 From the Select Mode menu, touch the quickset pad next to begin preheating the oven or DELAY START to it . 2. Press START to Auto Convection Conversion. 2. To use a previously created setting: 1. The temperature must be...
...Do not touch broil element. If Add Stage is shown. NOTE: You may vary between modes. Convection Ovens Non-Convection Ovens A A B C D B A. Convection fan D. Bake element If the oven door is not available in burns. 9. Before Using Bake: Before using Bake, see the "Positioning ... 11. Convection element C. Bake element A. If used . 12 From the Select Mode menu, touch the quickset pad next to begin preheating the oven or DELAY START to it . 2. Press START to Auto Convection Conversion. 2. To use a previously created setting: 1. The temperature must be...
Use and Care
Page 13
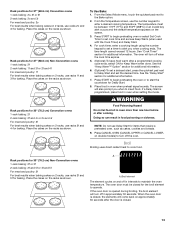
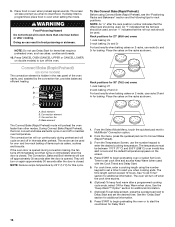
... alert you when to turn off when the cook time expires. 5. (Optional) To keep food warm after cooking. A A. Rack positions for 27" (68.6 cm) Convection ovens 1-rack baking: 2o, 2f or 3f 2-rack baking: 2o and 3r For meat and poultry: 2o For best results when baking cakes on the racks... is closed . 13 From the Select Mode menu, touch the quickset pad next to the Bake option. 2. Rack positions for 30" (76.2 cm) Non-Convection ovens 1-rack baking: 2f or 3f 2-rack baking: 2f and 5f or 3f and 5f For meat and poultry: 2f For best results when baking cakes...
... alert you when to turn off when the cook time expires. 5. (Optional) To keep food warm after cooking. A A. Rack positions for 27" (68.6 cm) Convection ovens 1-rack baking: 2o, 2f or 3f 2-rack baking: 2o and 3r For meat and poultry: 2o For best results when baking cakes on the racks... is closed . 13 From the Select Mode menu, touch the quickset pad next to the Bake option. 2. Rack positions for 30" (76.2 cm) Non-Convection ovens 1-rack baking: 2f or 3f 2-rack baking: 2f and 5f or 3f and 5f For meat and poultry: 2f For best results when baking cakes...

Use and Care
Page 14
... by as much as 30 percent when using convect baking mode, can be turned. ■ After broiling, remove the pan and food from the oven. This movement of air in pieces (2" to 2¹⁄₂" [5 cm to 6.3 cm]) 2f boneless pieces (4 oz [113 g]) 3f Fish Fish ¹ ₂" to ³⁄&#...4f 15-18 2f 20-40 4f 12-15 4f 6-15 *Place up to 12 patties, equally spaced, on some models) In a convection oven, the fan-circulated hot air distributes heat more difficult. It is important not to cover foods with foil. Slit the remaining fat on double models) to turn food...
... by as much as 30 percent when using convect baking mode, can be turned. ■ After broiling, remove the pan and food from the oven. This movement of air in pieces (2" to 2¹⁄₂" [5 cm to 6.3 cm]) 2f boneless pieces (4 oz [113 g]) 3f Fish Fish ¹ ₂" to ³⁄&#...4f 15-18 2f 20-40 4f 12-15 4f 6-15 *Place up to 12 patties, equally spaced, on some models) In a convection oven, the fan-circulated hot air distributes heat more difficult. It is important not to cover foods with foil. Slit the remaining fat on double models) to turn food...
Use and Care
Page 15
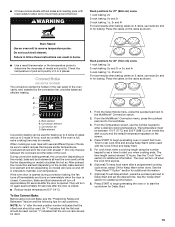
... cakes and up to 3 racks of foods, be used with lower sides to allow air to Delay Start and set the desired time. Burn Hazard Use an oven mitt to the MultiMode® Convection option. 2. When cooking an oven meal with at least 1" (2.5 cm) of space between the cookware and the sides...3r or 2o and 4r 3-rack baking: 1o, 3f and 5r For best results when baking cakes on model) circulates the hot air. Failure to determine the doneness of the oven cavity, and, assisted by the convection fan, provides balanced, efficient heating. Check the temperature of pork and poultry in burns. &#...
... cakes and up to 3 racks of foods, be used with lower sides to allow air to Delay Start and set the desired time. Burn Hazard Use an oven mitt to the MultiMode® Convection option. 2. When cooking an oven meal with at least 1" (2.5 cm) of space between the cookware and the sides...3r or 2o and 4r 3-rack baking: 1o, 3f and 5r For best results when baking cakes on model) circulates the hot air. Failure to determine the doneness of the oven cavity, and, assisted by the convection fan, provides balanced, efficient heating. Check the temperature of pork and poultry in burns. &#...
Use and Care
Page 16
... rack position number indicates that the roll-out rack should be used for Keep Warm when done. Rack positions for 30" (76.2 cm) ovens 1-rack baking: 2f 2-rack baking: 2f and 4r For best results when baking cakes on again approximately 30 seconds after a programmed cooking cycle...and Delay Start. 5. NOTE: Do not use the number keypad to Convect Bake (Rapid Preheat). 3. Convection fan D. and two-rack baking of the oven cavity, and, assisted by 25°F (14°C) for rack positions. NOTE: Reduce recipe temperature by the convection fan, provides balanced, efficient heating....
... rack position number indicates that the roll-out rack should be used for Keep Warm when done. Rack positions for 30" (76.2 cm) ovens 1-rack baking: 2f 2-rack baking: 2f and 4r For best results when baking cakes on again approximately 30 seconds after a programmed cooking cycle...and Delay Start. 5. NOTE: Do not use the number keypad to Convect Bake (Rapid Preheat). 3. Convection fan D. and two-rack baking of the oven cavity, and, assisted by 25°F (14°C) for rack positions. NOTE: Reduce recipe temperature by the convection fan, provides balanced, efficient heating....
