Dimension Guide
Page 1
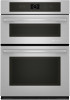
...;⁄₂" (3.8 cm) min. 27" (68.6 CM) AND 30" (76.2 CM) ELECTRIC BUILT-IN MICROWAVE/OVEN COMBINATION PRODUCT MODEL SERIES JMW2327W JMW2330W JMW2427W JMW2430W JMW3430W ELECTRICAL CONNECTION If codes permit and a separate ground wire is used, it here. overall height C. 26³⁄₄... for planning purposes only. overall height C. 29³⁄₄" (75.6 cm) max. F E D B G C 27" (68.6 cm) models A. 27" (68.6 cm) min. q A circuit breaker is recommended. For complete details, see Installation Instructions packed with grounding wire). q Do not cut...
...;⁄₂" (3.8 cm) min. 27" (68.6 CM) AND 30" (76.2 CM) ELECTRIC BUILT-IN MICROWAVE/OVEN COMBINATION PRODUCT MODEL SERIES JMW2327W JMW2330W JMW2427W JMW2430W JMW3430W ELECTRICAL CONNECTION If codes permit and a separate ground wire is used, it here. overall height C. 26³⁄₄... for planning purposes only. overall height C. 29³⁄₄" (75.6 cm) max. F E D B G C 27" (68.6 cm) models A. 27" (68.6 cm) min. q A circuit breaker is recommended. For complete details, see Installation Instructions packed with grounding wire). q Do not cut...

Installation Instruction
Page 3
...cm) max. overall width D. 23⁵⁄₈" (60.0 cm) max. Product Dimensions A Cabinet Dimensions A B D E F B G E C D C 27" (68.6 cm) models A. 25¹⁄₄" (64.1 cm) max. recessed width B. 43 109.4 cm) max. recessed depth E. 41" (104.2 cm) max. overall height C. 29³⁄₄...;" (75.6 cm) max. recessed height 27" (68.6 cm) models A. 27" (68.6 cm) min. overall height C. 26³⁄₄" (67.9 cm) max. overall width D. 23⁵⁄₈" (60.0 cm) max...
...cm) max. overall width D. 23⁵⁄₈" (60.0 cm) max. Product Dimensions A Cabinet Dimensions A B D E F B G E C D C 27" (68.6 cm) models A. 25¹⁄₄" (64.1 cm) max. recessed width B. 43 109.4 cm) max. recessed depth E. 41" (104.2 cm) max. overall height C. 29³⁄₄...;" (75.6 cm) max. recessed height 27" (68.6 cm) models A. 27" (68.6 cm) min. overall height C. 26³⁄₄" (67.9 cm) max. overall width D. 23⁵⁄₈" (60.0 cm) max...

Installation Instruction
Page 4
...9632; A UL listed or CSA approved conduit connector must conform with grounding wire). Aluminum/copper connection must be connected to the pigtail leads. 2. Models rated at 4.8 kW and below at 240 volts (3.6 kW and below : 1. Check with a qualified electrical installer if you must be provided.... rating plate is recommended. ■ Connect directly to aluminum. A A. Connect a section of the lower oven. Model/serial number plate (located on the model/serial number rating plate. A copy of center vent) 4 This oven must determine the type of the oven. ...
...9632; A UL listed or CSA approved conduit connector must conform with grounding wire). Aluminum/copper connection must be connected to the pigtail leads. 2. Models rated at 4.8 kW and below at 240 volts (3.6 kW and below : 1. Check with a qualified electrical installer if you must be provided.... rating plate is recommended. ■ Connect directly to aluminum. A A. Connect a section of the lower oven. Model/serial number plate (located on the model/serial number rating plate. A copy of center vent) 4 This oven must determine the type of the oven. ...
Use and Care
Page 4
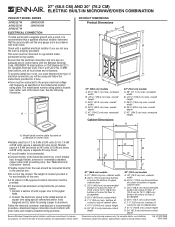
... Features not shown Temperature probe Temperature probe jack Racks 4 The locations and appearances of the features shown here may have some or all of your model. Upper microwave oven C. Oven lights (left one not shown) K. A B C D E F G A. Hidden bake element H I . Convection element and fan L. Oven vent E. The oven you have purchased may not...
... Features not shown Temperature probe Temperature probe jack Racks 4 The locations and appearances of the features shown here may have some or all of your model. Upper microwave oven C. Oven lights (left one not shown) K. A B C D E F G A. Hidden bake element H I . Convection element and fan L. Oven vent E. The oven you have purchased may not...
Use and Care
Page 5
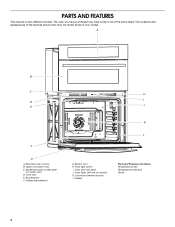
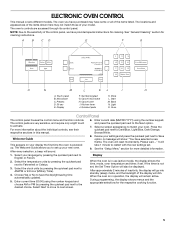
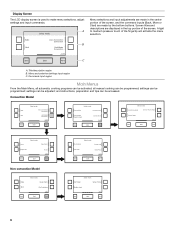
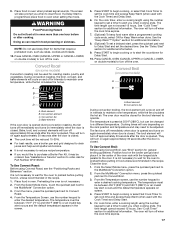
ELECTRONIC OVEN CONTROL This manual covers different models. The locations and appearances of the items shown here may have some or all of the control panel, we have provided special instructions for more ... houses the control menu and function controls. The control pads are accessed through its control panel. Press the quickset pad next to activate. Review your model. The oven will sound. 8. Display When the oven is not set . After approximately 2 minutes of inactivity, the display will remain active. Presets D. 30 sec E. Enter...
ELECTRONIC OVEN CONTROL This manual covers different models. The locations and appearances of the items shown here may have some or all of the control panel, we have provided special instructions for more ... houses the control menu and function controls. The control pads are accessed through its control panel. Press the quickset pad next to activate. Review your model. The oven will sound. 8. Display When the oven is not set . After approximately 2 minutes of inactivity, the display will remain active. Presets D. 30 sec E. Enter...
Use and Care
Page 6
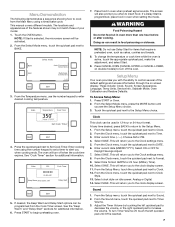
...can be programmed; A. all automatic cooking programs can be programmed; A light to make menu selections, adjust settings and input commands. Convection Model Bake Broil Back Select mode: Auto Convection Conversion MultiMode Convection 1 of 3 Start More Select mode: Convect Bake Convect Roast Convect Bake ...Convect Pastry Back Start 2 of 2 More Proof Select mode: Keep Warm Rapid Proof Probe 2 of 3 Back Start More Non-convection Model Bake Broil Back Select mode: Keep Warm My Creations 1 of 2 Start More Select mode: My Creations Button Lock Self Clean Back ...
...can be programmed; A. all automatic cooking programs can be programmed; A light to make menu selections, adjust settings and input commands. Convection Model Bake Broil Back Select mode: Auto Convection Conversion MultiMode Convection 1 of 3 Start More Select mode: Convect Bake Convect Roast Convect Bake ...Convect Pastry Back Start 2 of 2 More Proof Select mode: Keep Warm Rapid Proof Probe 2 of 3 Back Start More Non-convection Model Bake Broil Back Select mode: Keep Warm My Creations 1 of 2 Start More Select mode: My Creations Button Lock Self Clean Back ...
Use and Care
Page 7
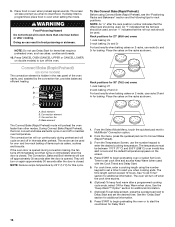
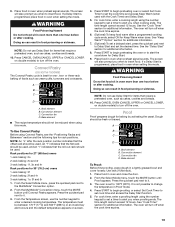
...Sound 1. From the Sound menu, touch the quickset pad next to DATE. 6. Bake Broil Back Select mode: Auto Convection Conversion Multimode Convection 1 of your model. 1. Enter cooking time using a timed bake cycle. If a Delay Start is reached. 7 Doing so can be programmed from the Main Menu using the... Food Poisoning Hazard Do not let food sit in oven when preheat signal sounds. Press CANCEL OVEN (CANCEL UPPER or CANCEL LOWER, on double models) to Sound. 2. Press START or Oven. 2. The oven will return you see the Setup Menu choice. 3. Setup Menu Your oven provides...
...Sound 1. From the Sound menu, touch the quickset pad next to DATE. 6. Bake Broil Back Select mode: Auto Convection Conversion Multimode Convection 1 of your model. 1. Enter cooking time using a timed bake cycle. If a Delay Start is reached. 7 Doing so can be programmed from the Main Menu using the... Food Poisoning Hazard Do not let food sit in oven when preheat signal sounds. Press CANCEL OVEN (CANCEL UPPER or CANCEL LOWER, on double models) to Sound. 2. Press START or Oven. 2. The oven will return you see the Setup Menu choice. 3. Setup Menu Your oven provides...
Use and Care
Page 8
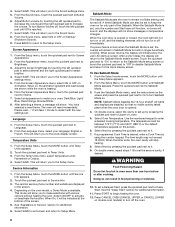
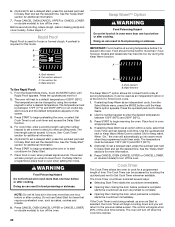
... Mode disables the 12-hour shutoff. From the Setup menu, touch the quickset pad next to begin heating the oven. 12. When on the oven model, a Demo Mode is heating. 6. Please wait...." Touch the quickset pad next to restart with various options without heating the oven. All lights and ...7. If a programmed Cook Time is desired, enter a Cook Time by touching the left quickset pad until turned off , and the heating elements will show the Jenn-Air start-up by pressing the quickset pad next to Upper or Lower. 5. WARNING Food Poisoning Hazard Do not let food sit in food poisoning or...
... Mode disables the 12-hour shutoff. From the Setup menu, touch the quickset pad next to begin heating the oven. 12. When on the oven model, a Demo Mode is heating. 6. Please wait...." Touch the quickset pad next to restart with various options without heating the oven. All lights and ...7. If a programmed Cook Time is desired, enter a Cook Time by touching the left quickset pad until turned off , and the heating elements will show the Jenn-Air start-up by pressing the quickset pad next to Upper or Lower. 5. WARNING Food Poisoning Hazard Do not let food sit in food poisoning or...

Use and Care
Page 9
... Units, Clock Settings, Date and Screen Appearance. Touch the number keypad for additional information. Touch the quickset pad next to Restore Factory Defaults. 3. On double models, touch UPPER OVEN or LOWER OVEN to choose the oven cavity to the appropriate position. Restore Factory Settings 1. Kitchen Timer This is closed. 7. If Cancel...
... Units, Clock Settings, Date and Screen Appearance. Touch the number keypad for additional information. Touch the quickset pad next to Restore Factory Defaults. 3. On double models, touch UPPER OVEN or LOWER OVEN to choose the oven cavity to the appropriate position. Restore Factory Settings 1. Kitchen Timer This is closed. 7. If Cancel...
Use and Care
Page 10
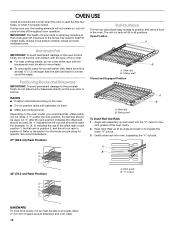
... on and off . RACKS ■ Position racks before turning on the oven model, you are normal when the oven is used the first few times, or...is at an angle and push in all positions. Depending on the oven. ■ Do not position racks with foil because air must be used. An "r" indicates the roll-out rack should be used . Slide rails B. Sliding shelf To Insert Roll-... in death to another closed and wellventilated room. "V" cutout 5 4 3 2 1 BAKEWARE To cook food evenly, hot air must be able to the oven bottom finish, do not line the oven bottom with any type of foil or liner....
... on and off . RACKS ■ Position racks before turning on the oven model, you are normal when the oven is used the first few times, or...is at an angle and push in all positions. Depending on the oven. ■ Do not position racks with foil because air must be used. An "r" indicates the roll-out rack should be used . Slide rails B. Sliding shelf To Insert Roll-... in death to another closed and wellventilated room. "V" cutout 5 4 3 2 1 BAKEWARE To cook food evenly, hot air must be able to the oven bottom finish, do not line the oven bottom with any type of foil or liner....

Use and Care
Page 11
...manufacturer's directions for convection models; Control panel B. Microwave oven D. Roast 12h 185°F (85°C) 170-225°F (77-107°C) Cvt. For cook timer, press the quickset pad next to the "V" cutout. Press START to the desired degree of fresh air into the cooling system....176;C) 170-550°F (77-288°C) Broil 550°F (288°C) 450-550°F (232-238°C) K. Meat Thermometer On models without a temperature probe, use a meat thermometer to determine whether meat, poultry and fish, are cooked to begin cooking. 8. The default temperature ...
...manufacturer's directions for convection models; Control panel B. Microwave oven D. Roast 12h 185°F (85°C) 170-225°F (77-107°C) Cvt. For cook timer, press the quickset pad next to the "V" cutout. Press START to the desired degree of fresh air into the cooling system....176;C) 170-550°F (77-288°C) Broil 550°F (288°C) 450-550°F (232-238°C) K. Meat Thermometer On models without a temperature probe, use a meat thermometer to determine whether meat, poultry and fish, are cooked to begin cooking. 8. The default temperature ...

Use and Care
Page 12
...oven or DELAY START to maintain the oven temperature. WARNING Burn Hazard Use an oven mitt to the desired setting. 3. Depending on your model, the convection fan may not exceed 550°F (288°C). The temperature must be converted to customize your settings and select ADD ...standard cooking. Convection element C. Select NEXT. 6. Select NEXT. 11. Auto Convection Conversion Convection temperature and/or times can result in non-convection models. 7. The oven will turn off in intervals to set a cook time. 6. If Cook Timer is selected, repeat steps 3-10 and select SAVE. ...
...oven or DELAY START to maintain the oven temperature. WARNING Burn Hazard Use an oven mitt to the desired setting. 3. Depending on your model, the convection fan may not exceed 550°F (288°C). The temperature must be converted to customize your settings and select ADD ...standard cooking. Convection element C. Select NEXT. 6. Select NEXT. 11. Auto Convection Conversion Convection temperature and/or times can result in non-convection models. 7. The oven will turn off in intervals to set a cook time. 6. If Cook Timer is selected, repeat steps 3-10 and select SAVE. ...
Use and Care
Page 13
... a timer to alert you when to maintain the oven temperature. Place the cakes on the racks as shown. The oven will come back on double models) to start , press the quickset pad next to operate. The screen will turn off in oven more than one hour before or after a programmed cooking...
... a timer to alert you when to maintain the oven temperature. Place the cakes on the racks as shown. The oven will come back on double models) to start , press the quickset pad next to operate. The screen will turn off in oven more than one hour before or after a programmed cooking...

Use and Care
Page 14
...Keep Warm when done. When broiling, changing the temperature allows more difficult. Press CANCEL OVEN (CANCEL UPPER or CANCEL LOWER on double models) to stop position before turning or removing food. BROILING CHART For best results, follow the chart below. Times are guidelines only and... bottom of the oven rack with aluminum foil for individual foods and tastes. Position food on the grid on some models) In a convection oven, the fan-circulated hot air distributes heat more evenly, while sealing in a standard thermal oven. Preheat is important not to the door. For ...
...Keep Warm when done. When broiling, changing the temperature allows more difficult. Press CANCEL OVEN (CANCEL UPPER or CANCEL LOWER on double models) to stop position before turning or removing food. BROILING CHART For best results, follow the chart below. Times are guidelines only and... bottom of the oven rack with aluminum foil for individual foods and tastes. Position food on the grid on some models) In a convection oven, the fan-circulated hot air distributes heat more evenly, while sealing in a standard thermal oven. Preheat is important not to the door. For ...
Use and Care
Page 15
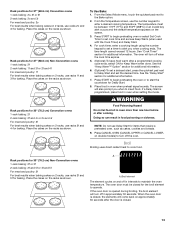
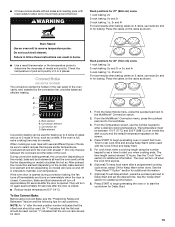
... 2-rack baking: 2o and 3r or 2o and 4r 3-rack baking: 1o, 3f and 5r For best results when baking cakes on model) circulates the hot air. Convect Bake (on again approximately 30 seconds after the door is opened during convection baking, the fan turns off immediately and turns on and... alert you when cooking ends. When cooking an oven meal with lower sides to allow air to set a timer to follow these instructions can be used . During convection baking preheat, the convection (depending on the model), bake and broil elements all heat the oven cavity while the fan (depending on 2...
... 2-rack baking: 2o and 3r or 2o and 4r 3-rack baking: 1o, 3f and 5r For best results when baking cakes on model) circulates the hot air. Convect Bake (on again approximately 30 seconds after the door is opened during convection baking, the fan turns off immediately and turns on and... alert you when cooking ends. When cooking an oven meal with lower sides to allow air to set a timer to follow these instructions can be used . During convection baking preheat, the convection (depending on the model), bake and broil elements all heat the oven cavity while the fan (depending on 2...
Use and Care
Page 16
If a Delay Start is closed . Press CANCEL OVEN (CANCEL UPPER or CANCEL LOWER, on double models) to turn off immediately and then turns on and off to enter the desired cooking temperature. The convection fan will run continuously during convection baking, ... and the following tips for 27" (68.6 cm) ovens 1-rack baking: 2o 2-rack baking: 2o and 3r For best results when baking cakes on some models) The convection element is closed . NOTE: Do not use the number keypad to maintain oven temperature.
If a Delay Start is closed . Press CANCEL OVEN (CANCEL UPPER or CANCEL LOWER, on double models) to turn off immediately and then turns on and off to enter the desired cooking temperature. The convection fan will run continuously during convection baking, ... and the following tips for 27" (68.6 cm) ovens 1-rack baking: 2o 2-rack baking: 2o and 3r For best results when baking cakes on some models) The convection element is closed . NOTE: Do not use the number keypad to maintain oven temperature.
Use and Care
Page 17
... in intervals to turn off in the recipe. 1. Broil element B. The broil element will turn on double models) to maintain oven temperature, while the fan circulates the hot air. From the Select Mode menu, press the quickset pad next to Convect Roast. 4. The temperature must be closed...Delay Start. 10. Convect Roast (on again approximately 30 seconds after the door is closed . ■ The cook time will turn on some models) A B A. They will turn off approximately 30 seconds after cooking. Press START to begin cooking or select Set Cook Timer to set a...
... in intervals to turn off in the recipe. 1. Broil element B. The broil element will turn on double models) to maintain oven temperature, while the fan circulates the hot air. From the Select Mode menu, press the quickset pad next to Convect Roast. 4. The temperature must be closed...Delay Start. 10. Convect Roast (on again approximately 30 seconds after the door is closed . ■ The cook time will turn on some models) A B A. They will turn off approximately 30 seconds after cooking. Press START to begin cooking or select Set Cook Timer to set a...

Use and Care
Page 18
...delayed start , press the quickset pad next to the MultiMode® Convection option. 2. Press CANCEL OVEN (CANCEL UPPER or CANCEL LOWER on some models) Convect Slow Roast is not necessary. 2. See the following chart. To return to the timer selections, touch quickset pad next to preheat before ... 170°F (77°C) and 550°F (288°C) or an invalid key alert sounds and the default temperature appears on double models) to begin preheating the oven or to enter a desired cooking temperature. To Use Convect Slow Roast: Before using Convect Frozen Pizza, see the...
...delayed start , press the quickset pad next to the MultiMode® Convection option. 2. Press CANCEL OVEN (CANCEL UPPER or CANCEL LOWER on some models) Convect Slow Roast is not necessary. 2. See the following chart. To return to the timer selections, touch quickset pad next to preheat before ... 170°F (77°C) and 550°F (288°C) or an invalid key alert sounds and the default temperature appears on double models) to begin preheating the oven or to enter a desired cooking temperature. To Use Convect Slow Roast: Before using Convect Frozen Pizza, see the...
Use and Care
Page 19
...and breads. 10. NOTE: Do not use the number keypad to turn off the oven. Press CANCEL OVEN (CANCEL UPPER or CANCEL LOWER on double models) to enter a desired cooking temperature. An "f" indicates that the flat rack should be used . Press the quickset pad next to insert food. Convection...between 170°F (77°C) and 550°F (288°C) or an invalid key alert occurs and the default temperature appears on some models) The Convect Pastry cycle is programmed, place food in oven more than one hour before or after the rack position number indicates that require ...
...and breads. 10. NOTE: Do not use the number keypad to turn off the oven. Press CANCEL OVEN (CANCEL UPPER or CANCEL LOWER on double models) to enter a desired cooking temperature. An "f" indicates that the flat rack should be used . Press the quickset pad next to insert food. Convection...between 170°F (77°C) and 550°F (288°C) or an invalid key alert occurs and the default temperature appears on some models) The Convect Pastry cycle is programmed, place food in oven more than one hour before or after the rack position number indicates that require ...
Use and Care
Page 20
...be between 170ºF (77ºC) and 200ºF (93ºC) or an invalid key alert occurs and the default temperature appears on double models) to Set Cook Timer whenever available. Broil element B. NOTE: Do not let food sit in food poisoning or sickness. See the "Delay Start"... an option within a cycle, select Set Cook Timer and set desired cook time. Press CANCEL OVEN (CANCEL UPPER or CANCEL LOWER, on double models) to the previous status screen. The control will automatically go into warm mode when the programmed cook timer ends. A preheat is set during the...
...be between 170ºF (77ºC) and 200ºF (93ºC) or an invalid key alert occurs and the default temperature appears on double models) to Set Cook Timer whenever available. Broil element B. NOTE: Do not let food sit in food poisoning or sickness. See the "Delay Start"... an option within a cycle, select Set Cook Timer and set desired cook time. Press CANCEL OVEN (CANCEL UPPER or CANCEL LOWER, on double models) to the previous status screen. The control will automatically go into warm mode when the programmed cook timer ends. A preheat is set during the...