
Use and Care Guide
Page 2
... 2 Printed in material and workmanship. Table of Contents Wall Oven Warranty 2 IMPORTANT SAFETY INSTRUCTIONS 3-4 Product Record 4 Serial Plate Location 4 Wall Oven Features 5 Oven Vent and Racks 6 Air Circulation in the Oven 6 Control Pad Features 7 Setting the Clock 8-9 Consumer Defined Control 10-11 Setting Oven Controls 12=26 Self=Cleaning 27=29 Adjusting the Oven Temperature 29 General Care & Cleaning 30-32 Before You Call 33-34 Protection Agreements 35 Sears Service 36 Please carefully read and save these exclusions or limitations may not...
... 2 Printed in material and workmanship. Table of Contents Wall Oven Warranty 2 IMPORTANT SAFETY INSTRUCTIONS 3-4 Product Record 4 Serial Plate Location 4 Wall Oven Features 5 Oven Vent and Racks 6 Air Circulation in the Oven 6 Control Pad Features 7 Setting the Clock 8-9 Consumer Defined Control 10-11 Setting Oven Controls 12=26 Self=Cleaning 27=29 Adjusting the Oven Temperature 29 General Care & Cleaning 30-32 Before You Call 33-34 Protection Agreements 35 Sears Service 36 Please carefully read and save these exclusions or limitations may not...
Use and Care Guide
Page 3
... the circuit breaker or fuse box. • User Servicing. Loose=fitting or hanging garments should never be worn while using this appliance can result in • All wall ovens can be done only by removing panels, wire covers or any part of personal injury and damage to climb or play with the wall oven. Fat or grease may cause serious bodily harm, death or property damage. Install...
... the circuit breaker or fuse box. • User Servicing. Loose=fitting or hanging garments should never be worn while using this appliance can result in • All wall ovens can be done only by removing panels, wire covers or any part of personal injury and damage to climb or play with the wall oven. Fat or grease may cause serious bodily harm, death or property damage. Install...
Use and Care Guide
Page 4
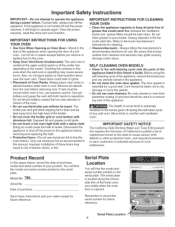
... oven door is not turned off the power to warn customers of a hot oven. The serial plate is located along the interior side trim of any kind should be moved while oven is essential for future reference. Once the power resumes, reset the clock and oven function. If rack must be used in this Owner's Guide. Use pot holders and grasp the rack with both hands to operate the appliance during the self-clean...
... oven door is not turned off the power to warn customers of a hot oven. The serial plate is located along the interior side trim of any kind should be moved while oven is essential for future reference. Once the power resumes, reset the clock and oven function. If rack must be used in this Owner's Guide. Use pot holders and grasp the rack with both hands to operate the appliance during the self-clean...

Use and Care Guide
Page 5
Your Electric Wail Oven Features At a Glance Wall Oven Features Note: The features of your wall oven will vary according to model. 1, Electronic Oven Controls with Large Window Opening 11. Upper Oven Vent 4. Upper Oven Broil Element 5. Regular Oven Light (some models) Convection fan 8. Decorative Bottom Trim Large One Piece Door Handle 10. Serf-Cleaning Convection Oven 7. Upper Oven Door Lock 3. Glass Front Oven Door with Clock and Kitchen Timer 2. AdjustabLe Oven Racks 9. Single or Double (some models) 6. Lower Self-Clean Convection Oven with same features as the ...
Your Electric Wail Oven Features At a Glance Wall Oven Features Note: The features of your wall oven will vary according to model. 1, Electronic Oven Controls with Large Window Opening 11. Upper Oven Vent 4. Upper Oven Broil Element 5. Regular Oven Light (some models) Convection fan 8. Decorative Bottom Trim Large One Piece Door Handle 10. Serf-Cleaning Convection Oven 7. Upper Oven Door Lock 3. Glass Front Oven Door with Clock and Kitchen Timer 2. AdjustabLe Oven Racks 9. Single or Double (some models) 6. Lower Self-Clean Convection Oven with same features as the ...
Use and Care Guide
Page 6
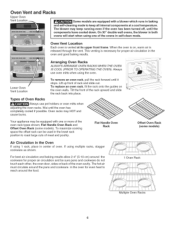
... cooled down. Flat Handle Oven Rack Air Circulation in the Oven If using one or more of the oven rack types shown; The hot air must circulate around the pans and cookware in self=clean mode. Oven Vent Location Each oven is released through the vent. To replace an oven rack, fit the rack onto the guides on , warm air is vented at a cool temperature. To maximize cooking space the offset rack can be sure pans and cookware do not...
... cooled down. Flat Handle Oven Rack Air Circulation in the Oven If using one or more of the oven rack types shown; The hot air must circulate around the pans and cookware in self=clean mode. Oven Vent Location Each oven is released through the vent. To replace an oven rack, fit the rack onto the guides on , warm air is vented at a cool temperature. To maximize cooking space the offset rack can be sure pans and cookware do not...
Use and Care Guide
Page 7
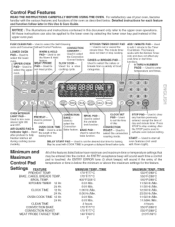
... This feature works with Oven Light). Used to select the lower ove n. BAKE PAD-- Press STOP to set the desired start or stop cooking. KITCHEN TIMER ON/OFF PAD -- DELAY START PAD -- START -- NOTICE : The illustrations and instructions contained in this document only refer to program a delayed timed bake cycle. Used to enter temperature and times. MEAT PROBE Convert feature. Used to preheat the oven. Control Pad Features READ THE iNSTRUCTiONS CAREFULLY BEFORE USING THE OVEN. PREHEAT-Used to enter i' Bake feature. CONVECTION ROAST-- CLOCK TiME 12...
... This feature works with Oven Light). Used to select the lower ove n. BAKE PAD-- Press STOP to set the desired start or stop cooking. KITCHEN TIMER ON/OFF PAD -- DELAY START PAD -- START -- NOTICE : The illustrations and instructions contained in this document only refer to program a delayed timed bake cycle. Used to enter temperature and times. MEAT PROBE Convert feature. Used to preheat the oven. Control Pad Features READ THE iNSTRUCTiONS CAREFULLY BEFORE USING THE OVEN. PREHEAT-Used to enter i' Bake feature. CONVECTION ROAST-- CLOCK TiME 12...
Use and Care Guide
Page 10
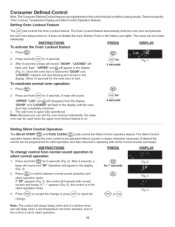
... not disable the clock, Kitchen Timer or the interior oven lights. INSTRUCTIONS PRESS DISPLAY To activate the Oven Lockout feature 1. Press and hold _ for 6 seconds (Fig. 2). Note: Because you can be used when the upper oven lockout feature is on . Press and hold _ for 7 seconds @ DISPLAY Fig. 2 Fig. 3 Fig. 4 Note: The control will always beep at the end of a kitchen timer and will beep when a set temperature has been...
... not disable the clock, Kitchen Timer or the interior oven lights. INSTRUCTIONS PRESS DISPLAY To activate the Oven Lockout feature 1. Press and hold _ for 6 seconds (Fig. 2). Note: Because you can be used when the upper oven lockout feature is on . Press and hold _ for 7 seconds @ DISPLAY Fig. 2 Fig. 3 Fig. 4 Note: The control will always beep at the end of a kitchen timer and will beep when a set temperature has been...
Use and Care Guide
Page 12
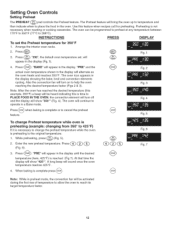
... preheat mode, the convection fan will appear in the display until the desired temperature (here, 425°F) is preheating to place the food in the display. The Preheat feature will appear in the oven. Press _. (_ 3. "PRE" and the actual oven temperature shown in the display showing the bake, broil and convection elements cycling. Enter the new preheat temperature. At that time the display will alternate as the oven heats and reaches 350°F. Setting Oven Controls Setting Preheat...
... preheat mode, the convection fan will appear in the display until the desired temperature (here, 425°F) is preheating to place the food in the display. The Preheat feature will appear in the oven. Press _. (_ 3. "PRE" and the actual oven temperature shown in the display showing the bake, broil and convection elements cycling. Enter the new preheat temperature. At that time the display will alternate as the oven heats and reaches 350°F. Setting Oven Controls Setting Preheat...

Use and Care Guide
Page 13
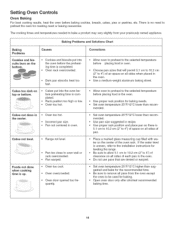
... be turned on during the Self-Cleaning cycle. When a cooking mode is equipped with some models) Your appliance is active. bake, convection bake, convection roast, cakes and breads. Setting Bake TheBAK"E--'_p_a_dcoo,pntronlosrmbaal kingp.r,eheatisingecessareryfet,orthe___PreheFaetatuforerinstructions. Press (_. 3. To change the Bake Temperature (example: changing from prior cooking and has remained heated, the bake element symbol may be manually turned off during any cooking process. G 2. The actual oven temperature will rise as the unit preheat. A beep will...
... be turned on during the Self-Cleaning cycle. When a cooking mode is equipped with some models) Your appliance is active. bake, convection bake, convection roast, cakes and breads. Setting Bake TheBAK"E--'_p_a_dcoo,pntronlosrmbaal kingp.r,eheatisingecessareryfet,orthe___PreheFaetatuforerinstructions. Press (_. 3. To change the Bake Temperature (example: changing from prior cooking and has remained heated, the bake element symbol may be manually turned off during any cooking process. G 2. The actual oven temperature will rise as the unit preheat. A beep will...
Use and Care Guide
Page 14
... installation instructions for roasting meat or baking casseroles. There Js no need to preheat the oven for leveling the range, • Be sure to allow 5.1 cm to l0.2 cm (2" to 4") of clearance on all sides of air space on the bottom. Setting Oven Controls Oven Baking For best cooking results, heat the oven before preheating time is completed, • Rack position too high or low. • Oven too hot. The cooking times and temperatures needed to bake a product...
... installation instructions for roasting meat or baking casseroles. There Js no need to preheat the oven for leveling the range, • Be sure to allow 5.1 cm to l0.2 cm (2" to 4") of clearance on all sides of air space on the bottom. Setting Oven Controls Oven Baking For best cooking results, heat the oven before preheating time is completed, • Rack position too high or low. • Oven too hot. The cooking times and temperatures needed to bake a product...
Use and Care Guide
Page 15
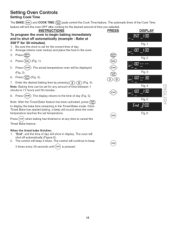
Setting Oven Controls Setting Cook Time The BAKE _ and COOK TiME _ pads control the Cook Time feature. Arrange interior oven rack(s) and place the food in the Timed Bake mode. Fig. 1 3. Press _ART_. Enter the desired baking time by pressing _ _ (Fig. 4). Note: After the Timed Bake feature has been activated, press to 11 hours and 59 minutes.. _'_ _ Fig. 3 Fig. 4 8. Once Timed Bake has started baking, a beep will beep 3 times. Note: Baking time can be displayed (Fig. 2). 6. The control will sound when the oven temperature reaches the...
Setting Oven Controls Setting Cook Time The BAKE _ and COOK TiME _ pads control the Cook Time feature. Arrange interior oven rack(s) and place the food in the Timed Bake mode. Fig. 1 3. Press _ART_. Enter the desired baking time by pressing _ _ (Fig. 4). Note: After the Timed Bake feature has been activated, press to 11 hours and 59 minutes.. _'_ _ Fig. 3 Fig. 4 8. Once Timed Bake has started baking, a beep will beep 3 times. Note: Baking time can be displayed (Fig. 2). 6. The control will sound when the oven temperature reaches the...
Use and Care Guide
Page 17
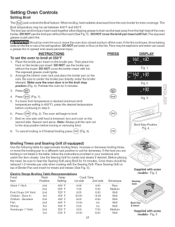
... stop position (Fig. 4). "C'_TY Fig. 3 6. turn off the oven. Before placing the meat, be kept away from the oven broiler for even coverage. Fig. 5 Gr"i Searing Bro, & insert Supplied with some models - INSTRUCTIONS PRESS DISPLAY To set between 400°F and 550°F. If a lower broil temperature is desired (minimum broil temperature setting is browned; The oven will begin to center the broiler pan directly under the broiler element. DO NOT cover...
... stop position (Fig. 4). "C'_TY Fig. 3 6. turn off the oven. Before placing the meat, be kept away from the oven broiler for even coverage. Fig. 5 Gr"i Searing Bro, & insert Supplied with some models - INSTRUCTIONS PRESS DISPLAY To set between 400°F and 550°F. If a lower broil temperature is desired (minimum broil temperature setting is browned; The oven will begin to center the broiler pan directly under the broiler element. DO NOT cover...

Use and Care Guide
Page 20
.... Plug the meat probe into the probe receptacle located on the desired oven rack position and slide into the food. During the cooking process you wish 20 If the target temperature needs to be set temperature. Use the @ key to toggle back to the actual oven temperature. 10. To set oven to accept the change how your oven reacts when using the numeric key pads (default setting is correctly plugged in the display...
.... Plug the meat probe into the probe receptacle located on the desired oven rack position and slide into the food. During the cooking process you wish 20 If the target temperature needs to be set temperature. Use the @ key to toggle back to the actual oven temperature. 10. To set oven to accept the change how your oven reacts when using the numeric key pads (default setting is correctly plugged in the display...
Use and Care Guide
Page 23
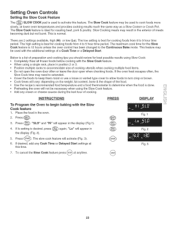
... the oven control has been changed to the Continuous Bake mode. Below is a list of a Cook Time or a Delayed Start. Add any Cook Time or Delayed Start settings at anytime. Cook times will activate (Fig. 3). 6. depending on the weight, fat content, bone & the shape of cooking utensils when cooking multiple food items. Do not open the oven door often or leave the door open when checking foods. Setting Oven Controls Setting the Slow Cook Feature The @ SLOW COOK pad is used to...
... the oven control has been changed to the Continuous Bake mode. Below is a list of a Cook Time or a Delayed Start. Add any Cook Time or Delayed Start settings at anytime. Cook times will activate (Fig. 3). 6. depending on the weight, fat content, bone & the shape of cooking utensils when cooking multiple food items. Do not open the oven door often or leave the door open when checking foods. Setting Oven Controls Setting the Slow Cook Feature The @ SLOW COOK pad is used to...
Use and Care Guide
Page 24
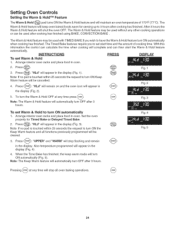
... cancelled. 4. INSTRUCTIONS PRESS DISPLAY To set Warm & Hold to turn the Warm & Hold OFF at any other cooking operations or can be used with TIMED BAKE if you to set start the Warm & Hold feature automatically. Press _. Arrange interior oven racks and place food in the display (Fig. 4). 4. Press _. Also temperature programmed will stop flashing and remain in the display. When the Time Bake has finished, the keep oven baked foods warm for Timed Bake or Delayed Timed Bake. 2. The Warm & Hold...
... cancelled. 4. INSTRUCTIONS PRESS DISPLAY To set Warm & Hold to turn the Warm & Hold OFF at any other cooking operations or can be used with TIMED BAKE if you to set start the Warm & Hold feature automatically. Press _. Arrange interior oven racks and place food in the display (Fig. 4). 4. Press _. Also temperature programmed will stop flashing and remain in the display. When the Time Bake has finished, the keep oven baked foods warm for Timed Bake or Delayed Timed Bake. 2. The Warm & Hold...

Use and Care Guide
Page 25
... oven temperature change the oven temperature once baking has started. Should you just want one oven ON so continue to be OFF, be needed during the Sabbath/Jewish Holidays. After the Sabbath observance turn back on the Jewish Sabbath & Holidays) The _ COOK TIME and _ DELAY START pads are used only during the Sabbath/Jewish Holidays. If the oven light will appear in the oven. Be sure that the oven control will no longer beep or display...
... oven temperature change the oven temperature once baking has started. Should you just want one oven ON so continue to be OFF, be needed during the Sabbath/Jewish Holidays. After the Sabbath observance turn back on the Jewish Sabbath & Holidays) The _ COOK TIME and _ DELAY START pads are used only during the Sabbath/Jewish Holidays. If the oven light will appear in the oven. Be sure that the oven control will no longer beep or display...
Use and Care Guide
Page 27
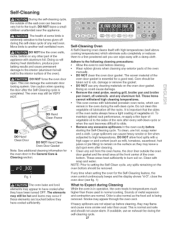
... been turned OFF. Doing so could cause damage. ,, Remove the meat probe, searing grill, broiler pan and broiler pan insert, all ustensils and any excessive spiilovers in normal cooking. To clean, use an exhaust fan during Cleaning While the oven is being removed. This can cause heavy smoke or fire when subjected to the touch. Sounds of the wall oven can become very hot to high temperatures. if...
... been turned OFF. Doing so could cause damage. ,, Remove the meat probe, searing grill, broiler pan and broiler pan insert, all ustensils and any excessive spiilovers in normal cooking. To clean, use an exhaust fan during Cleaning While the oven is being removed. This can cause heavy smoke or fire when subjected to the touch. Sounds of the wall oven can become very hot to high temperatures. if...

Use and Care Guide
Page 32
... bake element cover with both hands (See picture). 2. The glass shield can be removed to be manually operated by a wire holder. THIS GLASS SHIELD MUST BE IN PLACE WHENEVER THE OVEN IS IN USE. High temperature will turn on the control panel. To replace the light bulb: CAUTION: BE SURE OVEN IS COOL 1. Wear a leather-faced glove for protection against possible broken glass. 3. For self-cleaning oven, press wire holder to release glass shield, change oven light. To remove...
... bake element cover with both hands (See picture). 2. The glass shield can be removed to be manually operated by a wire holder. THIS GLASS SHIELD MUST BE IN PLACE WHENEVER THE OVEN IS IN USE. High temperature will turn on the control panel. To replace the light bulb: CAUTION: BE SURE OVEN IS COOL 1. Wear a leather-faced glove for protection against possible broken glass. 3. For self-cleaning oven, press wire holder to release glass shield, change oven light. To remove...
Use and Care Guide
Page 33
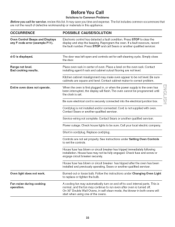
.../SOLUTION Oven Control Beeps and Displays any F code error (example F11). Bad cooking results. See instructions under Changing Oven Light to replace or tighten the bulb. House fuse has blown or circuit breaker has tripped immediately following installation. House fuse has blown or circuit breaker has tripped after oven is turned off to cool internal parts. Cord/plug is securely connected into the electrical junction box. Press STOP and call for self-cleaning cycle. Oven light does not work. Place oven rack in cord/plug. Be sure cabinets are...
.../SOLUTION Oven Control Beeps and Displays any F code error (example F11). Bad cooking results. See instructions under Changing Oven Light to replace or tighten the bulb. House fuse has blown or circuit breaker has tripped immediately following installation. House fuse has blown or circuit breaker has tripped after oven is turned off to cool internal parts. Cord/plug is securely connected into the electrical junction box. Press STOP and call for self-cleaning cycle. Oven light does not work. Place oven rack in cord/plug. Be sure cabinets are...

Use and Care Guide
Page 34
... completely removed after self=cleaning cycle is closed . DO NOT use the broiler pan without grid or grid cover with foil. Grease has built up on broiler pan wrong-side up. See Baking for longer cleaning time. Make sure the oven door is completed. Follow instructions. Set the self-clean cycle for hints, causes and corrections. Flames inside oven or smoke from meat. Reposition the rack to prevent curling, but do not cut into broiler pan. Broiler pan used...
... completely removed after self=cleaning cycle is closed . DO NOT use the broiler pan without grid or grid cover with foil. Grease has built up on broiler pan wrong-side up. See Baking for longer cleaning time. Make sure the oven door is completed. Follow instructions. Set the self-clean cycle for hints, causes and corrections. Flames inside oven or smoke from meat. Reposition the rack to prevent curling, but do not cut into broiler pan. Broiler pan used...


