
Instruction Manual
Page 1
Refer to read through this instruction manual. GPS NAVIGATION SYSTEM DNX9140 MONITOR WITH DVD RECEIVER DDX814 DDX8034BT INSTRUCTION MANUAL Take the time to the model and serial numbers whenever you obtain the best performance from your Kenwood dealer for information or service on the warranty card, and in the space provided below. Familiarity with installation and operation...
Refer to read through this instruction manual. GPS NAVIGATION SYSTEM DNX9140 MONITOR WITH DVD RECEIVER DDX814 DDX8034BT INSTRUCTION MANUAL Take the time to the model and serial numbers whenever you obtain the best performance from your Kenwood dealer for information or service on the warranty card, and in the space provided below. Familiarity with installation and operation...

Instruction Manual
Page 2
... the Easy Control Screen 17 Watching DVD/Video CD 18 Playback Screen 18 Easy Control Screen 18 Source Control Screen 18 DVD-VIDEO Disc Menu 20 DVD-VR Menu Control 21 Video CD ...Link search (Music file) 29 2 DNX9140/DDX814/DDX8034BT Initial Setup 97 Radio Listening 30 Source Control Screen 30 Preset Select 31 Auto Memory 31 Manual Memory 32 Radio Text (North American sales area...(North American sales area only) 42 Source Control Screen 42 Auto Memory 43 Manual Memory 43 Receive mode 44 Direct Search 44 iTunes Tagging (HD Radio Tagging) 45 Bluetooth Audio Control...
... the Easy Control Screen 17 Watching DVD/Video CD 18 Playback Screen 18 Easy Control Screen 18 Source Control Screen 18 DVD-VIDEO Disc Menu 20 DVD-VR Menu Control 21 Video CD ...Link search (Music file) 29 2 DNX9140/DDX814/DDX8034BT Initial Setup 97 Radio Listening 30 Source Control Screen 30 Preset Select 31 Auto Memory 31 Manual Memory 32 Radio Text (North American sales area...(North American sales area only) 42 Source Control Screen 42 Auto Memory 43 Manual Memory 43 Receive mode 44 Direct Search 44 iTunes Tagging (HD Radio Tagging) 45 Bluetooth Audio Control...

Instruction Manual
Page 4
...continues to flip the page for the rest of the operations. Display Setting "AUTO1" Tunes in this manual This manual uses illustrations to provide clear explanations of the instruction. 4 DNX9140/DDX814/DDX8034BT [CRSC] FM Turns the CRSC function On or Off. [SEEK] Switches the Seek mode....Control Screen See . 2 Operation on the Source Control screen 1 [FM] Switches to the FM1/2/3 band. [AM] Switches to the next frequency manually. 2 sec. Multi Function Short Press Press the button, denoted by touching the button on the screen. The displays and panels shown in a station...
...continues to flip the page for the rest of the operations. Display Setting "AUTO1" Tunes in this manual This manual uses illustrations to provide clear explanations of the instruction. 4 DNX9140/DDX814/DDX8034BT [CRSC] FM Turns the CRSC function On or Off. [SEEK] Switches the Seek mode....Control Screen See . 2 Operation on the Source Control screen 1 [FM] Switches to the FM1/2/3 band. [AM] Switches to the next frequency manually. 2 sec. Multi Function Short Press Press the button, denoted by touching the button on the screen. The displays and panels shown in a station...

Instruction Manual
Page 6
... coloring on the recording surface or discs that has not been finalized. (For the finalization process refer to your writing software, and your recorder instruction manual.) • If you try to load a 3-inch-disc with a clean soft dry cloth. ¤ • Applying spray cleaner directly to ...see (page 13). • When the unit is turned on the lens in trash. For disposal or recycling information, please contact your Kenwood dealer. 6 DNX9140/DDX814/DDX8034BT Handling discs • Do not touch the recording surface of the disc and move outward. • When removing discs from the ...
... coloring on the recording surface or discs that has not been finalized. (For the finalization process refer to your writing software, and your recorder instruction manual.) • If you try to load a 3-inch-disc with a clean soft dry cloth. ¤ • Applying spray cleaner directly to ...see (page 13). • When the unit is turned on the lens in trash. For disposal or recycling information, please contact your Kenwood dealer. 6 DNX9140/DDX814/DDX8034BT Handling discs • Do not touch the recording surface of the disc and move outward. • When removing discs from the ...

Instruction Manual
Page 7
... the Audio file In the example of folder/file tree shown below, the files are complied with 8-cm (3 inch) discs DVD-R DL (Dual layer) DVD+R DL (Double layer) ‡ ‡ Only video format DVD-RAM × CD Music CD ‡ CD-TEXT/8-cm (3 inch) discs supported. Registration Code changes each time a file with CPRM...
... the Audio file In the example of folder/file tree shown below, the files are complied with 8-cm (3 inch) discs DVD-R DL (Dual layer) DVD+R DL (Double layer) ‡ ‡ Only video format DVD-RAM × CD Music CD ‡ CD-TEXT/8-cm (3 inch) discs supported. Registration Code changes each time a file with CPRM...

Instruction Manual
Page 8
... to HD Radio tuner features. The word "iPod" appearing in this manual indicates the iPod/ iPhone connected with the KCA-iP301V (optional accessory). ... • When the USB device is connected to this unit, "KENWOOD" or "✓" is powered. • Install the USB device in...Satellite Radio tuner This unit supports Satellite Radio tuners which 8 DNX9140/DDX814/DDX8034BT have no compensation for audio files. TV tuner that can ...8226; Extensions jpg, jpeg • Acceptable media CD-R/RW/ROM, DVD±R/RW, mass-storage-class USB device Acceptable discs, disc formats,...
... to HD Radio tuner features. The word "iPod" appearing in this manual indicates the iPod/ iPhone connected with the KCA-iP301V (optional accessory). ... • When the USB device is connected to this unit, "KENWOOD" or "✓" is powered. • Install the USB device in...Satellite Radio tuner This unit supports Satellite Radio tuners which 8 DNX9140/DDX814/DDX8034BT have no compensation for audio files. TV tuner that can ...8226; Extensions jpg, jpeg • Acceptable media CD-R/RW/ROM, DVD±R/RW, mass-storage-class USB device Acceptable discs, disc formats,...
Instruction Manual
Page 9
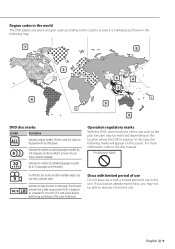
... 9 can select a favorite language. 32 Indicates the number of this unit. English 9 In this case, the following map. 1 5 2 1 4 2 6 2 3 1 5 4 DVD disc marks Symbol Description ALL Indicates a region number. Indicates the number of screen for the image. Up to 32 languages can be able to remove... it is playing. For more information, refer to the disc manual. Up 8 to 8 languages can be recorded in a movie. If a DVD disc has scenes shot from this unit. Indicates the type of audio languages recorded. Region codes in ...
... 9 can select a favorite language. 32 Indicates the number of this unit. English 9 In this case, the following map. 1 5 2 1 4 2 6 2 3 1 5 4 DVD disc marks Symbol Description ALL Indicates a region number. Indicates the number of screen for the image. Up to 32 languages can be able to remove... it is playing. For more information, refer to the disc manual. Up 8 to 8 languages can be recorded in a movie. If a DVD disc has scenes shot from this unit. Indicates the type of audio languages recorded. Region codes in ...
Instruction Manual
Page 12
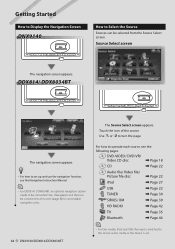
... TOP SRC The navigation screen appears. • For how to set . See (page 8) for connectable navigation units. 12 DNX9140/DDX814/DDX8034BT The Source Select screen appears. DVD-VIDEO/ DVD-VR/ Video CD disc \ Page 18 CD \ Page 22 Audio file/ Video file/ Picture file disc \ Page 22 iPod \ Page ... Sources can be connected. Touch the icon of the source. For how to operate each source, see the Navigation Instruction Manual. ⁄ • For DDX814/ DDX8034BT, an optional navigation system needs to turn the page. Source Select screen The navigation screen appears.
... TOP SRC The navigation screen appears. • For how to set . See (page 8) for connectable navigation units. 12 DNX9140/DDX814/DDX8034BT The Source Select screen appears. DVD-VIDEO/ DVD-VR/ Video CD disc \ Page 18 CD \ Page 22 Audio file/ Video file/ Picture file disc \ Page 22 iPod \ Page ... Sources can be connected. Touch the icon of the source. For how to operate each source, see the Navigation Instruction Manual. ⁄ • For DDX814/ DDX8034BT, an optional navigation system needs to turn the page. Source Select screen The navigation screen appears.
Instruction Manual
Page 13
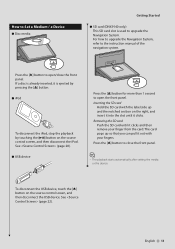
... touching the [38] button on the source control screen, and then disconnect the iPod. For how to upgrade the Navigation System, refer to the instruction manual of the navigation system. 0 Press the [0] button to upgrade the Navigation System. Press the [0] button to open /close the front panel. ⁄ • The playback...
... touching the [38] button on the source control screen, and then disconnect the iPod. For how to upgrade the Navigation System, refer to the instruction manual of the navigation system. 0 Press the [0] button to upgrade the Navigation System. Press the [0] button to open /close the front panel. ⁄ • The playback...
Instruction Manual
Page 15
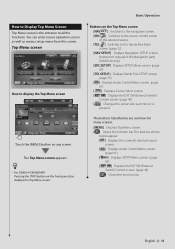
The Top Menu screen appears. • For DDX814/ DDX8034BT Pressing the [TOP] button on any screen. The buttons listed below appear. [ ] Displays the currently selected source screen. [ ] Displays Audio Control Menu screen. (page ... the source control screen of the selected source. [TEL ] Switches to the Hands Free Main screen. (page 52) [NAV SETUP] Displays Navigation SETUP screen. (Instruction manual of the Navigation part) (DNX9140 only) [SRC SETUP] Displays SETUP Menu screen. (page 66) [TEL SETUP] Displays Hands Free SETUP screen. (page 55) [ ] Displays Audio...
The Top Menu screen appears. • For DDX814/ DDX8034BT Pressing the [TOP] button on any screen. The buttons listed below appear. [ ] Displays the currently selected source screen. [ ] Displays Audio Control Menu screen. (page ... the source control screen of the selected source. [TEL ] Switches to the Hands Free Main screen. (page 52) [NAV SETUP] Displays Navigation SETUP screen. (Instruction manual of the Navigation part) (DNX9140 only) [SRC SETUP] Displays SETUP Menu screen. (page 66) [TEL SETUP] Displays Hands Free SETUP screen. (page 55) [ ] Displays Audio...
Instruction Manual
Page 30
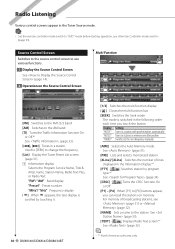
...and selects memorized station. [4Line]/ [2Line] Switches the number of broadcasting stations, see (page 91). Use the [SEEK] to the next frequency manually. [AME] Selects the Auto Memory mode. The mode is scrolled by program type.*1 See (page 34). [CRSC] FM Turns the CRSC function ... display is switched in a station. For memory of lines displayed in the Information Display.*1 [PTY] FM Searches station by touching it. 30 DNX9140/DDX814/DDX8034BT [1/3] Switches the multi function display. [ ] Closes the multi function bar. [SEEK] Switches the Seek mode. "AUTO2" Tunes in stations in...
...and selects memorized station. [4Line]/ [2Line] Switches the number of broadcasting stations, see (page 91). Use the [SEEK] to the next frequency manually. [AME] Selects the Auto Memory mode. The mode is scrolled by program type.*1 See (page 34). [CRSC] FM Turns the CRSC function ... display is switched in a station. For memory of lines displayed in the Information Display.*1 [PTY] FM Searches station by touching it. 30 DNX9140/DDX814/DDX8034BT [1/3] Switches the multi function display. [ ] Closes the multi function bar. [SEEK] Switches the Seek mode. "AUTO2" Tunes in stations in...
Instruction Manual
Page 32
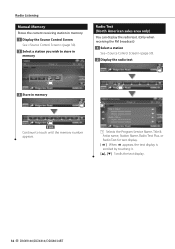
Radio Listening Manual Memory Stores the current receiving station in memory. 1 Display the Source Control Screen See (page 30). 2 Select a station you wish to touch until the memory number appears. 1 Selects the Program ..., the text display is scrolled by touching it. [5], [∞] Scrolls the text display. 32 DNX9140/DDX814/DDX8034BT Continue to store in memory Radio Text (North American sales area only) You can display the radio text. (Only when receiving the FM broadcast) 1 Select a station See (page 30). 2 Display the radio text 3 Store in...
Radio Listening Manual Memory Stores the current receiving station in memory. 1 Display the Source Control Screen See (page 30). 2 Select a station you wish to touch until the memory number appears. 1 Selects the Program ..., the text display is scrolled by touching it. [5], [∞] Scrolls the text display. 32 DNX9140/DDX814/DDX8034BT Continue to store in memory Radio Text (North American sales area only) You can display the radio text. (Only when receiving the FM broadcast) 1 Select a station See (page 30). 2 Display the radio text 3 Store in...
Instruction Manual
Page 36
...P1] - [P6] When [P1] to [P6] buttons appear, you touch the button. For memory of broadcasting stations, see (page 37) or (page 37). 36 DNX9140/DDX814/DDX8034BT The mode is scrolled by touching it. TV Watching (DDX8034BT only) Source Control Screen Switches to source control screen to use various functions. 1 Display... following order each time you can recall channels on the Source Control Screen 1 [BAND] Switches to the station. Switches to the next frequency manually. [PRE] Lists and selects memorized station. [NAME] Sets a name to TV1 or TV2. [4], [¢] Select a channel.
...P1] - [P6] When [P1] to [P6] buttons appear, you touch the button. For memory of broadcasting stations, see (page 37) or (page 37). 36 DNX9140/DDX814/DDX8034BT The mode is scrolled by touching it. TV Watching (DDX8034BT only) Source Control Screen Switches to source control screen to use various functions. 1 Display... following order each time you can recall channels on the Source Control Screen 1 [BAND] Switches to the station. Switches to the next frequency manually. [PRE] Lists and selects memorized station. [NAME] Sets a name to TV1 or TV2. [4], [¢] Select a channel.
Instruction Manual
Page 37
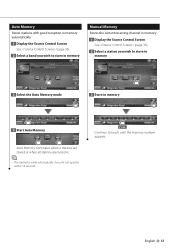
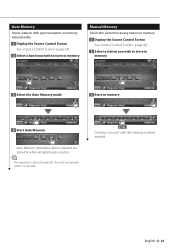
... Memory Stores stations with good reception in memory automatically. 1 Display the Source Control Screen See (page 36). 2 Select a band you wish to store in memory Manual Memory Stores the current receiving channel in . ⁄ • The operation ends automatically if you do not operate within 10 seconds. 2 sec. English 37
... Memory Stores stations with good reception in memory automatically. 1 Display the Source Control Screen See (page 36). 2 Select a band you wish to store in memory Manual Memory Stores the current receiving channel in . ⁄ • The operation ends automatically if you do not operate within 10 seconds. 2 sec. English 37

Instruction Manual
Page 42
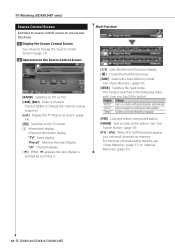
...displayed in the Information Display. [TTL] Displays the tuned in program information. [RCV] The Receive mode switches in the following order each time you can recall the stations on the Source Control ...HD FM] Switches to the HD FM1/2/3 band. [HD AM] Switches to the next frequency manually. [AME] Selects the Auto Memory mode. The mode is scrolled by entering the desired frequency ...or (page 43). ⁄ • * KTC-HR300 (optional accessory) connected only. 42 DNX9140/DDX814/DDX8034BT HD Radio Control (North American sales area only) Various control screens appear in the HD Radio ...
...displayed in the Information Display. [TTL] Displays the tuned in program information. [RCV] The Receive mode switches in the following order each time you can recall the stations on the Source Control ...HD FM] Switches to the HD FM1/2/3 band. [HD AM] Switches to the next frequency manually. [AME] Selects the Auto Memory mode. The mode is scrolled by entering the desired frequency ...or (page 43). ⁄ • * KTC-HR300 (optional accessory) connected only. 42 DNX9140/DDX814/DDX8034BT HD Radio Control (North American sales area only) Various control screens appear in the HD Radio ...
Instruction Manual
Page 43
... stations with good reception in memory automatically. 1 Display the Source Control Screen See (page 42). 2 Select a band you wish to store in memory Manual Memory Stores the current receiving station in memory. 1 Display the Source Control Screen See (page 42). 2 Select a station you do not operate within 10 seconds. 2 sec. Continue to...
... stations with good reception in memory automatically. 1 Display the Source Control Screen See (page 42). 2 Select a band you wish to store in memory Manual Memory Stores the current receiving station in memory. 1 Display the Source Control Screen See (page 42). 2 Select a station you do not operate within 10 seconds. 2 sec. Continue to...
Instruction Manual
Page 49
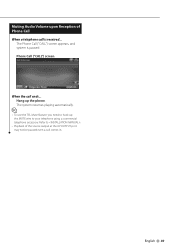
Phone Call ("CALL") screen When the call is paused. The system resumes playing automatically. ⁄ • To use the TEL Mute feature, you need to hook up the phone. The Phone Call ("CALL") screen appears, and system is received... Refer to your telephone using a commercial telephone accessory. English 49 Muting Audio Volume upon Reception of the source output at the AV OUTPUT port may not be paused even a call comes in. Hang up the MUTE wire to . • Playback of Phone Call When a telephone call ends...
Phone Call ("CALL") screen When the call is paused. The system resumes playing automatically. ⁄ • To use the TEL Mute feature, you need to hook up the phone. The Phone Call ("CALL") screen appears, and system is received... Refer to your telephone using a commercial telephone accessory. English 49 Muting Audio Volume upon Reception of the source output at the AV OUTPUT port may not be paused even a call comes in. Hang up the MUTE wire to . • Playback of Phone Call When a telephone call ends...

Instruction Manual
Page 51
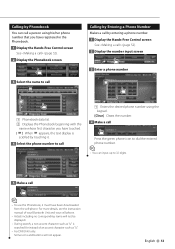
Receiving a Call Downloading the Phonebook Downloads the phonebook data from the cell-phone to this unit so that comes with your cell-phone before using it ...-download of phonebook: If the phonebook is not downloaded automatically for some reasons, follow the procedure above to download manually. • For how to operate the cell-phone, refer to the Instruction Manual that you need to register your cell-phone. • Up to 50* characters representing a name. (* 50: Number of your...
Receiving a Call Downloading the Phonebook Downloads the phonebook data from the cell-phone to this unit so that comes with your cell-phone before using it ...-download of phonebook: If the phonebook is not downloaded automatically for some reasons, follow the procedure above to download manually. • For how to operate the cell-phone, refer to the Instruction Manual that you need to register your cell-phone. • Up to 50* characters representing a name. (* 50: Number of your...
Instruction Manual
Page 53
For more details, see the instruction manual of your Bluetooth Unit and your cell-phone. • Initials including no corresponding name will not be displayed. • During search, a non-accent character such ...
For more details, see the instruction manual of your Bluetooth Unit and your cell-phone. • Initials including no corresponding name will not be displayed. • During search, a non-accent character such ...

Instruction Manual
Page 61
... the Adjust screen. [2], [3] Adjusts the right and left audio balance. 1 Display the Audio Control screen Touch Audio Control]. (page 61) 2 Set each item 1 In this manual, the above selection is displayed. The stream (Dolby Digital, dts, Linear PCM, MPEG, MP3, WMA or AAC) is indicated as: Touch [ ] > [ ]. 3 Select the Audio Control...
... the Adjust screen. [2], [3] Adjusts the right and left audio balance. 1 Display the Audio Control screen Touch Audio Control]. (page 61) 2 Set each item 1 In this manual, the above selection is displayed. The stream (Dolby Digital, dts, Linear PCM, MPEG, MP3, WMA or AAC) is indicated as: Touch [ ] > [ ]. 3 Select the Audio Control...


