
User Manual
Page 2
...CDs 8 General features 9 Power Selecting the Source Volume Attenuator Audio Control Subwoofer Output TEL Mute SRS WOW Select SRS WOW Control Equalizer Control Adjustment of Equalizer type at EASY Adjustment of Equalizer type at PRO Memory preset of adjustment of Equalizer type Spectrum Analyzer Select Switching Display Adjusting Clock Station/Disc Naming (SNPS/DNPS) Auxiliary Input Display Setting Tuner features 15 Tuning Direct Access Tuning Station Preset Memory Auto Memory Entry Preset Tuning Frequency Step Setting Cassette player features 17 Playing Cassette Tapes Fast Forwarding...
...CDs 8 General features 9 Power Selecting the Source Volume Attenuator Audio Control Subwoofer Output TEL Mute SRS WOW Select SRS WOW Control Equalizer Control Adjustment of Equalizer type at EASY Adjustment of Equalizer type at PRO Memory preset of adjustment of Equalizer type Spectrum Analyzer Select Switching Display Adjusting Clock Station/Disc Naming (SNPS/DNPS) Auxiliary Input Display Setting Tuner features 15 Tuning Direct Access Tuning Station Preset Memory Auto Memory Entry Preset Tuning Frequency Step Setting Cassette player features 17 Playing Cassette Tapes Fast Forwarding...
User Manual
Page 4
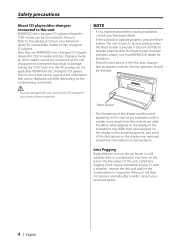
... connected to this unit. In such a situation, remove the disc and wait for assistance. • Press the reset button if the Disc auto changer fails to operate correctly. NOTE • If you connect them incorrectly. Safety precautions About CD players/disc changers connected to this unit KENWOOD disc changers/ CD players released in the Disc player of the unit. The functions that can be impossible to play. If the unit still fails to operate properly after the Reset button...
... connected to this unit. In such a situation, remove the disc and wait for assistance. • Press the reset button if the Disc auto changer fails to operate correctly. NOTE • If you connect them incorrectly. Safety precautions About CD players/disc changers connected to this unit KENWOOD disc changers/ CD players released in the Disc player of the unit. The functions that can be impossible to play. If the unit still fails to operate properly after the Reset button...
User Manual
Page 6
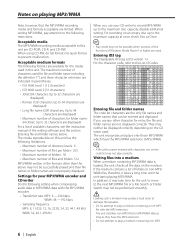
... a long time until the unit starts playing MP3/WMA. Notes on playing MP3/WMA Note, however, that can be entered and displayed. When writing MP3/WMA, pay attention to the following setting when compressing audio data in parentheses. • ISO 9660 Level 1 (12 characters) • ISO 9660 Level 2 (31 characters) • Joliet (64 character; The maximum number of Windows Media Player...
... a long time until the unit starts playing MP3/WMA. Notes on playing MP3/WMA Note, however, that can be entered and displayed. When writing MP3/WMA, pay attention to the following setting when compressing audio data in parentheses. • ISO 9660 Level 1 (12 characters) • ISO 9660 Level 2 (31 characters) • Joliet (64 character; The maximum number of Windows Media Player...
User Manual
Page 10
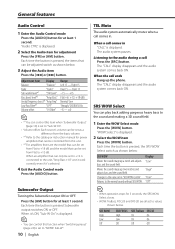
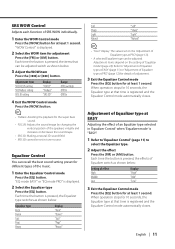
Subwoofer Output Turning the Subwoofer output ON or OFF. When it 's selected. 4 Exit the Audio Control mode Press the [AUDIO] button. The audio system pauses. Each time the button is set to the unit, "Amp Bass +18" won't work correctly even if it 's ON, "Sub-W On" is displayed. • You can control this function when 'Switching preout' (page 24) is pressed, the SRS WOW Select switch as shown below: SRS WOW Moves the sound image up a notch and...
Subwoofer Output Turning the Subwoofer output ON or OFF. When it 's selected. 4 Exit the Audio Control mode Press the [AUDIO] button. The audio system pauses. Each time the button is set to the unit, "Amp Bass +18" won't work correctly even if it 's ON, "Sub-W On" is displayed. • You can control this function when 'Switching preout' (page 24) is pressed, the SRS WOW Select switch as shown below: SRS WOW Moves the sound image up a notch and...
User Manual
Page 11
... an Equalizer type selected in tuner source. Equalizer Control You can be adjusted switch as shown below : Setting of the music. 1 Enter the Equalizer Control mode Press the [EQ] button. English | 11 Each time the button is pressed, the effects of Equalizer switch as shown below : Equalizer type Rock Dance Jazz Pops Heavy Display "Rock" "Dance" "Jazz" "Pops" "Heavy" Soft Sharp Light Natural "Soft" "Sharp" "Light" "Natural" • "User" display: The values set in 'Equalizer Control' when 'Equalizer mode...
... an Equalizer type selected in tuner source. Equalizer Control You can be adjusted switch as shown below : Setting of the music. 1 Enter the Equalizer Control mode Press the [EQ] button. English | 11 Each time the button is pressed, the effects of Equalizer switch as shown below : Equalizer type Rock Dance Jazz Pops Heavy Display "Rock" "Dance" "Jazz" "Pops" "Heavy" Soft Sharp Light Natural "Soft" "Sharp" "Light" "Natural" • "User" display: The values set in 'Equalizer Control' when 'Equalizer mode...

User Manual
Page 12
... 'Equalizer mode' is registered and the Equalizer Control mode automatically closes. Memory preset of adjustment of Equalizer type The 'Adjustment of Equalizer type at PRO' can be preset. 1 Refer to 'Adjustment of an Equalizer type selected in Bass Center Frequency change as shown below. Recalling a setting value 1 Enter the Equalizer Control mode Press the [EQ] button. Spectrum Analyzer Select Selecting the Spectrum Analyzer display. 1 Enter the Spectrum Analyzer Select mode Press the [S.A] button. "Speana mode" is pressed, the Spectrum Analyzers switch...
... 'Equalizer mode' is registered and the Equalizer Control mode automatically closes. Memory preset of adjustment of Equalizer type The 'Adjustment of Equalizer type at PRO' can be preset. 1 Refer to 'Adjustment of an Equalizer type selected in Bass Center Frequency change as shown below. Recalling a setting value 1 Enter the Equalizer Control mode Press the [EQ] button. Spectrum Analyzer Select Selecting the Spectrum Analyzer display. 1 Enter the Spectrum Analyzer Select mode Press the [S.A] button. "Speana mode" is pressed, the Spectrum Analyzers switch...
User Manual
Page 13
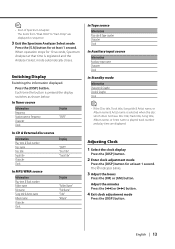
... Tuner source Information Frequency Station name or Frequency Character Clock Display "SNPS" In CD & External disc source Information Play time & Track number Disc name Disc title Track title Character Clock Display "DNPS" "Disc Title" "Track Title" In MP3/WMA source Information Play time & Track number Folder name File name Song title & Artist name Album name Character Clock Display "Folder Name" "File Name" "Title" "Album" In Tape source Information Play side & Tape counter Character Clock In Auxiliary input source Information Auxiliary input...
... Tuner source Information Frequency Station name or Frequency Character Clock Display "SNPS" In CD & External disc source Information Play time & Track number Disc name Disc title Track title Character Clock Display "DNPS" "Disc Title" "Track Title" In MP3/WMA source Information Play time & Track number Folder name File name Song title & Artist name Album name Character Clock Display "Folder Name" "File Name" "Title" "Album" In Tape source Information Play side & Tape counter Character Clock In Auxiliary input source Information Auxiliary input...
User Manual
Page 14
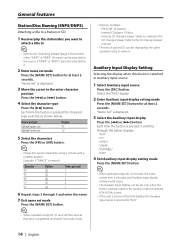
... the auxiliary input of station/CD can be changed by using a remote with a number buttons. External CD changer/ player: Varies according to the enter character position Press the [4] or [¢] button. 4 Select the character type Press the [38] button. "Name Set" is pressed the character type switches as shown below displays. • "AUX" • "TV" • "VIDEO" • "GAME" • "PORTABLE" • "DVD" 4 Exit Auxiliary input display setting mode Press the [NAME SET] button. • When operation...
... the auxiliary input of station/CD can be changed by using a remote with a number buttons. External CD changer/ player: Varies according to the enter character position Press the [4] or [¢] button. 4 Select the character type Press the [38] button. "Name Set" is pressed the character type switches as shown below displays. • "AUX" • "TV" • "VIDEO" • "GAME" • "PORTABLE" • "DVD" 4 Exit Auxiliary input display setting mode Press the [NAME SET] button. • When operation...

User Manual
Page 15
... time the [FM] button is pressed it switches between the FM1, FM2, and FM3 bands. 3 Tune up or down band Press the [4] or [¢] button. • During reception of remote Direct Access Tuning Entering the frequency and tuning. 1 Select the band Press the [FM] or [AM] button. 2 Enter Direct Access Tuning mode Press the [DIRECT] button on the remote. "- - - -" is ON. Tuner features ��� Band display Frequency display Preset station number ST indicator AUTO...
... time the [FM] button is pressed it switches between the FM1, FM2, and FM3 bands. 3 Tune up or down band Press the [4] or [¢] button. • During reception of remote Direct Access Tuning Entering the frequency and tuning. 1 Select the band Press the [FM] or [AM] button. 2 Enter Direct Access Tuning mode Press the [DIRECT] button on the remote. "- - - -" is ON. Tuner features ��� Band display Frequency display Preset station number ST indicator AUTO...

User Manual
Page 16
...] or [AM] button. 2 Enter Function mode Press the [FNC] button for at least 1 second. Select the "AME Ready" display. 4 Open Auto Memory Entry Press the [4] or [¢] button for at least 2 seconds. When 6 stations that can be put in the memory. 1 Select the band Press the [FM] or [AM] button. 2 Call up the station Press the desired [1] - [6] button. The preset number display blinks 1 time. The frequency step changes to FM band...
...] or [AM] button. 2 Enter Function mode Press the [FNC] button for at least 1 second. Select the "AME Ready" display. 4 Open Auto Memory Entry Press the [4] or [¢] button for at least 2 seconds. When 6 stations that can be put in the memory. 1 Select the band Press the [FM] or [AM] button. 2 Call up the station Press the desired [1] - [6] button. The preset number display blinks 1 time. The frequency step changes to FM band...
User Manual
Page 20
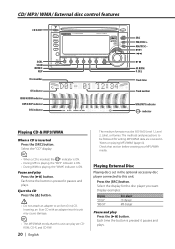
... 9660 Level 1, Level 2, Joliet, or Romeo. The methods and precautions to an 8cm (3 in the optional accessory disc player connected to this unit can play are covered in 'Notes on playing MP3/WMA' (page 6). Press the [SRC] button. CD/ MP3/ WMA/ External disc control features ��� Disc number CH indicator RDM/M.RDM indicator REP/D.REP indicator SCN indicator Track time Track number WMA...
... 9660 Level 1, Level 2, Joliet, or Romeo. The methods and precautions to an 8cm (3 in the optional accessory disc player connected to this unit can play are covered in 'Notes on playing MP3/WMA' (page 6). Press the [SRC] button. CD/ MP3/ WMA/ External disc control features ��� Disc number CH indicator RDM/M.RDM indicator REP/D.REP indicator SCN indicator Track time Track number WMA...

User Manual
Page 21
... remote. 2 Do Track/File Search Press the [4] or [¢] button. Function of disc changer/ MP3/ WMA Disc Search/Folder Search Selecting the disc set in the Disc changer or the folder recorded on the external disc players being connected. Press the [REP] button. Canceling Direct Track/File Search Press the [38] button. • The functions that can be used and the information that point. Release your finger to play the disc...
... remote. 2 Do Track/File Search Press the [4] or [¢] button. Function of disc changer/ MP3/ WMA Disc Search/Folder Search Selecting the disc set in the Disc changer or the folder recorded on the external disc players being connected. Press the [REP] button. Canceling Direct Track/File Search Press the [38] button. • The functions that can be used and the information that point. Release your finger to play the disc...
User Manual
Page 24
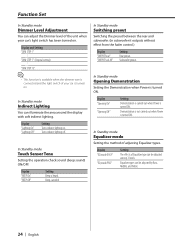
... adjusted among 3 levels. Turns indirect lighting off. In Standby mode Switching preout Switching the preout between the rear and subwoofer. (In subwoofer it outputs without effect from the fader control.) Display "SWPRE Rear" "SWPRE Sub-W" Setting Rear preout. Demonstration is not carried out when Power is heard. Display "EQ mode EASY" "EQ mode PRO" Setting The effects of your car's light switch has been turned on. Equalizer types can be adjusted by Bass, Middle, and Treble. 24 | English Function Set ...... In Standby mode...
... adjusted among 3 levels. Turns indirect lighting off. In Standby mode Switching preout Switching the preout between the rear and subwoofer. (In subwoofer it outputs without effect from the fader control.) Display "SWPRE Rear" "SWPRE Sub-W" Setting Rear preout. Demonstration is not carried out when Power is heard. Display "EQ mode EASY" "EQ mode PRO" Setting The effects of your car's light switch has been turned on. Equalizer types can be adjusted by Bass, Middle, and Treble. 24 | English Function Set ...... In Standby mode...

User Manual
Page 25
...-in Amp Mute Setting Toggles ON or OFF the mute control on the builtin amplifier. When "CODE WRITE" is displayed, "CODE ****" is displayed. is displayed. 3 Enter the Security Code Press the [1] - [4] button. In Standby mode Built-in amplifier deactivates. In Standby mode Navigation Mute Mute the audio sound during Voice Guidance of your choice. 1 Select the Security Code mode Press the [FM] or [AM] button. The Security Code function activates. • When a Code different from the battery power source 1 Turn the power ON...
...-in Amp Mute Setting Toggles ON or OFF the mute control on the builtin amplifier. When "CODE WRITE" is displayed, "CODE ****" is displayed. is displayed. 3 Enter the Security Code Press the [1] - [4] button. In Standby mode Built-in amplifier deactivates. In Standby mode Navigation Mute Mute the audio sound during Voice Guidance of your choice. 1 Select the Security Code mode Press the [FM] or [AM] button. The Security Code function activates. • When a Code different from the battery power source 1 Turn the power ON...

User Manual
Page 27
...remove it returns to 'Selecting the Source' (page 9). [ATT] button Turning the volume down quickly. Contact a doctor immediately if the battery is accidentally swallowed. • Do not set the remote on hot places such as illustrated. English | 27 Insert the batteries with the + and - When it is pressed the source switches. Basic operations [VOL.] buttons Adjusting the volume. [SRC] button Each time the button...65533;�� ��� ��� ��� �� Loading and Replacing the battery Use two "AA"-size...
...remove it returns to 'Selecting the Source' (page 9). [ATT] button Turning the volume down quickly. Contact a doctor immediately if the battery is accidentally swallowed. • Do not set the remote on hot places such as illustrated. English | 27 Insert the batteries with the + and - When it is pressed the source switches. Basic operations [VOL.] buttons Adjusting the volume. [SRC] button Each time the button...65533;�� ��� ��� ��� �� Loading and Replacing the battery Use two "AA"-size...
User Manual
Page 28
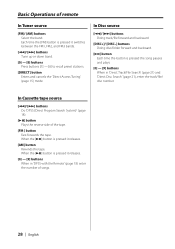
... pauses and plays. [0] - [9] buttons When in 'DPSS with the Remote' (page 18) enter the number of songs. 28 | English In Disc source [4]/ [¢] buttons Doing track/file forward and backward. [DISC+]/ [DISC-] buttons Doing disc/folder forward and backward. [38] button Each time the button is pressed it switches between the FM1, FM2, and FM3 bands. [4]/ [¢] buttons Tune up or down band. [0] - [9] buttons Press buttons [1] - [6] to recall preset stations. [DIRECT] button Enters...
... pauses and plays. [0] - [9] buttons When in 'DPSS with the Remote' (page 18) enter the number of songs. 28 | English In Disc source [4]/ [¢] buttons Doing track/file forward and backward. [DISC+]/ [DISC-] buttons Doing disc/folder forward and backward. [38] button Each time the button is pressed it switches between the FM1, FM2, and FM3 bands. [4]/ [¢] buttons Tune up or down band. [0] - [9] buttons Press buttons [1] - [6] to recall preset stations. [DIRECT] button Enters...

User Manual
Page 29
.../ Installation Procedure Accessories 1 2 3 4 ..........1 ..........1 ..........6 ..........6 Installation Procedure 1. Make the proper input and output wire connections for each unit. 3. Reconnect the - Connect the wiring harness connector to both the rear output terminals (do not connect the - If you connect the + connector of the wiring harness. 4. battery. 2. Connect the wiring harness wires in turn may cause a short circuit, that the faceplate will not hit the lid when closing and opening. • If the fuse blows, first make sure to a power source that the mounting...
.../ Installation Procedure Accessories 1 2 3 4 ..........1 ..........1 ..........6 ..........6 Installation Procedure 1. Make the proper input and output wire connections for each unit. 3. Reconnect the - Connect the wiring harness connector to both the rear output terminals (do not connect the - If you connect the + connector of the wiring harness. 4. battery. 2. Connect the wiring harness wires in turn may cause a short circuit, that the faceplate will not hit the lid when closing and opening. • If the fuse blows, first make sure to a power source that the mounting...
User Manual
Page 32
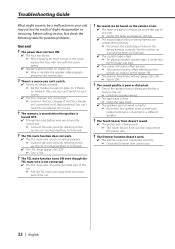
... reset button. ? The power does not turn ON. The fuse has blown. After checking for possible problems. General ? Before calling service, first check the following table for short circuits in the car. Check the speaker wiring. The tape head is being pinched by a screw in the wires, replace the fuse with the same rating. Speaker cable touches on 'Connecting Wires to Terminals'. ? The Dimmer function...
... reset button. ? The power does not turn ON. The fuse has blown. After checking for possible problems. General ? Before calling service, first check the following table for short circuits in the car. Check the speaker wiring. The tape head is being pinched by a screw in the wires, replace the fuse with the same rating. Speaker cable touches on 'Connecting Wires to Terminals'. ? The Dimmer function...

User Manual
Page 33
...; The car antenna is not extended. Pull the antenna out all the way. The antenna control wire is severely scratched. Try another disc inserted. Press the [0] button and remove the disc. ? "AUX EXT" is displayed without achieving External disc control mode. Unsupported disc changer is loaded in the 'About CD players/disc changers connected to this unit' (page 4) of the ACC switch being turned OFF. The specified disc does not play...
...; The car antenna is not extended. Pull the antenna out all the way. The antenna control wire is severely scratched. Try another disc inserted. Press the [0] button and remove the disc. ? "AUX EXT" is displayed without achieving External disc control mode. Unsupported disc changer is loaded in the 'About CD players/disc changers connected to this unit' (page 4) of the ACC switch being turned OFF. The specified disc does not play...
User Manual
Page 34
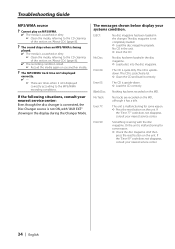
... the MP3/WMA recording conditions. If the "Error 99" code does not disappear, consult your nearest service center. Blank Disc: Nothing has been recorded on the unit. The messages shown below display your nearest service center: Even though the disc changer is connected, the Disc Changer source is malfunctioning for some reason. Press the reset button on the MD. The CD is quite dirty...
... the MP3/WMA recording conditions. If the "Error 99" code does not disappear, consult your nearest service center. Blank Disc: Nothing has been recorded on the unit. The messages shown below display your nearest service center: Even though the disc changer is connected, the Disc Changer source is malfunctioning for some reason. Press the reset button on the MD. The CD is quite dirty...


