
User Manual
Page 3
... AUX Input Level 62 Clock adjustment 63 Timer operation 64 Setting the O.T.T 64 Setting the Program Timer 65 Activating or deactivating the O.T.T. Before applying power 3 HM-381MD (En) Contents Preparation section Preparation section Before applying power 2 Safety precautions 2 IMPORTANT SAFEGUARDS 4 Special features 6 In regard to demonstration 6 Accessories 7 Handling of discs 8 Notes on cassette tape 9 Digital recording and SCMS 9 System connection 10 Connection of the System Accessories 10 Connection of Other Accessories (Commercially Available Parts...
... AUX Input Level 62 Clock adjustment 63 Timer operation 64 Setting the O.T.T 64 Setting the Program Timer 65 Activating or deactivating the O.T.T. Before applying power 3 HM-381MD (En) Contents Preparation section Preparation section Before applying power 2 Safety precautions 2 IMPORTANT SAFEGUARDS 4 Special features 6 In regard to demonstration 6 Accessories 7 Handling of discs 8 Notes on cassette tape 9 Digital recording and SCMS 9 System connection 10 Connection of the System Accessories 10 Connection of Other Accessories (Commercially Available Parts...
User Manual
Page 4
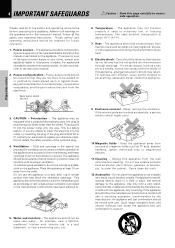
...cords at least 10 cm away from the walls. Electric shock - Care should be placed in a built-in installation such as TV sets, speaker systems, radios, motorized toys or magnetized objects. 11.Cleaning - If the internal parts are not sure of the type of the safety and operating instructions...other appliances (including amplifiers) that may cause the appliance and cart combination to put records or a tablecloth on the appliance. Enclosure removal - to insert the plug fully into the power outlet only one blade wider than the other sources, refer to your home, consult your ...
...cords at least 10 cm away from the walls. Electric shock - Care should be placed in a built-in installation such as TV sets, speaker systems, radios, motorized toys or magnetized objects. 11.Cleaning - If the internal parts are not sure of the type of the safety and operating instructions...other appliances (including amplifiers) that may cause the appliance and cart combination to put records or a tablecloth on the appliance. Enclosure removal - to insert the plug fully into the power outlet only one blade wider than the other sources, refer to your home, consult your ...
User Manual
Page 5
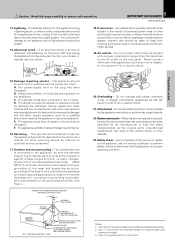
... service or repairs to this page carefully to rain or water. Never connect other servicing should be fatal. 19.AC outlets - If an outside antenna system, extreme care should be sure the service technician has used replacement parts specified by following the instruction manual. NATIONAL ELECTRICAL CODE ANTENNA DISCHARGE UNIT (NEC SECTION 810-20) GROUNDING CONDUCTORS (NEC SECTION 810-21) GROUND CLAMP POWER SERVICE GROUNDING ELECTRODE SYSTEM...
... service or repairs to this page carefully to rain or water. Never connect other servicing should be fatal. 19.AC outlets - If an outside antenna system, extreme care should be sure the service technician has used replacement parts specified by following the instruction manual. NATIONAL ELECTRICAL CODE ANTENNA DISCHARGE UNIT (NEC SECTION 810-20) GROUNDING CONDUCTORS (NEC SECTION 810-21) GROUND CLAMP POWER SERVICE GROUNDING ELECTRODE SYSTEM...
User Manual
Page 6
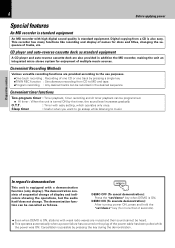
... not change of tracks, etc. DEMO ON (To execute demonstration): After turning power ON, press and hold the "set /demo" key when DEMO is equipped with a demonstration function (only display). Convenient Recording Methods Various versatile recording functions are muted and their sound cannot be recorded in addition the MD recorder, making the unit an integrated micro stereo system for enjoyment of the power cable has...
... not change of tracks, etc. DEMO ON (To execute demonstration): After turning power ON, press and hold the "set /demo" key when DEMO is equipped with a demonstration function (only display). Convenient Recording Methods Various versatile recording functions are muted and their sound cannot be recorded in addition the MD recorder, making the unit an integrated micro stereo system for enjoyment of the power cable has...
User Manual
Page 8
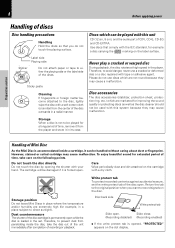
... erasure, set . Disc back side Write protect tab Slide open. 8 Before applying power Handling of the disc open. Storage When a disc is opened, "PROTECTED" appears on the cartridge with this unit CD (12 cm, 8 cm), and the audio part of recording or playback. Preparation section Handling of the disc outwards in a place subject to avoid danger, never use discs which can be played with tape or...
... erasure, set . Disc back side Write protect tab Slide open. 8 Before applying power Handling of the disc open. Storage When a disc is opened, "PROTECTED" appears on the cartridge with this unit CD (12 cm, 8 cm), and the audio part of recording or playback. Preparation section Handling of the disc outwards in a place subject to avoid danger, never use discs which can be played with tape or...
User Manual
Page 10
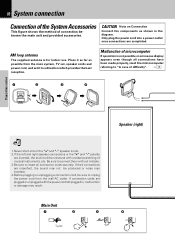
.... AM loop antenna The supplied antenna is not possible or erroneous display appears even though all connection cords securely. Be sure to connect them without mistake. 3.Be sure to a direction which provides the best reception. Main Unit 1 2 3 Twist Speaker (right) 4 If their connections are inverted, the sound will be sure to unplug the power cord from the main system, TV set, speaker cords and power cord, and set it as far...
.... AM loop antenna The supplied antenna is not possible or erroneous display appears even though all connection cords securely. Be sure to connect them without mistake. 3.Be sure to a direction which provides the best reception. Main Unit 1 2 3 Twist Speaker (right) 4 If their connections are inverted, the sound will be sure to unplug the power cord from the main system, TV set, speaker cords and power cord, and set it as far...
User Manual
Page 12
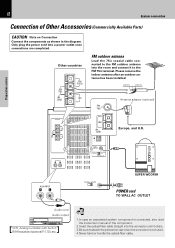
... plug the power cord into a power outlet once connections are completed. Notes 1.In case an associated system component is not used. 4.Never band or bundle the optical-fiber cable. Please remove the indoor antenna after an outdoor antenna has been installed. 10mm 10mm Antenna adaptor (optional) FM 75Ω ANTENNA FM 75Ω GND FM 300Ω AM AUX INPUT R L AM SPEAKERS (6-16Ω) + L - R + SUPER WOOFER PRE OUT MANUAL AUTO PANEL OPEN/CLOSE...
... plug the power cord into a power outlet once connections are completed. Notes 1.In case an associated system component is not used. 4.Never band or bundle the optical-fiber cable. Please remove the indoor antenna after an outdoor antenna has been installed. 10mm 10mm Antenna adaptor (optional) FM 75Ω ANTENNA FM 75Ω GND FM 300Ω AM AUX INPUT R L AM SPEAKERS (6-16Ω) + L - R + SUPER WOOFER PRE OUT MANUAL AUTO PANEL OPEN/CLOSE...
User Manual
Page 15
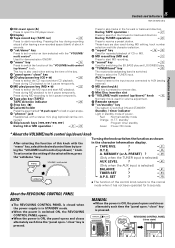
... 15 HM-381MD (En) Preparation section 1 CD cover open (0) Press to open " to load or eject a tape. @ "phones" jack Headphones with a stereo mini plug (optional) can be con- These keys are also used when setting the time of this is pressed. TAPE RVS. ? ¶ O.T.E. ? MANUAL AUTO ANTENNA FM 75Ω GND FM 300Ω AM AUX INPUT SPEAKERS (6-16Ω) + L - - standby :Program timer standby Green :Power ON mode * About the VOLUME/multi control (up /down ) knob Turning the knob switches the...
... 15 HM-381MD (En) Preparation section 1 CD cover open (0) Press to open " to load or eject a tape. @ "phones" jack Headphones with a stereo mini plug (optional) can be con- These keys are also used when setting the time of this is pressed. TAPE RVS. ? ¶ O.T.E. ? MANUAL AUTO ANTENNA FM 75Ω GND FM 300Ω AM AUX INPUT SPEAKERS (6-16Ω) + L - - standby :Program timer standby Green :Power ON mode * About the VOLUME/multi control (up /down ) knob Turning the knob switches the...
User Manual
Page 16
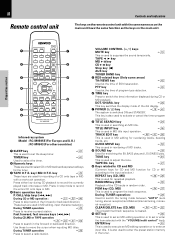
... backward direction. ral reception). key/ MD O.T.E. Press in stop mode to record the entire CD onto tape or MD. 4 Basic operation keys P.CALL/skip keys (4, ¢) During CD or MD operation : ¡£p Press to set the sleep timer. During TUNER operation: • Press to switch the tuning mode between "AUTO" (auto tuning, stereo reception) and Manual (manual tuning, monau- SET ENTER DISPLAY REMOTE CONTROL UNIT RC-M0505E 7 8 9 0 ! During TUNER operation: ª Used to select a radio station. MD TONE SOUND 4 P.CALL...
... backward direction. ral reception). key/ MD O.T.E. Press in stop mode to record the entire CD onto tape or MD. 4 Basic operation keys P.CALL/skip keys (4, ¢) During CD or MD operation : ¡£p Press to set the sleep timer. During TUNER operation: • Press to switch the tuning mode between "AUTO" (auto tuning, stereo reception) and Manual (manual tuning, monau- SET ENTER DISPLAY REMOTE CONTROL UNIT RC-M0505E 7 8 9 0 ! During TUNER operation: ª Used to select a radio station. MD TONE SOUND 4 P.CALL...
User Manual
Page 17
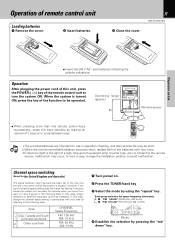
... SLEEP A.P.S. Operation of the remote control unit to turn the system ON. Operation After plugging the power cord of this case, change the installation position to which the system is turned ON, press the key of AM/FM broadcasts cannot be operated. ÷ When pressing more between radio channels has been set / demo" key. In this unit, press the POWER ( ) key of remote control unit Loading batteries 1 Remove the cover. 2 Insert batteries. 17 HM-381MD (En...
... SLEEP A.P.S. Operation of the remote control unit to turn the system ON. Operation After plugging the power cord of this case, change the installation position to which the system is turned ON, press the key of AM/FM broadcasts cannot be operated. ÷ When pressing more between radio channels has been set / demo" key. In this unit, press the POWER ( ) key of remote control unit Loading batteries 1 Remove the cover. 2 Insert batteries. 17 HM-381MD (En...
User Manual
Page 18
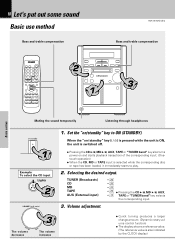
... also turns power on /standby" key to play. 2. Volume adjustment. down The volume decreases 3 up The volume increases ÷ Quick turning produces a larger change amount. (Dynamic rotary volume control function) ÷ The display shows a reference value. (The reference value is selected while the corresponding disc or tape has been loaded, it immediately starts to ON (STANDBY). TUNER (Broadcasts) CD MD TAPE AUX (External input) Pressing the CD 6, MD 6, AUX, @ TAPE or "TUNER band" key selects the corresponding input. 3. Set...
... also turns power on /standby" key to play. 2. Volume adjustment. down The volume decreases 3 up The volume increases ÷ Quick turning produces a larger change amount. (Dynamic rotary volume control function) ÷ The display shows a reference value. (The reference value is selected while the corresponding disc or tape has been loaded, it immediately starts to ON (STANDBY). TUNER (Broadcasts) CD MD TAPE AUX (External input) Pressing the CD 6, MD 6, AUX, @ TAPE or "TUNER band" key selects the corresponding input. 3. Set...
User Manual
Page 19
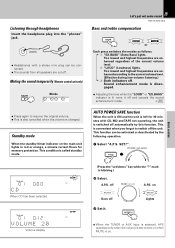
... a stereo mini plug can be connected. ÷ The sounds from all speakers are cut off automatically by the following operation. 1 Select "A.P.S. phones ÷ Headphones with CD, MD and TAPE not operating, the unit is changed. down up set/demo A.P.S. Muting the sound temporarily (Remote control unit only) MUTE Blinks RANDOM PGM REPEAT ALL S Let's put out some sound 19 HM-381MD (En) Bass and treble compensation sound EX.BASS or LOUD Each press switches the modes...
... a stereo mini plug can be connected. ÷ The sounds from all speakers are cut off automatically by the following operation. 1 Select "A.P.S. phones ÷ Headphones with CD, MD and TAPE not operating, the unit is changed. down up set/demo A.P.S. Muting the sound temporarily (Remote control unit only) MUTE Blinks RANDOM PGM REPEAT ALL S Let's put out some sound 19 HM-381MD (En) Bass and treble compensation sound EX.BASS or LOUD Each press switches the modes...
User Manual
Page 27
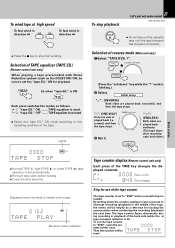
.... played contents. 1 AM 0 0 0 0 (Tape count) 2 AM 8 4 5 (Time display) A tip for use of the tape, the memo will be helpful as follows. 1 "tape EQ." menu VOLUME / multi control set/demo (Press the "set to interrupt recording (playback) in case you want to "0000" when a cassette tape is loaded. VOLUME / multi control down the counter reading in the middle of the tape counter The tape counter is set /demo" key while the "?" TOTAL AUTO TUNED STEREO...
.... played contents. 1 AM 0 0 0 0 (Tape count) 2 AM 8 4 5 (Time display) A tip for use of the tape, the memo will be helpful as follows. 1 "tape EQ." menu VOLUME / multi control set/demo (Press the "set to interrupt recording (playback) in case you want to "0000" when a cassette tape is loaded. VOLUME / multi control down the counter reading in the middle of the tape counter The tape counter is set /demo" key while the "?" TOTAL AUTO TUNED STEREO...
User Manual
Page 42
... be used. Auto presetting must be selected automatically. TOTAL AUTO TUNED STEREO 0 1 1 1 0 2 5 0 FM AM kHz PM MHz BEST HITS O.T.E. Each press switches the modes as follows. 1 TA Traffic Announcement 2 NEWS News 3 TA/NEWS Traffic Announcement/ News 4 Display not lit ........ MEMORY ?". RANDOM PGM REPEAT ALL SLEEP A.P.S. PROG. 1 2 R·D·S EON NEWS TP TA PTY TRACK NO. Application section VOLUME / multi control menu 2 3 set/demo 2 (Press the "set/demo...
... be used. Auto presetting must be selected automatically. TOTAL AUTO TUNED STEREO 0 1 1 1 0 2 5 0 FM AM kHz PM MHz BEST HITS O.T.E. Each press switches the modes as follows. 1 TA Traffic Announcement 2 NEWS News 3 TA/NEWS Traffic Announcement/ News 4 Display not lit ........ MEMORY ?". RANDOM PGM REPEAT ALL SLEEP A.P.S. PROG. 1 2 R·D·S EON NEWS TP TA PTY TRACK NO. Application section VOLUME / multi control menu 2 3 set/demo 2 (Press the "set/demo...
User Manual
Page 61
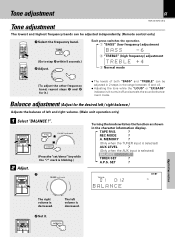
... decreased. SET ? NR T.E. 2 2 2 VO Tone adjustment 61 Tone adjustment HM-381MD (En) The lowest and highest frequency bands can be adjusted independently. (Remote control only) 1 Select the frequency band. menu VOLUME / multi control 2 set/demo 2 Adjust. (Press the "set /demo 2 REC MODE ? MEMORY ? (Only when the TUNER input is selected) AUX LEVEL ? (Only when the AUX input is decreased. up The left and right volume. (Main unit operation only) 1 Select "BALANCE ?". TAPE RVS. ? TIMER SET ? TOTAL AUTO TUNED STEREO 8 0 1 8 0 0 1 2 FM...
... decreased. SET ? NR T.E. 2 2 2 VO Tone adjustment 61 Tone adjustment HM-381MD (En) The lowest and highest frequency bands can be adjusted independently. (Remote control only) 1 Select the frequency band. menu VOLUME / multi control 2 set/demo 2 Adjust. (Press the "set /demo 2 REC MODE ? MEMORY ? (Only when the TUNER input is selected) AUX LEVEL ? (Only when the AUX input is decreased. up The left and right volume. (Main unit operation only) 1 Select "BALANCE ?". TAPE RVS. ? TIMER SET ? TOTAL AUTO TUNED STEREO 8 0 1 8 0 0 1 2 FM...
User Manual
Page 62
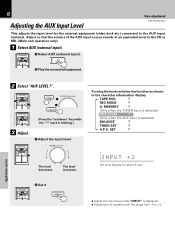
... (video deck etc.) connected to +3. AUX 2 2 Playtheconnectedequipment. 2 2 2 2 2 2 Select "AUX LEVEL ?". REC MODE ? mark is selected) BALANCE ? Turning the knob switches the function as shown in the character information display. Adjust so that the volume of the AUX input source sounds at an equivalent level to the CD or MD. (Main unit operation only) 1 Select AUX (external input). 1 Select AUX (external input). A.P.S. A. menu VOLUME / multi control 2 set/demo (Press the "set /demo 2 ÷ Adjust the input level while "INPUT" is displayed. ÷ Adjustment...
... (video deck etc.) connected to +3. AUX 2 2 Playtheconnectedequipment. 2 2 2 2 2 2 Select "AUX LEVEL ?". REC MODE ? mark is selected) BALANCE ? Turning the knob switches the function as shown in the character information display. Adjust so that the volume of the AUX input source sounds at an equivalent level to the CD or MD. (Main unit operation only) 1 Select AUX (external input). 1 Select AUX (external input). A.P.S. A. menu VOLUME / multi control 2 set/demo (Press the "set /demo 2 ÷ Adjust the input level while "INPUT" is displayed. ÷ Adjustment...
User Manual
Page 64
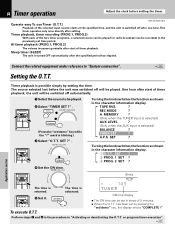
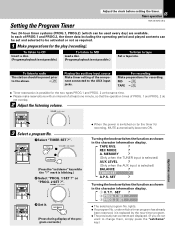
... after start of timer playback. SET ? 2 PROG. 1 SET ? 2 set /demo (Only when the TUNER input is selected) AUX LEVEL ? (Only when the AUX input is blinking.) 3 Select "O.T.T. This timer operates only once directly after setting. O.T.T. or program timer execution". ¨ Application section 64 Timer operation Adjust the clock before the unit was switched off automatically. 1 Select the source to "System connection". 0 Setting the O.T.T. 2 2 2 2 Timer playback is returned. REC MODE ? TIMER SET ? VOLUME / multi control Turning the knob switches the...
... after start of timer playback. SET ? 2 PROG. 1 SET ? 2 set /demo (Only when the TUNER input is selected) AUX LEVEL ? (Only when the AUX input is blinking.) 3 Select "O.T.T. This timer operates only once directly after setting. O.T.T. or program timer execution". ¨ Application section 64 Timer operation Adjust the clock before the unit was switched off automatically. 1 Select the source to "System connection". 0 Setting the O.T.T. 2 2 2 2 Timer playback is returned. REC MODE ? TIMER SET ? VOLUME / multi control Turning the knob switches the...
User Manual
Page 65
... operation times of the component connected to be preset prior to tape Set a tape into. VOLUME / multi control 2 3 Set it is possible for recording, MUTE automatically becomes ON. REC MODE ? or "PROG. 2 SET ?". SET ? lights. ÷ If a program No. menu VOLUME / multi control 2 set/demo (Press the "set /demo" key.) Application section TAPE RVS. ? TIMER SET ? Turning the knob switches the function as shown in the character information display. 1 O.T.T. For recording Make preparations for the play (recording). MEMORY ? (Only when the TUNER input...
... operation times of the component connected to be preset prior to tape Set a tape into. VOLUME / multi control 2 3 Set it is possible for recording, MUTE automatically becomes ON. REC MODE ? or "PROG. 2 SET ?". SET ? lights. ÷ If a program No. menu VOLUME / multi control 2 set/demo (Press the "set /demo" key.) Application section TAPE RVS. ? TIMER SET ? Turning the knob switches the function as shown in the character information display. 1 O.T.T. For recording Make preparations for the play (recording). MEMORY ? (Only when the TUNER input...
User Manual
Page 70
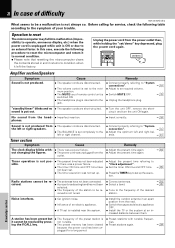
... The clock display blinks with tunable frequencies. ÷ Preset stations again. ª Knowledge section Before calling for a long period. ÷ Preset stations with - ÷ There was unplugged from the outlet. ÷ Connect properly referring to "System connection". 0 ÷ Adjust the optimum left the factory. 2 Unplug the power cord from the power outlet then, while holding the "set/demo" key depressed, plug the power cord again. phones. ÷ Turn the unit OFF, remove the...
... The clock display blinks with tunable frequencies. ÷ Preset stations again. ª Knowledge section Before calling for a long period. ÷ Preset stations with - ÷ There was unplugged from the outlet. ÷ Connect properly referring to "System connection". 0 ÷ Adjust the optimum left the factory. 2 Unplug the power cord from the power outlet then, while holding the "set/demo" key depressed, plug the power cord again. phones. ÷ Turn the unit OFF, remove the...
User Manual
Page 71
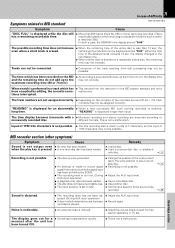
... not been adjusted. (During AUX input operation) ÷ A disc in which distorted sound has been recorded is played. ÷ Adjust the AUX input level. ÷ Record again. "READING" is displayed longer than 256.) In such a case, the REMAIN time display shows "0:00". When search is performed in a track which has been recorded on the contents of the recorded source (CD etc.), the track numbers may not...
... not been adjusted. (During AUX input operation) ÷ A disc in which distorted sound has been recorded is played. ÷ Adjust the AUX input level. ÷ Record again. "READING" is displayed longer than 256.) In such a case, the REMAIN time display shows "0:00". When search is performed in a track which has been recorded on the contents of the recorded source (CD etc.), the track numbers may not...


