

User Manual
Page 2
...Power Selecting the Source Volume System Q Audio Control Speaker Setting Switching Display Auxiliary Input Display Setting Theft Deterrent Faceplate TEL Mute Tuner features 11 Tuning Station Preset Memory Auto Memory Entry Preset Tuning RDS features 13 Traffic Information Radio Text Scroll PTY (Program Type) Program Type preset Changing Language for PTY Function CD/External disc control features 16 Playing CD Playing External Disc Fast Forwarding and Reversing Track Search Disc Search Track/Disc Repeat Scan Play Random Play Magazine Random Play Disc Naming (DNPS) Text/Title Scroll Menu...
...Power Selecting the Source Volume System Q Audio Control Speaker Setting Switching Display Auxiliary Input Display Setting Theft Deterrent Faceplate TEL Mute Tuner features 11 Tuning Station Preset Memory Auto Memory Entry Preset Tuning RDS features 13 Traffic Information Radio Text Scroll PTY (Program Type) Program Type preset Changing Language for PTY Function CD/External disc control features 16 Playing CD Playing External Disc Fast Forwarding and Reversing Track Search Disc Search Track/Disc Repeat Scan Play Random Play Magazine Random Play Disc Naming (DNPS) Text/Title Scroll Menu...
User Manual
Page 3
...battery, or ground wires, make sure to use a new one with the prescribed rating. Also avoid places with too much dust or the possibility of precision equipment. • When replacing a fuse, only use automotive-grade wires or other wires with the wrong rating may fall out of the unit. • Do not install the unit...body or clothing, wash it off the power immediately and consult your Kenwood dealer. • Make sure not to get your fingers caught between the faceplate and the unit. • Do not apply excessive force to direct sunlight, excessive heat or humidity. Safety ...
...battery, or ground wires, make sure to use a new one with the prescribed rating. Also avoid places with too much dust or the possibility of precision equipment. • When replacing a fuse, only use automotive-grade wires or other wires with the wrong rating may fall out of the unit. • Do not install the unit...body or clothing, wash it off the power immediately and consult your Kenwood dealer. • Make sure not to get your fingers caught between the faceplate and the unit. • Do not apply excessive force to direct sunlight, excessive heat or humidity. Safety ...
User Manual
Page 4
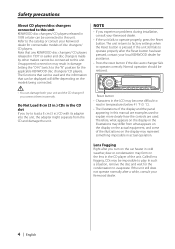
... unit fails to play. Lens Fogging Right after you turn on the car heater in cold weather, dew or condensation may represent something impossible in the CD slot If you experience problems during installation, consult your unit and the CD changer if you connect them incorrectly. In such a situation, remove the disc and wait for assistance. • Press the reset button if the disc auto changer...
... unit fails to play. Lens Fogging Right after you turn on the car heater in cold weather, dew or condensation may represent something impossible in the CD slot If you experience problems during installation, consult your unit and the CD changer if you connect them incorrectly. In such a situation, remove the disc and wait for assistance. • Press the reset button if the disc auto changer...

User Manual
Page 7
... the vehicles battery. Volume Increasing Volume Turn the [VOL] knob clockwise. General features Release button SRC Q/AUD FM AM PTY SCAN RDM REP M.RDM TI FM AM VOL 4 ¢ DISP Power Turning ON the Power Press the [SRC] button. • When the power is ON, the 'Security Code' (page 20) is displayed as "CODE ON" or "CODE OFF" . Source required Tuner CD External disc (Optional accessory) Auxiliary input (Optional...
... the vehicles battery. Volume Increasing Volume Turn the [VOL] knob clockwise. General features Release button SRC Q/AUD FM AM PTY SCAN RDM REP M.RDM TI FM AM VOL 4 ¢ DISP Power Turning ON the Power Press the [SRC] button. • When the power is ON, the 'Security Code' (page 20) is displayed as "CODE ON" or "CODE OFF" . Source required Tuner CD External disc (Optional accessory) Auxiliary input (Optional...
User Manual
Page 8
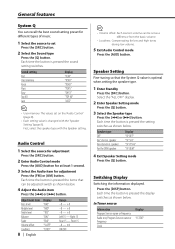
.../OFF • Volume offset: Each source's volume can be adjusted switch as a difference from the basic volume. • Loudness: Compensating for low and high tones during low volume. 5 Exit Audio Control mode Press the [AUD] button. Select the "ALL OFF" display. 2 Enter Speaker Setting mode Press the [Q] button. 3 Select the Speaker type Press the [4] or [¢] button. Switching Display Switching the information displayed. Press the [DISP] button. In Tuner source Information Program Service name or Frequency Radio text, Program Service name or Frequency Clock Display "R-TEXT"
.../OFF • Volume offset: Each source's volume can be adjusted switch as a difference from the basic volume. • Loudness: Compensating for low and high tones during low volume. 5 Exit Audio Control mode Press the [AUD] button. Select the "ALL OFF" display. 2 Enter Speaker Setting mode Press the [Q] button. 3 Select the Speaker type Press the [4] or [¢] button. Switching Display Switching the information displayed. Press the [DISP] button. In Tuner source Information Program Service name or Frequency Radio text, Program Service name or Frequency Clock Display "R-TEXT"
User Manual
Page 9
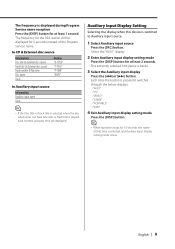
... [DISP] button for at least 1 second. Each time the button is pressed it switches through the below displays. • "AUX1" • "TV" • "VIDEO" • "GAME" • "PORTABLE" • "DVD" 4 Exit Auxiliary input display setting mode Press the [DISP] button. • When operation stops for 5 seconds instead of the Program Service name. The presently selected AUX Name is selected, and Auxiliary input display setting mode closes. Auxiliary Input Display Setting Selecting the display when this device is switched to Auxiliary input source. 1 Select Auxiliary input source Press...
... [DISP] button for at least 1 second. Each time the button is pressed it switches through the below displays. • "AUX1" • "TV" • "VIDEO" • "GAME" • "PORTABLE" • "DVD" 4 Exit Auxiliary input display setting mode Press the [DISP] button. • When operation stops for 5 seconds instead of the Program Service name. The presently selected AUX Name is selected, and Auxiliary input display setting mode closes. Auxiliary Input Display Setting Selecting the display when this device is switched to Auxiliary input source. 1 Select Auxiliary input source Press...

User Manual
Page 11
... [FM] or [AM] button. English | 11 Select the "TUNER" display. 2 Select the band Press the [FM] or [AM] button. Station Preset Memory Putting the station in the memory on each [1] - [6] button. • During reception of stereo stations the "ST" indicator is ON. Tuner features SRC MENU FM AM PTY SCAN RDM REP M.RDM TI FM AM ST indicator 4¢ 1-6 Preset station number Band display Frequency display Tuning Selecting the station. 1 Select tuner source Press the [SRC] button. The preset number display blinks 1 time.
... [FM] or [AM] button. English | 11 Select the "TUNER" display. 2 Select the band Press the [FM] or [AM] button. Station Preset Memory Putting the station in the memory on each [1] - [6] button. • During reception of stereo stations the "ST" indicator is ON. Tuner features SRC MENU FM AM PTY SCAN RDM REP M.RDM TI FM AM ST indicator 4¢ 1-6 Preset station number Band display Frequency display Tuning Selecting the station. 1 Select tuner source Press the [SRC] button. The preset number display blinks 1 time.
User Manual
Page 13
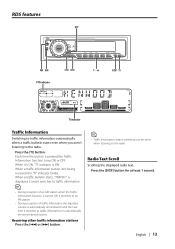
... Information function is turned ON, it switches to an FM station. • During reception of traffic information the adjusted volume is automatically remembered, and the next time it switches to the radio. Press the [TI] button. When a traffic bulletin starts, "TRAFFIC" is displayed it and it 's ON, "TI" indicator is pressed the Traffic Information function turns ON or OFF. Receiving other traffic information stations Press...
... Information function is turned ON, it switches to an FM station. • During reception of traffic information the adjusted volume is automatically remembered, and the next time it switches to the radio. Press the [TI] button. When a traffic bulletin starts, "TRAFFIC" is displayed it and it 's ON, "TI" indicator is pressed the Traffic Information function turns ON or OFF. Receiving other traffic information stations Press...

User Manual
Page 17
... first part of disc changer Disc Search Selecting the disc you 're listening to is displayed as shown below. Press the [DISC-] or [DISC+] button. Repeat play the disc at that point. Playing External Disc Playing discs set in the optional accessory disc player connected to . 1 Start Scan Play Press the [SCAN] button. Release your finger to play Press the [38] button. Each time the button is pressed the Repeat Play switches as "0". • The functions that can be used...
... first part of disc changer Disc Search Selecting the disc you 're listening to is displayed as shown below. Press the [DISC-] or [DISC+] button. Repeat play the disc at that point. Playing External Disc Playing discs set in the optional accessory disc player connected to . 1 Start Scan Play Press the [SCAN] button. Release your finger to play Press the [38] button. Each time the button is pressed the Repeat Play switches as "0". • The functions that can be used...

User Manual
Page 18
....S] button for 10 seconds the name at least 2 seconds. Disc Naming (DNPS) Attaching a title to a CD. 1 Play the disc you used to the 'Switching Display' (page 8) and select the "DNPS" display. 2 Enter name set mode 18 | English CD/External disc control features Random Play Playing all the songs on all the discs in the disc changer in random order. External CD changer/ player: Varies according to - Function of a CD can be changed...
....S] button for 10 seconds the name at least 2 seconds. Disc Naming (DNPS) Attaching a title to a CD. 1 Play the disc you used to the 'Switching Display' (page 8) and select the "DNPS" display. 2 Enter name set mode 18 | English CD/External disc control features Random Play Playing all the songs on all the discs in the disc changer in random order. External CD changer/ player: Varies according to - Function of a CD can be changed...

User Manual
Page 19
... this operation explanation. 1 Enter Menu mode Press the [MENU] button for items that aren't applicable ('Manual Clock Adjustment' etc.) are entered step by returning to step 2 and setting other items. 4 Exit Menu mode Press the [MENU] button. • When other items that are displayed afterwards their setting content is the original setting.) Also, the explanation for at least 1 second. You can continue by step. functions. Menu system SRC MENU...
... this operation explanation. 1 Enter Menu mode Press the [MENU] button for items that aren't applicable ('Manual Clock Adjustment' etc.) are entered step by returning to step 2 and setting other items. 4 Exit Menu mode Press the [MENU] button. • When other items that are displayed afterwards their setting content is the original setting.) Also, the explanation for at least 1 second. You can continue by step. functions. Menu system SRC MENU...
User Manual
Page 20
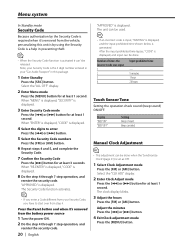
... Standby mode Security Code Because authorization by using the Security Code is a help in preventing theft. • When the Security Code function is activated it can be done when the 'Synchronize Clock' (page 21) is set as OFF. 1 Select Clock Adjustment mode Press the [FM] or [AM] button. When "MENU" is displayed, "SECURITY" is displayed, and input can be released. Press the Reset button and when it 's removed from the battery power source 1 Turn the power ON...
... Standby mode Security Code Because authorization by using the Security Code is a help in preventing theft. • When the Security Code function is activated it can be done when the 'Synchronize Clock' (page 21) is set as OFF. 1 Select Clock Adjustment mode Press the [FM] or [AM] button. When "MENU" is displayed, "SECURITY" is displayed, and input can be released. Press the Reset button and when it 's removed from the battery power source 1 Turn the power ON...
User Manual
Page 21
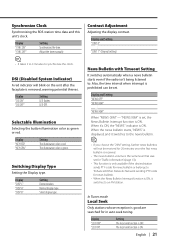
... OFF" Setting LED flashes. LED OFF. Display "KEY RED" "KEY GRN" Setting The illumination color is green. The illumination color is red. Silent display type. ... Adjust the time manually. ... Normal display type. Display "SYNC ON" "SYNC OFF" Setting Synchronizes the time. Selectable Illumination Selecting the button illumination color as green or red. Display "DISP C" "DISP A" "DISP B" Setting Demonstration. Synchronize Clock Synchronizing the RDS station time data and this unit's clock. In Tuner mode Local Seek Only stations whose...
... OFF" Setting LED flashes. LED OFF. Display "KEY RED" "KEY GRN" Setting The illumination color is green. The illumination color is red. Silent display type. ... Adjust the time manually. ... Normal display type. Display "SYNC ON" "SYNC OFF" Setting Synchronizes the time. Selectable Illumination Selecting the button illumination color as green or red. Display "DISP C" "DISP A" "DISP B" Setting Demonstration. Synchronize Clock Synchronizing the RDS station time data and this unit's clock. In Tuner mode Local Seek Only stations whose...

User Manual
Page 22
... display changes. • The text scrolled is ON. Menu system In Tuner mode Tuning Mode Sets the tuning mode. Display "ATPS ON" "ATPS OFF" Setting The Auto TP Seek Function is OFF. The Region Restrict Function is ON. Display "SCL MANU" "SCL AUTO" Setting Doesn't scroll. Tuning mode Auto seek Preset station seek Manual Display "AUTO 1" "AUTO 2" "MANUAL" Operation Automatic search for a particular network, to 'Auto Memory Entry' (page 12). • Sometimes stations in the same RDS network with the AF function for a station...
... display changes. • The text scrolled is ON. Menu system In Tuner mode Tuning Mode Sets the tuning mode. Display "ATPS ON" "ATPS OFF" Setting The Auto TP Seek Function is OFF. The Region Restrict Function is ON. Display "SCL MANU" "SCL AUTO" Setting Doesn't scroll. Tuning mode Auto seek Preset station seek Manual Display "AUTO 1" "AUTO 2" "MANUAL" Operation Automatic search for a particular network, to 'Auto Memory Entry' (page 12). • Sometimes stations in the same RDS network with the AF function for a station...

User Manual
Page 24
... use antenna conversion adapters (ISO-JASO) when the antenna cord has an ISO plug. • Make sure that the wires have an ACC position, or if the ignition wire is 30° or less. 24 | English Reconnect the - Press the reset button. • If your car is not prepared for each unit. 3. Accessories/ Installation Procedure Accessories ..........1 ..........2 ..........1 ..........1 ..........1 ..........2 Installation Procedure 1. Connect the wire on the wiring harness and connect it to a power source that...
... use antenna conversion adapters (ISO-JASO) when the antenna cord has an ISO plug. • Make sure that the wires have an ACC position, or if the ignition wire is 30° or less. 24 | English Reconnect the - Press the reset button. • If your car is not prepared for each unit. 3. Accessories/ Installation Procedure Accessories ..........1 ..........2 ..........1 ..........1 ..........1 ..........2 Installation Procedure 1. Connect the wire on the wiring harness and connect it to a power source that...
User Manual
Page 25
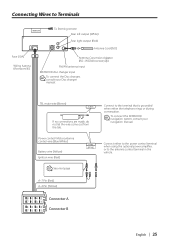
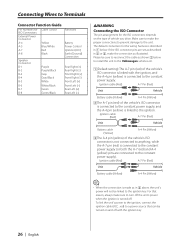
... Connector A Connector B English | 25 Connect either to the power control terminal when using the optional power amplifier, or to the terminal that is grounded when either the telephone rings or during conversation. Connecting Wires to Terminals REMO.CONT To Steering remote Rear left output (White) Rear right output (Red) Antenna Cord (ISO) Fuse (10A) Wiring harness (Accessory1) Antenna Conversion Adaptor (ISO-JASO) (Accessory3) FM/AM antenna input KENWOOD disc changer input To connect the Disc changer, consult your navigation manual. TEL mute wire...
... Connector A Connector B English | 25 Connect either to the power control terminal when using the optional power amplifier, or to the terminal that is grounded when either the telephone rings or during conversation. Connecting Wires to Terminals REMO.CONT To Steering remote Rear left output (White) Rear right output (Red) Antenna Cord (ISO) Fuse (10A) Wiring harness (Accessory1) Antenna Conversion Adaptor (ISO-JASO) (Accessory3) FM/AM antenna input KENWOOD disc changer input To connect the Disc changer, consult your navigation manual. TEL mute wire...
User Manual
Page 26
... unit's power to the ignition, connect the ignition cable (ACC...red) to a power source that reason, always make sure to turn off the unit's power when the ignition is connected to the constant power supply). Make sure to Terminals Connector Function Guide Pin Numbers for ISO Connectors External Power Connector A-4 A-5 A-7 A-8 Cable Colour Yellow Blue/White Red Black Speaker Connector B-1 B-2 B-3 B-4 B-5 B-6 B-7 B-8 Purple Purple/Black Gray Gray/Black White White/Black Green Green/Black Functions Battery Power Control Ignition (ACC) Earth (Ground) Connection Rear...
... unit's power to the ignition, connect the ignition cable (ACC...red) to a power source that reason, always make sure to turn off the unit's power when the ignition is connected to the constant power supply). Make sure to Terminals Connector Function Guide Pin Numbers for ISO Connectors External Power Connector A-4 A-5 A-7 A-8 Cable Colour Yellow Blue/White Red Black Speaker Connector B-1 B-2 B-3 B-4 B-5 B-6 B-7 B-8 Purple Purple/Black Gray Gray/Black White White/Black Green Green/Black Functions Battery Power Control Ignition (ACC) Earth (Ground) Connection Rear...
User Manual
Page 27
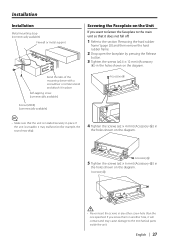
... • Never insert the screws in the holes shown on the diagram. Accessory5 5 Tighten the screws (ø2 × 6 mm) (Accessory 6) in any other screw hole than the one specified. Installation Installation Metal mounting strap (commercially available) Firewall or metal support Screwing the Faceplate on the Unit If you screw them in another hole, it will contact and...
... • Never insert the screws in the holes shown on the diagram. Accessory5 5 Tighten the screws (ø2 × 6 mm) (Accessory 6) in any other screw hole than the one specified. Installation Installation Metal mounting strap (commercially available) Firewall or metal support Screwing the Faceplate on the Unit If you screw them in another hole, it will contact and...
User Manual
Page 29
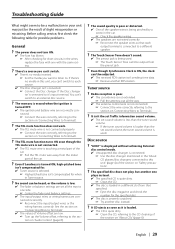
... balance settings are set sound volume,the tuner sound volume is used . ☞ The Touch Sensor Tone can 't switch to an external disc source. ? Radio reception is poor. ✔ The car antenna is not extended. ☞ Pull the antenna out all the way to one side. ☞ Center the fader and balance settings. ✔ The input/output wires or wiring harness are connected incorrectly. ☞ Reconnect the input/output wires or the wiring harness correctly. The specified disc does not play...
... balance settings are set sound volume,the tuner sound volume is used . ☞ The Touch Sensor Tone can 't switch to an external disc source. ? Radio reception is poor. ✔ The car antenna is not extended. ☞ Pull the antenna out all the way to one side. ☞ Center the fader and balance settings. ✔ The input/output wires or wiring harness are connected incorrectly. ☞ Reconnect the input/output wires or the wiring harness correctly. The specified disc does not play...
User Manual
Page 30
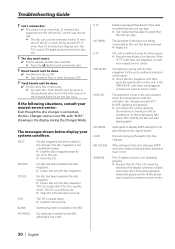
... the disc changer is connected, the Disc Changer source is malfunctioning for some reason. ➪ Check the disc magazine. The CD is scratched a lot. ➪ Clean the CD and load it been played at least 1 time. The faceplate of the ACC switch being turned OFF. If the "MECHA ER" code does not disappear, consult your nearest service center. If the CD cannot be removed within...
... the disc changer is connected, the Disc Changer source is malfunctioning for some reason. ➪ Check the disc magazine. The CD is scratched a lot. ➪ Clean the CD and load it been played at least 1 time. The faceplate of the ACC switch being turned OFF. If the "MECHA ER" code does not disappear, consult your nearest service center. If the CD cannot be removed within...


