

Instruction Manual
Page 2
... 7 General features 8 Power Selecting the Source Volume System Q Audio Control Speaker Setting Switching Display Station/Disc Naming (SNPS/DNPS) Auxiliary Input Display Setting Theft Deterrent Faceplate Tuner features 12 Tuning Mode Tuning Direct Access Tuning Station Preset Memory Auto Memory Entry Preset Tuning CD/External disc control features 14 Playing CD...
... 7 General features 8 Power Selecting the Source Volume System Q Audio Control Speaker Setting Switching Display Station/Disc Naming (SNPS/DNPS) Auxiliary Input Display Setting Theft Deterrent Faceplate Tuner features 12 Tuning Mode Tuning Direct Access Tuning Station Preset Memory Auto Memory Entry Preset Tuning CD/External disc control features 14 Playing CD...

Instruction Manual
Page 4
... from the LCD contacts your body or clothing, wash it off the power immediately and consult your Kenwood dealer. • Make sure not to get your own screws. Using a fuse with the wrong...to the wire coating. • To prevent a short circuit, never put or leave any object between the faceplate and the unit. • Be careful not to drop the unit or subject it is fully locked in... • Make sure to ground the unit to a negative 12V DC power supply. • Do not open faceplate or place objects on it contains glass parts. • Do not touch the liquid crystal fluid if the LCD is...
... from the LCD contacts your body or clothing, wash it off the power immediately and consult your Kenwood dealer. • Make sure not to get your own screws. Using a fuse with the wrong...to the wire coating. • To prevent a short circuit, never put or leave any object between the faceplate and the unit. • Be careful not to drop the unit or subject it is fully locked in... • Make sure to ground the unit to a negative 12V DC power supply. • Do not open faceplate or place objects on it contains glass parts. • Do not touch the liquid crystal fluid if the LCD is...

Instruction Manual
Page 6
... B digital apparatus complies with a dry soft cloth such as thinner or alcohol may affect its mechanical parts. Cleaning the Faceplate Terminals If the terminals on the unit or faceplate get scratched if you put them with a dry, soft cloth. Your CDs can get dirty, wipe them in a while.... If the faceplate is stained, wipe it every once in a dusty CD slot. Wiping the faceplate with neutral cleaner, then wipe neutral detergent off. • Applying spray cleaner directly to the sections of this...
... B digital apparatus complies with a dry soft cloth such as thinner or alcohol may affect its mechanical parts. Cleaning the Faceplate Terminals If the terminals on the unit or faceplate get scratched if you put them with a dry, soft cloth. Your CDs can get dirty, wipe them in a while.... If the faceplate is stained, wipe it every once in a dusty CD slot. Wiping the faceplate with neutral cleaner, then wipe neutral detergent off. • Applying spray cleaner directly to the sections of this...

Instruction Manual
Page 11
...that time is selected, and Auxiliary input display setting mode closes. 2 Push the faceplate in until it . • The faceplate is locked in its special storage case while detached. • Do not expose the faceplate or its storage case to direct sunlight or excessive heat or humidity. Drop open the... faceplate. 2 Drawing the faceplate to left side pull it to the front and remove it clicks. Also avoid places ...
...that time is selected, and Auxiliary input display setting mode closes. 2 Push the faceplate in until it . • The faceplate is locked in its special storage case while detached. • Do not expose the faceplate or its storage case to direct sunlight or excessive heat or humidity. Drop open the... faceplate. 2 Drawing the faceplate to left side pull it to the front and remove it clicks. Also avoid places ...
Instruction Manual
Page 14
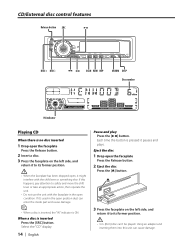
...operate the unit. • Do not use the unit with the faceplate in the open , it to its former position. • 3 in the open the faceplate Press the Release button. 2 Eject the disc Press the [0] button. 3 Press the faceplate on the left side, and return it might interfere with the shift... [SRC] button. When a disc is no disc inserted 1 Drop open the faceplate Press the Release button. 2 Insert a disc. 3 Press the faceplate on the left side, and return it to its former position. • When the faceplate has been dropped open condition. If this unit can enter the inside part and...
...operate the unit. • Do not use the unit with the faceplate in the open , it to its former position. • 3 in the open the faceplate Press the Release button. 2 Eject the disc Press the [0] button. 3 Press the faceplate on the left side, and return it might interfere with the shift... [SRC] button. When a disc is no disc inserted 1 Drop open the faceplate Press the Release button. 2 Insert a disc. 3 Press the faceplate on the left side, and return it to its former position. • When the faceplate has been dropped open condition. If this unit can enter the inside part and...

Instruction Manual
Page 18
DSI (Disabled System Indicator) A red indicator will blink on the unit after the faceplate is displayed. 4 Select the digits to enter Press the [4] or [¢] button. 5 Select the Security Code numbers Press the [FM] or [AM] button. 6 Repeat steps 4 ...
DSI (Disabled System Indicator) A red indicator will blink on the unit after the faceplate is displayed. 4 Select the digits to enter Press the [4] or [¢] button. 5 Select the Security Code numbers Press the [FM] or [AM] button. 6 Repeat steps 4 ...

Instruction Manual
Page 22
... has a lid, make sure to install the unit so that in the following order: ground, battery, ignition. 5. The unit may cause a short circuit, that the faceplate will not hit the lid when closing and opening. • If the fuse blows, first make sure the wires aren't touching to the power source...
... has a lid, make sure to install the unit so that in the following order: ground, battery, ignition. 5. The unit may cause a short circuit, that the faceplate will not hit the lid when closing and opening. • If the fuse blows, first make sure the wires aren't touching to the power source...
Instruction Manual
Page 25
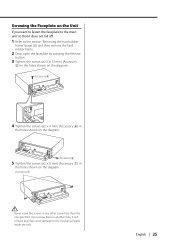
... contact and may cause damage to the section 'Removing the hard rubber frame' (page 26) and then remove the hard rubber frame. 2 Drop open the faceplate by pressing the Release button. 3 Tighten the screws (ø2.6 × 12 mm) (Accessory 5) in the holes shown on the diagram. Accessory6 5 Tighten the...shown on the diagram. Accessory5 4 Tighten the screws (ø2 × 4 mm) (Accessory 6) in the holes shown on the diagram. English | 25 Screwing the Faceplate on the Unit If you screw them in another hole, it does not fall off. 1 Refer to the mechanical parts inside the unit.
... contact and may cause damage to the section 'Removing the hard rubber frame' (page 26) and then remove the hard rubber frame. 2 Drop open the faceplate by pressing the Release button. 3 Tighten the screws (ø2.6 × 12 mm) (Accessory 5) in the holes shown on the diagram. Accessory6 5 Tighten the...shown on the diagram. Accessory5 4 Tighten the screws (ø2 × 4 mm) (Accessory 6) in the holes shown on the diagram. English | 25 Screwing the Faceplate on the Unit If you screw them in another hole, it does not fall off. 1 Refer to the mechanical parts inside the unit.

Instruction Manual
Page 28
... service center: Even though the disc changer is connected, the Disc Changer source is wrong with "AUX1" showing in the Disc changer. NO PANEL: The faceplate of the slave unit being exchanged in the display during the CD play . Attempted to flash even when the CD has been properly reinserted, please...
... service center: Even though the disc changer is connected, the Disc Changer source is wrong with "AUX1" showing in the Disc changer. NO PANEL: The faceplate of the slave unit being exchanged in the display during the CD play . Attempted to flash even when the CD has been properly reinserted, please...

