

Instruction Manual
Page 41
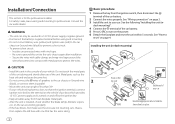
...short circuit. • To prevent short circuit: - Consult the car audio dealer. Insulate unconnected wires with cable clamps and wrap vinyl tape around the wires that has the same rating. (C) Mounting sleeve (×1) (D) Wiring harness (×1) (E) Extraction key (×2) (F) Screws* M5 × 7 mm (×4) ... all cables away from the ignition switch, then disconnect the terminal of your vehicle wiring harness does not have the ignition terminal, connect Ignition wire (red) to protect the wires. Part list for installation (A) Faceplate (×1) (B) Trim plate (×1) WARNING ...
...short circuit. • To prevent short circuit: - Consult the car audio dealer. Insulate unconnected wires with cable clamps and wrap vinyl tape around the wires that has the same rating. (C) Mounting sleeve (×1) (D) Wiring harness (×1) (E) Extraction key (×2) (F) Screws* M5 × 7 mm (×4) ... all cables away from the ignition switch, then disconnect the terminal of your vehicle wiring harness does not have the ignition terminal, connect Ignition wire (red) to protect the wires. Part list for installation (A) Faceplate (×1) (B) Trim plate (×1) WARNING ...

Instruction Manual
Page 43
Brown (Mute control wire) To connect the KENWOOD navigation system, refer your safety. Installation/Connection Wiring connection Fuse (10 A) IMPORTANT We recommend installing the unit with a commercially available custom wiring harness specific for your car and leave this job to professionals for your navigation manual Blue/White (Power control wire/ Antenna control wire) (12 V 350 mA) Light blue...
Brown (Mute control wire) To connect the KENWOOD navigation system, refer your safety. Installation/Connection Wiring connection Fuse (10 A) IMPORTANT We recommend installing the unit with a commercially available custom wiring harness specific for your car and leave this job to professionals for your navigation manual Blue/White (Power control wire/ Antenna control wire) (12 V 350 mA) Light blue...
Quick Start Guide 1
Page 8
... the ignition switch, then disconnect the terminal of your car. Do not touch the metal parts of this unit during and shortly after installation. - See "Wiring connection" on the power. 6 Detach the faceplate and reset the unit within 5 seconds. See "How to prevent a short circuit. • To prevent... unit in - Consult the car audio dealer. See the following "Installing the unit (in the console of your vehicle wiring harness does not have the ignition terminal, connect Ignition wire (red) to hold the sleeve firmly in parallel. • Mount the unit at an angle of less than 30&#...
... the ignition switch, then disconnect the terminal of your car. Do not touch the metal parts of this unit during and shortly after installation. - See "Wiring connection" on the power. 6 Detach the faceplate and reset the unit within 5 seconds. See "How to prevent a short circuit. • To prevent... unit in - Consult the car audio dealer. See the following "Installing the unit (in the console of your vehicle wiring harness does not have the ignition terminal, connect Ignition wire (red) to hold the sleeve firmly in parallel. • Mount the unit at an angle of less than 30&#...

Quick Start Guide 1
Page 9
... the mounting sleeve and trim plate from the tab. Removing the unit Part list (supplied) (A) Faceplate (×1) (B) Trimplate (×1) (C) Mounting sleeve (×1) (D) Wiring harness (×1) (E) Extraction key (×2) (F) Screw (supplied for / / / ) M5 × 7 mm (×4) M5 × 6 mm (×4) M4 ...× 8 mm (×1) Car fuse box Ignition switch Car fuse box Battery a Brown: To connect the KENWOOD navigation system, refer your navigation manual b Blue/white: To the power control terminal when using the optional power amplifier or to the antenna ...
... the mounting sleeve and trim plate from the tab. Removing the unit Part list (supplied) (A) Faceplate (×1) (B) Trimplate (×1) (C) Mounting sleeve (×1) (D) Wiring harness (×1) (E) Extraction key (×2) (F) Screw (supplied for / / / ) M5 × 7 mm (×4) M5 × 6 mm (×4) M4 ...× 8 mm (×1) Car fuse box Ignition switch Car fuse box Battery a Brown: To connect the KENWOOD navigation system, refer your navigation manual b Blue/white: To the power control terminal when using the optional power amplifier or to the antenna ...


