Instruction Manual
Page 1
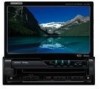
... with installation and operation procedures will help you call upon your Kenwood dealer for information or service on the warranty card, and in the space provided below. Refer to read through this instruction manual. Model KVT-512/KVT-532DVD Serial number US Residence Only Register Online Register your Kenwood product at www.Kenwoodusa.com © B64-4021-00/00 (KW/RW) MONITOR WITH DVD RECEIVER KVT-512 KVT-532DVD INSTRUCTION MANUAL...
... with installation and operation procedures will help you call upon your Kenwood dealer for information or service on the warranty card, and in the space provided below. Refer to read through this instruction manual. Model KVT-512/KVT-532DVD Serial number US Residence Only Register Online Register your Kenwood product at www.Kenwoodusa.com © B64-4021-00/00 (KW/RW) MONITOR WITH DVD RECEIVER KVT-512 KVT-532DVD INSTRUCTION MANUAL...
Instruction Manual
Page 2
...22 iPod Control 33 Connecting an iPod 33 Functions When Displaying the Easy Control Panel 33 Functions While Displaying the Control Screen 34 USB Device Control 36 Functions When Displaying the Easy Control Panel 36 Functions While displaying the Control Screen 36 Folder Select 38 Music Disc & Audio File Listening 23 Functions While Displaying the Control Screen 23 Video File/Picture Watching 25 Function During Playback Screen 25 Functions When Displaying the Easy Control Panel 26 Functions While Displaying the Control Screen 26 Picture Control 27 Sirius/XM...
...22 iPod Control 33 Connecting an iPod 33 Functions When Displaying the Easy Control Panel 33 Functions While Displaying the Control Screen 34 USB Device Control 36 Functions When Displaying the Easy Control Panel 36 Functions While displaying the Control Screen 36 Folder Select 38 Music Disc & Audio File Listening 23 Functions While Displaying the Control Screen 23 Video File/Picture Watching 25 Function During Playback Screen 25 Functions When Displaying the Easy Control Panel 26 Functions While Displaying the Control Screen 26 Picture Control 27 Sirius/XM...
Instruction Manual
Page 3
... Phone Number Preset 56 SMS (Short Message Service) 57 Setup Menu 58 Setup Menu 58 Audio Setup 58 Crossover Network Setup 59 DVD Setup 59 Language Setup 60 Parental Level Setup 61 System Setup 62 Panel Color Coordinate 63 AV Interface Setup 64 User Interface 66 Direct Source Button Setup 67 Entering Background 68 Background Delete 68 Background Select 69 Touch Panel Adjustment 69 Clock Setup 70 Monitor Setup 70 Security Code Setup 72 Deactivating Security Code 73 iPod Setup 74 Sirius Setup 74 Sirius Parental Code Setup 75 Sirius Parental Lock...
... Phone Number Preset 56 SMS (Short Message Service) 57 Setup Menu 58 Setup Menu 58 Audio Setup 58 Crossover Network Setup 59 DVD Setup 59 Language Setup 60 Parental Level Setup 61 System Setup 62 Panel Color Coordinate 63 AV Interface Setup 64 User Interface 66 Direct Source Button Setup 67 Entering Background 68 Background Delete 68 Background Select 69 Touch Panel Adjustment 69 Clock Setup 70 Monitor Setup 70 Security Code Setup 72 Deactivating Security Code 73 iPod Setup 74 Sirius Setup 74 Sirius Parental Code Setup 75 Sirius Parental Lock...
Instruction Manual
Page 6
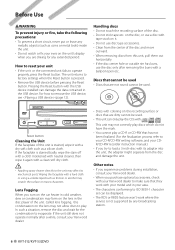
... watch or fix your area. • The characters conforming to evaporate. Handling discs • Do not touch the recording surface of the disc and move outward. • When removing discs from this unit is not supported by any broadcasting station. 6 KVT-512/KVT-532DVD Discs that cannot be used • Discs that are dirty cannot be displayed. • The RDS or RBDS feature won't work with a hard cloth or using...
... watch or fix your area. • The characters conforming to evaporate. Handling discs • Do not touch the recording surface of the disc and move outward. • When removing discs from this unit is not supported by any broadcasting station. 6 KVT-512/KVT-532DVD Discs that cannot be used • Discs that are dirty cannot be displayed. • The RDS or RBDS feature won't work with a hard cloth or using...
Instruction Manual
Page 7
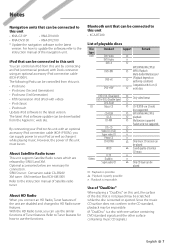
... supported. Use of Satellite radio tuner. The latest iPod software updater can be on this unit must be played. SIRIUS tuner : Conversion cable CA-SR20V XM tuner : XM interface Box KCA-XM100V Refer to HD Radio tuner features. Optional accessories below are disabled and changed to the instruction manual of "DualDisc" When playing a "DualDisc" on . Refer to Tuner features for connection. Only music CD session can use the functions. With the HD Radio tuner, you can control...
... supported. Use of Satellite radio tuner. The latest iPod software updater can be on this unit must be played. SIRIUS tuner : Conversion cable CA-SR20V XM tuner : XM interface Box KCA-XM100V Refer to HD Radio tuner features. Optional accessories below are disabled and changed to the instruction manual of "DualDisc" When playing a "DualDisc" on . Refer to Tuner features for connection. Only music CD session can use the functions. With the HD Radio tuner, you can control...
Instruction Manual
Page 8
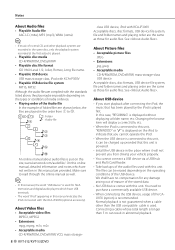
... at the first setout is played. • Playable disc media CD-R/RW/ROM, DVD±R/RW • Playable disc file format ISO 9660 Level 1/2, Joliet, Romeo, Long file name. • Playable USB device USB mass storage class, iPod with KCA-iP300V • Playable USB device file system FAT16, FAT32 Although the audio files are complied with the standards listed above, the play maybe impossible depending on the...
... at the first setout is played. • Playable disc media CD-R/RW/ROM, DVD±R/RW • Playable disc file format ISO 9660 Level 1/2, Joliet, Romeo, Long file name. • Playable USB device USB mass storage class, iPod with KCA-iP300V • Playable USB device file system FAT16, FAT32 Although the audio files are complied with the standards listed above, the play maybe impossible depending on the...

Instruction Manual
Page 16
... Adjusts the volume. 3 During DVD play : Selects music. See (page 7) for information on using the navigation system. ⁄ • You can be connected. During CD play : Selects a chapter. During Audio file, Video file, or Picture file play : Selects a file. 4 When pressed twice, the disc is displayed on the screen. Using the Navigation System Displays the navigation system screen and makes the navigation function available. 1 Displaying the navigation screen Control of Other Sources While Displaying the Navigation Screen Selected source can set the navigation system function...
... Adjusts the volume. 3 During DVD play : Selects music. See (page 7) for information on using the navigation system. ⁄ • You can be connected. During CD play : Selects a chapter. During Audio file, Video file, or Picture file play : Selects a file. 4 When pressed twice, the disc is displayed on the screen. Using the Navigation System Displays the navigation system screen and makes the navigation function available. 1 Displaying the navigation screen Control of Other Sources While Displaying the Navigation Screen Selected source can set the navigation system function...

Instruction Manual
Page 18
... Playback Screen Basic functions are available even when the playback screen is updated. 1 DVD VIDEO Title 2 1 Chap 1 3 T 00:00:05 1 Title Number Display 2 Chapter Number Display 3 Play Time Display 4 Forward Chapter Search Area Selects the next chapter. 18 KVT-512/KVT-532DVD Also, the information can play DVD/VCD using various functions. • For the basic method of how to watch DVD/VCD, see (page 10). • Set the remote controller mode switch to "DVD" mode before starting operation, see...
... Playback Screen Basic functions are available even when the playback screen is updated. 1 DVD VIDEO Title 2 1 Chap 1 3 T 00:00:05 1 Title Number Display 2 Chapter Number Display 3 Play Time Display 4 Forward Chapter Search Area Selects the next chapter. 18 KVT-512/KVT-532DVD Also, the information can play DVD/VCD using various functions. • For the basic method of how to watch DVD/VCD, see (page 10). • Set the remote controller mode switch to "DVD" mode before starting operation, see...
Instruction Manual
Page 28
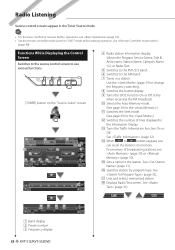
... station. t Sets a name to change the frequency switching. 8 Switches the button display. 9 Turns the CRSC function On or Off. (Only when receiving the FM broadcast) p Selects the Auto Memory mode. (See page 30 for the ) q Switches the Seek mode. (See page 29 for the ) w Switches the number of lines displayed in the Information Display. See (page 31). Functions While Displaying the Control Screen Switches to the source control screen to the AM band. 7 Tunes in a station. Selects the Program Service...
... station. t Sets a name to change the frequency switching. 8 Switches the button display. 9 Turns the CRSC function On or Off. (Only when receiving the FM broadcast) p Selects the Auto Memory mode. (See page 30 for the ) q Switches the Seek mode. (See page 29 for the ) w Switches the number of lines displayed in the Information Display. See (page 31). Functions While Displaying the Control Screen Switches to the source control screen to the AM band. 7 Tunes in a station. Selects the Program Service...

Instruction Manual
Page 36
... unit. • For the connection of the monitor. USB Mode:Full AV - USB Device Control You can control and listen to songs in your USB device by simply connecting it to use various playback functions. Functions When Displaying the Easy Control Panel Displays the basic operation buttons on the "Source Select" screen 36 KVT-512/KVT-532DVD O U T: AV - When Video or picture is hidden when you touch a central part of a USB device, see (page 10). O U T: AV - I N SCRN TI 1 USB 1 0002/0006 1 Selects a file. 2 Plays...
... unit. • For the connection of the monitor. USB Mode:Full AV - USB Device Control You can control and listen to songs in your USB device by simply connecting it to use various playback functions. Functions When Displaying the Easy Control Panel Displays the basic operation buttons on the "Source Select" screen 36 KVT-512/KVT-532DVD O U T: AV - When Video or picture is hidden when you touch a central part of a USB device, see (page 10). O U T: AV - I N SCRN TI 1 USB 1 0002/0006 1 Selects a file. 2 Plays...

Instruction Manual
Page 37
.... When "No Device" is connected, press it . 6 Removes the USB device. See (page 38). If there is no playback screen, wallpaper is displayed. If there is no image in random order).* r Switches the number of the category. p Switches the button display. e Starts or stops Random Play (to play music in the folder currently being played, initial background is displalyed. 2 Track Number Display 3 Play Mode Display 4 Play Time Display 5 Music information display Selects the Folder Name, File Name, TItle, Artist...
.... When "No Device" is connected, press it . 6 Removes the USB device. See (page 38). If there is no playback screen, wallpaper is displayed. If there is no image in random order).* r Switches the number of the category. p Switches the button display. e Starts or stops Random Play (to play music in the folder currently being played, initial background is displalyed. 2 Track Number Display 3 Play Mode Display 4 Play Time Display 5 Music information display Selects the Folder Name, File Name, TItle, Artist...

Instruction Manual
Page 43
Muting Audio Volume upon Reception of Phone Call When the telephone is called , the system is paused automatically. English 43 Hang up the MUTE wire to your telephone using a commercial telephone accessory. Refer to hook up the phone. The system resumes playing automatically. ⁄ • To use the TEL Mute feature, you need to . Muting Audio Volume upon Reception of Phone call ends... Phone Call ("CALL") screen When the call When the telephone is paused. The Phone Call ("CALL") screen appears, and system is called ...
Muting Audio Volume upon Reception of Phone Call When the telephone is called , the system is paused automatically. English 43 Hang up the MUTE wire to your telephone using a commercial telephone accessory. Refer to hook up the phone. The system resumes playing automatically. ⁄ • To use the TEL Mute feature, you need to . Muting Audio Volume upon Reception of Phone call ends... Phone Call ("CALL") screen When the call When the telephone is paused. The Phone Call ("CALL") screen appears, and system is called ...

Instruction Manual
Page 45
...": Turning the Dimmer function On or Off when the vehicle light control switch is displayed only when you have applied the parking brake. • The picture quality can be set for an NTSC system image on Video, iPod, USB or Rear View Camera. 3 Color Control Displayed on the Video, iPod, USB or Rear View Camera screen only. 4 Contrast Control 5 Black Level Adjustment 6 Dimmer Mode Setup "ON": The display dims. "OFF": The display doesn't dim. Screen Control Setting the monitor screen. English 45 O U T: AV - I N SCRN TI DVD VIDEO Title 1 C h a p 1 T 0 0 : 0 0 : 0 5 IN 3 Adjust the...
...": Turning the Dimmer function On or Off when the vehicle light control switch is displayed only when you have applied the parking brake. • The picture quality can be set for an NTSC system image on Video, iPod, USB or Rear View Camera. 3 Color Control Displayed on the Video, iPod, USB or Rear View Camera screen only. 4 Contrast Control 5 Black Level Adjustment 6 Dimmer Mode Setup "ON": The display dims. "OFF": The display doesn't dim. Screen Control Setting the monitor screen. English 45 O U T: AV - I N SCRN TI DVD VIDEO Title 1 C h a p 1 T 0 0 : 0 0 : 0 5 IN 3 Adjust the...
Instruction Manual
Page 61
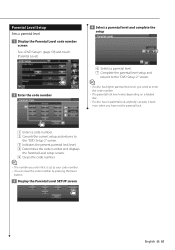
... Level code number screen See (page 59) and touch [Parental Level]. 2 Enter the code number 1 2 3 4 5 1 Enters a code number. 2 Cancels the current setup and returns to the "DVD Setup 2" screen. 3 Indicates the present parental lock level. 4 Determines the code number and displays the Parental Level setup screen. 5 Clears the code number. ⁄ • The number you enter first is set as your code number. • You can clear the code number by pressing the Reset button. 3 Display the Parental Level SETUP screen...
... Level code number screen See (page 59) and touch [Parental Level]. 2 Enter the code number 1 2 3 4 5 1 Enters a code number. 2 Cancels the current setup and returns to the "DVD Setup 2" screen. 3 Indicates the present parental lock level. 4 Determines the code number and displays the Parental Level setup screen. 5 Clears the code number. ⁄ • The number you enter first is set as your code number. • You can clear the code number by pressing the Reset button. 3 Display the Parental Level SETUP screen...

Instruction Manual
Page 62
... cannot play an Audio file/VCD disc in Standby mode) "Rear" : Rear sound is output. e Sets the Preout output. (Settable only when in the "2" position. OFF" : Press the [NAV] button for more than 1 second to switch to turn the display off. "2": Forcibly plays back a disc as a music CD. "V. See (page 63). 9 When set up the system parameters. 1 Display the System Setup screen Touch Menu" screen (page 58). r Sets the function of text display on the Source Control screen. ( "Auto") "Auto": Scrolls the screen automatically. Setup Menu System Setup...
... cannot play an Audio file/VCD disc in Standby mode) "Rear" : Rear sound is output. e Sets the Preout output. (Settable only when in the "2" position. OFF" : Press the [NAV] button for more than 1 second to switch to turn the display off. "2": Forcibly plays back a disc as a music CD. "V. See (page 63). 9 When set up the system parameters. 1 Display the System Setup screen Touch Menu" screen (page 58). r Sets the function of text display on the Source Control screen. ( "Auto") "Auto": Scrolls the screen automatically. Setup Menu System Setup...

Instruction Manual
Page 64
... the Kenwood's Navigation System to "Reverse". In this image is displayed. Operation screen is also switched to the DVD (or USB). "AV-IN": Allows a third-party navigation system to be set to DVD. • If "AV-OUT" is set audio and visual (AV) interface parameters. 1 Display the AV Interface screen Touch Menu" screen (page 58). Use the easy control buttons to operate the front source. 8 Sets output of car to connect via the AV INPUT port. in front monitor allows the rear source to...
... the Kenwood's Navigation System to "Reverse". In this image is displayed. Operation screen is also switched to the DVD (or USB). "AV-IN": Allows a third-party navigation system to be set to DVD. • If "AV-OUT" is set audio and visual (AV) interface parameters. 1 Display the AV Interface screen Touch Menu" screen (page 58). Use the easy control buttons to operate the front source. 8 Sets output of car to connect via the AV INPUT port. in front monitor allows the rear source to...
Instruction Manual
Page 66
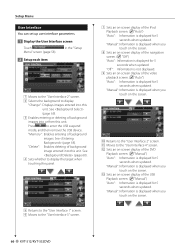
... touch on -screen display of the DVD Playback screen. ( "Manual") "Auto": Information is displayed for 5 seconds when updated. "Change": Displays images entered into or from this unit. "Memory": Enables entering of background image entered into this unit. w Sets an on -screen display of background images into this unit. Setup Menu User Interface You can set up user interface parameters. 1 Display the User Interface screen Touch Menu" screen (page 58). Press to the "User Interface 4" screen. e Sets an on -screen display of the video playback screen. ( "Auto") "Auto...
... touch on -screen display of the DVD Playback screen. ( "Manual") "Auto": Information is displayed for 5 seconds when updated. "Change": Displays images entered into or from this unit. "Memory": Enables entering of background image entered into this unit. w Sets an on -screen display of background images into this unit. Setup Menu User Interface You can set up user interface parameters. 1 Display the User Interface screen Touch Menu" screen (page 58). Press to the "User Interface 4" screen. e Sets an on -screen display of the video playback screen. ( "Auto") "Auto...
Instruction Manual
Page 70
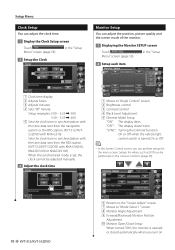
"SYNC": Turning the Dimmer function On or Off when the vehicle light control switch is set, the clock cannot be performed on Setup Menu Clock Setup You can be adjusted manually. 3 Adjust the clock time 70 KVT-512/KVT-532DVD Monitor Setup You can perform setups for videos such as DVD can adjust the clock time. 1 Display the Clock Setup screen Touch Menu" screen (page 58). in the "Setup 2 Setup the Clock 2 3 1 2 3 4 5 1 Clock time display 2 Adjusts hours. 3 Adjusts minutes. 4 Sets "00" minute. in the "Setup 2 Setup each item 1 2 5 3 4 1 Moves to "Mode Select...
"SYNC": Turning the Dimmer function On or Off when the vehicle light control switch is set, the clock cannot be performed on Setup Menu Clock Setup You can be adjusted manually. 3 Adjust the clock time 70 KVT-512/KVT-532DVD Monitor Setup You can perform setups for videos such as DVD can adjust the clock time. 1 Display the Clock Setup screen Touch Menu" screen (page 58). in the "Setup 2 Setup the Clock 2 3 1 2 3 4 5 1 Clock time display 2 Adjusts hours. 3 Adjusts minutes. 4 Sets "00" minute. in the "Setup 2 Setup each item 1 2 5 3 4 1 Moves to "Mode Select...
Instruction Manual
Page 94
... the disc. ✔ The disc is disabled. ☞ (page 86) ! What might seem to the CD cleaning of the navigation unit. 94 KVT-512/KVT-532DVD Audio file source ? The touch panel control of the rear speakers. ▲ The Dual zone function is severely scratched. ☞ Try another media. The sound skips when an Audio file is being used. ☞ The Touch Sensor Tone can't be output from the subwoofer. • Cannot set...
... the disc. ✔ The disc is disabled. ☞ (page 86) ! What might seem to the CD cleaning of the navigation unit. 94 KVT-512/KVT-532DVD Audio file source ? The touch panel control of the rear speakers. ▲ The Dual zone function is severely scratched. ☞ Try another media. The sound skips when an Audio file is being used. ☞ The Touch Sensor Tone can't be output from the subwoofer. • Cannot set...
Instruction Manual
Page 96
... fitted has dropped. Media was played that doesn't have occurred to the connected USB device. ➡ Change the source to USB/iPod again. See (page 7). 96 KVT-512/KVT-532DVD Help? No Music: The connected USB device contains no USB device/iPod is activated and you set. The unit does not support the iPod. ➡ See (page 7). At such times this message will appear. ➡ Use the unit again after reducing the temperature inside the disc changer is rated a current...
... fitted has dropped. Media was played that doesn't have occurred to the connected USB device. ➡ Change the source to USB/iPod again. See (page 7). 96 KVT-512/KVT-532DVD Help? No Music: The connected USB device contains no USB device/iPod is activated and you set. The unit does not support the iPod. ➡ See (page 7). At such times this message will appear. ➡ Use the unit again after reducing the temperature inside the disc changer is rated a current...


