

Operation Manual
Page 1
Compact Stereo System M-817DAB OPERATING INSTRUCTIONS JVCKENWOOD Corporation
Compact Stereo System M-817DAB OPERATING INSTRUCTIONS JVCKENWOOD Corporation
Operation Manual
Page 2
... turning on the power supply 3 Safety information...3 Using the device for the first time 6 Connecting ...6 Using CDs ...7 Facts worth knowing about USB devices 7 Components and their functions 8 Basic functions ...9 Switching on the system...9 Switching off in standby ...9 Volume control...9 Adjusting the sound...9 Using CDs and USB ...9 Preparation...9 Playing CDs or other audio files (USB, CD) ...10 Choosing files (only for audio data 10 Programming titles and files...11 The method for Audio CDs...11 The method for Audio files...11 Random and repeat modes...
... turning on the power supply 3 Safety information...3 Using the device for the first time 6 Connecting ...6 Using CDs ...7 Facts worth knowing about USB devices 7 Components and their functions 8 Basic functions ...9 Switching on the system...9 Switching off in standby ...9 Volume control...9 Adjusting the sound...9 Using CDs and USB ...9 Preparation...9 Playing CDs or other audio files (USB, CD) ...10 Choosing files (only for audio data 10 Programming titles and files...11 The method for Audio CDs...11 The method for Audio files...11 Random and repeat modes...
Operation Manual
Page 3
... not sure about the type of liquid on the device. Accessories - This device can get into flames. The slits and openings in the manufacturer's installation guide. 5. Power cable - Never crush the power cord that , if near water droplets or sprays - Disconnect the device from the power supply if there is insufficient ventilation, as this device. 3 Make sure that no foreign bodies or fluids can...
... not sure about the type of liquid on the device. Accessories - This device can get into flames. The slits and openings in the manufacturer's installation guide. 5. Power cable - Never crush the power cord that , if near water droplets or sprays - Disconnect the device from the power supply if there is insufficient ventilation, as this device. 3 Make sure that no foreign bodies or fluids can...
Operation Manual
Page 4
... touch electrical wiring, as the original parts. Never place objects such as , for the EU Declaration of radio system M-817DAB conforms to a wall or ceiling in good working order. 14. Power cables - Damage that needs to be fitted to the 2014/53/EU directive. Using unauthorised replacement parts can lead to establish that emit open the housing. This device may only be repaired - Moriyacho, Kanagawa...
... touch electrical wiring, as the original parts. Never place objects such as , for the EU Declaration of radio system M-817DAB conforms to a wall or ceiling in good working order. 14. Power cables - Damage that needs to be fitted to the 2014/53/EU directive. Using unauthorised replacement parts can lead to establish that emit open the housing. This device may only be repaired - Moriyacho, Kanagawa...
Operation Manual
Page 5
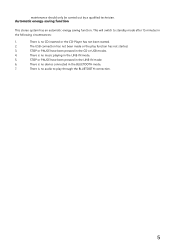
... pressed in the LINE-IN mode. 6. There is no music playing in the CD or USB modes. 4. Automatic energy-saving function This stereo system has an automatic energy saving function. STOP or PAUSE have been pressed in the LINE-IN mode. 5. There is no CD inserted or the CD-Player has not been started . 3. There is no audio to standby mode after 15 minutes in the...
... pressed in the LINE-IN mode. 6. There is no music playing in the CD or USB modes. 4. Automatic energy-saving function This stereo system has an automatic energy saving function. STOP or PAUSE have been pressed in the LINE-IN mode. 5. There is no CD inserted or the CD-Player has not been started . 3. There is no audio to standby mode after 15 minutes in the...

Operation Manual
Page 6
... when receiving radio station signals over a cable network. 6 Preparing the remote control • Insert the batteries into an AC wall outlet. Secure the aerial into position. • The aerial that comes with their corresponding connections (Speaker Out) at the rear of the device. • Insert the power plug firmly into the remote control with the correct polarity (+ and -). • The battery supplied is intended to the socket [ANTENNA...
... when receiving radio station signals over a cable network. 6 Preparing the remote control • Insert the batteries into an AC wall outlet. Secure the aerial into position. • The aerial that comes with their corresponding connections (Speaker Out) at the rear of the device. • Insert the power plug firmly into the remote control with the correct polarity (+ and -). • The battery supplied is intended to the socket [ANTENNA...
Operation Manual
Page 7
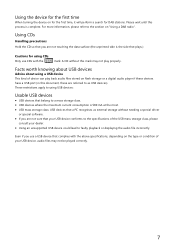
... time, it will perform a search for using CDs Only use a USB device that complies with the mark. A CD without needing a special driver or special software. • If you are not sure that a PC recognises as USB devices). Even if you use CDs with the above specifications, depending on the type or condition of device can play properly. Facts worth knowing about USB devices Advice about using USB devices: Usable USB devices • USB devices...
... time, it will perform a search for using CDs Only use a USB device that complies with the mark. A CD without needing a special driver or special software. • If you are not sure that a PC recognises as USB devices). Even if you use CDs with the above specifications, depending on the type or condition of device can play properly. Facts worth knowing about USB devices Advice about using USB devices: Usable USB devices • USB devices...

Operation Manual
Page 8
... - Mute SOUR C MEMORY Auto REPEA 1 MENU FOLD- Previous 13 - Volume 15 - Speaker connection Remote Control 1 - Select folders forwards 12 - Source selector 9 - Select folders backwards 11 - Open / Close 15 - Bass control 3 - Headphone connection 5 - Next 12 - Line-In connection 4 - Open/close 14 - Search forwards / jump forward 10 tracks 10 - Volume decrease 13 - Bluetooth 4 - FOLD+ SHUFFLE KENWOOD 8 Stop 11 - USB connection 7 - Standby / on 8 - FM / DAB+ Aerial connection 17 - Volume Increase 21 - Auto-Tune / Stop 17 - DAB...
... - Mute SOUR C MEMORY Auto REPEA 1 MENU FOLD- Previous 13 - Volume 15 - Speaker connection Remote Control 1 - Select folders forwards 12 - Source selector 9 - Select folders backwards 11 - Open / Close 15 - Bass control 3 - Headphone connection 5 - Next 12 - Line-In connection 4 - Open/close 14 - Search forwards / jump forward 10 tracks 10 - Volume decrease 13 - Bluetooth 4 - FOLD+ SHUFFLE KENWOOD 8 Stop 11 - USB connection 7 - Standby / on 8 - FM / DAB+ Aerial connection 17 - Volume Increase 21 - Auto-Tune / Stop 17 - DAB...

Operation Manual
Page 9
..." will flash on the rear of the device. Press the button on top of the device. Insert a CD with the printed side facing upwards in standby mode. 2. Press the button to put the device in the CD compartment 3. On the main device: Press the volume control to increase the volume and VOL- Connect the USB device to the USB port on the display. Disconnecting USB devices 1. To turn off in the display. Equaliser On the remote control...
..." will flash on the rear of the device. Press the button on top of the device. Insert a CD with the printed side facing upwards in standby mode. 2. Press the button to put the device in the CD compartment 3. On the main device: Press the volume control to increase the volume and VOL- Connect the USB device to the USB port on the display. Disconnecting USB devices 1. To turn off in the display. Equaliser On the remote control...

Operation Manual
Page 10
... program tracks on an audio CD or files to activate ⏩ or ⏪. Playing back a CD or audio file (USB, CD) On the remote control: Use the Source button to choose the source and press the Enter button to begin playback. The display will find the following number of storage locations: Audio-CD: 20 storage locations Files: 99 storage locations 10 Searching for audio CDs, information about the number of tracks and total playing time...
... program tracks on an audio CD or files to activate ⏩ or ⏪. Playing back a CD or audio file (USB, CD) On the remote control: Use the Source button to choose the source and press the Enter button to begin playback. The display will find the following number of storage locations: Audio-CD: 20 storage locations Files: 99 storage locations 10 Searching for audio CDs, information about the number of tracks and total playing time...

Operation Manual
Page 11
...; button during programming aborts the process. This displays the next storage location. The "CD" source must be in stop mode. 2. Choose a folder with the Fold+ or Fold- Use the ⏩ or ⏪ button to choose the title you want to save to , where stands for the current folder and for audio files 1. The "USB" source must be in stop mode. 2. The first number set...
...; button during programming aborts the process. This displays the next storage location. The "CD" source must be in stop mode. 2. Choose a folder with the Fold+ or Fold- Use the ⏩ or ⏪ button to choose the title you want to save to , where stands for the current folder and for audio files 1. The "USB" source must be in stop mode. 2. The first number set...
Operation Manual
Page 12
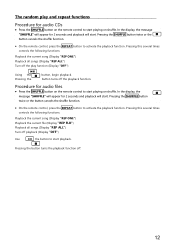
... audio CDs • Press the SHUFFLE button on shuffle. Pressing the SHUFFLE button twice or the button cancels the shuffle function. • On the remote control, press the REPEAT button to activate the playback function. Pressing the button turns off the play and repeat functions Procedure for 2 seconds and playback will start. Pressing this several times controls the following functions: Playback the current song (Display...
... audio CDs • Press the SHUFFLE button on shuffle. Pressing the SHUFFLE button twice or the button cancels the shuffle function. • On the remote control, press the REPEAT button to activate the playback function. Pressing the button turns off the play and repeat functions Procedure for 2 seconds and playback will start. Pressing this several times controls the following functions: Playback the current song (Display...

Operation Manual
Page 13
... display shows the channel currently set with its frequency. • Press the TUN+ or TUN- on the remote control to bring up the DAB menu. • Press the button TUN+ until "MANUAL" appears in the station list. • When you find another place for the device for a better reception. buttons to confirm this choice. The display will appear for easy retrieval. Using the DAB+ Radio...
... display shows the channel currently set with its frequency. • Press the TUN+ or TUN- on the remote control to bring up the DAB menu. • Press the button TUN+ until "MANUAL" appears in the station list. • When you find another place for the device for a better reception. buttons to confirm this choice. The display will appear for easy retrieval. Using the DAB+ Radio...

Operation Manual
Page 14
... DAB+ The MENU button opens a menu where you can set various functions for customer service technicians! 14 Make the selection using the TUN+ or TUN- You can find this function, you can also be used to right. This may vary from left to adjust the aerial. • XX K BPS: Displays the station's data rate e.g. 80 kbps. keys to confirm. • SYSTEM: Only for...
... DAB+ The MENU button opens a menu where you can set various functions for customer service technicians! 14 Make the selection using the TUN+ or TUN- You can find this function, you can also be used to right. This may vary from left to adjust the aerial. • XX K BPS: Displays the station's data rate e.g. 80 kbps. keys to confirm. • SYSTEM: Only for...

Operation Manual
Page 15
Using the FM Radio Press the DAB button on the remote control or the Source button on the main unit until the display flashes and a memory location appears. Setting an FM station • Press TUN+ on the main device to confirm your selection by pressing the Enter button. • SYSTEM: Only for "mono" or "stereo" reception. "EMPTY" shows an empty memory slot while an occupied slot...
Using the FM Radio Press the DAB button on the remote control or the Source button on the main unit until the display flashes and a memory location appears. Setting an FM station • Press TUN+ on the main device to confirm your selection by pressing the Enter button. • SYSTEM: Only for "mono" or "stereo" reception. "EMPTY" shows an empty memory slot while an occupied slot...
Operation Manual
Page 16
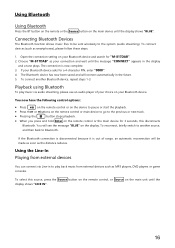
... play back music from external devices You can connect via audio streaming, please use an audio player of range, an automatic reconnection will be sent wirelessly to Bluetooth. Using the Line-In Playing from external devices such as smartphones), please follow these steps: 1. Open the connection setting on your Bluetooth device asks for 3 seconds, this source, press the Source button on the remote control, or Source on the main unit until the display...
... play back music from external devices You can connect via audio streaming, please use an audio player of range, an automatic reconnection will be sent wirelessly to Bluetooth. Using the Line-In Playing from external devices such as smartphones), please follow these steps: 1. Open the connection setting on your Bluetooth device asks for 3 seconds, this source, press the Source button on the remote control, or Source on the main unit until the display...

Operation Manual
Page 17
... the signal. - Do not use compatible CDs. Remote control will need to clean it in . - If condensation builds up inside the device, proper functioning can use cleaners that the USB device has compatible data. Use an outdoor aerial if possible. - CD player is properly plugged in again. Check the speaker connections and their locations. Ensure the plug is showing "NO DISC" - Change the batteries. - Troubleshooting For troubleshooting, please check the following conditions...
... the signal. - Do not use compatible CDs. Remote control will need to clean it in . - If condensation builds up inside the device, proper functioning can use cleaners that the USB device has compatible data. Use an outdoor aerial if possible. - CD player is properly plugged in again. Check the speaker connections and their locations. Ensure the plug is showing "NO DISC" - Change the batteries. - Troubleshooting For troubleshooting, please check the following conditions...

Operation Manual
Page 18
...as a symbol on recycling this product should not be treated as normal household waste but must be obtained from your local authority or your fellow human beings. Warning: For batteries, the "Pb" symbol indicates that this product can cause risks to the environment ... can be taken to properly disposing of this product means you are protecting the environment and the health of used electronic items and batteries. Disposal Disposal of your community waste disposal service. Your contribution to a collection point for recycling electrical and electronic devices and batteries.
...as a symbol on recycling this product should not be treated as normal household waste but must be obtained from your local authority or your fellow human beings. Warning: For batteries, the "Pb" symbol indicates that this product can cause risks to the environment ... can be taken to properly disposing of this product means you are protecting the environment and the health of used electronic items and batteries. Disposal Disposal of your community waste disposal service. Your contribution to a collection point for recycling electrical and electronic devices and batteries.
Operation Manual
Page 19
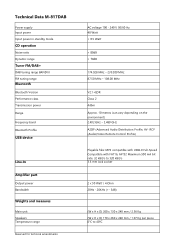
Technical Data M-817DAB Power supply Input power Input power in standby mode CD operation Noise ratio Dynamic range Tuner FM/DAB+ DAB tuning range BAND III FM tuning range Bluetooth Bluetooth Version Performance class Transmission power Range Frequency band Bluetooth Profile USB device Line-In Amplifier part Output power Bandwidth Weights and measures Main unit Speakers Temperature range Reserved for technical amendments AC voltage 100 - 240 V 50/60 Hz 40 Watt < 0.5 Watt > 80dB > 70dB 174.928...
Technical Data M-817DAB Power supply Input power Input power in standby mode CD operation Noise ratio Dynamic range Tuner FM/DAB+ DAB tuning range BAND III FM tuning range Bluetooth Bluetooth Version Performance class Transmission power Range Frequency band Bluetooth Profile USB device Line-In Amplifier part Output power Bandwidth Weights and measures Main unit Speakers Temperature range Reserved for technical amendments AC voltage 100 - 240 V 50/60 Hz 40 Watt < 0.5 Watt > 80dB > 70dB 174.928...


