

User Manual
Page 3
... been set . Press [ ] again to switch the transceiver power OFF. o Transceiver Password If the transceiver is password protected, "Input Password" will appear on the display when the power is turned on . Turn the Power switch/ Volume control counterclockwise to switch the transceiver OFF. BASIC OPERATIONS SWITCHING POWER ON/ OFF Portable Turn the Power switch/ Volume control clockwise to enter Transceiver Password Mode. To unlock the transceiver, enter the correct password. 1 Press the button programmed as [Menu] to enter Transceiver Password Mode using the Menu Mode...
... been set . Press [ ] again to switch the transceiver power OFF. o Transceiver Password If the transceiver is password protected, "Input Password" will appear on the display when the power is turned on . Turn the Power switch/ Volume control counterclockwise to switch the transceiver OFF. BASIC OPERATIONS SWITCHING POWER ON/ OFF Portable Turn the Power switch/ Volume control clockwise to enter Transceiver Password Mode. To unlock the transceiver, enter the correct password. 1 Press the button programmed as [Menu] to enter Transceiver Password Mode using the Menu Mode...

User Manual
Page 21
... Menu and/or programmable to reset the Activity Detection countdown timer. o 2-tone Allows you to select a preferred preset profile that have been programmed onto your transceiver. o Audio Profile Allows you to quickly call the 2-tone list that have been programmed onto your dealer. ● Texts in the < > brackets are the displays for the button guides. ● Some functions may not be connected...
... Menu and/or programmable to reset the Activity Detection countdown timer. o 2-tone Allows you to select a preferred preset profile that have been programmed onto your transceiver. o Audio Profile Allows you to quickly call the 2-tone list that have been programmed onto your dealer. ● Texts in the < > brackets are the displays for the button guides. ● Some functions may not be connected...
User Manual
Page 24
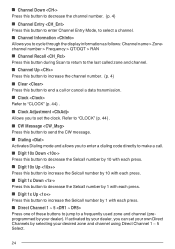
... set your own Direct Channels by selecting your dealer). o Clock Adjustment Allows you to cycle through the display information as follows: Channel name > Zonechannel number > Frequency > QT/DQT > RAN o Channel Recall Press this button during Scan to return to send the CW message. o Dialing Activates Dialing mode and allows you can set the clock. o Digit 1x Up Press this button to make a call or cancel a data transmission. o Channel...
... set your own Direct Channels by selecting your dealer). o Clock Adjustment Allows you to cycle through the display information as follows: Channel name > Zonechannel number > Frequency > QT/DQT > RAN o Channel Recall Press this button during Scan to return to send the CW message. o Dialing Activates Dialing mode and allows you can set the clock. o Digit 1x Up Press this button to make a call or cancel a data transmission. o Channel...

User Manual
Page 25
...Activates Front Panel Programming mode. o GPS/ Bluetooth Reset Activates GPS/ Bluetooth Reset mode. o Direct Channel 1 ~ 5 Select Allows you to "DISPLAY TYPE (Portable transceivers only)" {p. 46} . o Emergency Refer to an optional external speaker. o External Speaker Switches the speaker from the transceiver's built-in speaker to "EMERGENCY CALLS" {p. 39} . o Group Activates Group Call Mode. o External Mic Sense Activates External Mic Sense mode. o Fixed Volume Allows you to add new Conventional channels using your location data. o Function Press this button, then press...
...Activates Front Panel Programming mode. o GPS/ Bluetooth Reset Activates GPS/ Bluetooth Reset mode. o Direct Channel 1 ~ 5 Select Allows you to "DISPLAY TYPE (Portable transceivers only)" {p. 46} . o Emergency Refer to an optional external speaker. o External Speaker Switches the speaker from the transceiver's built-in speaker to "EMERGENCY CALLS" {p. 39} . o Group Activates Group Call Mode. o External Mic Sense Activates External Mic Sense mode. o Fixed Volume Allows you to add new Conventional channels using your location data. o Function Press this button, then press...

User Manual
Page 26
... received. In other operating systems, this button to jump to set your own Home Channel by your desired zone and channel using a channel programmed with low or medium power, this button to enter a Group ID. o Home Channel Press this button functions the same as Channel Entry. o Home Channel Select Allows you to your home zone and channel (pre-programmed by selecting your dealer). o Language Allows you to change...
... received. In other operating systems, this button to jump to set your own Home Channel by your desired zone and channel using a channel programmed with low or medium power, this button to enter a Group ID. o Home Channel Press this button functions the same as Channel Entry. o Home Channel Select Allows you to your home zone and channel (pre-programmed by selecting your dealer). o Language Allows you to change...

User Manual
Page 29
... Auto Gain Control Allows you to set the transceiver to a specific level for low frequencies. o Save Log Data Allows you to save the operation and communication logs of the receiving sound to automatically adjust the volume of this allows you to the base station when a GPS unit has been installed. o Scan Program Allows you to reprogram the Scan List and Priority channels using your positioning data to send your call. Refer to change...
... Auto Gain Control Allows you to set the transceiver to a specific level for low frequencies. o Save Log Data Allows you to save the operation and communication logs of the receiving sound to automatically adjust the volume of this allows you to the base station when a GPS unit has been installed. o Scan Program Allows you to reprogram the Scan List and Priority channels using your positioning data to send your call. Refer to change...
User Manual
Page 31
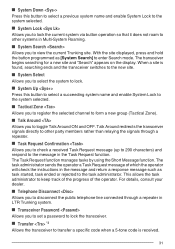
... a specific code when a 5-tone code is found, searching ends and the transceiver switches to the task administrator. The transceiver begins searching for a new site and "Search" appears on the display. o Transceiver Password Allows you to enter Search mode. With the site displayed, press and hold the button programmed as task started, task ended or rejected to the new site. The Task Request function manages tasks by using the...
... a specific code when a 5-tone code is found, searching ends and the transceiver switches to the task administrator. The transceiver begins searching for a new site and "Search" appears on the display. o Transceiver Password Allows you to enter Search mode. With the site displayed, press and hold the button programmed as task started, task ended or rejected to the new site. The Task Request function manages tasks by using the...

User Manual
Page 40
... [ ] button to set the new Encryption key. SELECTING THE ENCRYPTION KEY 1 Press the button programmed as [Menu] to enter Scrambler/ Encryption Mode using the Menu Mode. 2 Press the [J] and [K] buttons to increase or decrease the Scrambler code. ● Up to 16 Scrambler codes can be used. Note: ● In NXDN systems, a key error will be displayed when a Key ID which is 0x40 and above is turned ON. ● Pressing the PTT switch...
... [ ] button to set the new Encryption key. SELECTING THE ENCRYPTION KEY 1 Press the button programmed as [Menu] to enter Scrambler/ Encryption Mode using the Menu Mode. 2 Press the [J] and [K] buttons to increase or decrease the Scrambler code. ● Up to 16 Scrambler codes can be used. Note: ● In NXDN systems, a key error will be displayed when a Key ID which is 0x40 and above is turned ON. ● Pressing the PTT switch...

User Manual
Page 42
... Mode using the Menu Mode. ● The indicator appears on the display. 3 Press the [J] and [K] buttons to select your desired tone or code from 1 to 40. 4 Press the [ ] button to save your new setting. If a call containing a matching tone or code is received. Likewise, signals that you transmit will only open when a call containing a matching RAN is a digital signaling for digital radio communications. This allows you to turn...
... Mode using the Menu Mode. ● The indicator appears on the display. 3 Press the [J] and [K] buttons to select your desired tone or code from 1 to 40. 4 Press the [ ] button to save your new setting. If a call containing a matching tone or code is received. Likewise, signals that you transmit will only open when a call containing a matching RAN is a digital signaling for digital radio communications. This allows you to turn...
User Manual
Page 50
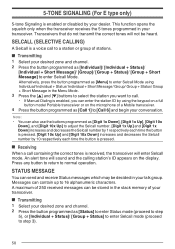
... sound and the calling station's ID appears on the microphone of your desired zone and channel. 2 Press the button programmed as [Status] to enter Status mode (proceed to step 5), or [Individual + Status]/ [Group + Status] to enter Selcall mode (proceed to enter Selcall Mode. A maximum of 250 received messages can enter the station ID by 10 respectively each time the button is pressed. 5-TONE SIGNALING...
... sound and the calling station's ID appears on the microphone of your desired zone and channel. 2 Press the button programmed as [Status] to enter Status mode (proceed to step 5), or [Individual + Status]/ [Group + Status] to enter Selcall mode (proceed to enter Selcall Mode. A maximum of 250 received messages can enter the station ID by 10 respectively each time the button is pressed. 5-TONE SIGNALING...

User Manual
Page 56
... used with this transceiver to connect to a Bluetooth-enabled PC without using a programming cable to communicate with the Field Programming Unit (FPU) or to use a Bluetooth device that is enabled by Bluetooth SIG can use the PC Interface Protocol. Profile Headset Profile (HSP) Serial Port Profile (SPP) Description Headset Profile provides support for more details on each profile. *: Supported on Portable transceivers (full button model and standard button model) only Device class : Phone...
... used with this transceiver to connect to a Bluetooth-enabled PC without using a programming cable to communicate with the Field Programming Unit (FPU) or to use a Bluetooth device that is enabled by Bluetooth SIG can use the PC Interface Protocol. Profile Headset Profile (HSP) Serial Port Profile (SPP) Description Headset Profile provides support for more details on each profile. *: Supported on Portable transceivers (full button model and standard button model) only Device class : Phone...

User Manual
Page 59
... [Bluetooth Connect/ Disconnect]. ● The LED indicator blinks in blue. ● For Bluetooth devices that does not support Simple Secure Pairing, you need to operate the Bluetooth headset to select "Find Device". o Pairing Bluetooth devices 1 Press the [J] and [K] buttons to select the device to connect to search for available Bluetooth devices. The transceiver starts to . Up to enter a Personal Identification Number (PIN) code. Alternatively, you can be found and listed on the display...
... [Bluetooth Connect/ Disconnect]. ● The LED indicator blinks in blue. ● For Bluetooth devices that does not support Simple Secure Pairing, you need to operate the Bluetooth headset to select "Find Device". o Pairing Bluetooth devices 1 Press the [J] and [K] buttons to select the device to connect to search for available Bluetooth devices. The transceiver starts to . Up to enter a Personal Identification Number (PIN) code. Alternatively, you can be found and listed on the display...
User Manual
Page 60
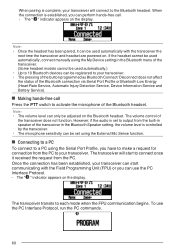
... Programming Unit (FPU) or you have to make a request for connection from the PC to activate the microphone of the Bluetooth headset. The volume control of the Bluetooth connection via Serial Port Profile or Bluetooth Low Energy (Heart Rate Service, Automatic Injury Detection Service, Device Information Service and Battery Service). The microphone sensitivity can perform hands-free call Press the PTT switch to your transceiver. However, if the audio is set using the My Device setting...
... Programming Unit (FPU) or you have to make a request for connection from the PC to activate the microphone of the Bluetooth headset. The volume control of the Bluetooth connection via Serial Port Profile or Bluetooth Low Energy (Heart Rate Service, Automatic Injury Detection Service, Device Information Service and Battery Service). The microphone sensitivity can perform hands-free call Press the PTT switch to your transceiver. However, if the audio is set using the My Device setting...
User Manual
Page 64
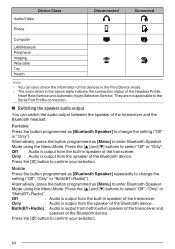
... and the Bluetooth headset. Portable Press the button programmed as [Bluetooth Speaker] repeatedly to confirm your selection. 64 Device Class Audio/Video Disconnected Connected Phone Computer LAN/Network Peripheral Imaging Wearable Toy Health Note: ● You can switch the audio output between the speaker of the Bluetooth device. Mobile Press the button programmed as [Bluetooth Speaker] to the Serial Port Profile connection. They are not applicable to change the setting ("Off", "Only" or "Both(BT+Radio)").
... and the Bluetooth headset. Portable Press the button programmed as [Bluetooth Speaker] repeatedly to confirm your selection. 64 Device Class Audio/Video Disconnected Connected Phone Computer LAN/Network Peripheral Imaging Wearable Toy Health Note: ● You can switch the audio output between the speaker of the Bluetooth device. Mobile Press the button programmed as [Bluetooth Speaker] to the Serial Port Profile connection. They are not applicable to change the setting ("Off", "Only" or "Both(BT+Radio)").

User Manual
Page 69
... AUX A of a Mobile transceiver is activated. (*4) AUX B is activated. (*4) AUX C is received and unread. Blinks during Auto Telephone search. Blinks when a new Task Request is activated. The OVCM function is activated. Blinks during Auto Recording. *1 Mobile: All models supported. (For K type) Not supported. (For E/C type) Portable: All models supported. *2 Mobile: Supported models: NX-3720G, NX-3720HG, NX-3820G, NX-3820HG only. The Tactical Zone is activated. (*4) The Horn Alert function...
... AUX A of a Mobile transceiver is activated. (*4) AUX B is activated. (*4) AUX C is received and unread. Blinks during Auto Telephone search. Blinks when a new Task Request is activated. The OVCM function is activated. Blinks during Auto Recording. *1 Mobile: All models supported. (For K type) Not supported. (For E/C type) Portable: All models supported. *2 Mobile: Supported models: NX-3720G, NX-3720HG, NX-3820G, NX-3820HG only. The Tactical Zone is activated. (*4) The Horn Alert function...

User Manual 2
Page 1
... is using high transmit power. Blinks when receiving an encrypted carrier. The Talk Around function is activated. Blinks when an incoming call matches your Optional Signaling. Blinks during Auto Recording. The Operator Selectable Tone function is activated. Programmed Function Name a b c d e f g h i j © 2017 (Enter the programmed function names for each key.) Comment B5A-2079-00 The channel is added to Bluetooth device. (NX3720HG/ NX-3820HG Only) The GPS...
... is using high transmit power. Blinks when receiving an encrypted carrier. The Talk Around function is activated. Blinks when an incoming call matches your Optional Signaling. Blinks during Auto Recording. The Operator Selectable Tone function is activated. Programmed Function Name a b c d e f g h i j © 2017 (Enter the programmed function names for each key.) Comment B5A-2079-00 The channel is added to Bluetooth device. (NX3720HG/ NX-3820HG Only) The GPS...

User Manual 2
Page 4
... CHECKING EQUIPMENT 6 SUPPLIED ACCESSORIES ...6 PREPARATION ...7 ORIENTATION ...9 OPERATION PANEL ...9 DISPLAY ...10 BASIC OPERATIONS ...13 SWITCHING POWER ON/ OFF 13 ADJUSTING THE VOLUME ...13 SELECTING A ZONE AND CHANNEL 13 TRANSMITTING ...13 RECEIVING ...13 INFORMATION ON SOFTWARE LICENSE 14 MANDATORY SAFETY INSTRUCTIONS TO INSTALLERS AND USERS (For VHF DIGITAL TRANSCEIVER 16 MANDATORY SAFETY INSTRUCTIONS TO INSTALLERS AND USERS (For UHF DIGITAL TRANSCEIVER 16 2 THANK YOU We are grateful you have chosen KENWOOD for your Digital Transceiver applications.
... CHECKING EQUIPMENT 6 SUPPLIED ACCESSORIES ...6 PREPARATION ...7 ORIENTATION ...9 OPERATION PANEL ...9 DISPLAY ...10 BASIC OPERATIONS ...13 SWITCHING POWER ON/ OFF 13 ADJUSTING THE VOLUME ...13 SELECTING A ZONE AND CHANNEL 13 TRANSMITTING ...13 RECEIVING ...13 INFORMATION ON SOFTWARE LICENSE 14 MANDATORY SAFETY INSTRUCTIONS TO INSTALLERS AND USERS (For VHF DIGITAL TRANSCEIVER 16 MANDATORY SAFETY INSTRUCTIONS TO INSTALLERS AND USERS (For UHF DIGITAL TRANSCEIVER 16 2 THANK YOU We are grateful you have chosen KENWOOD for your Digital Transceiver applications.

User Manual 2
Page 6
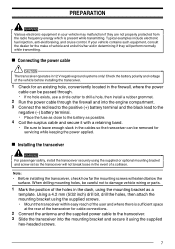
... coding Technology is explicitly prohibited from the transceiver, switch the transceiver power off before installing the transceiver. ● Use only the supplied DC power cable or a KENWOOD optional DC power cable. ● Do not cut and/or remove the fuse holder on the DC power cable. ● Do not place the microphone cable around your dealer. 4 The user of the vehicle before installing optional accessories. ● To dispose of batteries...
... coding Technology is explicitly prohibited from the transceiver, switch the transceiver power off before installing the transceiver. ● Use only the supplied DC power cable or a KENWOOD optional DC power cable. ● Do not cut and/or remove the fuse holder on the DC power cable. ● Do not place the microphone cable around your dealer. 4 The user of the vehicle before installing optional accessories. ● To dispose of batteries...
User Manual 2
Page 9
... control. Note: ● Before installing the transceiver, check how far the mounting screws will not break loose in the event of a collision. PREPARATION VariousWeAlRecNtIrNoGnic equipment in your vehicle contains such equipment, consult the dealer for cable connections. 2 Connect the antenna and the supplied power cable to the transceiver. 3 Slide the transceiver into the engine compartment. 3 Connect the red lead to the positive (+) battery...
... control. Note: ● Before installing the transceiver, check how far the mounting screws will not break loose in the event of a collision. PREPARATION VariousWeAlRecNtIrNoGnic equipment in your vehicle contains such equipment, consult the dealer for cable connections. 2 Connect the antenna and the supplied power cable to the transceiver. 3 Slide the transceiver into the engine compartment. 3 Connect the red lead to the positive (+) battery...
User Manual 2
Page 18
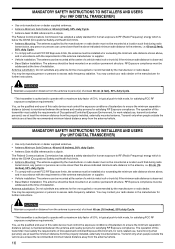
...), 50% duty Cycle. MANDATORY SAFETY INSTRUCTIONS TO INSTALLERS AND USERS (For UHF DIGITAL TRANSCEIVER) ● Use only manufacturer or dealer supplied antennas. ● Antenna Minimum Safe Distance: 40 cm (16 inches), 50% duty Cycle. ● Antenna Gain: 0 dBd referenced to a dipole. WARNING Maintain a separation distance from the antenna/vehicle. 16 The operation of this radio device must control the exposure conditions of the...
...), 50% duty Cycle. MANDATORY SAFETY INSTRUCTIONS TO INSTALLERS AND USERS (For UHF DIGITAL TRANSCEIVER) ● Use only manufacturer or dealer supplied antennas. ● Antenna Minimum Safe Distance: 40 cm (16 inches), 50% duty Cycle. ● Antenna Gain: 0 dBd referenced to a dipole. WARNING Maintain a separation distance from the antenna/vehicle. 16 The operation of this radio device must control the exposure conditions of the...


