

User Manual
Page 2
ENGLISH VHF FM TRANSCEIVER/ UHF FM TRANSCEIVER TK-2202/ TK-3202 INSTRUCTION MANUAL
ENGLISH VHF FM TRANSCEIVER/ UHF FM TRANSCEIVER TK-2202/ TK-3202 INSTRUCTION MANUAL
User Manual
Page 3
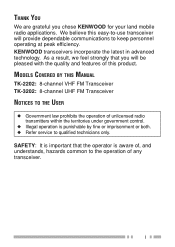
... or both. ◆ Refer service to keep personnel operating at peak efficiency. i MODELS COVERED BY THIS MANUAL TK-2202: 8-channel VHF FM Transceiver TK-3202: 8-channel UHF FM Transceiver NOTICES TO THE USER ◆ Government law prohibits the operation of unlicensed radio transmitters within the territories under government control. ◆ Illegal operation is important that you chose KENWOOD for your land mobile radio applications. KENWOOD transceivers incorporate the latest...
... or both. ◆ Refer service to keep personnel operating at peak efficiency. i MODELS COVERED BY THIS MANUAL TK-2202: 8-channel VHF FM Transceiver TK-3202: 8-channel UHF FM Transceiver NOTICES TO THE USER ◆ Government law prohibits the operation of unlicensed radio transmitters within the territories under government control. ◆ Illegal operation is important that you chose KENWOOD for your land mobile radio applications. KENWOOD transceivers incorporate the latest...
User Manual
Page 4
... microphone cable around your neck while near machinery that may catch the cable. • Do not place the transceiver on unstable surfaces. • Ensure that there are wet. • Ensure that the end of the antenna does not touch your eyes. • When the transceiver is connected to the volume level when turning the squelch off before installing optional accessories...
... microphone cable around your neck while near machinery that may catch the cable. • Do not place the transceiver on unstable surfaces. • Ensure that there are wet. • Ensure that the end of the antenna does not touch your eyes. • When the transceiver is connected to the volume level when turning the squelch off before installing optional accessories...
User Manual
Page 5
... a high-frequency burn. • If an abnormal odor or smoke is running. Transmitting at gasoline service stations. • Near explosives or blasting sites. • In aircrafts. • In medical institutions or near airbag equipment while the vehicle is detected coming from the transceiver, switch the transceiver power off immediately, remove the battery pack from the antenna covering...
... a high-frequency burn. • If an abnormal odor or smoke is running. Transmitting at gasoline service stations. • Near explosives or blasting sites. • In aircrafts. • In medical institutions or near airbag equipment while the vehicle is detected coming from the transceiver, switch the transceiver power off immediately, remove the battery pack from the antenna covering...
User Manual
Page 6
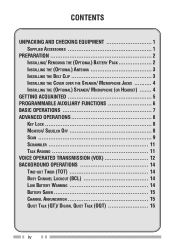
...1 SUPPLIED ACCESSORIES 1 PREPARATION 2 INSTALLING/ REMOVING THE (OPTIONAL) BATTERY PACK 2 INSTALLING THE (OPTIONAL) ANTENNA 3 INSTALLING THE BELT CLIP 3 INSTALLING THE COVER OVER THE SPEAKER/ MICROPHONE JACKS .......... 4 INSTALLING THE (OPTIONAL) SPEAKER/ MICROPHONE (OR HEADSET) ....... 4 GETTING ACQUAINTED 5 PROGRAMMABLE AUXILIARY FUNCTIONS 6 BASIC OPERATIONS 7 ADVANCED OPERATIONS 8 KEY LOCK 8 MONITOR/ SQUELCH OFF 8 SCAN 9 SCRAMBLER 11 TALK AROUND 11 VOICE OPERATED TRANSMISSION (VOX 12 BACKGROUND OPERATIONS 14 TIME-OUT TIMER (TOT 14 BUSY CHANNEL LOCKOUT (BCL 14 LOW BATTERY...
...1 SUPPLIED ACCESSORIES 1 PREPARATION 2 INSTALLING/ REMOVING THE (OPTIONAL) BATTERY PACK 2 INSTALLING THE (OPTIONAL) ANTENNA 3 INSTALLING THE BELT CLIP 3 INSTALLING THE COVER OVER THE SPEAKER/ MICROPHONE JACKS .......... 4 INSTALLING THE (OPTIONAL) SPEAKER/ MICROPHONE (OR HEADSET) ....... 4 GETTING ACQUAINTED 5 PROGRAMMABLE AUXILIARY FUNCTIONS 6 BASIC OPERATIONS 7 ADVANCED OPERATIONS 8 KEY LOCK 8 MONITOR/ SQUELCH OFF 8 SCAN 9 SCRAMBLER 11 TALK AROUND 11 VOICE OPERATED TRANSMISSION (VOX 12 BACKGROUND OPERATIONS 14 TIME-OUT TIMER (TOT 14 BUSY CHANNEL LOCKOUT (BCL 14 LOW BATTERY...
User Manual
Page 7
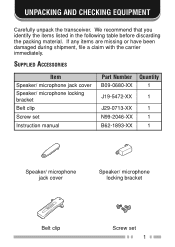
SUPPLIED ACCESSORIES Item Speaker/ microphone jack cover Speaker/ microphone locking bracket Belt clip Screw set Instruction manual Part Number Quantity B09-0680-XX 1 J19-5472-XX 1 J29-0713-XX 1 N99-2046-XX 1 B62-1893-XX 1 Speaker/ microphone jack cover Speaker/ microphone locking bracket Belt clip Screw set 1 UNPACKING AND CHECKING EQUIPMENT Carefully unpack the transceiver. We recommend that you identify the items listed in the following table before discarding the packing material...
SUPPLIED ACCESSORIES Item Speaker/ microphone jack cover Speaker/ microphone locking bracket Belt clip Screw set Instruction manual Part Number Quantity B09-0680-XX 1 J19-5472-XX 1 J29-0713-XX 1 N99-2046-XX 1 B62-1893-XX 1 Speaker/ microphone jack cover Speaker/ microphone locking bracket Belt clip Screw set 1 UNPACKING AND CHECKING EQUIPMENT Carefully unpack the transceiver. We recommend that you identify the items listed in the following table before discarding the packing material...
User Manual
Page 8
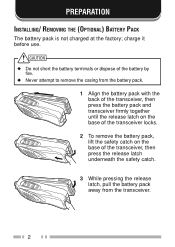
... of the transceiver locks. 2 To remove the battery pack, lift the safety catch on the base of the transceiver, then press the release latch underneath the safety catch. 3 While pressing the release latch, pull the battery pack away from the transceiver. 2 PREPARATION INSTALLING/ REMOVING THE (OPTIONAL) BATTERY PACK The battery pack is not charged at the factory;
... of the transceiver locks. 2 To remove the battery pack, lift the safety catch on the base of the transceiver, then press the release latch underneath the safety catch. 3 While pressing the release latch, pull the battery pack away from the transceiver. 2 PREPARATION INSTALLING/ REMOVING THE (OPTIONAL) BATTERY PACK The battery pack is not charged at the factory;

User Manual
Page 9
.... Note: The antenna is not installed, its base and turning it may cause damage to prevent screw loosening when installing the belt clip, as it clockwise until secure. Note: If the belt clip is neither a handle, a key ring retainer, nor a speaker/ microphone attachment point. INSTALLING THE BELT CLIP If necessary, attach the belt clip using the two supplied 3 x 8 mm screws...
.... Note: The antenna is not installed, its base and turning it may cause damage to prevent screw loosening when installing the belt clip, as it clockwise until secure. Note: If the belt clip is neither a handle, a key ring retainer, nor a speaker/ microphone attachment point. INSTALLING THE BELT CLIP If necessary, attach the belt clip using the two supplied 3 x 8 mm screws...
User Manual
Page 10
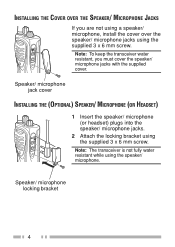
... THE SPEAKER/ MICROPHONE JACKS If you must cover the speaker/ microphone jacks with the supplied cover. Note: The transceiver is not fully water resistant while using the supplied 3 x 6 mm screw. Speaker/ microphone jack cover INSTALLING THE (OPTIONAL) SPEAKER/ MICROPHONE (OR HEADSET) 1 Insert the speaker/ microphone (or headset) plugs into the speaker/ microphone jacks. 2 Attach the locking bracket using the speaker/ microphone. Note: To keep the transceiver water resistant, you are not using a speaker/ microphone, install the cover over the speaker/ microphone jacks using the supplied...
... THE SPEAKER/ MICROPHONE JACKS If you must cover the speaker/ microphone jacks with the supplied cover. Note: The transceiver is not fully water resistant while using the supplied 3 x 6 mm screw. Speaker/ microphone jack cover INSTALLING THE (OPTIONAL) SPEAKER/ MICROPHONE (OR HEADSET) 1 Insert the speaker/ microphone (or headset) plugs into the speaker/ microphone jacks. 2 Attach the locking bracket using the speaker/ microphone. Note: To keep the transceiver water resistant, you are not using a speaker/ microphone, install the cover over the speaker/ microphone jacks using the supplied...

User Manual
Page 11
... 6). Speaker Microphone Channel selector Rotate to call a station. To switch OFF the transceiver, turn counterclockwise until a click sounds. PTT (Push-ToTalk) switch Press, then speak into the microphone to select channels 1 ~ 8. Side 2 key Press to adjust the volume level. Speaker/ microphone jacks Battery pack (KNB-29N) 5 Flashes red when the battery voltage is low while transmitting. Rotate to activate its programmable function (page 6). Lights green while receiving a signal. GETTING ACQUAINTED Antenna LED indicator Lights red while...
... 6). Speaker Microphone Channel selector Rotate to call a station. To switch OFF the transceiver, turn counterclockwise until a click sounds. PTT (Push-ToTalk) switch Press, then speak into the microphone to select channels 1 ~ 8. Side 2 key Press to adjust the volume level. Speaker/ microphone jacks Battery pack (KNB-29N) 5 Flashes red when the battery voltage is low while transmitting. Rotate to activate its programmable function (page 6). Lights green while receiving a signal. GETTING ACQUAINTED Antenna LED indicator Lights red while...
User Manual
Page 12
PROGRAMMABLE AUXILIARY FUNCTIONS Your dealer can program each of the Side 1 and Side 2 keys with Backup) • Monitor • Monitor Momentary • None (No function) (default setting for Side 1 key) • Scan • Scan + Temporary Delete • Scrambler • Squelch Off • Squelch Off Momentary (default setting for Side 2 key) • Talk Around • Temporary Delete 6 Refer to their descriptions, starting on page 8. • Key Lock • Key Lock (with one of the following auxiliary functions.
PROGRAMMABLE AUXILIARY FUNCTIONS Your dealer can program each of the Side 1 and Side 2 keys with Backup) • Monitor • Monitor Momentary • None (No function) (default setting for Side 1 key) • Scan • Scan + Temporary Delete • Scrambler • Squelch Off • Squelch Off Momentary (default setting for Side 2 key) • Talk Around • Temporary Delete 6 Refer to their descriptions, starting on page 8. • Key Lock • Key Lock (with one of the following auxiliary functions.

User Manual
Page 13
... OPERATIONS 1 1 1 1 Turn the Power switch/ Volume control clockwise to switch the transceiver power ON. • A beep sounds if enabled by your dealer. 2 Press the key programmed with the Monitor or Squelch Off function to hear background noise, then rotate the Power switch/ Volume control to adjust the volume. 3 Rotate the Channel selector to select your lips. 5 Release the PTT switch to receive. See "Low Battery Warning" on page 14. 7 Note: When the battery...
... OPERATIONS 1 1 1 1 Turn the Power switch/ Volume control clockwise to switch the transceiver power ON. • A beep sounds if enabled by your dealer. 2 Press the key programmed with the Monitor or Squelch Off function to hear background noise, then rotate the Power switch/ Volume control to adjust the volume. 3 Rotate the Channel selector to select your lips. 5 Release the PTT switch to receive. See "Low Battery Warning" on page 14. 7 Note: When the battery...

User Manual
Page 14
... keys/ functions can use the key programmed as Monitor or Squelch Off to listen to weak signals that you cannot hear during normal operation, to deactivate channel signalling, and to adjust the volume when no signals are programmable by your selected channel. • Squelch Off: Momentarily press to normal operation. 8 If the key is programmed "with backup", when the transceiver power is active: Key Lock, Monitor, Monitor Momentary, PTT, Squelch Off, Squelch...
... keys/ functions can use the key programmed as Monitor or Squelch Off to listen to weak signals that you cannot hear during normal operation, to deactivate channel signalling, and to adjust the volume when no signals are programmable by your selected channel. • Squelch Off: Momentarily press to normal operation. 8 If the key is programmed "with backup", when the transceiver power is active: Key Lock, Monitor, Monitor Momentary, PTT, Squelch Off, Squelch...
User Manual
Page 15
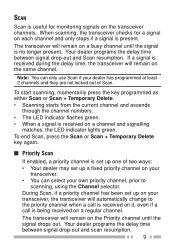
.... SCAN Scan is useful for a signal on the Priority channel until the signal is no longer present. If a signal is received during the delay time, the transceiver will remain on a regular channel. The transceiver will automatically change to scanning, using the Channel selector. To start scanning, momentarily press the key programmed as either Scan or Scan + Temporary Delete. • Scanning starts from the current channel and ascends through the channel numbers. • The LED indicator flashes...
.... SCAN Scan is useful for a signal on the Priority channel until the signal is no longer present. If a signal is received during the delay time, the transceiver will remain on a regular channel. The transceiver will automatically change to scanning, using the Channel selector. To start scanning, momentarily press the key programmed as either Scan or Scan + Temporary Delete. • Scanning starts from the current channel and ascends through the channel numbers. • The LED indicator flashes...

User Manual
Page 16
...: If your dealer has programmed a Priority channel, it is programmed with the Temporary Delete or Scan + Temporary Delete function, you can temporarily remove specific channels from the scanning sequence by pressing and holding the key programmed as the new revert channel. • Selected + Talkback: If the channel has been changed during Scan. Your dealer can program the revert channel using one has been set up. • You cannot...
...: If your dealer has programmed a Priority channel, it is programmed with the Temporary Delete or Scan + Temporary Delete function, you can temporarily remove specific channels from the scanning sequence by pressing and holding the key programmed as the new revert channel. • Selected + Talkback: If the channel has been changed during Scan. Your dealer can program the revert channel using one has been set up. • You cannot...
User Manual
Page 17
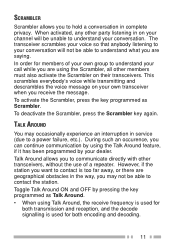
...the Scrambler, press the key programmed as Talk Around. • When using the Talk Around feature, if it has been programmed by using Talk Around, the receive frequency is used for both transmission and reception, and the decode signalling is too far away, or there are using the Scrambler, all other ... your channel will not be able to understand what you to communicate directly with other party listening in on your conversation will be able to hold a conversation in service (due to a power failure, etc.). Toggle Talk Around ON and OFF by pressing the key programmed as Scrambler...
...the Scrambler, press the key programmed as Talk Around. • When using the Talk Around feature, if it has been programmed by using Talk Around, the receive frequency is used for both transmission and reception, and the decode signalling is too far away, or there are using the Scrambler, all other ... your channel will not be able to understand what you to communicate directly with other party listening in on your conversation will be able to hold a conversation in service (due to a power failure, etc.). Toggle Talk Around ON and OFF by pressing the key programmed as Scrambler...

User Manual
Page 18
... sensitivity to recognize sound levels. To activate VOX and set a VOX Gain level. When operating VOX, you must first be activated by your voice when you to hold the Side 1 key while turning the transceiver power ON. 3 Continue to transmit hands-free. This feature must set the VOX Gain level, perform the following steps: 1 Connect the headset to the transceiver...
... sensitivity to recognize sound levels. To activate VOX and set a VOX Gain level. When operating VOX, you must first be activated by your voice when you to hold the Side 1 key while turning the transceiver power ON. 3 Continue to transmit hands-free. This feature must set the VOX Gain level, perform the following steps: 1 Connect the headset to the transceiver...

User Manual
Page 19
... switch to save the setting. • A beep will sound. • The transceiver announces the new VOX Gain level. 6 Turn the transceiver power OFF and the ON again to activate VOX. 1 Note: ◆ If a speaker/ microphone is connected to the transceiver while the VOX function is switched ON and the VOX Gain level is configured to a higher, more sensitive level, louder received signals...
... switch to save the setting. • A beep will sound. • The transceiver announces the new VOX Gain level. 6 Turn the transceiver power OFF and the ON again to activate VOX. 1 Note: ◆ If a speaker/ microphone is connected to the transceiver while the VOX function is switched ON and the VOX Gain level is configured to a higher, more sensitive level, louder received signals...

User Manual
Page 20
... be using the same channel that exceeds the programmed time set by your dealer for an explanation on how BCL functions when using a channel for an extended period of time. Replace or recharge the battery pack. 14 Pressing the PTT switch while the channel is in use will cause your dealer (default is to sound. LOW BATTERY WARNING Low Battery Warning alerts you when the battery needs to receive mode. Release...
... be using the same channel that exceeds the programmed time set by your dealer for an explanation on how BCL functions when using a channel for an extended period of time. Replace or recharge the battery pack. 14 Pressing the PTT switch while the channel is in use will cause your dealer (default is to sound. LOW BATTERY WARNING Low Battery Warning alerts you when the battery needs to receive mode. Release...
User Manual
Page 21
... power used when a signal is not being received and no operations are being performed (no keys are being turned). A QT tone/DQT code is received. This allows you to ignore (not hear) these calls. Although it may have your own private channel while using QT/DQT, other parties who are using the same channel. While the channel is not busy and no switches are using the Channel...
... power used when a signal is not being received and no operations are being performed (no keys are being turned). A QT tone/DQT code is received. This allows you to ignore (not hear) these calls. Although it may have your own private channel while using QT/DQT, other parties who are using the same channel. While the channel is not busy and no switches are using the Channel...


