
User Manual
Page 2
... NOT OPEN CAUTION: TO REDUCE THE RISK OF ELECTRIC SHOCK, DO NOT REMOVE COVER (OR BACK). It means that the unit is utilizing laser beams that have been classified as Class 1. For replacement, use only a 13-Amp ASTA-approved (BS 1362) fuse. 2. A power point, then obtain an appropriate safety approved extension lead or adapter, or consult your home...
... NOT OPEN CAUTION: TO REDUCE THE RISK OF ELECTRIC SHOCK, DO NOT REMOVE COVER (OR BACK). It means that the unit is utilizing laser beams that have been classified as Class 1. For replacement, use only a 13-Amp ASTA-approved (BS 1362) fuse. 2. A power point, then obtain an appropriate safety approved extension lead or adapter, or consult your home...
User Manual
Page 3
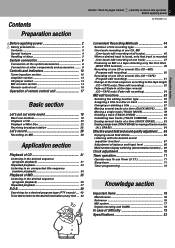
Before applying power XD-9580MD (En) Preparation section Basic section Before applying power 2 Safety precautions 2 Contents 3 Special features 4 Handling of discs 5 System connection 6 Connection of the system accessories 6 Connection of other components and accessories ........ 8 Controls and indicators 10 Tuner/equalizer section 10 Amplifier section 12 CD player section 13 MD recorder section 14 Remote control unit 16 Operation of remote control unit 17 Basic section Let's put out some sound 18 Basic use method...
Before applying power XD-9580MD (En) Preparation section Basic section Before applying power 2 Safety precautions 2 Contents 3 Special features 4 Handling of discs 5 System connection 6 Connection of the system accessories 6 Connection of other components and accessories ........ 8 Controls and indicators 10 Tuner/equalizer section 10 Amplifier section 12 CD player section 13 MD recorder section 14 Remote control unit 16 Operation of remote control unit 17 Basic section Let's put out some sound 18 Basic use method...
User Manual
Page 4
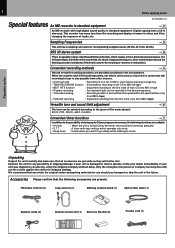
.... FM indoor antenna (1) Loop antenna (1) AM loop antenna stand (1) Optical fiber cable (1) Speaker cords (2) Remote control unit (1) Batteries (R6/AA) (2) Parallel cord (1) Knowledge sections This recorder has many functions like recording and display of names for use purposes. Digital copying from other sources. ÷ One-touch edit : Recording of one CD or MD or one track by the timer, the sound level increases gradually. : A timer with high digital sound quality is...
.... FM indoor antenna (1) Loop antenna (1) AM loop antenna stand (1) Optical fiber cable (1) Speaker cords (2) Remote control unit (1) Batteries (R6/AA) (2) Parallel cord (1) Knowledge sections This recorder has many functions like recording and display of names for use purposes. Digital copying from other sources. ÷ One-touch edit : Recording of one CD or MD or one track by the timer, the sound level increases gradually. : A timer with high digital sound quality is...
User Manual
Page 5
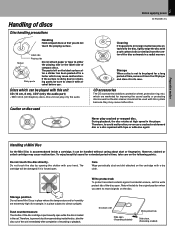
... cause malfunction. Playing side Sticker Do not attach paper or tape to the disc, lightly wipe the disc with a dry cloth. Caution on disc used with this unit CD accessories CD (12 cm, 8 cm), CDV (only the audio part) ÷ With CD-G (CD Graphics) discs, this system because they may cause malfunction. ... Preparation section Basic section Application section Handling of Mini Disc As the Mini Disc is forced open . (Recording...
... cause malfunction. Playing side Sticker Do not attach paper or tape to the disc, lightly wipe the disc with a dry cloth. Caution on disc used with this unit CD accessories CD (12 cm, 8 cm), CDV (only the audio part) ÷ With CD-G (CD Graphics) discs, this system because they may cause malfunction. ... Preparation section Basic section Application section Handling of Mini Disc As the Mini Disc is forced open . (Recording...
User Manual
Page 6
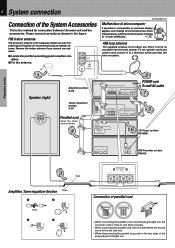
... C-H7 ANTENNA AM GND FM 75Ω TAPE REC OUT PLAY IN AUX INPUT L R CONNECT WITH A-H5 POWER cord To wall AC outlet 7 5 OPTICAL DIGITAL OUTPUT CONNECT WITH C-H5 OR C-H6 OR C-H7 AND X-H5 OR DM-H5 6 CD Player section DP-MH5 Preparation section Basic section CONNECT WITH DP-MH5 SYSTEM CONTROL DIGITAL INPUT OPTICAL OPTICAL 1 2 MD Recorder section DM-H5 Application section Knowledge sections 3 Red Amplifier, Tuner/equalizer Section Black 1 2 Twist 3 4 SPEAKERS R ( 6 - 16...
... C-H7 ANTENNA AM GND FM 75Ω TAPE REC OUT PLAY IN AUX INPUT L R CONNECT WITH A-H5 POWER cord To wall AC outlet 7 5 OPTICAL DIGITAL OUTPUT CONNECT WITH C-H5 OR C-H6 OR C-H7 AND X-H5 OR DM-H5 6 CD Player section DP-MH5 Preparation section Basic section CONNECT WITH DP-MH5 SYSTEM CONTROL DIGITAL INPUT OPTICAL OPTICAL 1 2 MD Recorder section DM-H5 Application section Knowledge sections 3 Red Amplifier, Tuner/equalizer Section Black 1 2 Twist 3 4 SPEAKERS R ( 6 - 16...
User Manual
Page 8
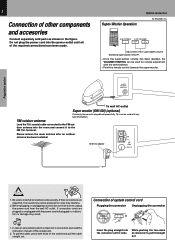
... be used for volume adjustment with the power cord left plugged in, malfunction or damage may result. Connection of system control cord Plugging the connector Unplugging the connector Insert the plug straight into the power outlet until all connection cords securely. Super-Woofer Operation BefoSryesatepmplcyionngnpeocwtioenr XD-9580MD (En) S.W.POWER S.W.VOLUME Adjustment of the socket and pull the cable straight out. AM Antenna adaptor GND FM 75Ω Application section Knowledge sections Caution 1. Before plugging or unplugging a connection cord...
... be used for volume adjustment with the power cord left plugged in, malfunction or damage may result. Connection of system control cord Plugging the connector Unplugging the connector Insert the plug straight into the power outlet until all connection cords securely. Super-Woofer Operation BefoSryesatepmplcyionngnpeocwtioenr XD-9580MD (En) S.W.POWER S.W.VOLUME Adjustment of the socket and pull the cable straight out. AM Antenna adaptor GND FM 75Ω Application section Knowledge sections Caution 1. Before plugging or unplugging a connection cord...
User Manual
Page 9
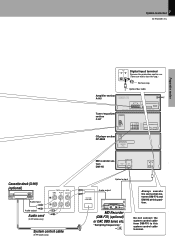
9 BefoSryesatepmplcyionngnpeocwtioenr XD-9580MD (En) Preparation section Basic section Cassette deck (X-H9) (optional) Audio input Audio output Audio cord (X-H9 accessory) TAPE REC OUT PLAY IN AUX INPUT L R System control cable (X-H9 accessory) DIGITAL INPUT OPTICAL OPTICAL 1 2 Digital input terminal Remove the protection cap for use. (Take care not to this position. "Sampling frequencies" ª Always execute the connection between DM-F70 and DM-H5 at this system control cable terminal. Application section Knowledge sections Do not connect the system control cable ...
9 BefoSryesatepmplcyionngnpeocwtioenr XD-9580MD (En) Preparation section Basic section Cassette deck (X-H9) (optional) Audio input Audio output Audio cord (X-H9 accessory) TAPE REC OUT PLAY IN AUX INPUT L R System control cable (X-H9 accessory) DIGITAL INPUT OPTICAL OPTICAL 1 2 Digital input terminal Remove the protection cap for use. (Take care not to this position. "Sampling frequencies" ª Always execute the connection between DM-F70 and DM-H5 at this system control cable terminal. Application section Knowledge sections Do not connect the system control cable ...
User Manual
Page 10
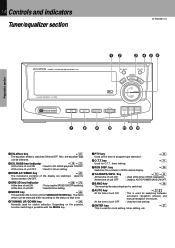
... MODE key. 7PTY key Used at the time of the TUNING UP/DOWN key. At the time of the display are switched. 1 0 Controls and indicators Tuner/equalizer section Controls and indicators XD-9580MD (En) Preparation section Basic section 12 3 456 TUNER / GRAPHIC EQUALIZER C-H7 (÷) SOUND RETRIEVAL SYSTEM STEREO EX. At the time of unit OFF : Used for timer setting. 3DISPLAY/DEMO key Ø The indications contents of unit OFF : Used for timer setting...
... MODE key. 7PTY key Used at the time of the TUNING UP/DOWN key. At the time of the display are switched. 1 0 Controls and indicators Tuner/equalizer section Controls and indicators XD-9580MD (En) Preparation section Basic section 12 3 456 TUNER / GRAPHIC EQUALIZER C-H7 (÷) SOUND RETRIEVAL SYSTEM STEREO EX. At the time of unit OFF : Used for timer setting. 3DISPLAY/DEMO key Ø The indications contents of unit OFF : Used for timer setting...
User Manual
Page 12
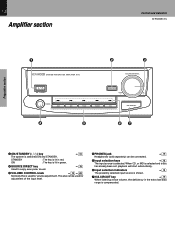
... Amplifier section Controls and indicators XD-9580MD (En) Preparation section 1 STEREO INTEGRATED AMPLIFIER A-H5 2 3 VOLUME CONTROL ON / STANDBY SOURCE DIRECT DOWN UP PHONES AUX MD TAPE TUNER CD N.B. ON : The key is lit in green. 2SOURCE DIRECT key ( Used to enjoy even purer sound. 3VOLUME CONTROL knob *ˆ Normally this is used for volume adjustment. This also can be used for adjustment of the input level. 4PHONES jack Headphones (sold separately) can be connected. ( 5Input selection keys * The input source...
... Amplifier section Controls and indicators XD-9580MD (En) Preparation section 1 STEREO INTEGRATED AMPLIFIER A-H5 2 3 VOLUME CONTROL ON / STANDBY SOURCE DIRECT DOWN UP PHONES AUX MD TAPE TUNER CD N.B. ON : The key is lit in green. 2SOURCE DIRECT key ( Used to enjoy even purer sound. 3VOLUME CONTROL knob *ˆ Normally this is used for volume adjustment. This also can be used for adjustment of the input level. 4PHONES jack Headphones (sold separately) can be connected. ( 5Input selection keys * The input source...
User Manual
Page 16
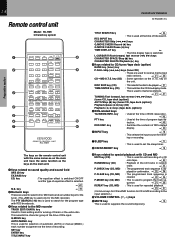
...- This is used to be played.¡ TIME/ENTER key (CD) : This switches the CD time display mode. CLEAR 4 5 6 7 8 PTY SEARCH 0 +10 MD AUTO/MANU. Q.MOVE TITLE INPUT SEARCH REC INPUT CHARACTER Q.MOVE CHECK CLEAR TIME DISPLAY L CURSOR R CHARACTER SPACE DELETE CD/TUNER/TAPE BAND P. key : Switches the contents of RDS-related display. · 6INPUT key * : This selects the input source for erasing of recording. PTY RDS DISP. TAPE INPUT SLEEP MUTE VOLUME CONTROL 8 9 0 ! quence...
...- This is used to be played.¡ TIME/ENTER key (CD) : This switches the CD time display mode. CLEAR 4 5 6 7 8 PTY SEARCH 0 +10 MD AUTO/MANU. Q.MOVE TITLE INPUT SEARCH REC INPUT CHARACTER Q.MOVE CHECK CLEAR TIME DISPLAY L CURSOR R CHARACTER SPACE DELETE CD/TUNER/TAPE BAND P. key : Switches the contents of RDS-related display. · 6INPUT key * : This selects the input source for erasing of recording. PTY RDS DISP. TAPE INPUT SLEEP MUTE VOLUME CONTROL 8 9 0 ! quence...
User Manual
Page 18
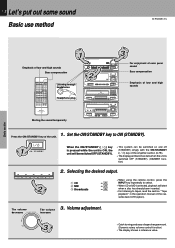
...to ON (STANDBY). Set the ON/STANDBY key to tapes, read the section "Tape playback" in the operation manual of low and high sounds 1. Volume adjustment. CHECK P. Application section Knowledge sections CLEAR 4 5 6 7 8 PTY SEARCH 0 +10 MD AUTO/MANU. TAPE INPUT SLEEP MUTE VOLUME CONTROL Listening through headphones PHONES Headphone plug REMOTE CONTROL UNIT RC-H9R Muting the sound temporarily 3 STEREO INTEGRATED AMPLIFIER A-H5 VOLUME CONTROL ON / SATNDBY SOURCE DIRECT DOWN UP PHONES AUX MD TAPE TUNER CD N.B. EDIT RANDOM 1 2 3 P. BEST HITS ¶...
...to ON (STANDBY). Set the ON/STANDBY key to tapes, read the section "Tape playback" in the operation manual of low and high sounds 1. Volume adjustment. CHECK P. Application section Knowledge sections CLEAR 4 5 6 7 8 PTY SEARCH 0 +10 MD AUTO/MANU. TAPE INPUT SLEEP MUTE VOLUME CONTROL Listening through headphones PHONES Headphone plug REMOTE CONTROL UNIT RC-H9R Muting the sound temporarily 3 STEREO INTEGRATED AMPLIFIER A-H5 VOLUME CONTROL ON / SATNDBY SOURCE DIRECT DOWN UP PHONES AUX MD TAPE TUNER CD N.B. EDIT RANDOM 1 2 3 P. BEST HITS ¶...
User Manual
Page 19
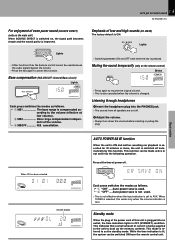
... all speakers are cut off. 2 Adjust the volume. ÷ Always turn down the volume before inserting or pulling the plug. TA/NEWS/INFO. Standby mode When the plug of the power cord of low and high sounds (EX. This mode is switched on the remote control) Blinks MUTE PTY P.B.C. CIRCUIT Y TOTAL SPACE PROG. MANU. cancellation. ON PROG. Press at low volume). 2 NB2 Bass range compensation independent of even purer sound (SOURCE DIRECT...
... all speakers are cut off. 2 Adjust the volume. ÷ Always turn down the volume before inserting or pulling the plug. TA/NEWS/INFO. Standby mode When the plug of the power cord of low and high sounds (EX. This mode is switched on the remote control) Blinks MUTE PTY P.B.C. CIRCUIT Y TOTAL SPACE PROG. MANU. cancellation. ON PROG. Press at low volume). 2 NB2 Bass range compensation independent of even purer sound (SOURCE DIRECT...
User Manual
Page 20
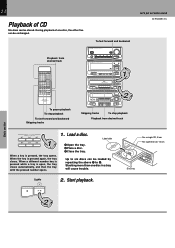
... and backward Skipping tracks STEREO INTEGRATED AMPLIFIER A-H5 VOLUME CONTROL ON / SATNDBY SOURCE DIRECT DOWN UP PHONES AUX MD TAPE TUNER CD N.B. Label side Up to 3. Start playback. 7 6 2 For a single CD, 8 cm For a general CD, 12 cm Disc tray Knowledge sections CIRCUIT TUNER / GRAPHIC EQUALIZER C-H7 (÷) SOUND RETRIEVAL SYSTEM STEREO EX. EDIT TRACK EDIT SPACE DELETE CHARACTER O.T.E. CALL TIME TUNING CDØMD DISC SKIP O.T.E. BASS SRS 3D EEFQFECT DEMO DISPLAY MODE UP TUNING DOWN R D S EON PTY O.T.T RDS...
... and backward Skipping tracks STEREO INTEGRATED AMPLIFIER A-H5 VOLUME CONTROL ON / SATNDBY SOURCE DIRECT DOWN UP PHONES AUX MD TAPE TUNER CD N.B. Label side Up to 3. Start playback. 7 6 2 For a single CD, 8 cm For a general CD, 12 cm Disc tray Knowledge sections CIRCUIT TUNER / GRAPHIC EQUALIZER C-H7 (÷) SOUND RETRIEVAL SYSTEM STEREO EX. EDIT TRACK EDIT SPACE DELETE CHARACTER O.T.E. CALL TIME TUNING CDØMD DISC SKIP O.T.E. BASS SRS 3D EEFQFECT DEMO DISPLAY MODE UP TUNING DOWN R D S EON PTY O.T.T RDS...
User Manual
Page 22
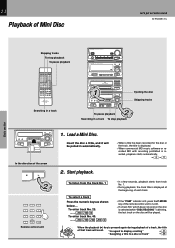
... lit. ÷ If a track NO. MODE REPEAT TRACK EDIT /CHARA. BEST HITS ¶ 8 7 3 To pause playback 2 Searching in a track STEREO INTEGRATED AMPLIFIER A-H5 VOLUME CONTROL ON / SATNDBY SOURCE DIRECT DOWN UP PHONES AUX MD TAPE TUNER CD N.B. CALL TIME TUNING CDØMD DISC SKIP O.T.E. BASS SRS 3D EEFQFECT DEMO DISPLAY MODE UP TUNING DOWN R D S EON PTY O.T.T RDS DISP. CLEAR 4 5 6 7 8 PTY SEARCH 0 +10 MD AUTO/MANU. TAPE INPUT SLEEP MUTE VOLUME CONTROL REMOTE CONTROL UNIT RC-H9R Searching in...
... lit. ÷ If a track NO. MODE REPEAT TRACK EDIT /CHARA. BEST HITS ¶ 8 7 3 To pause playback 2 Searching in a track STEREO INTEGRATED AMPLIFIER A-H5 VOLUME CONTROL ON / SATNDBY SOURCE DIRECT DOWN UP PHONES AUX MD TAPE TUNER CD N.B. CALL TIME TUNING CDØMD DISC SKIP O.T.E. BASS SRS 3D EEFQFECT DEMO DISPLAY MODE UP TUNING DOWN R D S EON PTY O.T.T RDS DISP. CLEAR 4 5 6 7 8 PTY SEARCH 0 +10 MD AUTO/MANU. TAPE INPUT SLEEP MUTE VOLUME CONTROL REMOTE CONTROL UNIT RC-H9R Searching in...
User Manual
Page 26
... One-by -one presetting STEREO INTEGRATED AMPLIFIER A-H5 VOLUME CONTROL ON / SATNDBY SOURCE DIRECT DOWN UP PHONES AUX MD TAPE TUNER CD TUNER / GRAPHIC EQUALIZER C-H7 2 (÷) SOUND RETRIEVAL SYSTEM STEREO N.B. CHECK P. AUTO ENTER TA/NEWS/INFO. CIRCUIT EX. BASS SRS 3D EEFQFECT DEMO DISPLAY MODE UP TUNING DOWN R D S EON PTY O.T.T RDS DISP. BAND AUTO ENTER 1 MULTIPLE COMPACT DISC PLAYER DP-MH5 COMPACT DIGITAL AUDIO 6 DISC CHANGER OPEN / CLOSE 01 02 03 04 05 06 TWIN REC 1 ¡ 4 ¢ 7 RANDOM DISC 1 DISC 2 DISC 3 DISC 4 DISC 5 DISC 6 REPEAT...
... One-by -one presetting STEREO INTEGRATED AMPLIFIER A-H5 VOLUME CONTROL ON / SATNDBY SOURCE DIRECT DOWN UP PHONES AUX MD TAPE TUNER CD TUNER / GRAPHIC EQUALIZER C-H7 2 (÷) SOUND RETRIEVAL SYSTEM STEREO N.B. CHECK P. AUTO ENTER TA/NEWS/INFO. CIRCUIT EX. BASS SRS 3D EEFQFECT DEMO DISPLAY MODE UP TUNING DOWN R D S EON PTY O.T.T RDS DISP. BAND AUTO ENTER 1 MULTIPLE COMPACT DISC PLAYER DP-MH5 COMPACT DIGITAL AUDIO 6 DISC CHANGER OPEN / CLOSE 01 02 03 04 05 06 TWIN REC 1 ¡ 4 ¢ 7 RANDOM DISC 1 DISC 2 DISC 3 DISC 4 DISC 5 DISC 6 REPEAT...
User Manual
Page 28
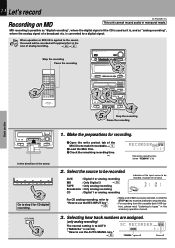
... AUDIO 6 DISC CHANGER OPEN / CLOSE 01 02 03 04 05 06 TWIN REC 1 ¡ 4 ¢ 1 6 RANDOM DISC 1 DISC 2 DISC 3 DISC 4 MINIDISC RECORDER DM-H5 7 DISC 5 DISC 6 REPEAT fsconverter TITLE SEARCH 6 TITLE INPUT TIME DISPLAY DISPLAY AUTO LOADING MECHANISM SET HARACTECRHARACTER/REC ENTER LEVEL C 4− EJECT 0 +¢ L CURSOR R 1 ¡ REPEAT REC INPUT CD=MD Q. TAPE INPUT SLEEP MUTE VOLUME CONTROL REMOTE CONTROL UNIT RC-H9R STEREO INTEGRATED AMPLIFIER A-H5 VOLUME CONTROL ON / SATNDBY SOURCE DIRECT DOWN UP PHONES AUX MD TAPE TUNER CD...
... AUDIO 6 DISC CHANGER OPEN / CLOSE 01 02 03 04 05 06 TWIN REC 1 ¡ 4 ¢ 1 6 RANDOM DISC 1 DISC 2 DISC 3 DISC 4 MINIDISC RECORDER DM-H5 7 DISC 5 DISC 6 REPEAT fsconverter TITLE SEARCH 6 TITLE INPUT TIME DISPLAY DISPLAY AUTO LOADING MECHANISM SET HARACTECRHARACTER/REC ENTER LEVEL C 4− EJECT 0 +¢ L CURSOR R 1 ¡ REPEAT REC INPUT CD=MD Q. TAPE INPUT SLEEP MUTE VOLUME CONTROL REMOTE CONTROL UNIT RC-H9R STEREO INTEGRATED AMPLIFIER A-H5 VOLUME CONTROL ON / SATNDBY SOURCE DIRECT DOWN UP PHONES AUX MD TAPE TUNER CD...
User Manual
Page 72
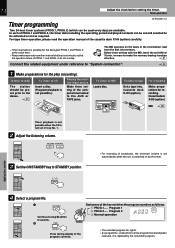
... MUSIC CALENDAR ÷ The selected program No. For tape timer operation, please read from the disk into . To listen to radio To listen to CD Playing the auxiliary input source The station should be activated or not as follows. 1 PROG.1..... Each press of the program contents. under reference to step 2 within 8 seconds. 2 TIME ENTER Press during display of the key switches the program numbers as required. 72 Adjust the clock before setting the timer...
... MUSIC CALENDAR ÷ The selected program No. For tape timer operation, please read from the disk into . To listen to radio To listen to CD Playing the auxiliary input source The station should be activated or not as follows. 1 PROG.1..... Each press of the program contents. under reference to step 2 within 8 seconds. 2 TIME ENTER Press during display of the key switches the program numbers as required. 72 Adjust the clock before setting the timer...
User Manual
Page 73
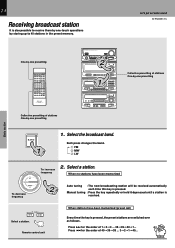
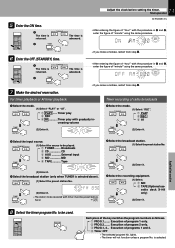
... timer. ON 3 Select the broadcast station (only when TUNER is selected. RDS EON TA NEWS INFO. ECHO P.B.C. Execution of the key switches the program numbers as follows. 1 PROG.1........ ECHO P.B.C. TUNING (1) Select "REC". 1 PLAY 2 REC 3 AI « TIME ENTER (2) Enter it . PGM MEMO EDIT AUTO DISC ALL TUNED STEREO MAX VOL. TP PTY OFF AM SLEEP O.T.T. Execution of "minute" using the same procedure. 7 3 Adjust the clock before - TUNING...
... timer. ON 3 Select the broadcast station (only when TUNER is selected. RDS EON TA NEWS INFO. ECHO P.B.C. Execution of the key switches the program numbers as follows. 1 PROG.1........ ECHO P.B.C. TUNING (1) Select "REC". 1 PLAY 2 REC 3 AI « TIME ENTER (2) Enter it . PGM MEMO EDIT AUTO DISC ALL TUNED STEREO MAX VOL. TP PTY OFF AM SLEEP O.T.T. Execution of "minute" using the same procedure. 7 3 Adjust the clock before - TUNING...
User Manual
Page 76
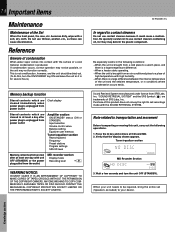
.../STANDBY status (ON or STANDBY) Input selection Volume control value Balance setting Equalizer user memory Tuner/equalizer section Receiving band Frequency Preset stations Program settings SRS 3D level Memory contents which are trademarks of the unit and the ambient temperature, or in at least a day after at least one day with the SOUND RETRIEVAL SYSTEM. If condensation occurs, correct operation may not be repaired, bring the entire set (Speakers...
.../STANDBY status (ON or STANDBY) Input selection Volume control value Balance setting Equalizer user memory Tuner/equalizer section Receiving band Frequency Preset stations Program settings SRS 3D level Memory contents which are trademarks of the unit and the ambient temperature, or in at least a day after at least one day with the SOUND RETRIEVAL SYSTEM. If condensation occurs, correct operation may not be repaired, bring the entire set (Speakers...
User Manual
Page 79
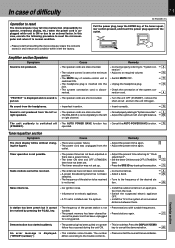
... is no sound is not produced. Sound is not possible. Timer operation is not produced from the left and right balance. ˆ ÷ Cancel the AUTO POWER SAVE function. ( Tuner/equalizer section Symptom Cause Remedy The clock display blinks without chang- ÷ There was a power failure. ÷ Adjust the present time again. ∏ ing the figures. ÷ The power cord was not set . ÷ The timer execution was...
... is no sound is not produced. Sound is not possible. Timer operation is not produced from the left and right balance. ˆ ÷ Cancel the AUTO POWER SAVE function. ( Tuner/equalizer section Symptom Cause Remedy The clock display blinks without chang- ÷ There was a power failure. ÷ Adjust the present time again. ∏ ing the figures. ÷ The power cord was not set . ÷ The timer execution was...


