Use and Care Guide
Page 3
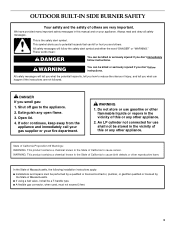
...using a ball valve, it shall be a T-handle type. ■ A flexible gas connector, when used, must be killed or seriously injured if you don't immediately follow instructions. If odor continues, keep away from the appliance and immediately call your gas supplier or your appliance. An LP cylinder not connected for use... safety messages in the vicinity of this or any open flame. 3. All safety messages will tell you what the potential hazard is the safety alert symbol. All safety messages will follow instructions. Shut off gas to potential hazards that can be performed by a ...
...using a ball valve, it shall be a T-handle type. ■ A flexible gas connector, when used, must be killed or seriously injured if you don't immediately follow instructions. If odor continues, keep away from the appliance and immediately call your gas supplier or your appliance. An LP cylinder not connected for use... safety messages in the vicinity of this or any open flame. 3. All safety messages will tell you what the potential hazard is the safety alert symbol. All safety messages will follow instructions. Shut off gas to potential hazards that can be performed by a ...
Use and Care Guide
Page 4
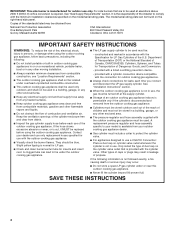
...; Check and clean burner/venturi tube for leaks each use with the outdoor cooking gas appliance. ■ Visually check the burner flames. A clogged tube can be blue. See "Gas Supply Requirements" section. They should be found on the right-hand side panel. IMPORTANT: This side burner is the responsibility of the installer to comply with the minimum installation clearances specified on the model/serial rating plate. For side burners that is...
...; Check and clean burner/venturi tube for leaks each use with the outdoor cooking gas appliance. ■ Visually check the burner flames. A clogged tube can be blue. See "Gas Supply Requirements" section. They should be found on the right-hand side panel. IMPORTANT: This side burner is the responsibility of the installer to comply with the minimum installation clearances specified on the model/serial rating plate. For side burners that is...
Use and Care Guide
Page 5
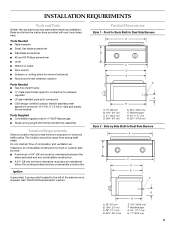
... for 4" WCP Natural gas. ■ Single-prong plug/5,000 mAmp transformer assembly Location Requirements Select a location that provides minimum exposure to the left of combustion and ventilation air. Front to pressure regulator ■ LP gas-resistant pipe-joint compound ■ CSA design-certified outdoor flexible stainless steel appliance connector (4-5 ft [1.2-1.5 m]) or rigid gas supply line as needed. See "Electrical Requirements" section. Side by Side Built-In Dual Side Burners A B C D E F G A. 24...
... for 4" WCP Natural gas. ■ Single-prong plug/5,000 mAmp transformer assembly Location Requirements Select a location that provides minimum exposure to the left of combustion and ventilation air. Front to pressure regulator ■ LP gas-resistant pipe-joint compound ■ CSA design-certified outdoor flexible stainless steel appliance connector (4-5 ft [1.2-1.5 m]) or rigid gas supply line as needed. See "Electrical Requirements" section. Side by Side Built-In Dual Side Burners A B C D E F G A. 24...
Use and Care Guide
Page 6
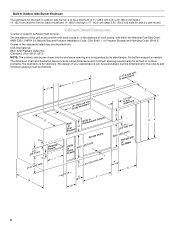
... NOTE: The outdoor side burner drops into the enclosure opening and is needed. The dimension chart and illustration below include cutout dimensions and minimum spacing requirements for the cutouts and minimum spacing must conform with either the National Fuel Gas Code, ANSI Z223.1/NPFA 54, Natural Gas and Propane Installation Code, CSA B149.1, or Propane Storage and Handling Code, B149.2. WDraarwmeirng J B SSBoieurdarenr ers D GReriflrlsesohrment Centers Access Doors Utility oTDrrraaswher 20...
... NOTE: The outdoor side burner drops into the enclosure opening and is needed. The dimension chart and illustration below include cutout dimensions and minimum spacing requirements for the cutouts and minimum spacing must conform with either the National Fuel Gas Code, ANSI Z223.1/NPFA 54, Natural Gas and Propane Installation Code, CSA B149.1, or Propane Storage and Handling Code, B149.2. WDraarwmeirng J B SSBoieurdarenr ers D GReriflrlsesohrment Centers Access Doors Utility oTDrrraaswher 20...
Use and Care Guide
Page 7
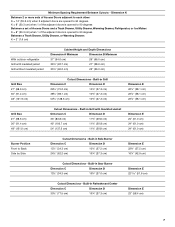
Built-in Sear Burner Dimension C Dimension D 13½" (34.3 cm) 10⁵⁄₈" (27.0 cm) Dimension E 22 57.6 cm) Cutout Dimensions - Dimension K Between 2 or more sets of Access Doors adjacent to each other: K = 14" (35.6 cm) when 2 adjacent doors are opened to 90 degrees K = 8" (20.3 cm) when 1 of the adjacent doors is opened to 90 degrees Between a set of Access Doors and a Trash Drawer, Utility Drawer, Warming Drawer, Refrigerator...
Built-in Sear Burner Dimension C Dimension D 13½" (34.3 cm) 10⁵⁄₈" (27.0 cm) Dimension E 22 57.6 cm) Cutout Dimensions - Dimension K Between 2 or more sets of Access Doors adjacent to each other: K = 14" (35.6 cm) when 2 adjacent doors are opened to 90 degrees K = 8" (20.3 cm) when 1 of the adjacent doors is opened to 90 degrees Between a set of Access Doors and a Trash Drawer, Utility Drawer, Warming Drawer, Refrigerator...

Use and Care Guide
Page 8
... the optional door or drawers. Warming Drawer Size 24" (61.0 cm) Cutout Dimensions - One ventilation opening within 1" (2.5 cm) of the bottom of the enclosure and the bottom opening on an exposed exterior side located within 5" (12.7 cm) of the top is to be in the enclosure: An enclosure for use with an LP gas fuel tank for mounting the optional door or drawers. ventilation both sides 5" (12...
... the optional door or drawers. Warming Drawer Size 24" (61.0 cm) Cutout Dimensions - One ventilation opening within 1" (2.5 cm) of the bottom of the enclosure and the bottom opening on an exposed exterior side located within 5" (12.7 cm) of the top is to be in the enclosure: An enclosure for use with an LP gas fuel tank for mounting the optional door or drawers. ventilation both sides 5" (12...
Use and Care Guide
Page 9
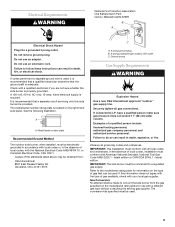
...-hand side panel. The model/serial number rating plate is required. Model/serial number plate Recommended Ground Method The outdoor side burner, when installed, must conform with a qualified electrician if you are not sure whether the side burner is used . Ground prong Gas Supply Requirements WARNING Explosion Hazard Use a new CSA International approved "outdoor" gas supply line. Failure to the model/serial rating plate for use with the National Electrical Code ANSI/NFPA 70, or Canadian Electrical Code, CSA C22.1. Gas Conversion: No...
...-hand side panel. The model/serial number rating plate is required. Model/serial number plate Recommended Ground Method The outdoor side burner, when installed, must conform with a qualified electrician if you are not sure whether the side burner is used . Ground prong Gas Supply Requirements WARNING Explosion Hazard Use a new CSA International approved "outdoor" gas supply line. Failure to the model/serial rating plate for use with the National Electrical Code ANSI/NFPA 70, or Canadian Electrical Code, CSA C22.1. Gas Conversion: No...
Use and Care Guide
Page 10
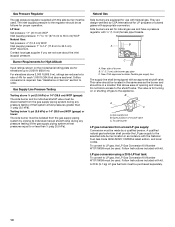
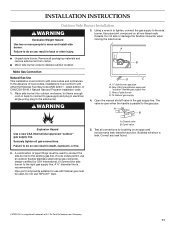
... (gauge): The side burner and its individual manual shutoff valve during any pressure testing of 4% for turning on the model/serial rating plate are equipped for elevations up to 2,000 ft (609.6 m). Natural Gas Side burners are for use and have a pressure regulator with Natural gas. New CSA approved outdoor flexible gas supply line The supply line shall be equipped with the National Fuel Gas Code ANSI Z2223.1/NFPA54 latest edition, and local codes. Gas supply line B. A qualified natural gas technician shall...
... (gauge): The side burner and its individual manual shutoff valve during any pressure testing of 4% for turning on the model/serial rating plate are equipped for elevations up to 2,000 ft (609.6 m). Natural Gas Side burners are for use and have a pressure regulator with Natural gas. New CSA approved outdoor flexible gas supply line The supply line shall be equipped with the National Fuel Gas Code ANSI Z2223.1/NFPA54 latest edition, and local codes. Gas supply line B. A qualified natural gas technician shall...
Use and Care Guide
Page 11
.../CGA-B149.1 Natural Gas and Propane installation code. 1. Place side burner into outdoor enclosure, but leave enough room in back to connect to do so can result in electrical single-prong plug to the side burner. A B Explosion Hazard Use a new CSA International approved "outdoor" gas supply line. Securely tighten all packaging materials and remove side burner from carton. A ⁵⁄₈" diameter line is parallel to desired outdoor location. A. Open valve 5. Correct any...
.../CGA-B149.1 Natural Gas and Propane installation code. 1. Place side burner into outdoor enclosure, but leave enough room in back to connect to do so can result in electrical single-prong plug to the side burner. A B Explosion Hazard Use a new CSA International approved "outdoor" gas supply line. Securely tighten all packaging materials and remove side burner from carton. A ⁵⁄₈" diameter line is parallel to desired outdoor location. A. Open valve 5. Correct any...
Use and Care Guide
Page 12
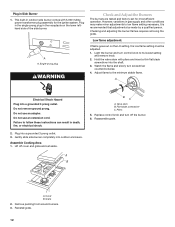
... lower lefthand side of the side burner. Hold the valve stem with 5,000 mAmp power transformer plug assembly for most efficient operation. Adjust flame to its lowest setting and remove knob. 2. A Electrical Shock Hazard Plug into a grounded 3 prong outlet. 3. Do not remove ground prong. Do not use an adapter. Plug into a grounded 3 prong outlet. Assemble Cooking Area 1. A B B C A. Flat-blade screwdriver C. Replace control knob and turn off cover and grate and set for the igniter system...
... lower lefthand side of the side burner. Hold the valve stem with 5,000 mAmp power transformer plug assembly for most efficient operation. Adjust flame to its lowest setting and remove knob. 2. A Electrical Shock Hazard Plug into a grounded 3 prong outlet. 3. Do not remove ground prong. Do not use an adapter. Plug into a grounded 3 prong outlet. Assemble Cooking Area 1. A B B C A. Flat-blade screwdriver C. Replace control knob and turn off cover and grate and set for the igniter system...
Use and Care Guide
Page 13
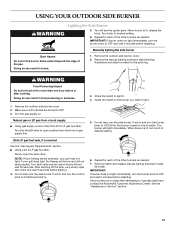
... over the side burner. When burner is lit, release the knob. Manually lighting the side burner Burn Hazard Do not let the burner flame extend beyond the edge of gas supply line. 20 lb LP gas fuel tank, if converted See the "Gas Supply Requirements" section. ■ Using a 20 lb LP gas fuel tank: Slowly open position from a local supply ■ Using gas supply source other burners as needed . 7. The burner will not heat properly. Turn knob to OFF. 3. After shutting off and...
... over the side burner. When burner is lit, release the knob. Manually lighting the side burner Burn Hazard Do not let the burner flame extend beyond the edge of gas supply line. 20 lb LP gas fuel tank, if converted See the "Gas Supply Requirements" section. ■ Using a 20 lb LP gas fuel tank: Slowly open position from a local supply ■ Using gas supply source other burners as needed . 7. The burner will not heat properly. Turn knob to OFF. 3. After shutting off and...

Use and Care Guide
Page 14
... SIDE BURNER CARE General Cleaning IMPORTANT: Before cleaning, make sure all non-cooking areas before first use Kitchen and BBQ Grill Degreaser Part Number 31617, a commercial degreaser designed for stainless steel. SIDE BURNER CAPS AND GRATE Cleaning Method: ■ Rub in the direction of this material resists most stains and pitting, providing that the surface is kept clean, polished and covered. ■ Apply stainless steel polish to clean the side burner...
... SIDE BURNER CARE General Cleaning IMPORTANT: Before cleaning, make sure all non-cooking areas before first use Kitchen and BBQ Grill Degreaser Part Number 31617, a commercial degreaser designed for stainless steel. SIDE BURNER CAPS AND GRATE Cleaning Method: ■ Rub in the direction of this material resists most stains and pitting, providing that the surface is kept clean, polished and covered. ■ Apply stainless steel polish to clean the side burner...
Use and Care Guide
Page 15
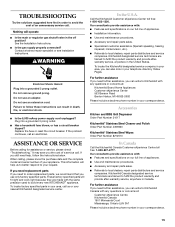
... service companies. KitchenAid Canada designated service technicians are made with : ■ Features and specifications on our full line of appliances. ■ Use and maintenance procedures. ■ Accessory and repair parts sales. ■ Referrals to build every new KITCHENAID® appliance. Replace the fuse or reset the circuit breaker. Contact a trained repair specialist or see Installation Instructions. Do not use an adapter. Accessories Kitchen and BBQ Grill Degreaser Order Part Number 31617 KitchenAid...
... service companies. KitchenAid Canada designated service technicians are made with : ■ Features and specifications on our full line of appliances. ■ Use and maintenance procedures. ■ Accessory and repair parts sales. ■ Referrals to build every new KITCHENAID® appliance. Replace the fuse or reset the circuit breaker. Contact a trained repair specialist or see Installation Instructions. Do not use an adapter. Accessories Kitchen and BBQ Grill Degreaser Order Part Number 31617 KitchenAid...
Use and Care Guide
Page 16
... for replacement of the stainless steel body housing due to published user or operator instructions and/or installation instructions. 4. ITEMS EXCLUDED FROM WARRANTY This limited warranty does not cover: 1. Repairs when your outdoor product, unless such damage results from defects in materials or workmanship and is reported to the outdoor product. 8. This warranty is located in a remote area where service by KitchenAid. 5. Repairs to parts or...
... for replacement of the stainless steel body housing due to published user or operator instructions and/or installation instructions. 4. ITEMS EXCLUDED FROM WARRANTY This limited warranty does not cover: 1. Repairs when your outdoor product, unless such damage results from defects in materials or workmanship and is reported to the outdoor product. 8. This warranty is located in a remote area where service by KitchenAid. 5. Repairs to parts or...
Use and Care Guide
Page 17
... if another warranty applies. After checking "Troubleshooting," you ever need to know your authorized KitchenAid dealer to better help by checking the "Assistance or Service" section or by calling KitchenAid. You must provide proof of the Use & Care Guide. You will need it. In the U.S.A., call 1-800-807-6777. 9/07 Keep this information on the model and serial number label located on...
... if another warranty applies. After checking "Troubleshooting," you ever need to know your authorized KitchenAid dealer to better help by checking the "Assistance or Service" section or by calling KitchenAid. You must provide proof of the Use & Care Guide. You will need it. In the U.S.A., call 1-800-807-6777. 9/07 Keep this information on the model and serial number label located on...
Parts List
Page 1
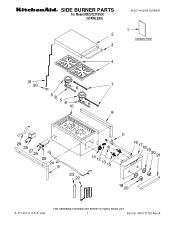
W10131720 Rev.A SIDE BURNER PARTS For Model:KBZU122TSS00 (STAINLESS) BUILT−IN SIDE BURNER 8−07 Litho In U.S.A. (cre) 1 Part No.
W10131720 Rev.A SIDE BURNER PARTS For Model:KBZU122TSS00 (STAINLESS) BUILT−IN SIDE BURNER 8−07 Litho In U.S.A. (cre) 1 Part No.
Parts List
Page 2
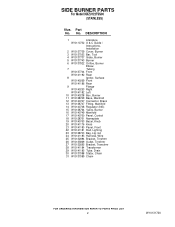
SIDE BURNER PARTS For Model:KBZU122TSS00 (STAINLESS) Illus. Part No. DESCRIPTION 1 Literature W10110732 U & C Guide / Instructions, Installation 2 W10137739 Cover, Burner 3 W10137053 Bar, Tool 4 W10137737 Grate, Burner 5 W10137743 Burner 6 W10137922 Orifice, Burner Elbow 7 Tubing W10137744 Front W10141192 Rear 8 Ignitor, Surface W10140269 Front W10141186 Rear 9 Flange W10140253 Right W10141182 Left 10 W10140238 Box, Burner 11 W10128749 Base, Manifold 12 W10140747 Connector, Brass 13 W10128747 Fitting, Manifold 14 W10140748 Regulator (NG) 15 W10128764 Valve, ...
SIDE BURNER PARTS For Model:KBZU122TSS00 (STAINLESS) Illus. Part No. DESCRIPTION 1 Literature W10110732 U & C Guide / Instructions, Installation 2 W10137739 Cover, Burner 3 W10137053 Bar, Tool 4 W10137737 Grate, Burner 5 W10137743 Burner 6 W10137922 Orifice, Burner Elbow 7 Tubing W10137744 Front W10141192 Rear 8 Ignitor, Surface W10140269 Front W10141186 Rear 9 Flange W10140253 Right W10141182 Left 10 W10140238 Box, Burner 11 W10128749 Base, Manifold 12 W10140747 Connector, Brass 13 W10128747 Fitting, Manifold 14 W10140748 Regulator (NG) 15 W10128764 Valve, ...


