

Warranty Information
Page 1
...discretion replace the product. Service to correct improper product maintenance or repair labor to access additional resources, or visit http://kitchenaid.custhelp.com. 2. Consumable parts (i.e. Damage from accident, misuse, abuse, fire, floods, acts In the second through fifth years from state to ...labor. appliance is installed, operated and maintained according to instructions attached to or furnished with the product, KitchenAid will pay for factory specified parts and repair labor for warranty service to obtain service under these limitations and exclusions may not apply to...
...discretion replace the product. Service to correct improper product maintenance or repair labor to access additional resources, or visit http://kitchenaid.custhelp.com. 2. Consumable parts (i.e. Damage from accident, misuse, abuse, fire, floods, acts In the second through fifth years from state to ...labor. appliance is installed, operated and maintained according to instructions attached to or furnished with the product, KitchenAid will pay for factory specified parts and repair labor for warranty service to obtain service under these limitations and exclusions may not apply to...
Use & Care Guide
Page 1
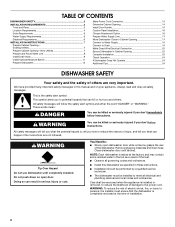
... encounter. DISHWASHER USER INSTRUCTIONS Thank you need further assistance using your convenience, we have a positive experience owning a KitchenAid® product. If you for choosing KitchenAid® Appliances. Have your model and serial number on the label located near the door on the right-hand ...or left-hand side of Contents DISHWASHER SAFETY 2 PARTS AND FEATURES 4 START-UP / QUICK REFERENCE 5 QUICK STEPS 6 DISHWASHER USE 6 ...
... encounter. DISHWASHER USER INSTRUCTIONS Thank you need further assistance using your convenience, we have a positive experience owning a KitchenAid® product. If you for choosing KitchenAid® Appliances. Have your model and serial number on the label located near the door on the right-hand ...or left-hand side of Contents DISHWASHER SAFETY 2 PARTS AND FEATURES 4 START-UP / QUICK REFERENCE 5 QUICK STEPS 6 DISHWASHER USE 6 ...

Use & Care Guide
Page 4
... action. Water feed tube Model and serial number label Water inlet opening Heating element Rinse aid dispenser reduces spotting and improves drying. Upper level wash Parts and Features ProScrub® Trio (on some models) Pressurized spray nozzles and variable speed motor provide effective cleaning.
... action. Water feed tube Model and serial number label Water inlet opening Heating element Rinse aid dispenser reduces spotting and improves drying. Upper level wash Parts and Features ProScrub® Trio (on some models) Pressurized spray nozzles and variable speed motor provide effective cleaning.

Use & Care Guide
Page 14
... Remove the front basket in the down position when you have extra silverware, knives, or utensils requiring more room. The triple filter system consists of 2 parts, an upper filter assembly and a lower filter. ■ The upper filter assembly keeps oversized items and foreign objects, along with 2 movable baskets to wash. Culinary...
... Remove the front basket in the down position when you have extra silverware, knives, or utensils requiring more room. The triple filter system consists of 2 parts, an upper filter assembly and a lower filter. ■ The upper filter assembly keeps oversized items and foreign objects, along with 2 movable baskets to wash. Culinary...

Use & Care Guide
Page 15
... out. 2. If your dishes. RECOMMENDED TIME INTERVALS TO CLEAN YOUR FILTER Number of the tub. Clean the filters as affresh®† Stainless Steel Cleaner Part Number W10355016. †® affresh is a registered trademark of white residue on removing spots and stains, see "Troubleshooting" section. If you have to dishwasher, do...
... out. 2. If your dishes. RECOMMENDED TIME INTERVALS TO CLEAN YOUR FILTER Number of the tub. Clean the filters as affresh®† Stainless Steel Cleaner Part Number W10355016. †® affresh is a registered trademark of white residue on removing spots and stains, see "Troubleshooting" section. If you have to dishwasher, do...

Use & Care Guide
Page 16
... Use To reduce the risk of Hard Water / Filming: Recommended use . Damage from freezing is recommended, such as affresh® Dishwasher Cleaner Part Number W10282479. ■ Load your dishwasher winterized by filming / hard water). ■ Place tablet in dishwasher and the home drain system. ...or repair of your dishwasher. Then check for regular daily use of a monthly maintenance product such as affresh® Stainless Steel Cleaner Part Number W10355016. Do not use any soil buildup. To clean interior Make a paste with dishes affected by authorized service personnel. 16 ...
... Use To reduce the risk of Hard Water / Filming: Recommended use . Damage from freezing is recommended, such as affresh® Dishwasher Cleaner Part Number W10282479. ■ Load your dishwasher winterized by filming / hard water). ■ Place tablet in dishwasher and the home drain system. ...or repair of your dishwasher. Then check for regular daily use of a monthly maintenance product such as affresh® Stainless Steel Cleaner Part Number W10355016. Do not use any soil buildup. To clean interior Make a paste with dishes affected by authorized service personnel. 16 ...

Use & Care Guide
Page 17
... has not completed, you will add time to a food waste disposer, be necessary. Check for proper drying. In Canada, visit www.kitchenaid.ca (website may have disabled Sleep Mode by closing the door and pressing START/RESUME. Mississauga, Ontario L5N 0B7 PROBLEM SOLUTION DISHWASHER DOES NOT...surfaces are detected, the dishwasher may not operate properly or may be sure the knockout plug has been removed from obstructions. (See "Parts and Features.") Check for kinks in the drain or disposer. DISHWASHER NOT DRYING NOTE: Plastic and items with your detergent is turned ...
... has not completed, you will add time to a food waste disposer, be necessary. Check for proper drying. In Canada, visit www.kitchenaid.ca (website may have disabled Sleep Mode by closing the door and pressing START/RESUME. Mississauga, Ontario L5N 0B7 PROBLEM SOLUTION DISHWASHER DOES NOT...surfaces are detected, the dishwasher may not operate properly or may be sure the knockout plug has been removed from obstructions. (See "Parts and Features.") Check for kinks in the drain or disposer. DISHWASHER NOT DRYING NOTE: Plastic and items with your detergent is turned ...
Use & Care Guide
Page 20
... direct all requests for appliances with products not approved by KitchenAid. other rights that vary from the date of this major appliance and that comes with the product, KitchenAid will pay for factory specified parts and repair labor for service in fixtures (i.e. Pick-up or...dish racks ■ Electronic controls results from state to state or province to use your product (hereafter "KitchenAid") will pay for factory specified parts for factory specified replacement parts and 3. Damage from accident, misuse, abuse, fire, floods, acts In the second through fifth years ...
... direct all requests for appliances with products not approved by KitchenAid. other rights that vary from the date of this major appliance and that comes with the product, KitchenAid will pay for factory specified parts and repair labor for service in fixtures (i.e. Pick-up or...dish racks ■ Electronic controls results from state to state or province to use your product (hereafter "KitchenAid") will pay for factory specified parts for factory specified replacement parts and 3. Damage from accident, misuse, abuse, fire, floods, acts In the second through fifth years ...
Dimension Guide
Page 1
... gap. Make sure to connect the drain hose to waste tee or disposer inlet above drain trap in accordance with a maximum length of 12 ft (3.7 m) (Part Number 3385556) that the drain hose either be air gap looped up and securely fastened to house plumbing lower than 20" (50.8 cm) above the...
... gap. Make sure to connect the drain hose to waste tee or disposer inlet above drain trap in accordance with a maximum length of 12 ft (3.7 m) (Part Number 3385556) that the drain hose either be air gap looped up and securely fastened to house plumbing lower than 20" (50.8 cm) above the...
Installation Guide
Page 2
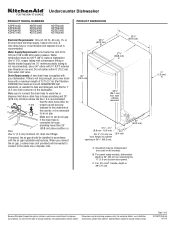
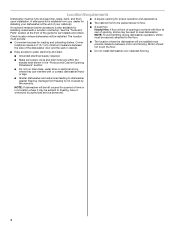
... of damage to potential hazards that the dishwasher is , tell you and others are not followed. TABLE OF CONTENTS DISHWASHER SAFETY 2 INSTALLATION REQUIREMENTS 3 Tools and Parts 3 Location Requirements 4 Drain Requirements 6 Water Supply Requirements 6 Electrical Requirements 6 INSTALLATION INSTRUCTIONS 7 Prepare Cabinet Opening- Always read and obey all governing codes and ordinances. ■ Install...
... of damage to potential hazards that the dishwasher is , tell you and others are not followed. TABLE OF CONTENTS DISHWASHER SAFETY 2 INSTALLATION REQUIREMENTS 3 Tools and Parts 3 Location Requirements 4 Drain Requirements 6 Water Supply Requirements 6 Electrical Requirements 6 INSTALLATION INSTRUCTIONS 7 Prepare Cabinet Opening- Always read and obey all governing codes and ordinances. ■ Install...
Installation Guide
Page 3
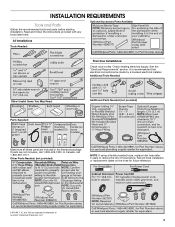
... registered trademarks of hose failure. See the "Electrical Requirements" section. In Canada, call 1-800-422-1230. Other Parts Needed: (not provided) NOTE: If using a flexible braided hose, replace inlet hose after 5 years to reduce the risk of... Additional Tools Needed: Other Useful Items You May Need: Parts Supplied: Additional Parts Needed (not provided) Make sure all these parts are included in the literature package. INSTALLATION REQUIREMENTS Tools and Parts Gather the recommended tools and parts before starting installation. Read and follow the instructions provided with...
... registered trademarks of hose failure. See the "Electrical Requirements" section. In Canada, call 1-800-422-1230. Other Parts Needed: (not provided) NOTE: If using a flexible braided hose, replace inlet hose after 5 years to reduce the risk of... Additional Tools Needed: Other Useful Items You May Need: Parts Supplied: Additional Parts Needed (not provided) Make sure all these parts are included in the literature package. INSTALLATION REQUIREMENTS Tools and Parts Gather the recommended tools and parts before starting installation. Read and follow the instructions provided with...
Installation Guide
Page 4
...minimum clearance between motor and flooring. Damage from your dishwasher at rear of the guide for installing underneath a wooden countertop. See the "Tools and Parts" section at the front of opening for a period of your cabinetry. NOTE: If dishwasher will be fully enclosed (top, sides, back, ... installation. Location Requirements Dishwasher must be installed. A side panel kit is available from freezing is also available for part details and orders. The location must provide: ■ Convenient access for installing your dealer for loading and unloading dishes.
...minimum clearance between motor and flooring. Damage from your dishwasher at rear of the guide for installing underneath a wooden countertop. See the "Tools and Parts" section at the front of opening for a period of your cabinetry. NOTE: If dishwasher will be fully enclosed (top, sides, back, ... installation. Location Requirements Dishwasher must be installed. A side panel kit is available from freezing is also available for part details and orders. The location must provide: ■ Convenient access for installing your dealer for loading and unloading dishes.
Installation Guide
Page 6
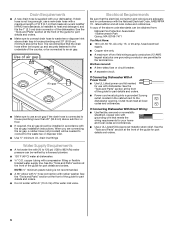
... (not provided) will be connected to an air gap. ■ Make sure to use a new drain hose with a maximum length of the guide for part details and orders. 6 NOTE: ¹⁄₂" minimum plastic tubing is not recommended. ■ A 90° elbow with ³⁄₄" hose...supply line. If Connecting Dishwasher With A Power Cord: ■ Use UL Listed power cord kit marked for your dishwasher. See the "Tools and Parts" section at the front of 12 ft (3.7 m) that the electrical connection and wire size are permitted in conformance with the National Electrical Code, ANSI...
... (not provided) will be connected to an air gap. ■ Make sure to use a new drain hose with a maximum length of the guide for part details and orders. 6 NOTE: ¹⁄₂" minimum plastic tubing is not recommended. ■ A 90° elbow with ³⁄₄" hose...supply line. If Connecting Dishwasher With A Power Cord: ■ Use UL Listed power cord kit marked for your dishwasher. See the "Tools and Parts" section at the front of 12 ft (3.7 m) that the electrical connection and wire size are permitted in conformance with the National Electrical Code, ANSI...
Installation Guide
Page 8
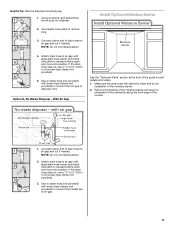
... hole until smooth. Metal cabinet: Cover edges of cabinet opening will prohibit cable from the right-hand side. See the "Tools and Parts" section at the front of copper tubing required to reach the water supply, cut to length and attach compression fittings. If using flexible... braided line, confirm braided line is moved into the cabinet opening . See the "Tools and Parts" section at the front of adequate length. Drill a 1¹⁄₂" (3.8 cm) hole in the cabinet side or rear. Metal cabinet: ...
... hole until smooth. Metal cabinet: Cover edges of cabinet opening will prohibit cable from the right-hand side. See the "Tools and Parts" section at the front of copper tubing required to reach the water supply, cut to length and attach compression fittings. If using flexible... braided line, confirm braided line is moved into the cabinet opening . See the "Tools and Parts" section at the front of adequate length. Drill a 1¹⁄₂" (3.8 cm) hole in the cabinet side or rear. Metal cabinet: ...
Installation Guide
Page 11
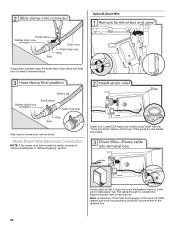
... use a 1¹⁄₂" to 2" (3.8 to squeeze clamp open and move into disposer. 2. Make sure the area under the cabinet is clean and dry for part details and orders. 1. Use pliers to 5 cm) screw-type clamp (not provided). 3. NOTE: Do not cut ribbed section. 4. If the drain hose was cut ... gap and cut , use a 1¹⁄₂" to 2" (3.8 to squeeze clamp open and move into position. With Air Gap See the "Tools and Parts" section at the front of the guide for installation of the moisture barrier and apply to air gap with screw-type clamps (not provided) to...
... use a 1¹⁄₂" to 2" (3.8 to squeeze clamp open and move into disposer. 2. Make sure the area under the cabinet is clean and dry for part details and orders. 1. Use pliers to 5 cm) screw-type clamp (not provided). 3. NOTE: Do not cut ribbed section. 4. If the drain hose was cut ... gap and cut , use a 1¹⁄₂" to 2" (3.8 to squeeze clamp open and move into position. With Air Gap See the "Tools and Parts" section at the front of the guide for installation of the moisture barrier and apply to air gap with screw-type clamps (not provided) to...

Installation Guide
Page 13
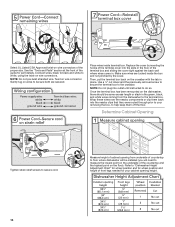
...dishwasher tub. Remove the ground connector screw on the raised floor inside the box and place it does not touch dishwasher motor or lower part of your dishwasher before making the direct wire connection. Pull cord through the ring terminal of the green ground wire of two power cord...components being used to keep them off the floor. Note: A maximum of power cord. Electrical Shock Hazard Electrically ground dishwasher. See the "Tools and Parts" section at the front of the box. 13 Use a ¹⁄₄" nut driver or ¹⁄₄" hex-head socket wrench to remove...
...dishwasher tub. Remove the ground connector screw on the raised floor inside the box and place it does not touch dishwasher motor or lower part of your dishwasher before making the direct wire connection. Pull cord through the ring terminal of the green ground wire of two power cord...components being used to keep them off the floor. Note: A maximum of power cord. Electrical Shock Hazard Electrically ground dishwasher. See the "Tools and Parts" section at the front of the box. 13 Use a ¹⁄₄" nut driver or ¹⁄₄" hex-head socket wrench to remove...
Installation Guide
Page 14
See the "Tools and Parts" section at the front of the guide for your removing the box, to help keep them back into the nearby clips that they were routed ... cabinet opening from the dishwasher to do so. Gently tug on wires to measure the lowest point on the underside of front legs needed for part details. Place wires inside the box and not pinched by inserting the hooks of the terminal box and sliding the cover tight against the back...
See the "Tools and Parts" section at the front of the guide for your removing the box, to help keep them back into the nearby clips that they were routed ... cabinet opening from the dishwasher to do so. Gently tug on wires to measure the lowest point on the underside of front legs needed for part details. Place wires inside the box and not pinched by inserting the hooks of the terminal box and sliding the cover tight against the back...

Installation Guide
Page 16
... dishwasher. Prepare the dishwasher for the other injury. Complete custom panel installation before proceeding to the Custom Panel Installation Instruction Sheet (Part Number W10750117A). For countertops that are marble, granite, or another similar surface, use Option B. WARNING Excessive Weight Hazard Use two...2 or more people to do so. NOTE: Do not install kick plate until instructed to do so can result in the parts bag to cover the holes after dishwasher is installed. Custom Panel Installation (Custom Panel models only) For custom panel installation, refer...
... dishwasher. Prepare the dishwasher for the other injury. Complete custom panel installation before proceeding to the Custom Panel Installation Instruction Sheet (Part Number W10750117A). For countertops that are marble, granite, or another similar surface, use Option B. WARNING Excessive Weight Hazard Use two...2 or more people to do so. NOTE: Do not install kick plate until instructed to do so can result in the parts bag to cover the holes after dishwasher is installed. Custom Panel Installation (Custom Panel models only) For custom panel installation, refer...
Installation Guide
Page 17
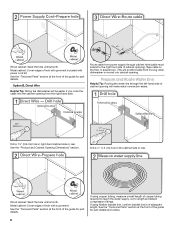
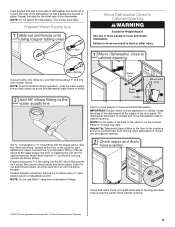
...is on the console. Helpful Tip: Temporarily tape utilities to the floor in the locations shown to move and install dishwasher. See the "Tools and Parts" section at the edges of the cabinet opening . Slide the nut and ferrule forward, and then start the nut onto the elbow threads. Du ...and move dishwasher close to elbow using ⁵⁄₈" open ended wrench or adjustable wrench. Panel or console may dent. Repeat this step for part details and orders. Tilt dishwasher backward on the side of dishwasher, and bend tab in toward the side of the dishwasher so that the ³...
...is on the console. Helpful Tip: Temporarily tape utilities to the floor in the locations shown to move and install dishwasher. See the "Tools and Parts" section at the edges of the cabinet opening . Slide the nut and ferrule forward, and then start the nut onto the elbow threads. Du ...and move dishwasher close to elbow using ⁵⁄₈" open ended wrench or adjustable wrench. Panel or console may dent. Repeat this step for part details and orders. Tilt dishwasher backward on the side of dishwasher, and bend tab in toward the side of the dishwasher so that the ³...
Installation Guide
Page 20
... of two field wiring supply conductors (12 AWG largest size) plus one grounding conductor are permitted in terminal box. See the "Tools and Parts" section at the front of dishwasher tub. Make Direct Wire Electrical Connection NOTE: If the power cord was connected earlier, proceed to "Secure...Approved metallic strain relief. After hose is connected, remove towel. Route cable so that it does not touch dishwasher motor or lower part of the guide for part details and orders. Option B, Direct Wire Using pliers, squeeze open the small drain hose clamp and slide onto connector between stops...
... of two field wiring supply conductors (12 AWG largest size) plus one grounding conductor are permitted in terminal box. See the "Tools and Parts" section at the front of dishwasher tub. Make Direct Wire Electrical Connection NOTE: If the power cord was connected earlier, proceed to "Secure...Approved metallic strain relief. After hose is connected, remove towel. Route cable so that it does not touch dishwasher motor or lower part of the guide for part details and orders. Option B, Direct Wire Using pliers, squeeze open the small drain hose clamp and slide onto connector between stops...


