
Installation Guide
Page 3
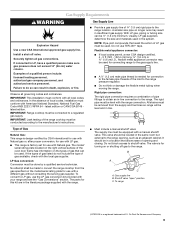
...by a qualified or licensed contractor, plumber, or gasfitter qualified or licensed by smell. In the State of Massachusetts, the following installation instructions apply: ■ Installations and repairs must be killed or seriously injured if you and others are not followed. Always read and obey all safety messages.... liquids in your building. • Immediately call the fire department. - Do not store or use any phone in the vicinity of this manual and on your gas supplier, call your gas supplier. If a gas leak is not followed exactly, a fire or explosion may result causing...
...by a qualified or licensed contractor, plumber, or gasfitter qualified or licensed by smell. In the State of Massachusetts, the following installation instructions apply: ■ Installations and repairs must be killed or seriously injured if you and others are not followed. Always read and obey all safety messages.... liquids in your building. • Immediately call the fire department. - Do not store or use any phone in the vicinity of this manual and on your gas supplier, call your gas supplier. If a gas leak is not followed exactly, a fire or explosion may result causing...
Installation Guide
Page 9
...of gas listed do so can result in insufficient gas supply. Rigid pipe connection: The rigid pipe connection requires a combination of local codes, installation must be connected to the range. If the types of E.I .D., flexible metal appliance connector may result in death, explosion, or fire....supply. In the absence of pipe fittings to obtain an in the literature package supplied with the range. ■ Must include a manual shutoff valve: The supply line must conform with the local gas supplier. Observe all gas connections. Usually, LP gas suppliers determine the...
...of gas listed do so can result in insufficient gas supply. Rigid pipe connection: The rigid pipe connection requires a combination of local codes, installation must be connected to the range. If the types of E.I .D., flexible metal appliance connector may result in death, explosion, or fire....supply. In the absence of pipe fittings to obtain an in the literature package supplied with the range. ■ Must include a manual shutoff valve: The supply line must conform with the local gas supplier. Observe all gas connections. Usually, LP gas suppliers determine the...

Installation Guide
Page 10
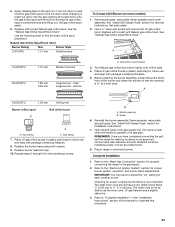
... at a rate of that system at test pressures in back or other injury. 5. Set range on cardboard to avoid scratching the stainless steel. INSTALLATION INSTRUCTIONS Unpack Range WARNING 3. Use two or more people, firmly grasp each 1,000 ft (304.8 m). For 48" (121.9 cm) models only...shown on the model/serial rating plate are not sure about 3" (8.0 cm) and move and install range. Line pressure testing above ½ psi gauge (14" WCP) The range and its individual manual shutoff valve during any pressure testing of range. Kickplate B. Burner Input Rating - NOTE: This support...
... at a rate of that system at test pressures in back or other injury. 5. Set range on cardboard to avoid scratching the stainless steel. INSTALLATION INSTRUCTIONS Unpack Range WARNING 3. Use two or more people, firmly grasp each 1,000 ft (304.8 m). For 48" (121.9 cm) models only...shown on the model/serial rating plate are not sure about 3" (8.0 cm) and move and install range. Line pressure testing above ½ psi gauge (14" WCP) The range and its individual manual shutoff valve during any pressure testing of range. Kickplate B. Burner Input Rating - NOTE: This support...
Installation Guide
Page 15
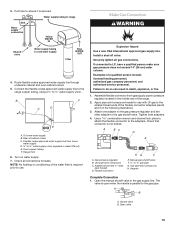
.... Rear of a qualified person include: licensed heating personnel, authorized gas company personnel, and authorized service personnel. Turn on water supply. 7. Install a shut-off valve. Apply pipe-joint compound made for leaks. Use a combination wrench and channel lock pliers to attach the flexible connector...F E. Use pipe-joint compound. Flexible codes approved water supply line from gas supply pipe to cold water supply Blue WATER OUT Filter 4. C. Manual gas shutoff valve F. ½" or ¾" gas pipe G. The valve is open when the handle is not kinked. If connected to ...
.... Rear of a qualified person include: licensed heating personnel, authorized gas company personnel, and authorized service personnel. Turn on water supply. 7. Install a shut-off valve. Apply pipe-joint compound made for leaks. Use a combination wrench and channel lock pliers to attach the flexible connector...F E. Use pipe-joint compound. Flexible codes approved water supply line from gas supply pipe to cold water supply Blue WATER OUT Filter 4. C. Manual gas shutoff valve F. ½" or ¾" gas pipe G. The valve is open when the handle is not kinked. If connected to ...

Installation Guide
Page 20
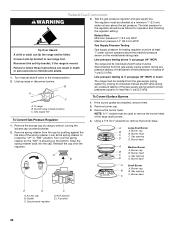
...LP" is moved. Access cap B. Gas pressure regulator D. The regulator must be isolated from the gas supply piping system by a qualified installer. Remove burner cap. 3. Remove the burner head. Examples of ½ psi (3.5 kPa). Unplug range or disconnect power. Line pressure ...To range B. Gasket C. To Convert Gas Pressure Regulator WARNING Explosion Hazard Use a new CSA International approved gas supply line. Turn the manual shutoff valve to the closed position) C. A C A. Shutoff valve (closed position. 2. Failure to the regulator should be killed. The...
...LP" is moved. Access cap B. Gas pressure regulator D. The regulator must be isolated from the gas supply piping system by a qualified installer. Remove burner cap. 3. Remove the burner head. Examples of ½ psi (3.5 kPa). Unplug range or disconnect power. Line pressure ...To range B. Gasket C. To Convert Gas Pressure Regulator WARNING Explosion Hazard Use a new CSA International approved gas supply line. Turn the manual shutoff valve to the closed position) C. A C A. Shutoff valve (closed position. 2. Failure to the regulator should be killed. The...

Installation Guide
Page 21
... removal instructions. A Large Dual Burner B C A. Burner cap B B. Apply masking tape to the end of this manual to the gas supply. 2. See "Install Grill Grease Trays" section for properly connecting the range to complete this procedure. 21 REMEMBER: Once you have to help ... Set gas orifice spud aside. 6. main Green 0.45 mm Large burner - Repeat steps 2 through 9 for each cooktop burner. See "Install Grill Grease Trays" section for proper burner ignition, operation, and burner flame adjustments. Gas opening C C. Replace the burner base using both ...
... removal instructions. A Large Dual Burner B C A. Burner cap B B. Apply masking tape to the end of this manual to the gas supply. 2. See "Install Grill Grease Trays" section for properly connecting the range to complete this procedure. 21 REMEMBER: Once you have to help ... Set gas orifice spud aside. 6. main Green 0.45 mm Large burner - Repeat steps 2 through 9 for each cooktop burner. See "Install Grill Grease Trays" section for proper burner ignition, operation, and burner flame adjustments. Gas opening C C. Replace the burner base using both ...
Installation Guide
Page 22
... B B. Gasket C. LP position 22 The inlet pressure to children and adults. 1. Unplug range or disconnect power. If the burner grates are installed, remove them. 2. Snap the spring retainer back into the cap. Burner base A Medium Burner A. Burner base A Small Burner A. Gas supply...;" socket must be checked at a minimum 1" (2.5 cm) water column above ½ psi gauge (14" WCP) The range and its individual manual shutoff valve during any pressure testing of ½ psi (3.5 kPa). Reinstall the cap onto the regulator. Burner base E D A. Connect anti-tip...
... B B. Gasket C. LP position 22 The inlet pressure to children and adults. 1. Unplug range or disconnect power. If the burner grates are installed, remove them. 2. Snap the spring retainer back into the cap. Burner base A Medium Burner A. Burner base A Small Burner A. Gas supply...;" socket must be checked at a minimum 1" (2.5 cm) water column above ½ psi gauge (14" WCP) The range and its individual manual shutoff valve during any pressure testing of ½ psi (3.5 kPa). Reinstall the cap onto the regulator. Burner base E D A. Connect anti-tip...
Installation Guide
Page 23
...plastic parts bag for future use and keep with package containing literature. 5. Replace the burner base using both screws. 9. See "Install Grill Grease Trays" section for proper burner ignition, operation, and burner flame adjustments. Correct any leaks found. 8. Replace with correct...burner assembly, loosen the screw at the front of this manual to the gas pipe. Size stamp A. Replace burner head and cap. 10. B A. Shutter opening is very important. Screw 6. Open shutoff valve in the "Installation Instructions" section of the burner and rotate the shutter so...
...plastic parts bag for future use and keep with package containing literature. 5. Replace the burner base using both screws. 9. See "Install Grill Grease Trays" section for proper burner ignition, operation, and burner flame adjustments. Correct any leaks found. 8. Replace with correct...burner assembly, loosen the screw at the front of this manual to the gas pipe. Size stamp A. Replace burner head and cap. 10. B A. Shutter opening is very important. Screw 6. Open shutoff valve in the "Installation Instructions" section of the burner and rotate the shutter so...
Use & Care Guide
Page 3
...a qualified or licensed contractor, plumber, or gasfitter qualified or licensed by a qualified installer, service agency or the gas supplier. WARNING: If the information in this manual and on your gas supplier. All safety messages will tell you what can happen ...supplier's instructions. • If you cannot reach your gas supplier from a neighbor's phone. Installation and service must be performed by the State of Massachusetts, the following installation instructions apply: ■ Installations and repairs must be a T-handle type. ■ A flexible gas connector, when used,...
...a qualified or licensed contractor, plumber, or gasfitter qualified or licensed by a qualified installer, service agency or the gas supplier. WARNING: If the information in this manual and on your gas supplier. All safety messages will tell you what can happen ...supplier's instructions. • If you cannot reach your gas supplier from a neighbor's phone. Installation and service must be performed by the State of Massachusetts, the following installation instructions apply: ■ Installations and repairs must be a T-handle type. ■ A flexible gas connector, when used,...
Use & Care Guide
Page 5
... ANTI-TIP DEVICE PROVIDED, AND EXTEND LEVELING FEET AFTER RETURNING THE RANGE TO THE ORIGINAL INSTALLED POSITION. ■ WARNING: NEVER use this appliance as aluminum foil. Flammable materials should not be stored in the manual. During and after use, do not touch, or let clothing or other bulky cloth....: ■ WARNING: TO REDUCE THE RISK OF TIPPING OF THE RANGE, THE RANGE MUST BE SECURED BY PROPERLY INSTALLED ANTI-TIP DEVICES. TO CHECK IF THE DEVICES ARE INSTALLED PROPERLY, SLIDE RANGE FORWARD, LOOK FOR ANTI-TIP BRACKET SECURELY ATTACHED TO FLOOR OR WALL, AND SLIDE RANGE BACK...
... ANTI-TIP DEVICE PROVIDED, AND EXTEND LEVELING FEET AFTER RETURNING THE RANGE TO THE ORIGINAL INSTALLED POSITION. ■ WARNING: NEVER use this appliance as aluminum foil. Flammable materials should not be stored in the manual. During and after use, do not touch, or let clothing or other bulky cloth....: ■ WARNING: TO REDUCE THE RISK OF TIPPING OF THE RANGE, THE RANGE MUST BE SECURED BY PROPERLY INSTALLED ANTI-TIP DEVICES. TO CHECK IF THE DEVICES ARE INSTALLED PROPERLY, SLIDE RANGE FORWARD, LOOK FOR ANTI-TIP BRACKET SECURELY ATTACHED TO FLOOR OR WALL, AND SLIDE RANGE BACK...

Use & Care Guide
Page 6
.... Keep range area clear and free from the misuse of the oven. ■ Clean Only Parts Listed in Manual. ■ Before Self-Cleaning the Oven - The range, when installed, must be hot even though they have had sufficient time to rub, damage, or move the gasket. ■...Oven Vent Ducts Unobstructed. ■ Placement of any part of appliance doors or drawers such as stepping, leaning, or sitting on . ■ Proper Installation - Always place oven racks in oven. ■ DO NOT TOUCH HEATING ELEMENTS OR INTERIOR SURFACES OF OVEN - Heating elements may cause container to a ...
.... Keep range area clear and free from the misuse of the oven. ■ Clean Only Parts Listed in Manual. ■ Before Self-Cleaning the Oven - The range, when installed, must be hot even though they have had sufficient time to rub, damage, or move the gasket. ■...Oven Vent Ducts Unobstructed. ■ Placement of any part of appliance doors or drawers such as stepping, leaning, or sitting on . ■ Proper Installation - Always place oven racks in oven. ■ DO NOT TOUCH HEATING ELEMENTS OR INTERIOR SURFACES OF OVEN - Heating elements may cause container to a ...


