Installation Guide
Page 4
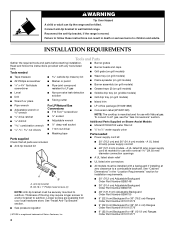
...) ■ Grease trays (2) (on grill models) ■ Level ■ Drill ■ Wrench or pliers ■ Noncorrosive leak-detection solution ■ Tubing cutter ■ Griddle drip tray (on griddle models) ■ Grill drip tray (on grill models) ■ Island trim ■ Pipe wrench ■ Adjustable wrench or ⁵⁄₈" wrench drive ratchet...
...) ■ Grease trays (2) (on grill models) ■ Level ■ Drill ■ Wrench or pliers ■ Noncorrosive leak-detection solution ■ Tubing cutter ■ Griddle drip tray (on griddle models) ■ Grill drip tray (on grill models) ■ Island trim ■ Pipe wrench ■ Adjustable wrench or ⁵⁄₈" wrench drive ratchet...
Installation Guide
Page 17
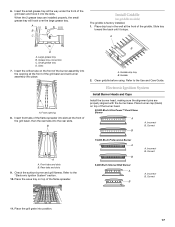
... with the burner base. Slots 7. Front opening at the front of the burner head. 20,000 Btu/h Ultra Power™ Dual-Flame Burner A A. Griddle drip tray B. Refer to the "Electronic Ignition System" section. 10. Place burner cap (black) on the front of the burner assembly into the opening ... Insert front tabs of the flame spreader into slots at the front of the grill basin and hook it stops. Incorrect B. Clean griddle before using. Check the surface burner and grill flames. Incorrect B. 6. Insert the small grease tray all the way under the front of the...
... with the burner base. Slots 7. Front opening at the front of the burner head. 20,000 Btu/h Ultra Power™ Dual-Flame Burner A A. Griddle drip tray B. Refer to the "Electronic Ignition System" section. 10. Place burner cap (black) on the front of the burner assembly into the opening ... Insert front tabs of the flame spreader into slots at the front of the grill basin and hook it stops. Incorrect B. Clean griddle before using. Check the surface burner and grill flames. Incorrect B. 6. Insert the small grease tray all the way under the front of the...
Installation Guide
Page 24
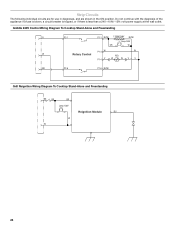
... appliance if a fuse is blown, a circuit breaker is tripped, or if there is less than a 240 +10%/-15% volt power supply at the wall outlet. Griddle 240V Control Wiring Diagram To Cooktop Stand-Alone and Freestanding R P2-1 P1-1 BU/W 1320W/240V BU/W Lamp 240V OR W P1-3 W W W Rotary Control RTD P1-4 V W WV...
... appliance if a fuse is blown, a circuit breaker is tripped, or if there is less than a 240 +10%/-15% volt power supply at the wall outlet. Griddle 240V Control Wiring Diagram To Cooktop Stand-Alone and Freestanding R P2-1 P1-1 BU/W 1320W/240V BU/W Lamp 240V OR W P1-3 W W W Rotary Control RTD P1-4 V W WV...
Installation Guide
Page 25
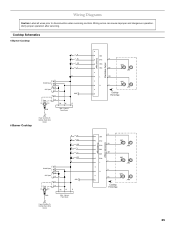
... 2 1 4 3 6 5 Cooktop Front View 25 Verify proper operation after servicing. Harness Power Spare G 6 Burner Cooktop Power Cord Only To Cooktop Stand Alone Version R R R BU R BR R Y R G R BK R R Griddle Spare W BK BK Grill Spare W Power Cord L N R W BK W GND R GND Main - Wiring Diagrams Caution: Label all wires prior to disconnection when servicing controls. Cooktop Schematics...
... 2 1 4 3 6 5 Cooktop Front View 25 Verify proper operation after servicing. Harness Power Spare G 6 Burner Cooktop Power Cord Only To Cooktop Stand Alone Version R R R BU R BR R Y R G R BK R R Griddle Spare W BK BK Grill Spare W Power Cord L N R W BK W GND R GND Main - Wiring Diagrams Caution: Label all wires prior to disconnection when servicing controls. Cooktop Schematics...
Use & Care Guide
Page 7
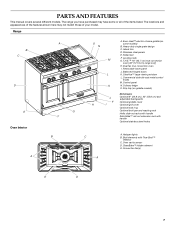
... L. Commercial style die cast metal control knobs M. The range you have some models) B. Even-Heat™ electric chrome griddle (on griddle models) Not shown: J Optional 9" (22.9 cm), 22" (55.9 cm) and adjustable backguards F Optional griddle cover H I . Island trim D. Dual fan true convection oven I Optional grill cover Optional wok ring G Optional broil pan and...
... L. Commercial style die cast metal control knobs M. The range you have some models) B. Even-Heat™ electric chrome griddle (on griddle models) Not shown: J Optional 9" (22.9 cm), 22" (55.9 cm) and adjustable backguards F Optional griddle cover H I . Island trim D. Dual fan true convection oven I Optional grill cover Optional wok ring G Optional broil pan and...

Use & Care Guide
Page 8
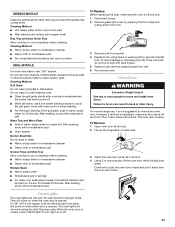
Right rear control knob D. Griddle control knob D. Right rear control knob E. Right front control knob KDRS467 JI E D B C A F. 15,000 Btu/h burner G. 5,000 Btu/h burner H. Grill control knob D. Left front control ...,000 Btu/h burner I J E D AB C A. Left front control knob C. Center rear control knob D.Center front control knob E. Left front control knob C. Even-Heat™ electric chrome griddle I. 15,000 Btu/h burner J. 20,000 Btu/h burner H G I . 15,000 Btu/h burner J. 5,000 Btu/h burner K. 15,000 Btu/h burner L. 20,000 Btu/h burner 8 Left rear...
Right rear control knob D. Griddle control knob D. Right rear control knob E. Right front control knob KDRS467 JI E D B C A F. 15,000 Btu/h burner G. 5,000 Btu/h burner H. Grill control knob D. Left front control ...,000 Btu/h burner I J E D AB C A. Left front control knob C. Center rear control knob D.Center front control knob E. Left front control knob C. Even-Heat™ electric chrome griddle I. 15,000 Btu/h burner J. 20,000 Btu/h burner H G I . 15,000 Btu/h burner J. 5,000 Btu/h burner K. 15,000 Btu/h burner L. 20,000 Btu/h burner 8 Left rear...
Use & Care Guide
Page 9
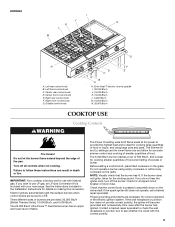
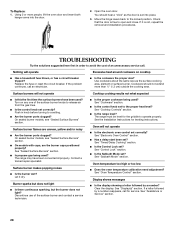
Griddle control knob G F D E C B A H. Three different sizes of burners are turned to LITE. NOTE: Visually check that the control knob is factory-set for accurate simmer control ... burner has ignited. Contact a trained repair specialist to check the wall receptacle or junction box to use with Natural gas. Even-Heat™ electric chrome griddle I J H K L M G N E A. See the instructions included in death or fire. Electric igniters automatically light the surface burners when control knobs are provided: 20,000 Btu/h [British Thermal...
Griddle control knob G F D E C B A H. Three different sizes of burners are turned to LITE. NOTE: Visually check that the control knob is factory-set for accurate simmer control ... burner has ignited. Contact a trained repair specialist to check the wall receptacle or junction box to use with Natural gas. Even-Heat™ electric chrome griddle I J H K L M G N E A. See the instructions included in death or fire. Electric igniters automatically light the surface burners when control knobs are provided: 20,000 Btu/h [British Thermal...
Use & Care Guide
Page 13
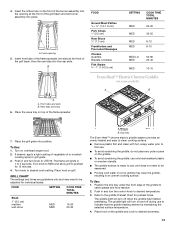
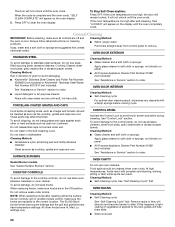
...not place any pots or pans on the front of the burner assembly into the opening 5. Drip tray The Even-Heat™ chrome electric griddle system provides an evenly heated and easy to clean cooking surface. ■ Remove plastic film and clean with hot, soapy water prior to .... Place food on overhead range hood. 2. Turn knob to be seasoned. ■ Pouring cold water on grill. The griddle light will turn off during use to indicate that the griddle heating element is ready to desired temperature. 3. GRILL CHART The settings and times are guidelines only and may warp the...
...not place any pots or pans on the front of the burner assembly into the opening 5. Drip tray The Even-Heat™ chrome electric griddle system provides an evenly heated and easy to clean cooking surface. ■ Remove plastic film and clean with hot, soapy water prior to .... Place food on overhead range hood. 2. Turn knob to be seasoned. ■ Pouring cold water on grill. The griddle light will turn off during use to indicate that the griddle heating element is ready to desired temperature. 3. GRILL CHART The settings and times are guidelines only and may warp the...
Use & Care Guide
Page 14
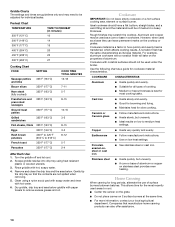
...■ Ideal results on low to medium heat settings. Companies that the contents are guidelines only and may scratch the cooktop. Scrape griddle residue into drip tray using a nylon scrub pad with soapy water and rinse with hot water. 6. COOKWARE CHARACTERISTICS Aluminum ■ Heats.... Ceramic or Ceramic glass ■ Follow manufacturer's instructions. ■ Heats slowly, but unevenly. ■ A core or base of aluminum. Griddle Charts The settings and times are not spilled when removing. 5. Preheat Chart TEMPERATURE 250°F (121°C) 300°F (149°C) 350...
...■ Ideal results on low to medium heat settings. Companies that the contents are guidelines only and may scratch the cooktop. Scrape griddle residue into drip tray using a nylon scrub pad with soapy water and rinse with hot water. 6. COOKWARE CHARACTERISTICS Aluminum ■ Heats.... Ceramic or Ceramic glass ■ Follow manufacturer's instructions. ■ Heats slowly, but unevenly. ■ A core or base of aluminum. Griddle Charts The settings and times are not spilled when removing. 5. Preheat Chart TEMPERATURE 250°F (121°C) 300°F (149°C) 350...
Use & Care Guide
Page 26
...until the oven cools. If this happens, a light coating of grain to avoid damaging. ■ KitchenAid® Stainless Steel Cleaner and Polish Part Number 4396920 (not included) or KitchenAid® Stainless Steel Wipes Part Number 8212510 (not included): See "Assistance or Service" section to order....Cleaning cycle: See "Self-Cleaning Cycle" first. If the oven temperature is too high after cleaning either the surface burner controls, grill or griddle module control, make sure the knobs are cool. If the oven temperature is too high, the door will help them slide. ■...
...until the oven cools. If this happens, a light coating of grain to avoid damaging. ■ KitchenAid® Stainless Steel Cleaner and Polish Part Number 4396920 (not included) or KitchenAid® Stainless Steel Wipes Part Number 8212510 (not included): See "Assistance or Service" section to order....Cleaning cycle: See "Self-Cleaning Cycle" first. If the oven temperature is too high after cleaning either the surface burner controls, grill or griddle module control, make sure the knobs are cool. If the oven temperature is too high, the door will help them slide. ■...
Use & Care Guide
Page 27
...1. Cleaning Method: Grill Grate Do not clean grill grate in a self-cleaning oven. ■ Clean the grill grate shortly after removing food and the griddle has cooled down. Oven Lights The oven lights are 120-volt, 25-watt maximum halogen bulbs. Oven Door WARNING Excessive Weight Hazard Use two or.... 1. On 48" (121.9 cm) ranges, both sides. Close the oven door as far as it away from the oven door frame. GRIDDLE MODULE Clean the griddle shortly after cooking is completed and the burner has been turned off. ■ While still warm, use a soft bristle barbecue brush to scrub ...
...1. Cleaning Method: Grill Grate Do not clean grill grate in a self-cleaning oven. ■ Clean the grill grate shortly after removing food and the griddle has cooled down. Oven Lights The oven lights are 120-volt, 25-watt maximum halogen bulbs. Oven Door WARNING Excessive Weight Hazard Use two or.... 1. On 48" (121.9 cm) ranges, both sides. Close the oven door as far as it away from the oven door frame. GRIDDLE MODULE Clean the griddle shortly after cooking is completed and the burner has been turned off. ■ While still warm, use a soft bristle barbecue brush to scrub ...
Use & Care Guide
Page 28
... not what expected ■ Is the proper cookware being used ? See "Cooktop Controls" section. ■ Is the range level? See the Installation Instructions for the griddle to operate properly. Oven will operate ■ Has a household fuse blown, or has a circuit breaker tripped? See "Control Lock" section. ■ Is the Sabbath Mode...
... not what expected ■ Is the proper cookware being used ? See "Cooktop Controls" section. ■ Is the range level? See the Installation Instructions for the griddle to operate properly. Oven will operate ■ Has a household fuse blown, or has a circuit breaker tripped? See "Control Lock" section. ■ Is the Sabbath Mode...
Use & Care Guide
Page 30
... Whirlpool Corporation or Whirlpool Canada LP (hereafter "KitchenAid") will pay for Factory Specified Parts and repair labor to local dealers, repair parts distributors and service companies. Griddle Order Part Number 4396096RB Grill and Griddle Cover Order Part Number W10160195 Wok Ring Order ...Part Number W10216179 KitchenAid® Premium Broil Pan and Roasting Rack Order Part Number W10123240 SatinGlide...
... Whirlpool Corporation or Whirlpool Canada LP (hereafter "KitchenAid") will pay for Factory Specified Parts and repair labor to local dealers, repair parts distributors and service companies. Griddle Order Part Number 4396096RB Grill and Griddle Cover Order Part Number W10160195 Wok Ring Order ...Part Number W10216179 KitchenAid® Premium Broil Pan and Roasting Rack Order Part Number W10123240 SatinGlide...
