Installation Guide
Page 17
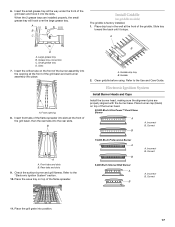
... the grill basin and set burner assembly into place. Rear tabs and slots 9. Correct A. A B C Install Griddle (on top of the flame spreader. 15,000 Btu/h Professional Burner A B 5,000 Btu/h Simmer/Melt Burner A B A. Grease tray connection C. Insert the orifice tube on top of the burner head. 20,000... Btu/h Ultra Power™ Dual-Flame Burner A A. Place burner cap (black) on griddle models) The griddle is factory installed. 1. Front tabs and slots B. Refer to...
... the grill basin and set burner assembly into place. Rear tabs and slots 9. Correct A. A B C Install Griddle (on top of the flame spreader. 15,000 Btu/h Professional Burner A B 5,000 Btu/h Simmer/Melt Burner A B A. Grease tray connection C. Insert the orifice tube on top of the burner head. 20,000... Btu/h Ultra Power™ Dual-Flame Burner A A. Place burner cap (black) on griddle models) The griddle is factory installed. 1. Front tabs and slots B. Refer to...

Installation Guide
Page 21
... aside. 6. LP Gas Orifice Spud/Hood Chart Burner Rating Color Size Burner Style 3,000 BTU Blue 0.55 mm Small burners 12,500 BTU Brass 1.04 mm Medium burners 15,500 BTU Yellow 1.05 mm Large burner - simmer 14,500 BTU Black Burner orifice spud A 1.18 mm Grill burner Grill orifice hood A A. Size stamp or...
... aside. 6. LP Gas Orifice Spud/Hood Chart Burner Rating Color Size Burner Style 3,000 BTU Blue 0.55 mm Small burners 12,500 BTU Brass 1.04 mm Medium burners 15,500 BTU Yellow 1.05 mm Large burner - simmer 14,500 BTU Black Burner orifice spud A 1.18 mm Grill burner Grill orifice hood A A. Size stamp or...
Installation Guide
Page 23
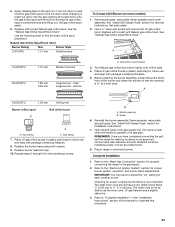
...cm) long. Correct any leaks found. 8. Refer to find the exact orifice spud placement. The outer cone is very important. A 15,000 BTU 20,000 BTU 1.75 mm 1.89 mm 0.69 mm Medium burners Large burner - simmer A. Turn Natural gas orifice hood down onto the gas orifice spud and... down tightly onto orifice base. 4. Repeat steps 2 through 9 for proper cooktop burner flame is not as distinct as the inner cone. A 18,000 BTU 1.93 mm Grill burner Burner orifice spud Grill orifice hood A A A. IMPORTANT: You may have a slightly yellow tip. 3. Insert nut driver into the...
...cm) long. Correct any leaks found. 8. Refer to find the exact orifice spud placement. The outer cone is very important. A 15,000 BTU 20,000 BTU 1.75 mm 1.89 mm 0.69 mm Medium burners Large burner - simmer A. Turn Natural gas orifice hood down onto the gas orifice spud and... down tightly onto orifice base. 4. Repeat steps 2 through 9 for proper cooktop burner flame is not as distinct as the inner cone. A 18,000 BTU 1.93 mm Grill burner Burner orifice spud Grill orifice hood A A A. IMPORTANT: You may have a slightly yellow tip. 3. Insert nut driver into the...

Use & Care Guide
Page 8
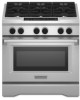
...Heat™ electric chrome griddle I. 15,000 Btu/h burner J. 20,000 Btu/h burner H G I . 15,000 Btu/h burner J. 5,000 Btu/h burner K. 15,000 Btu/h burner L. 20,000 Btu/h burner 8 Right front control knob F. 15,000 Btu/h burner G. 5,000 Btu/h burner H. Left front control knob C. Right...B. Right rear control knob D. Griddle control knob D. Right rear control knob E. Right front control knob B A F E D C G. 20,000 Btu/h burner H. 15,000 Btu/h burner I J E D AB C A. Left rear control knob B. Grill control knob D. Left rear control knob B. Left front control knob C. ...
...Heat™ electric chrome griddle I. 15,000 Btu/h burner J. 20,000 Btu/h burner H G I . 15,000 Btu/h burner J. 5,000 Btu/h burner K. 15,000 Btu/h burner L. 20,000 Btu/h burner 8 Right front control knob F. 15,000 Btu/h burner G. 5,000 Btu/h burner H. Left front control knob C. Right...B. Right rear control knob D. Griddle control knob D. Right rear control knob E. Right front control knob B A F E D C G. 20,000 Btu/h burner H. 15,000 Btu/h burner I J E D AB C A. Left rear control knob B. Grill control knob D. Left rear control knob B. Left front control knob C. ...
Use & Care Guide
Page 9
...the spark igniter still does not operate, call a trained repair specialist. Center front control knob E. Right rear control knob F. The 20,000 Btu/h Ultra Power™ dual-flame burner has an upper and lower level of burners are turned to use the lower flame only and allow for... the clicking sound. Electric igniters automatically light the surface burners when control knobs are provided: 20,000 Btu/h [British Thermal Units], 15,000 Btu/h, and 5,000 Btu/h. Left rear control knob B. Three different sizes of flame. The Simmer Hi and Lo settings use LP gas, an...
...the spark igniter still does not operate, call a trained repair specialist. Center front control knob E. Right rear control knob F. The 20,000 Btu/h Ultra Power™ dual-flame burner has an upper and lower level of burners are turned to use the lower flame only and allow for... the clicking sound. Electric igniters automatically light the surface burners when control knobs are provided: 20,000 Btu/h [British Thermal Units], 15,000 Btu/h, and 5,000 Btu/h. Left rear control knob B. Three different sizes of flame. The Simmer Hi and Lo settings use LP gas, an...
Use & Care Guide
Page 10
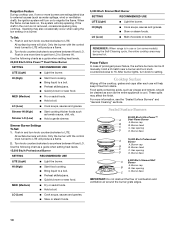
... a flame. 2. Only the burner with the control knob turned to external causes (such as a guide when setting heat levels. 15,000 Btu/h Professional Burner SETTING RECOMMENDED USE LITE (Light) ■ Light the burner. Use the following charts as tomato sauce, chili, etc. ■...LITE. Burner head C C. Burner cap B B. LO (Low) ■ Cook soups, sauces and gravies. ■ Stew or steam foods. 5,000 Btu/h Simmer/Melt Burner SETTING RECOMMENDED USE LITE (Light) ■ Light the burner. Hold a lit match near a burner and turn knob counterclockwise to anywhere between...
... a flame. 2. Only the burner with the control knob turned to external causes (such as a guide when setting heat levels. 15,000 Btu/h Professional Burner SETTING RECOMMENDED USE LITE (Light) ■ Light the burner. Use the following charts as tomato sauce, chili, etc. ■...LITE. Burner head C C. Burner cap B B. LO (Low) ■ Cook soups, sauces and gravies. ■ Stew or steam foods. 5,000 Btu/h Simmer/Melt Burner SETTING RECOMMENDED USE LITE (Light) ■ Light the burner. Hold a lit match near a burner and turn knob counterclockwise to anywhere between...

Use & Care Guide
Page 11
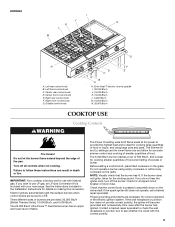
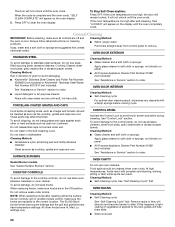
... should be adjusted, contact a trained repair specialist. 4. Do not use a wooden toothpick. Remove the burner cap and burner head (15,000 and 5,000 Btu/h burners) from the burner base and clean according to the "General Cleaning" section. Correct A B D C E F A. Flame spreader E. Drip tray ...: Gas must flow freely throughout the gas opening . Contact a trained repair specialist. Clean clogged burner ports with the burner cap. 20,000 Btu/h Ultra Power™ Dual-Flame Burner A A. Do not use oven cleaners, bleach or rust removers. 1. Wave tray C. Burner assembly D....
... should be adjusted, contact a trained repair specialist. 4. Do not use a wooden toothpick. Remove the burner cap and burner head (15,000 and 5,000 Btu/h burners) from the burner base and clean according to the "General Cleaning" section. Correct A B D C E F A. Flame spreader E. Drip tray ...: Gas must flow freely throughout the gas opening . Contact a trained repair specialist. Clean clogged burner ports with the burner cap. 20,000 Btu/h Ultra Power™ Dual-Flame Burner A A. Do not use oven cleaners, bleach or rust removers. 1. Wave tray C. Burner assembly D....
Use & Care Guide
Page 26
...locked. If the oven temperature is cool. These spills may affect the finish. COOKTOP CONTROLS To avoid damage to slide. The 20,000 Btu/h burner knobs have power settings and the grill and griddle knobs have Hi, Med, Lo settings only. To avoid damage to soft ...location. See "Control Lock" section. If this happens, a light coating of grain to avoid damaging. ■ KitchenAid® Stainless Steel Cleaner and Polish Part Number 4396920 (not included) or KitchenAid® Stainless Steel Wipes Part Number 8212510 (not included): See "Assistance or Service" section to order. If the...
...locked. If the oven temperature is cool. These spills may affect the finish. COOKTOP CONTROLS To avoid damage to slide. The 20,000 Btu/h burner knobs have power settings and the grill and griddle knobs have Hi, Med, Lo settings only. To avoid damage to soft ...location. See "Control Lock" section. If this happens, a light coating of grain to avoid damaging. ■ KitchenAid® Stainless Steel Cleaner and Polish Part Number 4396920 (not included) or KitchenAid® Stainless Steel Wipes Part Number 8212510 (not included): See "Assistance or Service" section to order. If the...