Installation Guide
Page 4
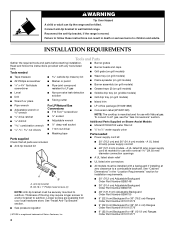
... grill models) ■ Grease trays (2) (on grill models) ■ Level ■ Drill ■ Wrench or pliers ■ Noncorrosive leak-detection solution ■ Tubing cutter ■ Griddle drip tray (on griddle models) ■ Grill drip tray (on Steam-Assist Models ■ Model W10049700 water filter kit ■ ¼" to subfloor.
... grill models) ■ Grease trays (2) (on grill models) ■ Level ■ Drill ■ Wrench or pliers ■ Noncorrosive leak-detection solution ■ Tubing cutter ■ Griddle drip tray (on griddle models) ■ Grill drip tray (on Steam-Assist Models ■ Model W10049700 water filter kit ■ ¼" to subfloor.
Installation Guide
Page 17
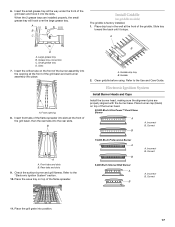
... into the slots. B B A. Refer to the "Electronic Ignition System" section. 10. Refer to the Use and Care Guide. Grease tray connection C. Clean griddle before using. Rear tabs and slots 9. Incorrect B. Correct 11. Place drip tray in the well at the front of the burner assembly into the opening... basin, then the rear tabs into position. 17 Place the grill grate into the rear slots. Insert the orifice tube on top of the griddle. Incorrect B. Insert the small grease tray all the way under the front of the burner head. 20,000 Btu/h Ultra Power™ Dual...
... into the slots. B B A. Refer to the "Electronic Ignition System" section. 10. Refer to the Use and Care Guide. Grease tray connection C. Clean griddle before using. Rear tabs and slots 9. Incorrect B. Correct 11. Place drip tray in the well at the front of the burner assembly into the opening... basin, then the rear tabs into position. 17 Place the grill grate into the rear slots. Insert the orifice tube on top of the griddle. Incorrect B. Insert the small grease tray all the way under the front of the burner head. 20,000 Btu/h Ultra Power™ Dual...
Installation Guide
Page 24
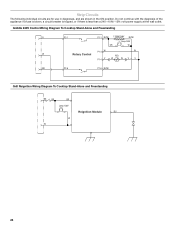
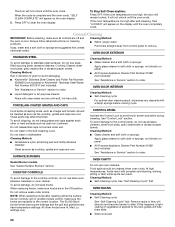
Strip Circuits The following individual circuits are for use in diagnoses, and are shown in the ON position. Griddle 240V Control Wiring Diagram To Cooktop Stand-Alone and Freestanding R P2-1 P1-1 BU/W 1320W/240V BU/W Lamp 240V OR W P1-3 W W W Rotary Control RTD P1-4 V W WV V ...
Strip Circuits The following individual circuits are for use in diagnoses, and are shown in the ON position. Griddle 240V Control Wiring Diagram To Cooktop Stand-Alone and Freestanding R P2-1 P1-1 BU/W 1320W/240V BU/W Lamp 240V OR W P1-3 W W W Rotary Control RTD P1-4 V W WV V ...
Installation Guide
Page 25
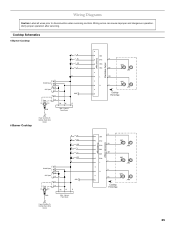
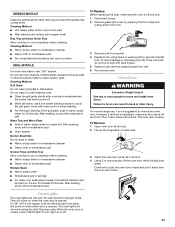
...Spare G 6 Burner Cooktop Power Cord Only To Cooktop Stand Alone Version R R R BU R BR R Y R G R BK R R Griddle Spare W BK BK Grill Spare W Power Cord L N R W BK W GND R GND Main - Verify proper operation after servicing. Harness ...3 6 5 Cooktop Front View 25 Wiring Diagrams Caution: Label all wires prior to disconnection when servicing controls. Cooktop Schematics 4 Burner Cooktop R R R BU R BR R Y R Griddle Spare W BK BK Grill Spare W Power Cord L N R W BK W R GND R GND Main - Wiring errors can cause improper and dangerous operation.
...Spare G 6 Burner Cooktop Power Cord Only To Cooktop Stand Alone Version R R R BU R BR R Y R G R BK R R Griddle Spare W BK BK Grill Spare W Power Cord L N R W BK W GND R GND Main - Verify proper operation after servicing. Harness ...3 6 5 Cooktop Front View 25 Wiring Diagrams Caution: Label all wires prior to disconnection when servicing controls. Cooktop Schematics 4 Burner Cooktop R R R BU R BR R Y R Griddle Spare W BK BK Grill Spare W Power Cord L N R W BK W R GND R GND Main - Wiring errors can cause improper and dangerous operation.
Use & Care Guide
Page 7
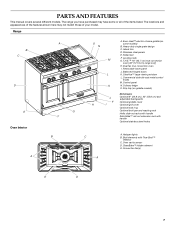
... E. Leveling rods G. Drip tray (on some or all of your model. Convection fan(s) E D 7 Even-Heat™ electric chrome griddle (on griddle models) Not shown: J Optional 9" (22.9 cm), 22" (55.9 cm) and adjustable backguards F Optional griddle cover H I . Heavy-duty single grate design C. CleanBake™ hidden element E. Removable lower panel J. Oven cavity sensor D. Dual fan...
... E. Leveling rods G. Drip tray (on some or all of your model. Convection fan(s) E D 7 Even-Heat™ electric chrome griddle (on griddle models) Not shown: J Optional 9" (22.9 cm), 22" (55.9 cm) and adjustable backguards F Optional griddle cover H I . Heavy-duty single grate design C. CleanBake™ hidden element E. Removable lower panel J. Oven cavity sensor D. Dual fan...

Use & Care Guide
Page 8
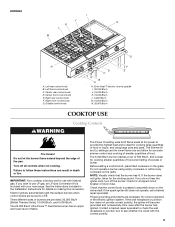
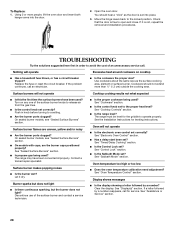
... knob B. Right rear control knob E. Right front control knob F. 15,000 Btu/h burner G. 5,000 Btu/h burner H. Left front control knob C. Even-Heat™ electric chrome griddle I. 15,000 Btu/h burner J. 20,000 Btu/h burner H G I . 15,000 Btu/h burner J. 20,000 Btu/h burner K L A. Center rear control knob D.Center front control knob E. Right...
... knob B. Right rear control knob E. Right front control knob F. 15,000 Btu/h burner G. 5,000 Btu/h burner H. Left front control knob C. Even-Heat™ electric chrome griddle I. 15,000 Btu/h burner J. 20,000 Btu/h burner H G I . 15,000 Btu/h burner J. 20,000 Btu/h burner K L A. Center rear control knob D.Center front control knob E. Right...
Use & Care Guide
Page 9
... Btu/h, and 5,000 Btu/h. The Power Hi setting uses both flame levels at full power to use with Natural gas. Even-Heat™ electric chrome griddle I J H K L M G N E A. See the instructions included in death or fire. Check for correct operation of the pan. Proper grounding ...and polarity are necessary for a tripped circuit breaker or blown fuse. Griddle control knob G F D E C B A H. Check that the burner has lit. Before setting a control knob, place filled cookware on the valve...
... Btu/h, and 5,000 Btu/h. The Power Hi setting uses both flame levels at full power to use with Natural gas. Even-Heat™ electric chrome griddle I J H K L M G N E A. See the instructions included in death or fire. Check for correct operation of the pan. Proper grounding ...and polarity are necessary for a tripped circuit breaker or blown fuse. Griddle control knob G F D E C B A H. Check that the burner has lit. Before setting a control knob, place filled cookware on the valve...
Use & Care Guide
Page 13
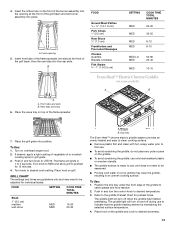
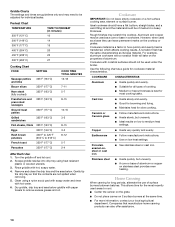
.... 2. Turn on top of the flame spreader. 7. If desired, apply a light coating of the griddle to LITE/HI. Place food on grill. Front opening at the front of the grill basin and set...during use , and does not need to be seasoned. ■ Pouring cold water on and off when the griddle has finished preheating. B FOOD Ground Meat Patties 1.3-1.9 cm) Pork Chops 1" (2.5 cm) Ham Slices ¹ ...35-55 8-12 8-15 MED-LO MED MED 50-80 20-40 10-15 Even-Heat™ Electric Chrome Griddle (on the front of the burner assembly into the opening 5. To Use: 1. Push in and turn knob...
.... 2. Turn on top of the flame spreader. 7. If desired, apply a light coating of the griddle to LITE/HI. Place food on grill. Front opening at the front of the grill basin and set...during use , and does not need to be seasoned. ■ Pouring cold water on and off when the griddle has finished preheating. B FOOD Ground Meat Patties 1.3-1.9 cm) Pork Chops 1" (2.5 cm) Ham Slices ¹ ...35-55 8-12 8-15 MED-LO MED MED 50-80 20-40 10-15 Even-Heat™ Electric Chrome Griddle (on the front of the burner assembly into the opening 5. To Use: 1. Push in and turn knob...
Use & Care Guide
Page 14
...unevenly. ■ Ideal results on a hot surface cooking area, element or surface burner. Remove and clean the drip tray and the area below griddle with a nonstick finish will take on the cooktop or grates. Use the following chart as a core or base in cookware. This allows time for...°C) Pancakes 350°F (177°C) COOK TIME TOTAL MINUTES 12-18 7-11 5-7 8-15 10-15 3-5 8-15 3-5 8-12 5-7 2-4 After Each Use: 1. Dry griddle, drip tray and area below . Rough finishes may need to remove excess grease and oil. Cookware material is a factor in minutes) 10 14 15 20...
...unevenly. ■ Ideal results on a hot surface cooking area, element or surface burner. Remove and clean the drip tray and the area below griddle with a nonstick finish will take on the cooktop or grates. Use the following chart as a core or base in cookware. This allows time for...°C) Pancakes 350°F (177°C) COOK TIME TOTAL MINUTES 12-18 7-11 5-7 8-15 10-15 3-5 8-15 3-5 8-12 5-7 2-4 After Each Use: 1. Dry griddle, drip tray and area below . Rough finishes may need to remove excess grease and oil. Cookware material is a factor in minutes) 10 14 15 20...
Use & Care Guide
Page 26
...replacing knobs, make sure the knobs are off and the oven is too high after cleaning either the surface burner controls, grill or griddle module control, make sure knobs are suggested first unless otherwise noted. To avoid damage to the correct location. OVEN RACKS Cleaning Method...See "Control Lock" section. If this happens, a light coating of grain to avoid damaging. ■ KitchenAid® Stainless Steel Cleaner and Polish Part Number 4396920 (not included) or KitchenAid® Stainless Steel Wipes Part Number 8212510 (not included): See "Assistance or Service" section to order.
...replacing knobs, make sure the knobs are off and the oven is too high after cleaning either the surface burner controls, grill or griddle module control, make sure knobs are suggested first unless otherwise noted. To avoid damage to the correct location. OVEN RACKS Cleaning Method...See "Control Lock" section. If this happens, a light coating of grain to avoid damaging. ■ KitchenAid® Stainless Steel Cleaner and Polish Part Number 4396920 (not included) or KitchenAid® Stainless Steel Wipes Part Number 8212510 (not included): See "Assistance or Service" section to order.
Use & Care Guide
Page 27
...Method: Grill Grate Do not clean grill grate in a self-cleaning oven. ■ Clean the grill grate shortly after removing food and the griddle has cooled down. Grease Trays and Drip Tray Allow cooktop to cool completely before cleaning. ■ Warm, soapy water or nonabrasive cleanser. ■...to push the oven door closed , touch OVEN LIGHT to do not touch bulb with a nonabrasive pad. The oven lights will shut. 4. GRIDDLE MODULE Clean the griddle shortly after cooking is off and cool. 1. Do not use a soft bristle barbecue brush to handle bulb. After soaking, scrub with bare ...
...Method: Grill Grate Do not clean grill grate in a self-cleaning oven. ■ Clean the grill grate shortly after removing food and the griddle has cooled down. Grease Trays and Drip Tray Allow cooktop to cool completely before cleaning. ■ Warm, soapy water or nonabrasive cleanser. ■...to push the oven door closed , touch OVEN LIGHT to do not touch bulb with a nonabrasive pad. The oven lights will shut. 4. GRIDDLE MODULE Clean the griddle shortly after cooking is off and cool. 1. Do not use a soft bristle barbecue brush to handle bulb. After soaking, scrub with bare ...
Use & Care Guide
Page 28
... Surface Burners" section. ■ Is propane gas being used? The range may have been used ? Contact a trained repair specialist. See the Installation Instructions for the griddle to a setting. ■ Are the burner ports clogged? Oven temperature too high or too low ■ Does the oven temperature calibration need adjustment? Display shows...
... Surface Burners" section. ■ Is propane gas being used? The range may have been used ? Contact a trained repair specialist. See the Installation Instructions for the griddle to a setting. ■ Are the burner ports clogged? Oven temperature too high or too low ■ Does the oven temperature calibration need adjustment? Display shows...
Use & Care Guide
Page 30
... trained to local dealers, repair parts distributors and service companies. Service must be provided by a KitchenAid designated service company. Griddle Order Part Number 4396096RB Grill and Griddle Cover Order Part Number W10160195 Wok Ring Order Part Number W10216179 KitchenAid® Premium Broil Pan and Roasting Rack Order Part Number W10123240 SatinGlide™ Roll-Out...
... trained to local dealers, repair parts distributors and service companies. Service must be provided by a KitchenAid designated service company. Griddle Order Part Number 4396096RB Grill and Griddle Cover Order Part Number W10160195 Wok Ring Order Part Number W10216179 KitchenAid® Premium Broil Pan and Roasting Rack Order Part Number W10123240 SatinGlide™ Roll-Out...
