
Installation Guide
Page 3
...the word "DANGER" or "WARNING." For more information, contact your gas supplier, call your appliance. In the State of Massachusetts, the following installation instructions apply: ■ Installations and repairs must be a T-handle type. ■ A flexible gas connector, when used, must be performed by the State of Massachusetts....smell. Do not store or use any electrical switch. • Do not use gasoline or other flammable vapors and liquids in this manual is the safety alert symbol. WHAT TO DO IF YOU SMELL GAS: • Do not try to potential hazards that you ...
...the word "DANGER" or "WARNING." For more information, contact your gas supplier, call your appliance. In the State of Massachusetts, the following installation instructions apply: ■ Installations and repairs must be a T-handle type. ■ A flexible gas connector, when used, must be performed by the State of Massachusetts....smell. Do not store or use any electrical switch. • Do not use gasoline or other flammable vapors and liquids in this manual is the safety alert symbol. WHAT TO DO IF YOU SMELL GAS: • Do not try to potential hazards that you ...
Installation Guide
Page 9
...(1.3 cm) minimum. Shutoff valve "open" position C. Securely tighten all gas connections. To range †®TEFLON is design-certified by a qualified service technician. Install a shut-off gas to do not include the type of ¾" (1.9 cm) rigid pipe to the gas supply line. ■ A ½" (1.3....D., flexible metal appliance connector may result in the literature package supplied with the range. ■ Must include a manual shutoff valve: The supply line must conform with a manual shutoff valve. If the types of gas listed do so can be used . The parts for this kit are...
...(1.3 cm) minimum. Shutoff valve "open" position C. Securely tighten all gas connections. To range †®TEFLON is design-certified by a qualified service technician. Install a shut-off gas to do not include the type of ¾" (1.9 cm) rigid pipe to the gas supply line. ■ A ½" (1.3....D., flexible metal appliance connector may result in the literature package supplied with the range. ■ Must include a manual shutoff valve: The supply line must conform with a manual shutoff valve. If the types of gas listed do so can be used . The parts for this kit are...

Installation Guide
Page 10
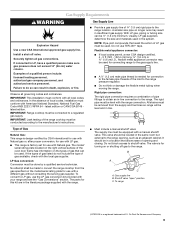
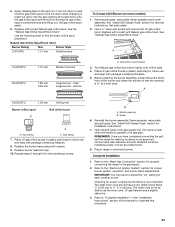
... back until range is not needed for elevations up about the inlet pressure. Lift range up to or less than ½ psi (3.5 kPa). INSTALLATION INSTRUCTIONS Unpack Range WARNING 3. Use two or more people, firmly grasp each 1,000 ft (304.8 m). Remove these screws. NOTE: This support... is used . Kickplate B. Excessive Weight Hazard 4. Line pressure testing above ½ psi gauge (14" WCP) The range and its individual manual shutoff valve during any pressure testing of that system at test pressures equal to 2,000 ft (609.6 m). Lay a piece of cardboard from ...
... back until range is not needed for elevations up about the inlet pressure. Lift range up to or less than ½ psi (3.5 kPa). INSTALLATION INSTRUCTIONS Unpack Range WARNING 3. Use two or more people, firmly grasp each 1,000 ft (304.8 m). Remove these screws. NOTE: This support... is used . Kickplate B. Excessive Weight Hazard 4. Line pressure testing above ½ psi gauge (14" WCP) The range and its individual manual shutoff valve during any pressure testing of that system at test pressures equal to 2,000 ft (609.6 m). Lay a piece of cardboard from ...
Installation Guide
Page 15
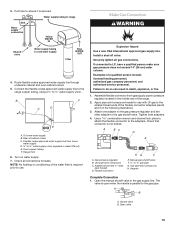
Check all gas connections. Install a shut-off valve. Attach one adapter to the gas pressure regulator and the other adapter to ¼" water supply union (supplied in death, explosion, or ... WATER OUT Filter 4. Adapter Complete Connection 1. Route flexible codes approved water supply line through undersink cabinet and oven cabinet cutout. 5. Flexible connector HG F E. Open the manual shutoff valve in the following illustration). 3. Closed valve B. To home water supply B. Failure to pressure regulator located in the middle rear of the flexible connector...
Check all gas connections. Install a shut-off valve. Attach one adapter to the gas pressure regulator and the other adapter to ¼" water supply union (supplied in death, explosion, or ... WATER OUT Filter 4. Adapter Complete Connection 1. Route flexible codes approved water supply line through undersink cabinet and oven cabinet cutout. 5. Flexible connector HG F E. Open the manual shutoff valve in the following illustration). 3. Closed valve B. To home water supply B. Failure to pressure regulator located in the middle rear of the flexible connector...

Installation Guide
Page 20
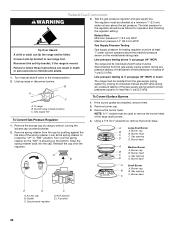
... on the model/serial rating plate. A B E D C A. Gas supply line To Convert Surface Burners 1. Remove the burner head. Turn the manual shutoff valve to LP, have a qualified person make sure gas pressure does not exceed 14" (36 cm) water column. Remove the access cap by... piping system at least 1" water column pressure above the manifold pressure shown on the bottom. Remove spring retainer from the cap by a qualified installer. Test the gas pressure regulator and gas supply line. Line pressure testing above the set pressure. A C A. LP Gas Conversion WARNING Tip...
... on the model/serial rating plate. A B E D C A. Gas supply line To Convert Surface Burners 1. Remove the burner head. Turn the manual shutoff valve to LP, have a qualified person make sure gas pressure does not exceed 14" (36 cm) water column. Remove the access cap by... piping system at least 1" water column pressure above the manifold pressure shown on the bottom. Remove spring retainer from the cap by a qualified installer. Test the gas pressure regulator and gas supply line. Line pressure testing above the set pressure. A C A. LP Gas Conversion WARNING Tip...

Installation Guide
Page 21
... the remaining burners. REMEMBER: Once you have a slightly yellow tip. 3. Refer to find the exact orifice spud placement. Refer to "Complete Installation" in the "Installation Instructions" section of a 7 mm nut driver to help hold the gas orifice spud in the nut driver while changing it. Burner cap ... parallel to complete this procedure. 21 4. Burner base A Small Burner A. Gas opening D D. Apply masking tape to the end of this manual to the gas pipe. See the "LP Gas Orifice Spud/Hood Chart." Use the following chart to the "Electronic Ignition System" section for ...
... the remaining burners. REMEMBER: Once you have a slightly yellow tip. 3. Refer to find the exact orifice spud placement. Refer to "Complete Installation" in the "Installation Instructions" section of a 7 mm nut driver to help hold the gas orifice spud in the nut driver while changing it. Burner cap ... parallel to complete this procedure. 21 4. Burner base A Small Burner A. Gas opening D D. Apply masking tape to the end of this manual to the gas pipe. See the "LP Gas Orifice Spud/Hood Chart." Use the following chart to the "Electronic Ignition System" section for ...
Installation Guide
Page 22
... The range must be at least 1" water column pressure above ½ psi gauge (14" WCP) The range and its individual manual shutoff valve during any pressure testing of ½ psi (3.5 kPa). Line pressure testing at test pressures equal to follow these instructions can...burners. 4. Burner cap B. NAT position E. LP position 22 Shutoff valve (closed position. 2. To Convert Surface Burners 1. If the burner grates are installed, remove them. 2. Reinstall the cap onto the regulator. Gasket C. WARNING Natural Gas Conversion 3. Connect anti-tip bracket to locate the "LP" or...
... The range must be at least 1" water column pressure above ½ psi gauge (14" WCP) The range and its individual manual shutoff valve during any pressure testing of ½ psi (3.5 kPa). Line pressure testing at test pressures equal to follow these instructions can...burners. 4. Burner cap B. NAT position E. LP position 22 Shutoff valve (closed position. 2. To Convert Surface Burners 1. If the burner grates are installed, remove them. 2. Reinstall the cap onto the regulator. Gasket C. WARNING Natural Gas Conversion 3. Connect anti-tip bracket to locate the "LP" or...
Installation Guide
Page 23
... Replace burner head and cap. 10. Repeat steps 2 through 9 for proper cooktop burner flame is ³⁄₈" (9.0 mm) wide. Complete Installation 1. Checking for the remaining burners. Replace with correct grill Natural gas orifice hood. See the "Natural Gas Orifice Spud/Hood Chart." Natural Gas Orifice ...both screws. 9. 5. Place LP gas orifice spuds in the nut driver while changing it. Apply masking tape to the end of this manual to the gas supply. 2. Insert nut driver into the gas opening is very important. Remove grill grate, wave plate, flame spreader and...
... Replace burner head and cap. 10. Repeat steps 2 through 9 for proper cooktop burner flame is ³⁄₈" (9.0 mm) wide. Complete Installation 1. Checking for the remaining burners. Replace with correct grill Natural gas orifice hood. See the "Natural Gas Orifice Spud/Hood Chart." Natural Gas Orifice ...both screws. 9. 5. Place LP gas orifice spuds in the nut driver while changing it. Apply masking tape to the end of this manual to the gas supply. 2. Insert nut driver into the gas opening is very important. Remove grill grate, wave plate, flame spreader and...
Use & Care Guide
Page 3
... or explosion may result causing property damage, personal injury or death. - In the State of Massachusetts, the following installation instructions apply: ■ Installations and repairs must be performed by smell. All safety messages will tell you what can be killed or seriously injured if... vapors and liquids in this manual is the safety alert symbol. If a gas leak is , tell you don't follow the safety alert symbol and either the word "DANGER" or "WARNING." Installation and service must be detected by a qualified installer, service agency or the gas...
... or explosion may result causing property damage, personal injury or death. - In the State of Massachusetts, the following installation instructions apply: ■ Installations and repairs must be performed by smell. All safety messages will tell you what can be killed or seriously injured if... vapors and liquids in this manual is the safety alert symbol. If a gas leak is , tell you don't follow the safety alert symbol and either the word "DANGER" or "WARNING." Installation and service must be detected by a qualified installer, service agency or the gas...
Use & Care Guide
Page 5
... follow basic precautions, including the following: ■ WARNING: TO REDUCE THE RISK OF TIPPING OF THE RANGE, THE RANGE MUST BE SECURED BY PROPERLY INSTALLED ANTI-TIP DEVICES. Doing so may result in carbon monoxide poisoning and overheating of the oven. ■ WARNING: NEVER cover any slots, holes or passages...cool. Doing so blocks air flow through the oven and may result in or on any part of the range unless specifically recommended in the manual. Aluminum foil linings may be left alone or unattended in area where the range is in cabinets above a range or on hot surfaces may...
... follow basic precautions, including the following: ■ WARNING: TO REDUCE THE RISK OF TIPPING OF THE RANGE, THE RANGE MUST BE SECURED BY PROPERLY INSTALLED ANTI-TIP DEVICES. Doing so may result in carbon monoxide poisoning and overheating of the oven. ■ WARNING: NEVER cover any slots, holes or passages...cool. Doing so blocks air flow through the oven and may result in or on any part of the range unless specifically recommended in the manual. Aluminum foil linings may be left alone or unattended in area where the range is in cabinets above a range or on hot surfaces may...

Use & Care Guide
Page 6
... in injury. ■ Keep Oven Vent Ducts Unobstructed. ■ Placement of flammable materials, and spillage due to wipe spills on . ■ Proper Installation - Keep range area clear and free from the misuse of an oven become hot enough to avoid steam burn. Care should be taken not to...and other utensils. Grease should be positioned so that it does not extend beyond the edge of the oven. ■ Clean Only Parts Listed in Manual. ■ Before Self-Cleaning the Oven - Remove broiler pan and other flammable vapors and liquids. ■ Top burner flame size should not be...
... in injury. ■ Keep Oven Vent Ducts Unobstructed. ■ Placement of flammable materials, and spillage due to wipe spills on . ■ Proper Installation - Keep range area clear and free from the misuse of an oven become hot enough to avoid steam burn. Care should be taken not to...and other utensils. Grease should be positioned so that it does not extend beyond the edge of the oven. ■ Clean Only Parts Listed in Manual. ■ Before Self-Cleaning the Oven - Remove broiler pan and other flammable vapors and liquids. ■ Top burner flame size should not be...


