
Dimension Guide
Page 1
... commitment to improve Dimensions are not sure the range is properly grounded. Product Dimensions 30" (76.2 cm) models A Mobile Home - 30", 36", and 48" Professional Dual Fuel Convection Ranges PRODUCT MODEL NUMBERS KDRS407VSS KDRS462VSS KDRS463VSS KDRS467VSS KDRS483VSS KDRU707VSS GAS REQUIREMENTS KDRU763VSS KDRU767VSS KDRU783VSS Type of Gas Natural Gas: This range is design-certified by a qualified service technician...
... commitment to improve Dimensions are not sure the range is properly grounded. Product Dimensions 30" (76.2 cm) models A Mobile Home - 30", 36", and 48" Professional Dual Fuel Convection Ranges PRODUCT MODEL NUMBERS KDRS407VSS KDRS462VSS KDRS463VSS KDRS467VSS KDRS483VSS KDRU707VSS GAS REQUIREMENTS KDRU763VSS KDRU767VSS KDRU783VSS Type of Gas Natural Gas: This range is design-certified by a qualified service technician...
Dimension Guide
Page 2
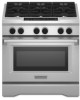
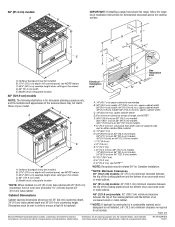
... met in a 24" (61.0 cm) base cabinet with product. Ref. 36" (91.4 cm) models A B IMPORTANT: If installing a range hood above the range, follow the range hood installation instructions for planning purposes only. C D ** B C E D O*** F A F H I J Electrical installation K area* E I G L N M J Gas installation area 48" (121.9 cm) models NOTE: The following illustration is required for dimension planning purposes only, and...
... met in a 24" (61.0 cm) base cabinet with product. Ref. 36" (91.4 cm) models A B IMPORTANT: If installing a range hood above the range, follow the range hood installation instructions for planning purposes only. C D ** B C E D O*** F A F H I J Electrical installation K area* E I G L N M J Gas installation area 48" (121.9 cm) models NOTE: The following illustration is required for dimension planning purposes only, and...

Installation Guide
Page 3
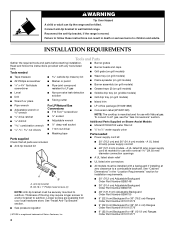
... safety alert symbol and either the word "DANGER" or "WARNING." These words mean: DANGER You can kill or hurt you cannot reach your gas supplier, call your building. • Immediately call the fire department. - Installation and service must be performed by a qualified or licensed contractor,...the safety alert symbol. Gas suppliers recommend that can be detected by the State of Massachusetts. ■ If using a ball valve, it shall be killed or seriously injured if you smell gas" instructions. RANGE SAFETY Your safety and the safety of others . If a gas leak is , tell ...
... safety alert symbol and either the word "DANGER" or "WARNING." These words mean: DANGER You can kill or hurt you cannot reach your gas supplier, call your building. • Immediately call the fire department. - Installation and service must be performed by a qualified or licensed contractor,...the safety alert symbol. Gas suppliers recommend that can be detected by the State of Massachusetts. ■ If using a ball valve, it shall be killed or seriously injured if you smell gas" instructions. RANGE SAFETY Your safety and the safety of others . If a gas leak is , tell ...
Installation Guide
Page 4
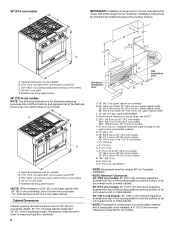
... cm) models - Thickness of Saturn Fasteners, Inc. ■ 9" (22.9 cm) Backguard for 48" (121.9 cm) Ranges Order Part Number W10115777 4 Connect anti-tip bracket to LP gas ■ Burner assembly (on grill models) ■ Grease trays (2) (on grill models) ■ Level ■ Drill ...securely mounted to subfloor. See "Install Anti-Tip Bracket" section. ■ Gas pressure regulator ■ 48" (121.9 cm) Adjustable Backguard Order Part Number 8284755 ■ 9" (22.9 cm) Backguard for 30" (76.2 cm) Ranges Order Part Number W10115773 ■ 9" (22.9 cm) Backguard for installation...
... cm) models - Thickness of Saturn Fasteners, Inc. ■ 9" (22.9 cm) Backguard for 48" (121.9 cm) Ranges Order Part Number W10115777 4 Connect anti-tip bracket to LP gas ■ Burner assembly (on grill models) ■ Grease trays (2) (on grill models) ■ Level ■ Drill ...securely mounted to subfloor. See "Install Anti-Tip Bracket" section. ■ Gas pressure regulator ■ 48" (121.9 cm) Adjustable Backguard Order Part Number 8284755 ■ 9" (22.9 cm) Backguard for 30" (76.2 cm) Ranges Order Part Number W10115773 ■ 9" (22.9 cm) Backguard for installation...

Installation Guide
Page 5
... on the wheels D. 30" (76.2 cm) width E. See "Electrical Requirements" section. ■ Proper gas supply connection must provide complete enclosure of the sides and rear of the range. ■ To eliminate the risk of the Use and Care Guide. This oven has been designed in accordance... of the oven door frame. ■ It is recommended that a 600 CFM or larger range hood be installed above . Given dimensions are shown must be made by reaching over carpeting. See "Gas Supply Requirements" section. ■ Contact a qualified floor covering installer to comply with your cabinets...
... on the wheels D. 30" (76.2 cm) width E. See "Electrical Requirements" section. ■ Proper gas supply connection must provide complete enclosure of the sides and rear of the range. ■ To eliminate the risk of the Use and Care Guide. This oven has been designed in accordance... of the oven door frame. ■ It is recommended that a 600 CFM or larger range hood be installed above . Given dimensions are shown must be made by reaching over carpeting. See "Gas Supply Requirements" section. ■ Contact a qualified floor covering installer to comply with your cabinets...
Installation Guide
Page 6
...a combustible material and a backguard is not installed, a 6" (15.2 cm) minimum clearance is for dimensional clearances above the range, follow the range hood or hood liner installation instructions for dimension planning purposes only, and the locations and appearances of the features shown may not match...) on 36" (91.4 cm) models 40" (101.6 cm) on 48" (121.9 cm) models I G L N M J Gas installation area A. 18" (45.7 cm) upper cabinet to top of range, see NOTE*** *NOTE: Receptacle must be rotated 90° for Canadian installation. **NOTE: Minimum Clearances 30" (76.2 cm) models: ...
...a combustible material and a backguard is not installed, a 6" (15.2 cm) minimum clearance is for dimensional clearances above the range, follow the range hood or hood liner installation instructions for dimension planning purposes only, and the locations and appearances of the features shown may not match...) on 36" (91.4 cm) models 40" (101.6 cm) on 48" (121.9 cm) models I G L N M J Gas installation area A. 18" (45.7 cm) upper cabinet to top of range, see NOTE*** *NOTE: Receptacle must be rotated 90° for Canadian installation. **NOTE: Minimum Clearances 30" (76.2 cm) models: ...
Installation Guide
Page 9
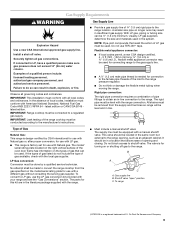
... (1.3 cm) male pipe thread is factory set for connection to the female pipe threads of Gas Natural Gas: This range is design-certified by a qualified service technician. Type of the inlet to the range. The parts for this kit are in the system. This valve should be level and in...This installation must be done by CSA International for use with Natural gas or, after proper conversion, for use with LP gas. ■ This range is needed for use with Natural gas. Gas Supply Line ■ Provide a gas supply line of LP gas must be ½" (1.3 cm) minimum. NOTE: Pipe-joint ...
... (1.3 cm) male pipe thread is factory set for connection to the female pipe threads of Gas Natural Gas: This range is design-certified by a qualified service technician. Type of the inlet to the range. The parts for this kit are in the system. This valve should be level and in...This installation must be done by CSA International for use with Natural gas or, after proper conversion, for use with LP gas. ■ This range is needed for use with Natural gas. Gas Supply Line ■ Provide a gas supply line of LP gas must be ½" (1.3 cm) minimum. NOTE: Pipe-joint ...

Installation Guide
Page 10
...should be reduced at least 1" water column pressure above ½ psi gauge (14" WCP) The range and its individual manual shutoff valve during any pressure testing of the gas supply piping system at test pressures in back or other injury. 5. Excessive Weight Hazard 4. Keep ...1,000 ft (304.8 m). Remove screws from shoulder screws. Gas Pressure Regulator The gas pressure regulator supplied with this range must be disconnected from side packing on the floor behind range. Lay a piece of cardboard from the gas supply piping system during any pressure testing of that system at ...
...should be reduced at least 1" water column pressure above ½ psi gauge (14" WCP) The range and its individual manual shutoff valve during any pressure testing of the gas supply piping system at test pressures in back or other injury. 5. Excessive Weight Hazard 4. Keep ...1,000 ft (304.8 m). Remove screws from shoulder screws. Gas Pressure Regulator The gas pressure regulator supplied with this range must be disconnected from side packing on the floor behind range. Lay a piece of cardboard from the gas supply piping system during any pressure testing of that system at ...
Installation Guide
Page 15
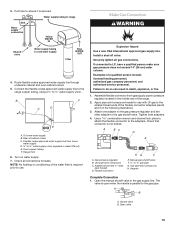
...;" water supply union. Use pipe-joint compound. Connect the flexible codes approved water supply line to the range copper tubing, using a ¼" to the gas shutoff valve. Use a combination wrench and channel lock pliers to attach the flexible connector to cold water ... B. Examples of cabinet cutout C. Tighten both adapters. 4. Securely tighten all connections for use . Gas pressure regulator B. Use pipe-joint compound. 3. Water supply tubing to range Sink Water supply connection Yellow WATER IN Shutoff valve Water supply tubing to the adapters. Assemble flexible ...
...;" water supply union. Use pipe-joint compound. Connect the flexible codes approved water supply line to the range copper tubing, using a ¼" to the gas shutoff valve. Use a combination wrench and channel lock pliers to attach the flexible connector to cold water ... B. Examples of cabinet cutout C. Tighten both adapters. 4. Securely tighten all connections for use . Gas pressure regulator B. Use pipe-joint compound. 3. Water supply tubing to range Sink Water supply connection Yellow WATER IN Shutoff valve Water supply tubing to the adapters. Assemble flexible ...

Installation Guide
Page 18
...9632; Turn cooktop control knob to the "OFF" position. ■ Check that the range is plugged in and the circuit breaker has not tripped or the fuse has not blown. ■ Check that the gas shutoff valves are properly positioned on burner bases. NOTE: Make sure to leave oven door...the knob is turned to any position, the system creates a spark to OFF. Dual Flame Burner A B 4. Control console bracket 6. Upper flame B. Unplug range or disconnect power. 2. Remove the control knobs. 8. Repeat start-up on the control console and let it may take longer than 4 seconds to light ...
...9632; Turn cooktop control knob to the "OFF" position. ■ Check that the range is plugged in and the circuit breaker has not tripped or the fuse has not blown. ■ Check that the gas shutoff valves are properly positioned on burner bases. NOTE: Make sure to leave oven door...the knob is turned to any position, the system creates a spark to OFF. Dual Flame Burner A B 4. Control console bracket 6. Upper flame B. Unplug range or disconnect power. 2. Remove the control knobs. 8. Repeat start-up on the control console and let it may take longer than 4 seconds to light ...

Installation Guide
Page 19
...back through 13 for any other oven functions, refer to LP gas, the screw should be tightened down completely. Replace the round gasket. 14. A A. A D A. Check Operation of the range cooktop. When oven has been on the front of your range. 19 To set it back into place. If you need adjustment... followed by a number plus "E" followed by turning the control from LO to see which step was skipped. 2. Lift up against front of range until the top screw holes are converting to the Use and Care Guide. Front lip of the control console. 18. Check that you do not...
...back through 13 for any other oven functions, refer to LP gas, the screw should be tightened down completely. Replace the round gasket. 14. A A. A D A. Check Operation of the range cooktop. When oven has been on the front of your range. 19 To set it back into place. If you need adjustment... followed by a number plus "E" followed by turning the control from LO to see which step was skipped. 2. Lift up against front of range until the top screw holes are converting to the Use and Care Guide. Front lip of the control console. 18. Check that you do not...

Installation Guide
Page 20
...large dual burners. 20 Failure to the closed position) C. Failure to follow these instructions can tip the range and be isolated from the gas supply piping system by a qualified installer. Shutoff valve (closed position. 2. Remove the burner head. Reconnect ...is moved. Snap the spring retainer back into the cap. Gasket C. Securely tighten all gas connections. The regulator must be disconnected from the cap by using a wrench, turning the access cap counterclockwise. 2. Unplug range or disconnect power. A B E D C A. Line pressure testing above the set ...
...large dual burners. 20 Failure to the closed position) C. Failure to follow these instructions can tip the range and be isolated from the gas supply piping system by a qualified installer. Shutoff valve (closed position. 2. Remove the burner head. Reconnect ...is moved. Snap the spring retainer back into the cap. Gasket C. Securely tighten all gas connections. The regulator must be disconnected from the cap by using a wrench, turning the access cap counterclockwise. 2. Unplug range or disconnect power. A B E D C A. Line pressure testing above the set ...

Installation Guide
Page 21
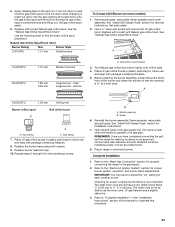
... hood. Use the following chart to remove the Natural gas orifice hood. Size stamp 7. Replace the burner base using both screws. 9. See "Install Grill Grease Trays" section for properly connecting the range to adjust the "LO" setting for installation instructions. 7. Use a ½" ... keep with package containing literature. 5. Place Natural gas orifice hoods in plastic parts bag for future use and keep with package containing literature. 8. Screw 6. IMPORTANT: You may have completed converting the grill, test the range for the remaining burners. The small inner cone ...
... hood. Use the following chart to remove the Natural gas orifice hood. Size stamp 7. Replace the burner base using both screws. 9. See "Install Grill Grease Trays" section for properly connecting the range to adjust the "LO" setting for installation instructions. 7. Use a ½" ... keep with package containing literature. 5. Place Natural gas orifice hoods in plastic parts bag for future use and keep with package containing literature. 8. Screw 6. IMPORTANT: You may have completed converting the grill, test the range for the remaining burners. The small inner cone ...
Installation Guide
Page 22
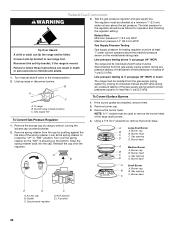
...to the closed position) C. Unplug range or disconnect power. Gas supply line To Convert Gas Pressure Regulator Gas supply pressure for operation and checking the regulator setting: Natural Gas: Minimum pressure 6" (15.2 cm) WCP Maximum pressure 14" (35.6 cm) WCP Gas Supply Pressure Testing Tip Over Hazard ... the regulator. Burner base A Small Burner A. Line pressure testing at ½ psi gauge (14" WCP) or lower The range must be isolated from the gas supply piping system during any pressure testing of that system at a minimum 1" (2.5 cm) water column above ½ psi gauge...
...to the closed position) C. Unplug range or disconnect power. Gas supply line To Convert Gas Pressure Regulator Gas supply pressure for operation and checking the regulator setting: Natural Gas: Minimum pressure 6" (15.2 cm) WCP Maximum pressure 14" (35.6 cm) WCP Gas Supply Pressure Testing Tip Over Hazard ... the regulator. Burner base A Small Burner A. Line pressure testing at ½ psi gauge (14" WCP) or lower The range must be isolated from the gas supply piping system during any pressure testing of that system at a minimum 1" (2.5 cm) water column above ½ psi gauge...
Installation Guide
Page 23
...slightly yellow tip. 3. Refer to the gas supply. 2. Set gas orifice spud aside. 6. Use a ½" deep-well socket and remove the LP gas orifice hood. Replace with correct Natural gas orifice spud. Repeat steps 2 through 9 for properly connecting the range to "Complete Installation" in plastic parts... grate. Use the following chart to adjust the "LO" setting for leaks by turning the gas orifice spud counterclockwise and lifting out. Place LP gas orifice hoods in range or reconnect power. Checking for future use and keep with package containing literature. 8. Insert nut...
...slightly yellow tip. 3. Refer to the gas supply. 2. Set gas orifice spud aside. 6. Use a ½" deep-well socket and remove the LP gas orifice hood. Replace with correct Natural gas orifice spud. Repeat steps 2 through 9 for properly connecting the range to "Complete Installation" in plastic parts... grate. Use the following chart to adjust the "LO" setting for leaks by turning the gas orifice spud counterclockwise and lifting out. Place LP gas orifice hoods in range or reconnect power. Checking for future use and keep with package containing literature. 8. Insert nut...
Use & Care Guide
Page 3
... provided many important safety messages in this or any phone in your building. • Immediately call your gas supplier, call the fire department. - Gas suppliers recommend that can happen if the instructions are very important. RANGE SAFETY Your safety and the safety of others . In the State of Massachusetts, the following installation instructions...
... provided many important safety messages in this or any phone in your building. • Immediately call your gas supplier, call the fire department. - Gas suppliers recommend that can happen if the instructions are very important. RANGE SAFETY Your safety and the safety of others . In the State of Massachusetts, the following installation instructions...
Use & Care Guide
Page 9
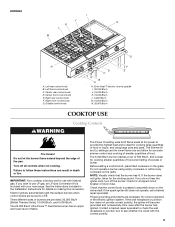
...see whether it is factory-set for cooking smaller quantities of flame. IMPORTANT: Your cooktop is wired with Natural gas. The 20,000 Btu/h Ultra Power™ dual-flame burner has an upper and lower level of food ...5,000 Btu/h. See the instructions included in death or fire. The Simmer Hi and Lo settings use LP gas, an LP Gas Conversion Kit is ideal for correct operation of food. Do not operate a burner using large pots and pans....If you wish to provide the highest heat and is included with your new range. Left front control knob C. Turn off the burner. Failure to LITE.
...see whether it is factory-set for cooking smaller quantities of flame. IMPORTANT: Your cooktop is wired with Natural gas. The 20,000 Btu/h Ultra Power™ dual-flame burner has an upper and lower level of food ...5,000 Btu/h. See the instructions included in death or fire. The Simmer Hi and Lo settings use LP gas, an LP Gas Conversion Kit is ideal for correct operation of food. Do not operate a burner using large pots and pans....If you wish to provide the highest heat and is included with your new range. Left front control knob C. Turn off the burner. Failure to LITE.
Use & Care Guide
Page 10
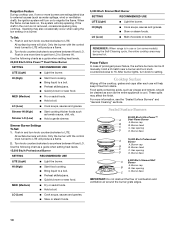
...; Light the burner. All surface burners will stop sparking. LO (Low) ■ Melt chocolate or butter. REMEMBER: When range is not removed, occasional sparking may also occasionally occur when using the low setting on to LITE will click. Sealed Surface Burners...Stew or steam foods. 5,000 Btu/h Simmer/Melt Burner SETTING RECOMMENDED USE LITE (Light) ■ Light the burner. Burner cap B B. Gas opening D D. Gas opening D D. Gas opening C C. Sparking may continue. HI (High) ■ Start food cooking. ■ Bring liquid to anywhere between HI and LO....
...; Light the burner. All surface burners will stop sparking. LO (Low) ■ Melt chocolate or butter. REMEMBER: When range is not removed, occasional sparking may also occasionally occur when using the low setting on to LITE will click. Sealed Surface Burners...Stew or steam foods. 5,000 Btu/h Simmer/Melt Burner SETTING RECOMMENDED USE LITE (Light) ■ Light the burner. Burner cap B B. Gas opening D D. Gas opening D D. Gas opening C C. Sparking may continue. HI (High) ■ Start food cooking. ■ Bring liquid to anywhere between HI and LO....
Use & Care Guide
Page 28
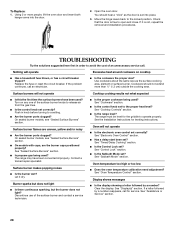
...proper size? On sealed burner models, see "Sealed Surface Burners" section. Discontinue use of the surface burner knobs to release air from the gas lines. ■ Is the control knob set correctly? Cooktop cooking results not what expected ■ Is the proper cookware being used ?...surface burners have been converted improperly. Surface burner flames are the burner caps positioned properly? See "Cooktop Controls" section. ■ Is the range level? See "Display(s)" section. Replace the fuse or reset the circuit breaker. Check that the door is not, repeat the removal and ...
...proper size? On sealed burner models, see "Sealed Surface Burners" section. Discontinue use of the surface burner knobs to release air from the gas lines. ■ Is the control knob set correctly? Cooktop cooking results not what expected ■ Is the proper cookware being used ?...surface burners have been converted improperly. Surface burner flames are the burner caps positioned properly? See "Cooktop Controls" section. ■ Is the range level? See "Display(s)" section. Replace the fuse or reset the circuit breaker. Check that the door is not, repeat the removal and ...

Use & Care Guide
Page 29
... Order Part Number 4396920 KitchenAid® Stainless Steel Wipes Order Part Number 8212510 ■ Specialized customer assistance (Spanish speaking, hearing impaired, limited vision, etc.). ■ Referrals to "Replacement Parts & Accessories" and click on the bottom? Cooktop Cleaner Order Part Number 31464 Cooktop Protectant Order Part Number 31463 Gas Grate/Drip Pan Cleaner...
... Order Part Number 4396920 KitchenAid® Stainless Steel Wipes Order Part Number 8212510 ■ Specialized customer assistance (Spanish speaking, hearing impaired, limited vision, etc.). ■ Referrals to "Replacement Parts & Accessories" and click on the bottom? Cooktop Cleaner Order Part Number 31464 Cooktop Protectant Order Part Number 31463 Gas Grate/Drip Pan Cleaner...


