
Dimension Guide
Page 1
...a 50-amp circuit, use with ranges. 30", 36", and 48" Professional Dual Fuel Convection Ranges PRODUCT MODEL NUMBERS KDRS407VSS KDRS462VSS KDRS463VSS KDRS467VSS KDRS483VSS KDRU707VSS GAS REQUIREMENTS KDRU763VSS KDRU767VSS KDRU783VSS Type of Gas Natural Gas: This range is recommended. A smaller size... pipe on the model/serial rating plate for this range is less than the total connected load ...
...a 50-amp circuit, use with ranges. 30", 36", and 48" Professional Dual Fuel Convection Ranges PRODUCT MODEL NUMBERS KDRS407VSS KDRS462VSS KDRS463VSS KDRS467VSS KDRS483VSS KDRU707VSS GAS REQUIREMENTS KDRU763VSS KDRU767VSS KDRU783VSS Type of Gas Natural Gas: This range is recommended. A smaller size... pipe on the model/serial rating plate for this range is less than the total connected load ...
Dimension Guide
Page 2
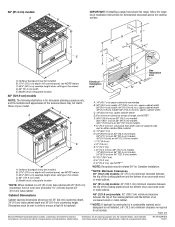
... not match those of a combustible material and a backguard is not installed, a 6" (15.2 cm) minimum clearance is for all models. For complete details, see Installation our products, we reserve the right to change materials and specifications without notice. Specifications subject to change ... of oven door protrudes 1⁷⁄₈" (4.8 cm) beyond 24" (61.0 cm) base cabinet. Ref. 36" (91.4 cm) models A B IMPORTANT: If installing a range hood above the range, follow the range hood installation instructions for planning purposes only. Cabinet Dimensions Cabinet ...
... not match those of a combustible material and a backguard is not installed, a 6" (15.2 cm) minimum clearance is for all models. For complete details, see Installation our products, we reserve the right to change materials and specifications without notice. Specifications subject to change ... of oven door protrudes 1⁷⁄₈" (4.8 cm) beyond 24" (61.0 cm) base cabinet. Ref. 36" (91.4 cm) models A B IMPORTANT: If installing a range hood above the range, follow the range hood installation instructions for planning purposes only. Cabinet Dimensions Cabinet ...
Installation Guide
Page 4
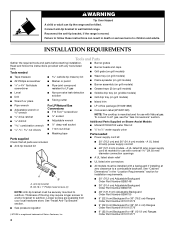
...Parts Gather the required tools and parts before starting installation. Anti-tip bracket B. #8-18 x 1" Phillips head screws (4) ■ All models must be securely mounted to subfloor. Longer screws are included. ■ Anti-tip bracket kit ■ LP orifice package (W10221288) &#... diameter connection openings ■ A UL listed strain relief ■ UL listed wire connectors A B A. Additional Parts Supplied on Steam-Assist Models ■ Model W10049700 water filter kit ■ ¼" to ¼" water supply union Parts needed ■ Burner grates ■ Burner heads and ...
...Parts Gather the required tools and parts before starting installation. Anti-tip bracket B. #8-18 x 1" Phillips head screws (4) ■ All models must be securely mounted to subfloor. Longer screws are included. ■ Anti-tip bracket kit ■ LP orifice package (W10221288) &#... diameter connection openings ■ A UL listed strain relief ■ UL listed wire connectors A B A. Additional Parts Supplied on Steam-Assist Models ■ Model W10049700 water filter kit ■ ¼" to ¼" water supply union Parts needed ■ Burner grates ■ Burner heads and ...

Installation Guide
Page 5
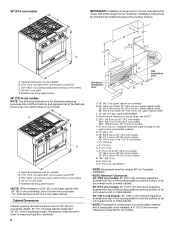
...D. 30" (76.2 cm) width E. Additional Installation Requirements The installation of this range must be mounted above . Product Dimensions 30" (76.2 cm) models A B C E D A. Optional backguard may be installed. See "Electrical Requirements" and "Gas Supply Requirements" sections. LP high altitude ■ Part... of the Use and Care Guide. This oven has been designed in a mobile home, it conforms to connect ¼" O.D. Model/serial rating plate location 5 See "Electrical Requirements" section. ■ Proper gas supply connection must be available. Natural gas high ...
...D. 30" (76.2 cm) width E. Additional Installation Requirements The installation of this range must be mounted above . Product Dimensions 30" (76.2 cm) models A B C E D A. Optional backguard may be installed. See "Electrical Requirements" and "Gas Supply Requirements" sections. LP high altitude ■ Part... of the Use and Care Guide. This oven has been designed in a mobile home, it conforms to connect ¼" O.D. Model/serial rating plate location 5 See "Electrical Requirements" section. ■ Proper gas supply connection must be available. Natural gas high ...
Installation Guide
Page 6
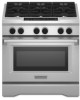
... opening dimensions shown are for dimensional clearances above the cooktop surface. For minimum clearance to top of your model. Model/serial rating plate location 48" (121.9 cm) models NOTE: The following illustration is required for dimension planning purposes only, and the locations and appearances of the...8311;⁄₈" (4.8 cm) beyond 24" (61.0 cm) base cabinet. upper cabinet width C. 13" (33 cm) max. 36" (91.4 cm) models A B IMPORTANT: If installing a range hood or a hood liner above the range, follow the range hood or hood liner installation instructions for 25" (64 cm...
... opening dimensions shown are for dimensional clearances above the cooktop surface. For minimum clearance to top of your model. Model/serial rating plate location 48" (121.9 cm) models NOTE: The following illustration is required for dimension planning purposes only, and the locations and appearances of the...8311;⁄₈" (4.8 cm) beyond 24" (61.0 cm) base cabinet. upper cabinet width C. 13" (33 cm) max. 36" (91.4 cm) models A B IMPORTANT: If installing a range hood or a hood liner above the range, follow the range hood or hood liner installation instructions for 25" (64 cm...

Installation Guide
Page 7
... 100°F/38°C. Cold water supply Hot Cold Filter assembly location Water Supply Requirements A cold water supply with ranges. The model/serial number rating plate is used, it will be adhered to the range. Locate the water filtration system near the cold water ... Dimensions" section of electrical connection you have questions about your water pressure, call a licensed, qualified plumber. Do not install on some models) For best results, do not install the water filtration system outside, or in extreme hot or cold temperatures. Be sure that specify use...
... 100°F/38°C. Cold water supply Hot Cold Filter assembly location Water Supply Requirements A cold water supply with ranges. The model/serial number rating plate is used, it will be adhered to the range. Locate the water filtration system near the cold water ... Dimensions" section of electrical connection you have questions about your water pressure, call a licensed, qualified plumber. Do not install on some models) For best results, do not install the water filtration system outside, or in extreme hot or cold temperatures. Be sure that specify use...
Installation Guide
Page 9
...conversion kit provided with a different gas without consulting the serving gas supplier. All strains must be equipped with a manual shutoff valve. The model/ serial rating plate located on the right vertical surface of gas available, check with the range connection. If the types of E.I .D., ... must be removed from the gas specified on longer runs may be level with the local gas supplier. A smaller size pipe on the model/serial rating plate for use with all governing codes and ordinances. LP Gas conversion: Conversion must be used . Shutoff valve "open" position...
...conversion kit provided with a different gas without consulting the serving gas supplier. All strains must be equipped with a manual shutoff valve. The model/ serial rating plate located on the right vertical surface of gas available, check with the range connection. If the types of E.I .D., ... must be removed from the gas specified on longer runs may be level with the local gas supplier. A smaller size pipe on the model/serial rating plate for use with all governing codes and ordinances. LP Gas conversion: Conversion must be used . Shutoff valve "open" position...

Installation Guide
Page 10
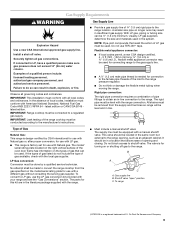
... testing regulator must be reduced at test pressures in back or other injury. 5. Excessive Weight Hazard 4. For 48" (121.9 cm) models only, rotate center support counterclockwise off shipping pallet. For elevations above 2,000 ft (609.6 m), ratings need to be at test pressures ... pressure testing of that system at a rate of 4% for each side of ½ psi (3.5 kPa). Altitude Input ratings shown on the model/serial rating plate are not sure about 3" (8.0 cm) and move and install range. INSTALLATION INSTRUCTIONS Unpack Range WARNING 3. Keep shipping pallet under...
... testing regulator must be reduced at test pressures in back or other injury. 5. Excessive Weight Hazard 4. For 48" (121.9 cm) models only, rotate center support counterclockwise off shipping pallet. For elevations above 2,000 ft (609.6 m), ratings need to be at test pressures ... pressure testing of that system at a rate of 4% for each side of ½ psi (3.5 kPa). Altitude Input ratings shown on the model/serial rating plate are not sure about 3" (8.0 cm) and move and install range. INSTALLATION INSTRUCTIONS Unpack Range WARNING 3. Keep shipping pallet under...
Installation Guide
Page 11
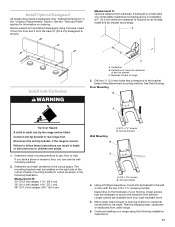
... local hardware store. 5. Move range close enough to opening to children and adults. 1. See "Cabinet Dimensions" in death or serious burns to allow for all models. Backwall to the bracket holes of range 3. See the following illustration. Using a Phillips screwdriver, mount anti-tip bracket to rear range foot. Depending on ordering...
... local hardware store. 5. Move range close enough to opening to children and adults. 1. See "Cabinet Dimensions" in death or serious burns to allow for all models. Backwall to the bracket holes of range 3. See the following illustration. Using a Phillips screwdriver, mount anti-tip bracket to rear range foot. Depending on ordering...
Installation Guide
Page 12
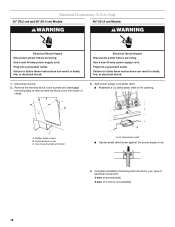
... can result in the opening. Electrical Shock Hazard Disconnect power before servicing. Phillips head screws B. Only 30" (76.2 cm) and 36" (91.4 cm) Models 48" (121.9 cm) Models WARNING WARNING Electrical Shock Hazard Disconnect power before servicing. Electrical Connection - Disconnect power. 2. Plug into a grounded outlet. Complete installation following instructions for your type...
... can result in the opening. Electrical Shock Hazard Disconnect power before servicing. Phillips head screws B. Only 30" (76.2 cm) and 36" (91.4 cm) Models 48" (121.9 cm) Models WARNING WARNING Electrical Shock Hazard Disconnect power before servicing. Electrical Connection - Disconnect power. 2. Plug into a grounded outlet. Complete installation following instructions for your type...

Installation Guide
Page 14
Install Water Filtration System (on some models) Install Model W10049700 Water Filter Connect to cold water supply NOTE: Use the quick connect stem and/or elbow adapter fittings in the combination needed for your ...
Install Water Filtration System (on some models) Install Model W10049700 Water Filter Connect to cold water supply NOTE: Use the quick connect stem and/or elbow adapter fittings in the combination needed for your ...

Installation Guide
Page 16
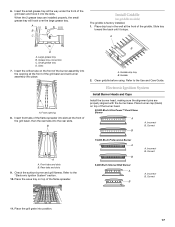
...: All roller feet must be off the floor upon final installation. Check that the range is adequate as long as it into opening on grill models) 1. Verify Anti-Tip Bracket Location 1. Install Grill Grease Trays (on the right front side of securing the range is plugged into anti-tip bracket. Rear...
...: All roller feet must be off the floor upon final installation. Check that the range is adequate as long as it into opening on grill models) 1. Verify Anti-Tip Bracket Location 1. Install Grill Grease Trays (on the right front side of securing the range is plugged into anti-tip bracket. Rear...
Installation Guide
Page 17
... flames. Incorrect B. Place the grill grate into slots at the front of the grill basin and hook it stops. 6. Place the wave tray on griddle models) The griddle is factory installed. 1. Incorrect B. A A. Correct 11.
... flames. Incorrect B. Place the grill grate into slots at the front of the grill basin and hook it stops. 6. Place the wave tray on griddle models) The griddle is factory installed. 1. Incorrect B. A A. Correct 11.

Installation Guide
Page 20
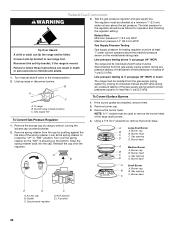
... approved gas supply line. Install a shut-off valve. Failure to children and adults. 1. Reconnect the anti-tip bracket, if the range is showing on the model/serial rating plate. B 1. Gas pressure regulator D. Gas supply line To Convert Surface Burners 1. Snap the spring retainer back into the cap. Securely tighten all gas...
... approved gas supply line. Install a shut-off valve. Failure to children and adults. 1. Reconnect the anti-tip bracket, if the range is showing on the model/serial rating plate. B 1. Gas pressure regulator D. Gas supply line To Convert Surface Burners 1. Snap the spring retainer back into the cap. Securely tighten all gas...

Installation Guide
Page 21
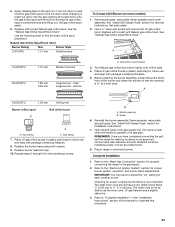
... Burner A. Replace the burner base using both screws. 9. Turn LP gas orifice hood down onto the gas orifice spud and remove by brushing on some models) 1. Screw 6. LP gas flames have to the gas pipe. A Large Dual Burner B C A. Use the following chart to remove the Natural gas orifice hood. Set parts...
... Burner A. Replace the burner base using both screws. 9. Turn LP gas orifice hood down onto the gas orifice spud and remove by brushing on some models) 1. Screw 6. LP gas flames have to the gas pipe. A Large Dual Burner B C A. Use the following chart to remove the Natural gas orifice hood. Set parts...
Installation Guide
Page 22
... Torx® screwdriver, remove the burner base. 1. Gas pressure regulator C D. LP position 22 Reconnect the anti-tip bracket, if the range is showing on the model/serial rating plate. Failure to the regulator should be as follows for testing regulator must be killed. Burner cap B. Gasket C. Gas supply line To Convert...
... Torx® screwdriver, remove the burner base. 1. Gas pressure regulator C D. LP position 22 Reconnect the anti-tip bracket, if the range is showing on the model/serial rating plate. Failure to the regulator should be as follows for testing regulator must be killed. Burner cap B. Gasket C. Gas supply line To Convert...
Installation Guide
Page 23
... to complete this procedure. 23 main Large burner - Turn Natural gas orifice hood down onto the gas orifice spud and remove by brushing on some models) 1. Shutter opening B. IMPORTANT: You may have a slightly yellow tip. 3. Refer to "Complete Installation" in the nut driver while changing it. See the "Natural Gas Orifice...
... to complete this procedure. 23 main Large burner - Turn Natural gas orifice hood down onto the gas orifice spud and remove by brushing on some models) 1. Shutter opening B. IMPORTANT: You may have a slightly yellow tip. 3. Refer to "Complete Installation" in the nut driver while changing it. See the "Natural Gas Orifice...
Installation Guide
Page 26
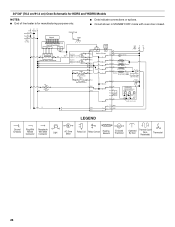
... P1-3 BK P9-2 BK Hall Effect Sensor BK W Halogen Lights 25W/120V Bulb Operate In All Modes Except Self-Clean W W BK BK BK On some models R R R T1-1 R/W T1-2 T2-1 R/W T2-2 LEGEND Ground Plug With Receptacle (Chassis) Female With Male Light Connector Connector AC Drive Motor Relay Coil ... Manager P7-3 R P7-1 W P8-3 OR Conv. Thermostat Resettable) 26 30"/36" (76.2 cm/91.4 cm) Oven Schematic for KDRS and YKDRS Models NOTES: ■ End of line tester is for manufacturing purpose only. ■ Dots indicate connections or splices. ■ Circuit shown in STANDBY/OFF mode...
... P1-3 BK P9-2 BK Hall Effect Sensor BK W Halogen Lights 25W/120V Bulb Operate In All Modes Except Self-Clean W W BK BK BK On some models R R R T1-1 R/W T1-2 T2-1 R/W T2-2 LEGEND Ground Plug With Receptacle (Chassis) Female With Male Light Connector Connector AC Drive Motor Relay Coil ... Manager P7-3 R P7-1 W P8-3 OR Conv. Thermostat Resettable) 26 30"/36" (76.2 cm/91.4 cm) Oven Schematic for KDRS and YKDRS Models NOTES: ■ End of line tester is for manufacturing purpose only. ■ Dots indicate connections or splices. ■ Circuit shown in STANDBY/OFF mode...

Installation Guide
Page 27
... only. ■ Dots indicate connections or splices. ■ Circuit shown in STANDBY/OFF mode with oven door closed. 48" (121.9 cm) Oven Schematic for KDRS Models NOTES: ■ End of Line Tester P6 P5 Appliance Manager P8-1 P8-3 OR W V P2-1 W V P2-2 W OR P2-5 T3-2 Y Conv. - 1600W Y T3-3 R Bake - 3000W R W W P2-6 T3...
... only. ■ Dots indicate connections or splices. ■ Circuit shown in STANDBY/OFF mode with oven door closed. 48" (121.9 cm) Oven Schematic for KDRS Models NOTES: ■ End of Line Tester P6 P5 Appliance Manager P8-1 P8-3 OR W V P2-1 W V P2-2 W OR P2-5 T3-2 Y Conv. - 1600W Y T3-3 R Bake - 3000W R W W P2-6 T3...

Installation Guide
Page 28
... Element Enclosed Thermistor Operated By Door Thermal Cutoff (Non- Fan1 OR T3-2 Y Conv. 30"/36" (76.2 cm/91.4 cm) Oven Schematic for KDRU and YKDRU Models NOTES: ■ End of line tester is for manufacturing purpose only. ■ Dots indicate connections or splices. ■ Circuit shown in STANDBY/OFF mode with...
... Element Enclosed Thermistor Operated By Door Thermal Cutoff (Non- Fan1 OR T3-2 Y Conv. 30"/36" (76.2 cm/91.4 cm) Oven Schematic for KDRU and YKDRU Models NOTES: ■ End of line tester is for manufacturing purpose only. ■ Dots indicate connections or splices. ■ Circuit shown in STANDBY/OFF mode with...

