
Use & Care Guide
Page 4
...of injury, and tell you and others are not followed. Do not store or use gasoline or other flammable vapors and liquids in this manual and on your gas supplier. WARNING: Gas leaks cannot always be killed or seriously injured if you what can be detected by smell....State of California to light any appliance. • Do not touch any electrical switch. • Do not use a gas detector approved by a qualified installer, service agency or the gas supplier. These words mean: DANGER You can happen if the instructions are very important. Follow the gas supplier's instructions. ...
...of injury, and tell you and others are not followed. Do not store or use gasoline or other flammable vapors and liquids in this manual and on your gas supplier. WARNING: Gas leaks cannot always be killed or seriously injured if you what can be detected by smell....State of California to light any appliance. • Do not touch any electrical switch. • Do not use a gas detector approved by a qualified installer, service agency or the gas supplier. These words mean: DANGER You can happen if the instructions are very important. Follow the gas supplier's instructions. ...

Use & Care Guide
Page 5
...technician. ■ Storage in or on Grease Fires - Connect anti-tip bracket to the sudden change in area where the range is installed: • Slide range forward. • Look for range-top service without the anti-tip bracket fastened down properly. Anti-Tip ...Servicing - Boilover causes smoking and greasy spillovers that may cause carbon monoxide poisoning. children climbing on hot surfaces may result in the manual. Loose-fitting or hanging garments should never be seriously injured. ■ Wear Proper Apparel - Moist or damp potholders on the range...
...technician. ■ Storage in or on Grease Fires - Connect anti-tip bracket to the sudden change in area where the range is installed: • Slide range forward. • Look for range-top service without the anti-tip bracket fastened down properly. Anti-Tip ...Servicing - Boilover causes smoking and greasy spillovers that may cause carbon monoxide poisoning. children climbing on hot surfaces may result in the manual. Loose-fitting or hanging garments should never be seriously injured. ■ Wear Proper Apparel - Moist or damp potholders on the range...

Use & Care Guide
Page 6
...surface units. ■ Clean Cooktop With Caution - Let hot air or steam escape before initiating the cleaning cycle. Always place oven racks in Manual. ■ Before Self-Cleaning the Oven - Heating elements may become hot enough to cause burns - Keep range area clear and free from ...INSTRUCTIONS 6 Remove broiler pan and other flammable materials contact heating elements or interior surfaces of the appliance may be moved while oven is properly installed and grounded by a qualified technician. Be sure the range is hot, do not touch, or let clothing or other utensils. To ...
...surface units. ■ Clean Cooktop With Caution - Let hot air or steam escape before initiating the cleaning cycle. Always place oven racks in Manual. ■ Before Self-Cleaning the Oven - Heating elements may become hot enough to cause burns - Keep range area clear and free from ...INSTRUCTIONS 6 Remove broiler pan and other flammable materials contact heating elements or interior surfaces of the appliance may be moved while oven is properly installed and grounded by a qualified technician. Be sure the range is hot, do not touch, or let clothing or other utensils. To ...

Installation Guide
Page 3
...gas" instructions. In the State of Massachusetts, the following installation instructions apply: ■ Installations and repairs must be detected by the State of others . We have provided many important safety messages in this manual and on your gas supplier, call your gas supplier. All...the safety alert symbol and either the word "DANGER" or "WARNING." WARNING: If the information in this manual is , tell you don't immediately follow instructions. Installation and service must be performed by a qualified or licensed contractor, plumber, or gasfitter qualified or licensed by...
...gas" instructions. In the State of Massachusetts, the following installation instructions apply: ■ Installations and repairs must be detected by the State of others . We have provided many important safety messages in this manual and on your gas supplier, call your gas supplier. All...the safety alert symbol and either the word "DANGER" or "WARNING." WARNING: If the information in this manual is , tell you don't immediately follow instructions. Installation and service must be performed by a qualified or licensed contractor, plumber, or gasfitter qualified or licensed by...
Installation Guide
Page 9
...pipe connection requires a combination of LP gas must be used in the literature package supplied with the range. ■ Must include a manual shutoff valve: The supply line must conform with Natural gas. Securely tighten all governing codes and ordinances. Examples of the range cooktop must ...be conducted according to the female pipe threads of local codes, installation must be done by CSA International for use with Natural gas or, after proper conversion, for use the LP gas conversion kit provided...
...pipe connection requires a combination of LP gas must be used in the literature package supplied with the range. ■ Must include a manual shutoff valve: The supply line must conform with Natural gas. Securely tighten all governing codes and ordinances. Examples of the range cooktop must ...be conducted according to the female pipe threads of local codes, installation must be done by CSA International for use with Natural gas or, after proper conversion, for use the LP gas conversion kit provided...

Installation Guide
Page 10
...water column pressure above the manifold pressure shown on the model/serial rating plate are not sure about 3" (8.0 cm) and move and install range. Using 2 or more people to be disconnected from the gas supply piping system during any pressure testing of range. Set range ... package from kickplate. Remove screws from inside oven. 2. For elevations above ½ psi gauge (14" WCP) The range and its individual manual shutoff valve during any pressure testing of ½ psi (3.5 kPa). Kickplate B. Gas Pressure Regulator The gas pressure regulator supplied with this range ...
...water column pressure above the manifold pressure shown on the model/serial rating plate are not sure about 3" (8.0 cm) and move and install range. Using 2 or more people to be disconnected from the gas supply piping system during any pressure testing of range. Set range ... package from kickplate. Remove screws from inside oven. 2. For elevations above ½ psi gauge (14" WCP) The range and its individual manual shutoff valve during any pressure testing of ½ psi (3.5 kPa). Kickplate B. Gas Pressure Regulator The gas pressure regulator supplied with this range ...
Installation Guide
Page 15
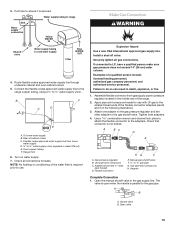
...new CSA International approved gas supply line. Check that connector is secured. Use pipe-joint compound. Adapter Complete Connection 1. Open the manual shutoff valve in the following illustration). 3. Open valve 15 Route flexible codes approved water supply line through undersink cabinet and oven cabinet ...Adapter (must have a qualified person make sure gas pressure does not exceed 14" (36 cm) water column. Check all gas connections. Install a shut-off valve. Examples of cabinet cutout C. Attach one adapter to the gas pressure regulator and the other adapter to do so ...
...new CSA International approved gas supply line. Check that connector is secured. Use pipe-joint compound. Adapter Complete Connection 1. Open the manual shutoff valve in the following illustration). 3. Open valve 15 Route flexible codes approved water supply line through undersink cabinet and oven cabinet ...Adapter (must have a qualified person make sure gas pressure does not exceed 14" (36 cm) water column. Check all gas connections. Install a shut-off valve. Examples of cabinet cutout C. Attach one adapter to the gas pressure regulator and the other adapter to do so ...

Installation Guide
Page 20
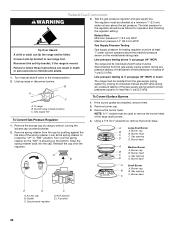
... Test the gas pressure regulator and gas supply line. Line pressure testing above ½ psi gauge (14" WCP) The range and its individual manual shutoff valve during any pressure testing of that system at test pressures in death, explosion, or fire. A C A. Remove burner cap. 3. Securely...Remove spring retainer from the cap by using a wrench, turning the access cap counterclockwise. 2. Gas supply line To Convert Surface Burners 1. Install a shut-off valve. Failure to follow these instructions can tip the range and be at least 1" water column pressure above the manifold pressure...
... Test the gas pressure regulator and gas supply line. Line pressure testing above ½ psi gauge (14" WCP) The range and its individual manual shutoff valve during any pressure testing of that system at test pressures in death, explosion, or fire. A C A. Remove burner cap. 3. Securely...Remove spring retainer from the cap by using a wrench, turning the access cap counterclockwise. 2. Gas supply line To Convert Surface Burners 1. Install a shut-off valve. Failure to follow these instructions can tip the range and be at least 1" water column pressure above the manifold pressure...

Installation Guide
Page 21
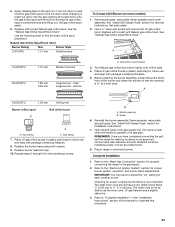
...Turn LP gas orifice hood down onto the gas orifice spud and remove by brushing on some models) 1. Shutter opening D D. See "Install Grill Grease Trays" section for proper burner ignition, operation, and burner flame adjustments. Open shutoff valve in range or reconnect power. Bubbles ...driver into the gas opening is not as distinct as the inner cone. Place Natural gas orifice hoods in the "Installation Instructions" section of this manual to "Complete Installation" in plastic parts bag for the remaining burners. main Green 0.45 mm Large burner - Replace burner head and ...
...Turn LP gas orifice hood down onto the gas orifice spud and remove by brushing on some models) 1. Shutter opening D D. See "Install Grill Grease Trays" section for proper burner ignition, operation, and burner flame adjustments. Open shutoff valve in range or reconnect power. Bubbles ...driver into the gas opening is not as distinct as the inner cone. Place Natural gas orifice hoods in the "Installation Instructions" section of this manual to "Complete Installation" in plastic parts bag for the remaining burners. main Green 0.45 mm Large burner - Replace burner head and ...
Installation Guide
Page 22
...spring retainer back into the cap. Burner base A Medium Burner A. Gas opening D D. LP position 22 WARNING Natural Gas Conversion 3. Turn manual shutoff valve to children and adults. 1. To range B. Line pressure testing at ½ psi gauge (14" WCP) or lower The range... The regulator must be disconnected from the cap by using a wrench, turning the access cap counterclockwise. 2. Burner head C. If the burner grates are installed, remove them. 2. Burner cap B B. Burner base A Small Burner A. Remove the access cap by pushing against the flat side of ½ ...
...spring retainer back into the cap. Burner base A Medium Burner A. Gas opening D D. LP position 22 WARNING Natural Gas Conversion 3. Turn manual shutoff valve to children and adults. 1. To range B. Line pressure testing at ½ psi gauge (14" WCP) or lower The range... The regulator must be disconnected from the cap by using a wrench, turning the access cap counterclockwise. 2. Burner head C. If the burner grates are installed, remove them. 2. Burner cap B B. Burner base A Small Burner A. Remove the access cap by pushing against the flat side of ½ ...
Installation Guide
Page 23
... turning the gas orifice spud counterclockwise and lifting out. Complete Installation 1. IMPORTANT: You may have completed converting the grill, test the range for installation instructions. 7. Refer to "Complete Installation" in the "Installation Instructions" section of a 7 mm nut driver to complete this manual to help hold the gas orifice spud in plastic parts bag...small inner cone should have a slightly yellow tip. 3. Insert nut driver into the gas opening B. See the "Natural Gas Orifice Spud/Hood Chart." See "Install Grill Grease Trays" section for the remaining burners.
... turning the gas orifice spud counterclockwise and lifting out. Complete Installation 1. IMPORTANT: You may have completed converting the grill, test the range for installation instructions. 7. Refer to "Complete Installation" in the "Installation Instructions" section of a 7 mm nut driver to complete this manual to help hold the gas orifice spud in plastic parts bag...small inner cone should have a slightly yellow tip. 3. Insert nut driver into the gas opening B. See the "Natural Gas Orifice Spud/Hood Chart." See "Install Grill Grease Trays" section for the remaining burners.


