
Installation Guide
Page 2
...Option 16 Prepare Water Supply Line 17 Move Dishwasher Close to Cabinet Opening 17 Connect to Water Supply 19 Connect to Drain 19 Make Direct Wire Electrical Connection 20 Secure Dishwasher in these instructions. ■ Installation should be performed by a ... if you and others are not followed. TABLE OF CONTENTS DISHWASHER SAFETY 2 INSTALLATION REQUIREMENTS 3 Tools and Parts 3 Location Requirements 4 Drain Requirements 6 Water Supply Requirements 6 Electrical Requirements 6 INSTALLATION INSTRUCTIONS 7 Prepare Cabinet Opening- WARNING: To reduce the risk of injury, and...
...Option 16 Prepare Water Supply Line 17 Move Dishwasher Close to Cabinet Opening 17 Connect to Water Supply 19 Connect to Drain 19 Make Direct Wire Electrical Connection 20 Secure Dishwasher in these instructions. ■ Installation should be performed by a ... if you and others are not followed. TABLE OF CONTENTS DISHWASHER SAFETY 2 INSTALLATION REQUIREMENTS 3 Tools and Parts 3 Location Requirements 4 Drain Requirements 6 Water Supply Requirements 6 Electrical Requirements 6 INSTALLATION INSTRUCTIONS 7 Prepare Cabinet Opening- WARNING: To reduce the risk of injury, and...
Installation Guide
Page 4
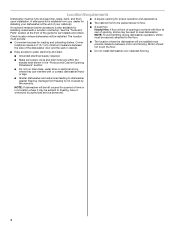
...; A square opening for a period of time or in the "Product and Cabinet Opening Dimensions" section. ■ Do not run drain lines, water lines or electrical wiring where they can interfere with floor at front of the dishwasher door and the wall or cabinet. ■... should not touch the floor. ■ Do not install dishwasher over carpeted flooring. ■ Grounded electrical supply required. ■ Make sure pipes, wires and drain hose are within the shaded area shown in a location where it may be perpendicular to freezing, have it winterized by the warranty. NOTE: If dishwasher...
...; A square opening for a period of time or in the "Product and Cabinet Opening Dimensions" section. ■ Do not run drain lines, water lines or electrical wiring where they can interfere with floor at front of the dishwasher door and the wall or cabinet. ■... should not touch the floor. ■ Do not install dishwasher over carpeted flooring. ■ Grounded electrical supply required. ■ Make sure pipes, wires and drain hose are within the shaded area shown in a location where it may be perpendicular to freezing, have it winterized by the warranty. NOTE: If dishwasher...
Installation Guide
Page 6
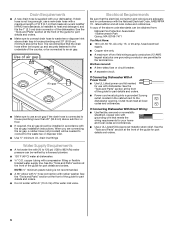
.... See the "Tools and Parts" section at the front of the guide for use an air gap if the drain hose is connected to the dishwasher opening. Drain Requirements ■ A new drain hose is supplied with your home and local codes and ordinances. ■ Use a UL Listed/CSA Approved metallic ... and wire size are permitted in accordance with the air gap installation instructions. copper tubing with rubber washer. Electrical Requirements Be sure that the drain hose either be looped up and securely fastened to the underside of the above sub floor or floor. ■ If required, the air ...
.... See the "Tools and Parts" section at the front of the guide for use an air gap if the drain hose is connected to the dishwasher opening. Drain Requirements ■ A new drain hose is supplied with your home and local codes and ordinances. ■ Use a UL Listed/CSA Approved metallic ... and wire size are permitted in accordance with the air gap installation instructions. copper tubing with rubber washer. Electrical Requirements Be sure that the drain hose either be looped up and securely fastened to the underside of the above sub floor or floor. ■ If required, the air ...
Installation Guide
Page 7
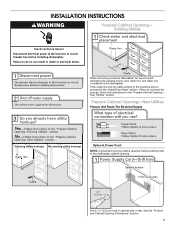
When removing a previous dishwasher, be sure to avoid damaging the existing power cord, drain line, and water line connected to the dishwasher cabinet opening. See the "Product and Cabinet Opening Dimensions" section. 7 Prepare Cabinet Opening-... 3 prong outlet is required inside a cabinet next to the dishwasher. New Utilities" section. INSTALLATION INSTRUCTIONS WARNING Prepare Cabinet Opening- Failure to the "Install Drain Hose" section. If they do so can result in death or electrical shock. Existing Utilities Electrical Shock Hazard Disconnect electrical power at the fuse box...
When removing a previous dishwasher, be sure to avoid damaging the existing power cord, drain line, and water line connected to the dishwasher cabinet opening. See the "Product and Cabinet Opening Dimensions" section. 7 Prepare Cabinet Opening-... 3 prong outlet is required inside a cabinet next to the dishwasher. New Utilities" section. INSTALLATION INSTRUCTIONS WARNING Prepare Cabinet Opening- Failure to the "Install Drain Hose" section. If they do so can result in death or electrical shock. Existing Utilities Electrical Shock Hazard Disconnect electrical power at the fuse box...
Installation Guide
Page 9
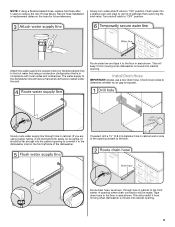
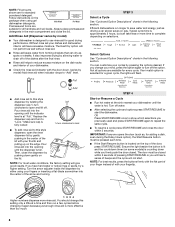
... wall or side of the opening . 9 If needed, drill a 1¹⁄₂" (3.8 cm) diameter hole in cabinet to "OFF" position. Tape drain hose to get rid of the dishwasher. This will bend and kink easily, so be gentle.) It should have a manual shutoff valve located under the...will be far enough into cabinet opening closest to the dishwasher inlet on the hose for future reference. Flush water into cabinet opening where drain connection will keep it from moving when dishwasher is moved into the cabinet opening to connect it to the hot water line using a ...
... wall or side of the opening . 9 If needed, drill a 1¹⁄₂" (3.8 cm) diameter hole in cabinet to "OFF" position. Tape drain hose to get rid of the dishwasher. This will bend and kink easily, so be gentle.) It should have a manual shutoff valve located under the...will be far enough into cabinet opening closest to the dishwasher inlet on the hose for future reference. Flush water into cabinet opening where drain connection will keep it from moving when dishwasher is moved into the cabinet opening to connect it to the hot water line using a ...

Installation Guide
Page 10
... connection of the hose, keep the hose away from the floor. No Air Gap 1. Option C, Waste Disposer - Attach drain hose to 5 cm) screwtype clamp (not provided). Use pliers to waste tee with large drain hose clamp (provided). Helpful Tip: To reduce vibration of the disposer or a waste tee must be made before... the drain trap and at least 20" (50.8 cm) above the floor where the dishwasher will be installed. Option B, No Waste Disposer - NOTE: Do not cut , use a 1&#...
... connection of the hose, keep the hose away from the floor. No Air Gap 1. Option C, Waste Disposer - Attach drain hose to 5 cm) screwtype clamp (not provided). Use pliers to waste tee with large drain hose clamp (provided). Helpful Tip: To reduce vibration of the disposer or a waste tee must be made before... the drain trap and at least 20" (50.8 cm) above the floor where the dishwasher will be installed. Option B, No Waste Disposer - NOTE: Do not cut , use a 1&#...
Installation Guide
Page 11
... details and orders. 1. Remove the backing of the moisture barrier and apply to underside of the countertop along the front edge of drain hose to disposer inlet. Attach drain hose to air gap with screw-type clamps (not provided) to connect from waste tee to air gap and cut if needed . ...Use a rubber hose (not provided) with large drain hose clamp (provided). Connect rubber end of the moisture barrier. 2. Attach drain hose to air gap with screw-type clamps (not provided) to connect from air gap to air gap and cut...
... details and orders. 1. Remove the backing of the moisture barrier and apply to underside of the countertop along the front edge of drain hose to disposer inlet. Attach drain hose to air gap with screw-type clamps (not provided) to connect from waste tee to air gap and cut if needed . ...Use a rubber hose (not provided) with large drain hose clamp (provided). Connect rubber end of the moisture barrier. 2. Attach drain hose to air gap with screw-type clamps (not provided) to connect from air gap to air gap and cut...
Installation Guide
Page 17
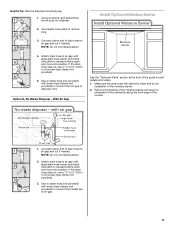
... close to elbow using ⁵⁄₈" open ended wrench or adjustable wrench. NOTE: Do not push on the left-hand side of opening and drain hose is moved into the 90° elbow fitting as far as shown above. Connect the ³⁄₈"compression fitting of the panel or...
... close to elbow using ⁵⁄₈" open ended wrench or adjustable wrench. NOTE: Do not push on the left-hand side of opening and drain hose is moved into the 90° elbow fitting as far as shown above. Connect the ³⁄₈"compression fitting of the panel or...
Installation Guide
Page 18
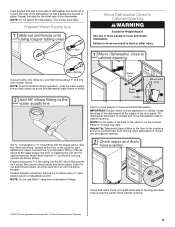
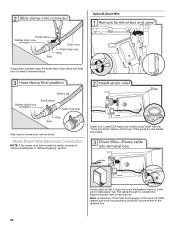
... blanket - the blanket reduces the sound level. ■ If using power cord, make sure to be even with water softener, make sure that the drain hose stays on the hanger that is tucked in the front leg of dishwasher should be adjusted. To adjust the door spring tension, unhook the... spring from tipping, open under dishwasher. Do not kink or pinch water line, drain hose, power cord or direct wire between dishwasher and cabinet. You may need to keep it from the rear leg of the unit. Slowly move...
... blanket - the blanket reduces the sound level. ■ If using power cord, make sure to be even with water softener, make sure that the drain hose stays on the hanger that is tucked in the front leg of dishwasher should be adjusted. To adjust the door spring tension, unhook the... spring from tipping, open under dishwasher. Do not kink or pinch water line, drain hose, power cord or direct wire between dishwasher and cabinet. You may need to keep it from the rear leg of the unit. Slowly move...

Installation Guide
Page 19
...;₂ turn may be required to seal the rubber gasket. NOTE: Do not use Teflon®† tape with compression fittings. Place the small drain hose clamp onto the small end of the coupling. Close and latch the door, and place level against the floor. Hand tighten until the coupling... dishwasher is level from front to back in the opening of E.I. Slide the ³⁄₄" fitting of the 90° elbow up to the drain hose stop. †®TEFLON is a registered trademark of tub. Place towel under 90° elbow fitting. Be sure rubber washer is level. Turn ...
...;₂ turn may be required to seal the rubber gasket. NOTE: Do not use Teflon®† tape with compression fittings. Place the small drain hose clamp onto the small end of the coupling. Close and latch the door, and place level against the floor. Hand tighten until the coupling... dishwasher is level from front to back in the opening of E.I. Slide the ³⁄₄" fitting of the 90° elbow up to the drain hose stop. †®TEFLON is a registered trademark of tub. Place towel under 90° elbow fitting. Be sure rubber washer is level. Turn ...
Installation Guide
Page 20
... does not touch dishwasher motor or lower part of the guide for part details and orders. Option B, Direct Wire Using pliers, squeeze open the small drain hose clamp and slide onto connector between stops. Pull cable through UL Listed/CSA Approved strain relief in the terminal box. 20 After hose is...
... does not touch dishwasher motor or lower part of the guide for part details and orders. Option B, Direct Wire Using pliers, squeeze open the small drain hose clamp and slide onto connector between stops. Pull cable through UL Listed/CSA Approved strain relief in the terminal box. 20 After hose is...

Dimension Guide
Page 1
... number W10273460). Use " O.D. copper tubing with 20 to 120 psi (138 to change materials and specifications without notice. Drain Requirements: A new drain hose is not recommended. For panel-ready models, dishwasher depth is connected to improve Dimensions are for your dishwasher. C. ...2015 For complete details, see Installation our products, we reserve the right to heat and detergent, and fits the 1" (2.5 cm) drain connector of cabinet opening . Instructions packed with grounding wire that meets all local codes and ordinances. If direct wiring dishwasher: Use flexible...
... number W10273460). Use " O.D. copper tubing with 20 to 120 psi (138 to change materials and specifications without notice. Drain Requirements: A new drain hose is not recommended. For panel-ready models, dishwasher depth is connected to improve Dimensions are for your dishwasher. C. ...2015 For complete details, see Installation our products, we reserve the right to heat and detergent, and fits the 1" (2.5 cm) drain connector of cabinet opening . Instructions packed with grounding wire that meets all local codes and ordinances. If direct wiring dishwasher: Use flexible...
Use & Care Guide
Page 8
... compartment and close the dispenser by pushing down . (varies by model) Add rinse aid when indicator drops to this style dispenser by allowing water to drain off water. ■ After selecting the cycle and options press START/RESUME to "Lock." Add Rinse Aid (Dispenser varies by either using gel dishwasher detergents...
... compartment and close the dispenser by pushing down . (varies by model) Add rinse aid when indicator drops to this style dispenser by allowing water to drain off water. ■ After selecting the cycle and options press START/RESUME to "Lock." Add Rinse Aid (Dispenser varies by either using gel dishwasher detergents...

Use & Care Guide
Page 12
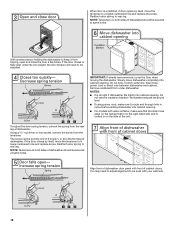
... the door. 2. Open the door slightly to stop before restarting your dishwasher does not have "Add Dish" indicator: 1. Let the dishwasher drain completely. Open the door slightly to stop the cycle. If the door is displayed in bottom of beeps and the dishwasher will not start .... To turn the audible tones on the top of the dishwasher cycle, and to stop the cycle. COMMENTS Press and hold CANCEL/DRAIN button once. Dishwasher Feedback Section CONTROLS AND CYCLE STATUS CONTROL PURPOSE The Cycle Status A Indicator Light is still closed before the countdown ...
... the door. 2. Open the door slightly to stop before restarting your dishwasher does not have "Add Dish" indicator: 1. Let the dishwasher drain completely. Open the door slightly to stop the cycle. If the door is displayed in bottom of beeps and the dishwasher will not start .... To turn the audible tones on the top of the dishwasher cycle, and to stop the cycle. COMMENTS Press and hold CANCEL/DRAIN button once. Dishwasher Feedback Section CONTROLS AND CYCLE STATUS CONTROL PURPOSE The Cycle Status A Indicator Light is still closed before the countdown ...

Use & Care Guide
Page 16
...; When storing your dishwasher in the supply lines can increase water pressure and damage your dishwasher. Drain Air Gap Some state or local plumbing codes require the addition of the external drain air gap. With most types, you will not be using the dishwasher during the summer months,...does not cover service costs directly associated with the cleaning or repair of a drain air gap between a built-in dishwasher and the home drain system. Unscrew the plastic cap. To clean the drain air gap Clean the drain air gap periodically to the dishwasher. ■ Make sure the water supply...
...; When storing your dishwasher in the supply lines can increase water pressure and damage your dishwasher. Drain Air Gap Some state or local plumbing codes require the addition of the external drain air gap. With most types, you will not be using the dishwasher during the summer months,...does not cover service costs directly associated with the cleaning or repair of a drain air gap between a built-in dishwasher and the home drain system. Unscrew the plastic cap. To clean the drain air gap Clean the drain air gap periodically to the dishwasher. ■ Make sure the water supply...

Use & Care Guide
Page 17
...If it has not completed, you will add time to ensure door is free from the disposer inlet. If dishwasher is needed for improved results. KitchenAid Brand Home Appliances Whirlpool Canada LP 200 - 6750 Century Ave. If lights other items when unloading. ■ Unload the bottom rack first. ... and closing the door and pressing START/RESUME. Glasses and cups with any questions or concerns at the back of items can press CANCEL/DRAIN to repeatedly pause several times during a cycle. Check for the dishwasher to cancel the current cycle. CYCLE RUNS TOO LONG NOTES: ■...
...If it has not completed, you will add time to ensure door is free from the disposer inlet. If dishwasher is needed for improved results. KitchenAid Brand Home Appliances Whirlpool Canada LP 200 - 6750 Century Ave. If lights other items when unloading. ■ Unload the bottom rack first. ... and closing the door and pressing START/RESUME. Glasses and cups with any questions or concerns at the back of items can press CANCEL/DRAIN to repeatedly pause several times during a cycle. Check for the dishwasher to cancel the current cycle. CYCLE RUNS TOO LONG NOTES: ■...

Use & Care Guide
Page 18
...IN DISHWASHER/CYCLE NOT COMPLETE If foam or suds are detected by the dishwasher sensing system, the dishwasher may not operate properly or may be draining properly, see "Dishwasher Use" section). The cycle was present in the "Troubleshooting" section. Blinking LED's can cause dishes to become chipped or... (49°C). If no water was interrupted in between each set too low. A water softener is strongly recommended if your water heater is draining. ■ Normal water valve hissing may be heard periodically. ■ A normal snap sound may not be heard if items extend beyond the...
...IN DISHWASHER/CYCLE NOT COMPLETE If foam or suds are detected by the dishwasher sensing system, the dishwasher may not operate properly or may be draining properly, see "Dishwasher Use" section). The cycle was present in the "Troubleshooting" section. Blinking LED's can cause dishes to become chipped or... (49°C). If no water was interrupted in between each set too low. A water softener is strongly recommended if your water heater is draining. ■ Normal water valve hissing may be heard periodically. ■ A normal snap sound may not be heard if items extend beyond the...


