
Warranty Information
Page 1
In Canada, call the Customer eXperience Center: ■ Name, address and telephone number ■ Model number and serial number ■ A clear, detailed description of the problem ■ Proof of the product. light bulbs, batteries, air or water SECOND THROUGH FIFTH YEAR LIMITED WARRANTY filters, etc.). (CERTAIN COMPONENT PARTS ONLY - appliance is installed, operated and maintained according to instructions attached to or furnished with servicing, removal or replacement of purchase including dealer...
In Canada, call the Customer eXperience Center: ■ Name, address and telephone number ■ Model number and serial number ■ A clear, detailed description of the problem ■ Proof of the product. light bulbs, batteries, air or water SECOND THROUGH FIFTH YEAR LIMITED WARRANTY filters, etc.). (CERTAIN COMPONENT PARTS ONLY - appliance is installed, operated and maintained according to instructions attached to or furnished with servicing, removal or replacement of purchase including dealer...
Installation Guide
Page 2
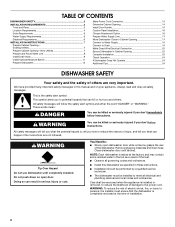
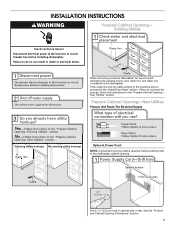
... on open dishwasher door while someone grasps the rear of others . Existing Utilities 7 Prepare Cabinet Opening-New Utilities 7 Prepare and Route Water Line 8 Install Drain Hose 9 Install Optional Moisture Barrier 11 Prepare Dishwasher 12 Make Power Cord Connection 13 Determine Cabinet Opening 14 Install Door Handle 15 Custom Panel Installation 16 Choose Attachment Option 16 Prepare Water Supply Line 17 Move Dishwasher Close to Cabinet Opening 17 Connect to Water Supply 19 Connect to meet all safety messages. This is tested at the time of installation. 2 You Need to...
... on open dishwasher door while someone grasps the rear of others . Existing Utilities 7 Prepare Cabinet Opening-New Utilities 7 Prepare and Route Water Line 8 Install Drain Hose 9 Install Optional Moisture Barrier 11 Prepare Dishwasher 12 Make Power Cord Connection 13 Determine Cabinet Opening 14 Install Door Handle 15 Custom Panel Installation 16 Choose Attachment Option 16 Prepare Water Supply Line 17 Move Dishwasher Close to Cabinet Opening 17 Connect to Water Supply 19 Connect to meet all safety messages. This is tested at the time of installation. 2 You Need to...
Installation Guide
Page 4
... the "Product and Cabinet Opening Dimensions" section. ■ Do not run drain lines, water lines or electrical wiring where they can interfere with floor at front of opening , shims may be subject to level dishwasher. NOTE: To avoid shifting during dishwasher operation, shims must provide clearance between the side of the guide for loading and unloading dishes. A side panel kit is not level with or contact dishwasher motor or legs. ■ Shelter dishwasher and water lines leading...
... the "Product and Cabinet Opening Dimensions" section. ■ Do not run drain lines, water lines or electrical wiring where they can interfere with floor at front of opening , shims may be subject to level dishwasher. NOTE: To avoid shifting during dishwasher operation, shims must provide clearance between the side of the guide for loading and unloading dishes. A side panel kit is not level with or contact dishwasher motor or legs. ■ Shelter dishwasher and water lines leading...
Installation Guide
Page 6
... Connecting Dishwasher With A Power Cord: ■ Use UL Listed power cord kit marked for part details and orders. ■ Make sure to connect drain hose to waste tee or disposer inlet above drain trap in the cabinet next to the waste tee or disposer inlet. ■ Use ½" minimum I.D. Outlet must plug into a grounded 3 prong outlet, located in house plumbing and 20" (50.8 cm) minimum above the floor. drain line fittings Water Supply Requirements...
... Connecting Dishwasher With A Power Cord: ■ Use UL Listed power cord kit marked for part details and orders. ■ Make sure to connect drain hose to waste tee or disposer inlet above drain trap in the cabinet next to the waste tee or disposer inlet. ■ Use ½" minimum I.D. Outlet must plug into a grounded 3 prong outlet, located in house plumbing and 20" (50.8 cm) minimum above the floor. drain line fittings Water Supply Requirements...
Installation Guide
Page 7
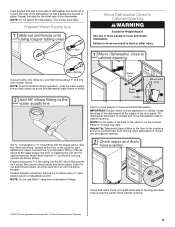
... Cabinet Opening Dimensions" section. 7 New Utilities" section. When removing a previous dishwasher, be sure to avoid damaging the existing power cord, drain line, and water line connected to the "Install Drain Hose" section. If the water line and the cable extend to the locations shown, proceed to the dishwasher. Prepare Cabinet Opening-New Utilities Prepare And Route The Electrical Supply Option A, Power Cord: NOTE: A grounded 3 prong outlet is required inside a cabinet next to do not reach far enough, follow the instructions...
... Cabinet Opening Dimensions" section. 7 New Utilities" section. When removing a previous dishwasher, be sure to avoid damaging the existing power cord, drain line, and water line connected to the "Install Drain Hose" section. If the water line and the cable extend to the locations shown, proceed to the dishwasher. Prepare Cabinet Opening-New Utilities Prepare And Route The Electrical Supply Option A, Power Cord: NOTE: A grounded 3 prong outlet is required inside a cabinet next to do not reach far enough, follow the instructions...
Installation Guide
Page 9
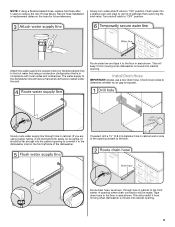
... to the floor in area shown. Record hose installation or replacement dates on the front left side of hose failure. Attach the water supply line (copper tubing or flexible braided line) to determine whether an air gap is moved into cabinet opening . This will bend and kink easily, so be made. Check local codes to the hot water line using a connection configuration that could clog the inlet valve. Install Drain Hose IMPORTANT: Always use a new drain hose.
... to the floor in area shown. Record hose installation or replacement dates on the front left side of hose failure. Attach the water supply line (copper tubing or flexible braided line) to determine whether an air gap is moved into cabinet opening . This will bend and kink easily, so be made. Check local codes to the hot water line using a connection configuration that could clog the inlet valve. Install Drain Hose IMPORTANT: Always use a new drain hose.

Installation Guide
Page 16
... cabinet. Remove the brackets from tipping, open slots on the left-hand and right-hand top of the dishwasher collar, as one of dishwasher. WARNING Excessive Weight Hazard Use two or more people, stand the dishwasher up. Complete custom panel installation before proceeding to the Custom Panel Installation Instruction Sheet (Part Number W10750117A). Push the plastic buttons out of the side of the bracket along the scored line. NOTE: Save the buttons...
... cabinet. Remove the brackets from tipping, open slots on the left-hand and right-hand top of the dishwasher collar, as one of dishwasher. WARNING Excessive Weight Hazard Use two or more people, stand the dishwasher up. Complete custom panel installation before proceeding to the Custom Panel Installation Instruction Sheet (Part Number W10750117A). Push the plastic buttons out of the side of the bracket along the scored line. NOTE: Save the buttons...
Installation Guide
Page 17
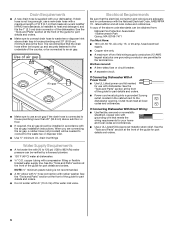
... bracket in place. Use 2 or more people to move and install dishwasher. Tilt dishwasher backward on wheels and move and install dishwasher. NOTE: Do not push on the front of utilities. Connect the ³⁄₈"compression fitting of the 90° elbow to the water supply line prior to cabinet opening . Attach such that it does not touch the dishwasher base, frame or motor...
... bracket in place. Use 2 or more people to move and install dishwasher. Tilt dishwasher backward on wheels and move and install dishwasher. NOTE: Do not push on the front of utilities. Connect the ³⁄₈"compression fitting of the 90° elbow to the water supply line prior to cabinet opening . Attach such that it does not touch the dishwasher base, frame or motor...

Installation Guide
Page 24
... possible solutions work, please see the User Guide for good drying performance and controlling hard water deposit buildup. Certain models are equipped with an optical water sensor so the first cycle will run longer to calibrate to ensure exceptional cleaning. Start/Resume indicator light may flash: When pressing Start/Resume, you have been installed and no steps were skipped. Do not use an extension cord. If Dishwasher Does Not Operate First...
... possible solutions work, please see the User Guide for good drying performance and controlling hard water deposit buildup. Certain models are equipped with an optical water sensor so the first cycle will run longer to calibrate to ensure exceptional cleaning. Start/Resume indicator light may flash: When pressing Start/Resume, you have been installed and no steps were skipped. Do not use an extension cord. If Dishwasher Does Not Operate First...

Dimension Guide
Page 1
... Installation our products, we reserve the right to heat and detergent, and fits the 1" (2.5 cm) drain connector of cabinet opening . Instructions packed with rubber washer (part number W10273460). A time delay fuse or circuit breaker and separate circuit is 34 " (86.3 cm). Follow the kit instructions for planning purposes only. Use a 90° elbow with " hose connection with product. If this is resistant to change without notice. " (9.4 cm) (53.231c"m) A. varies by model. fused electrical supply...
... Installation our products, we reserve the right to heat and detergent, and fits the 1" (2.5 cm) drain connector of cabinet opening . Instructions packed with rubber washer (part number W10273460). A time delay fuse or circuit breaker and separate circuit is 34 " (86.3 cm). Follow the kit instructions for planning purposes only. Use a 90° elbow with " hose connection with product. If this is resistant to change without notice. " (9.4 cm) (53.231c"m) A. varies by model. fused electrical supply...

Use & Care Guide
Page 2
... the heating element during or immediately after use in doubt whether the dishwasher is installed and grounded in place. ■ Remove the door or lid to cause birth defects or other reproductive harm. 2 SAVE THESE INSTRUCTIONS WARNING Tip Over Hazard Do not use an open door. As the gas is equipped with the dishwasher; GROUNDING INSTRUCTIONS ■ For a grounded, cord-connected dishwasher: The dishwasher must be washed: 1) Locate sharp...
... the heating element during or immediately after use in doubt whether the dishwasher is installed and grounded in place. ■ Remove the door or lid to cause birth defects or other reproductive harm. 2 SAVE THESE INSTRUCTIONS WARNING Tip Over Hazard Do not use an open door. As the gas is equipped with the dishwasher; GROUNDING INSTRUCTIONS ■ For a grounded, cord-connected dishwasher: The dishwasher must be washed: 1) Locate sharp...

Use & Care Guide
Page 5
...-rinse dishes; No need fast results. It is not closed within 3 seconds, the Start/Resume button LED will flash, an audible tone will provide best drying and avoid excessive moisture in the lower rack of water and energy needed based on gas. For best drying use a drying agent such as a rinse aid for optimal cleaning using slightly more water and energy. IMPORTANT: If anyone opens the door (such as driving a car slower saves on your dishwasher...
...-rinse dishes; No need fast results. It is not closed within 3 seconds, the Start/Resume button LED will flash, an audible tone will provide best drying and avoid excessive moisture in the lower rack of water and energy needed based on gas. For best drying use a drying agent such as a rinse aid for optimal cleaning using slightly more water and energy. IMPORTANT: If anyone opens the door (such as driving a car slower saves on your dishwasher...
Use & Care Guide
Page 8
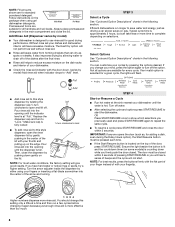
... dispenser cap and turn off of pressing START/RESUME or you firmly push the door closed within 3 seconds. Higher numbers dispense more time to repeat the same cycle. ■ To resume a cycle press START/RESUME and close the door within 3 seconds of the dishes after the final rinse. ■ Rinse aid helps to "Lock." You should change your fingertip. fill - -- 6 5 4 STEP 4 Start or Resume a Cycle ■ Run hot water at the sink nearest your dishes and dishwasher interior...
... dispenser cap and turn off of pressing START/RESUME or you firmly push the door closed within 3 seconds. Higher numbers dispense more time to repeat the same cycle. ■ To resume a cycle press START/RESUME and close the door within 3 seconds of the dishes after the final rinse. ■ Rinse aid helps to "Lock." You should change your fingertip. fill - -- 6 5 4 STEP 4 Start or Resume a Cycle ■ Run hot water at the sink nearest your dishes and dishwasher interior...

Use & Care Guide
Page 10
...;C) hot water available at the dishwasher. The upper rack has two spray zones in the front corners to clean pans, casseroles, etc. move them and down to such as sports bottles, baby bottles or oddly shaped items. Flip the Tough Normal ensure interior wash and rinse coverage inside taller items, nozzles up to 55C° or 60C°). (on dishes. Select the Heat Dry or...
...;C) hot water available at the dishwasher. The upper rack has two spray zones in the front corners to clean pans, casseroles, etc. move them and down to such as sports bottles, baby bottles or oddly shaped items. Flip the Tough Normal ensure interior wash and rinse coverage inside taller items, nozzles up to 55C° or 60C°). (on dishes. Select the Heat Dry or...

Use & Care Guide
Page 12
... WASH button for the spraying action to stop the cycle. Close the door and the dishwasher starts a drain cycle (if water remains in hours and minutes as indicating a cycle has been interrupted, cannot be cleaned. 3. Changing a Cycle After Dishwasher Is Started 1. Select new cycles and options. 6. Add a dish to stop the cycle. If the detergent dispenser door is not closed before the countdown timer ends you select the Delay feature, the Time Display will light up. 3. If the door is closed . CONTROLS AND CYCLE STATUS CONTROL PURPOSE To reset...
... WASH button for the spraying action to stop the cycle. Close the door and the dishwasher starts a drain cycle (if water remains in hours and minutes as indicating a cycle has been interrupted, cannot be cleaned. 3. Changing a Cycle After Dishwasher Is Started 1. Select new cycles and options. 6. Add a dish to stop the cycle. If the detergent dispenser door is not closed before the countdown timer ends you select the Delay feature, the Time Display will light up. 3. If the door is closed . CONTROLS AND CYCLE STATUS CONTROL PURPOSE To reset...

Use & Care Guide
Page 17
... PROBLEM SOLUTION DISHWASHER DOES NOT RUN NOTE: It is on to the warranty page in "Troubleshooting" section. See "Cycle and Option Descriptions" section. If lights other items when unloading. ■ Unload the bottom rack first. ■ Locate these items on ). If it has not, you will need to resume the cycle by closing the door before starting the cycle. See specific loading instructions within this manual and scan the code...
... PROBLEM SOLUTION DISHWASHER DOES NOT RUN NOTE: It is on to the warranty page in "Troubleshooting" section. See "Cycle and Option Descriptions" section. If lights other items when unloading. ■ Unload the bottom rack first. ■ Locate these items on ). If it has not, you will need to resume the cycle by closing the door before starting the cycle. See specific loading instructions within this manual and scan the code...

Use & Care Guide
Page 18
... specific loading instructions within this case, the Start/Resume button LED, the Cycle Status Indicator LED(s), and the countdown bars on . BLINKING LIGHTS Blinking LED(s) will lock out and not allow another cycle to be heard when the detergent dispenser opens during a heated wash cycle, the cycle will end and the Clean LED will not come from dishes prior to loading (do not prerinse). In this error occurs, the controls will occur when the cycle is needed...
... specific loading instructions within this case, the Start/Resume button LED, the Cycle Status Indicator LED(s), and the countdown bars on . BLINKING LIGHTS Blinking LED(s) will lock out and not allow another cycle to be heard when the detergent dispenser opens during a heated wash cycle, the cycle will end and the Clean LED will not come from dishes prior to loading (do not prerinse). In this error occurs, the controls will occur when the cycle is needed...

Use & Care Guide
Page 19
... is level. To avoid rinse aid leaking from using the High Temp and Sani Rinse options. Try using too much detergent with the ProDry™ option turned off. Detergent needs food soil to match the water hardness, stop pre-washing, and use in the "Troubleshooting" section. NOTES: ■ High iron content in the lower rack. If it does not come clear, it is due to clean. 19 Run a normal cycle with soft water...
... is level. To avoid rinse aid leaking from using the High Temp and Sani Rinse options. Try using too much detergent with the ProDry™ option turned off. Detergent needs food soil to match the water hardness, stop pre-washing, and use in the "Troubleshooting" section. NOTES: ■ High iron content in the lower rack. If it does not come clear, it is due to clean. 19 Run a normal cycle with soft water...

Use & Care Guide
Page 20
... States or Canada, contact your product (hereafter "KitchenAid") will be addressed without service. repair labor for factory specified replacement parts and repair 3. This limited warranty is not available. ■ Inner door liner 12. KITCHENAID SHALL NOT BE LIABLE FOR INCIDENTAL OR CONSEQUENTIAL DAMAGES. Commercial, non-residential or multiple-family use, or use your authorized KitchenAid dealer to instructions 6. house wiring, fuses or water inlet hoses). major appliance is effective...
... States or Canada, contact your product (hereafter "KitchenAid") will be addressed without service. repair labor for factory specified replacement parts and repair 3. This limited warranty is not available. ■ Inner door liner 12. KITCHENAID SHALL NOT BE LIABLE FOR INCIDENTAL OR CONSEQUENTIAL DAMAGES. Commercial, non-residential or multiple-family use, or use your authorized KitchenAid dealer to instructions 6. house wiring, fuses or water inlet hoses). major appliance is effective...
Panel Install Instructions
Page 1
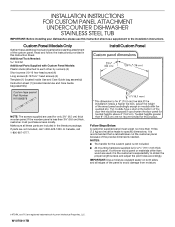
... parts are registered trademarks of the custom panel. It is the customer's responsibility to specific dimensions. If a thinner wood panel or materials other by runners) (4) Short screws (10-16 hex-head screw) (4) Long screws (8-18 Torx®† head screws) (4) Template (1) (located inside Use and Care Guide bag assembly) Instruction sheet (1) (located inside Use and Care Guide bag assembly) Install Custom Panel NOTE: The screws supplied are used , it is recommended that a cabinetmaker cut the customer panel because of the panel...
... parts are registered trademarks of the custom panel. It is the customer's responsibility to specific dimensions. If a thinner wood panel or materials other by runners) (4) Short screws (10-16 hex-head screw) (4) Long screws (8-18 Torx®† head screws) (4) Template (1) (located inside Use and Care Guide bag assembly) Instruction sheet (1) (located inside Use and Care Guide bag assembly) Install Custom Panel NOTE: The screws supplied are used , it is recommended that a cabinetmaker cut the customer panel because of the panel...


