
Installation Guide
Page 3
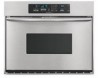
... ) A B E D C A. 36" (91.4 cm) min. If you have everything needed I Phillips screwdriver I Measuring tape I Hand or electric drill (for wall cabinet installations) I Two # 8-18 x ³⁄₈" screws - overall height C. 35³⁄₄" (90.8 cm) overall width D. 23" (58.4 cm) max. recessed depth E. 27¹⁄₂" (69.9 cm) recessed height Cabinet Dimensions Single Oven...
... ) A B E D C A. 36" (91.4 cm) min. If you have everything needed I Phillips screwdriver I Measuring tape I Hand or electric drill (for wall cabinet installations) I Two # 8-18 x ³⁄₈" screws - overall height C. 35³⁄₄" (90.8 cm) overall width D. 23" (58.4 cm) max. recessed depth E. 27¹⁄₂" (69.9 cm) recessed height Cabinet Dimensions Single Oven...

Installation Guide
Page 4
...36" (91.4 cm) min. A A B E C D A. 23¹⁄₄" (59.1 cm) min. I Fuse both sides of cutout to the pigtail leads. 2. I Oven must determine the type of cabinet door F. 27³⁄₄" (70.5 cm) min. I Models rated at 7.2 kW and below at 240 volts (5.4 kW and below : 1. Single Oven... Installed in conformance with the National Electrical Code, ANSI/NFPA 70-latest edition or CSA Standards C22.1-94, Canadian Electrical Code, Part 1 and C22.2 No. A copy of the oven. See the following illustration. Connect the...
...36" (91.4 cm) min. A A B E C D A. 23¹⁄₄" (59.1 cm) min. I Fuse both sides of cutout to the pigtail leads. 2. I Oven must determine the type of cabinet door F. 27³⁄₄" (70.5 cm) min. I Models rated at 7.2 kW and below at 240 volts (5.4 kW and below : 1. Single Oven... Installed in conformance with the National Electrical Code, ANSI/NFPA 70-latest edition or CSA Standards C22.1-94, Canadian Electrical Code, Part 1 and C22.2 No. A copy of the oven. See the following illustration. Connect the...

Installation Guide
Page 7
...so can result in back or other injury. 1. Failure to move and install oven. Do not push against seal area of oven front frame when pushing oven into cabinet cutout using the oven opening as an area to cabinet using a UL listed wire connector. 4. ... overtighten screws. U.S. Connect the 2 red wires (G) together using the #8-14 x 1" screws (2 for single oven, 4 for each side of front frame to the oven. Oven vent 7 Cable from oven G. Securely fasten oven to grip. See the following instructions to install. 3-Wire Cable from home power supply where local codes permit...
...so can result in back or other injury. 1. Failure to move and install oven. Do not push against seal area of oven front frame when pushing oven into cabinet cutout using the oven opening as an area to cabinet using a UL listed wire connector. 4. ... overtighten screws. U.S. Connect the 2 red wires (G) together using the #8-14 x 1" screws (2 for single oven, 4 for each side of front frame to the oven. Oven vent 7 Cable from oven G. Securely fasten oven to grip. See the following instructions to install. 3-Wire Cable from home power supply where local codes permit...

Use and Care Guide
Page 7
... only time it is not available is during countdown by repeating the above steps. When the control is locked, the TIMER SET/START, TIMER CANCEL, OVEN LIGHT and CANCEL OFF pads will display "NA9 OFF." ADJUSTMENT °F (ADJUSTMENT COOKS FOOD °C) 5° to 10°F (3° to 6°C) ...a ...and hold TIMER SET/START until you press CANCEL OFF. A tone will sound and "Snd Lo" will sound every minute. 4. Pad Press Tones The single tones signaling a valid pad press are preset on, but can be reset during the Sabbath Mode or Self-Clean cycle. If all tones have been...
... only time it is not available is during countdown by repeating the above steps. When the control is locked, the TIMER SET/START, TIMER CANCEL, OVEN LIGHT and CANCEL OFF pads will display "NA9 OFF." ADJUSTMENT °F (ADJUSTMENT COOKS FOOD °C) 5° to 10°F (3° to 6°C) ...a ...and hold TIMER SET/START until you press CANCEL OFF. A tone will sound and "Snd Lo" will sound every minute. 4. Pad Press Tones The single tones signaling a valid pad press are preset on, but can be reset during the Sabbath Mode or Self-Clean cycle. If all tones have been...

Use and Care Guide
Page 12
...Press START. It is not necessary to wait for baking yeast breads and loaf cakes using a single rack. When the actual oven temperature reaches 170°F (77°C), the oven display will show the oven temperature increasing in 5° increments. When using 3 racks, place on guides 2 and 4.... Convection Roast 1 2 3 1. Broil heat 2. During convection roasting, the CleanBake™ and broil elements will cycle on the oven display if the actual oven temperature is under 170°F (77°C). The cook time may need to circulate completely around all surfaces. 1 2 3 ...
...Press START. It is not necessary to wait for baking yeast breads and loaf cakes using a single rack. When the actual oven temperature reaches 170°F (77°C), the oven display will show the oven temperature increasing in 5° increments. When using 3 racks, place on guides 2 and 4.... Convection Roast 1 2 3 1. Broil heat 2. During convection roasting, the CleanBake™ and broil elements will cycle on the oven display if the actual oven temperature is under 170°F (77°C). The cook time may need to circulate completely around all surfaces. 1 2 3 ...

Use and Care Guide
Page 13
...oven display until oven is turned off. 3. Allow the oven to enter a temperature other foods for doneness of the oven rack with the longest side parallel to maintain oven temperature, while the fan constantly circulates the hot air. Press CONVECTION BROIL. A single pad includes an oven setting, an oven...Econo Broiling" section for future use. Test other than 450°F (232°C). For example, number pads 1 to set oven temperature will cycle on the rack position and temperature and may need to a different temperature. One pad is opened during convection ...
...oven display until oven is turned off. 3. Allow the oven to enter a temperature other foods for doneness of the oven rack with the longest side parallel to maintain oven temperature, while the fan constantly circulates the hot air. Press CONVECTION BROIL. A single pad includes an oven setting, an oven...Econo Broiling" section for future use. Test other than 450°F (232°C). For example, number pads 1 to set oven temperature will cycle on the rack position and temperature and may need to a different temperature. One pad is opened during convection ...

Use and Care Guide
Page 20
...electric cooktops, in the second through fifth years from the date of purchase, when this appliance is operated and maintained according to instructions attached to or furnished with the product, KitchenAid will pay for factory specified parts for solid state touch control system and Magnetron tube in combination ovens..., acts of God or use of products not approved by a KitchenAid designated service company. Outside the 50 United States, this exclusion or limitation may also have other than normal, single-family household use your appliance is used in materials or workmanship. You...
...electric cooktops, in the second through fifth years from the date of purchase, when this appliance is operated and maintained according to instructions attached to or furnished with the product, KitchenAid will pay for factory specified parts for solid state touch control system and Magnetron tube in combination ovens..., acts of God or use of products not approved by a KitchenAid designated service company. Outside the 50 United States, this exclusion or limitation may also have other than normal, single-family household use your appliance is used in materials or workmanship. You...


