
Use & Care Guide
Page 1
... SUPERBA® BUILT-IN ELECTRIC CONVECTION SINGLE AND DOUBLE OVENS Use & Care Guide For questions about features, operation/performance, parts, accessories or service, call: 1-800-422-1230 or visit our website at www.kitchenaid.com In Canada, call for assistance, installation and service, call: 1-800-807-6777 or visit our website at...
... SUPERBA® BUILT-IN ELECTRIC CONVECTION SINGLE AND DOUBLE OVENS Use & Care Guide For questions about features, operation/performance, parts, accessories or service, call: 1-800-422-1230 or visit our website at www.kitchenaid.com In Canada, call for assistance, installation and service, call: 1-800-807-6777 or visit our website at...

Use & Care Guide
Page 3
... alerts you to potential hazards that can be hot even though they have provided many important safety messages in this manual and on any part of others . IMPORTANT SAFETY INSTRUCTIONS WARNING: To reduce the risk of oven doors. Smother fire or flame or use a towel or ...surfaces are very important. The door gasket is cool. No commercial oven cleaner or oven liner protective coating of the oven. ■ Clean Only Parts Listed in Manual. ■ Before Self-Cleaning the Oven - WARNING You can kill or hurt you don't follow basic precautions, including the following...
... alerts you to potential hazards that can be hot even though they have provided many important safety messages in this manual and on any part of others . IMPORTANT SAFETY INSTRUCTIONS WARNING: To reduce the risk of oven doors. Smother fire or flame or use a towel or ...surfaces are very important. The door gasket is cool. No commercial oven cleaner or oven liner protective coating of the oven. ■ Clean Only Parts Listed in Manual. ■ Before Self-Cleaning the Oven - WARNING You can kill or hurt you don't follow basic precautions, including the following...

Use & Care Guide
Page 4
... This manual covers different models. Oven vent C. Oven door lock latch H. CleanBake™ bake element (hidden beneath floor panel) E. Lower oven (on right mounting rail) Parts and Features not shown Oven lights Third oven rack (roll out rack) Roasting rack Temperature probe 4 Temperature probe jack (cavity with convection element and fan...
... This manual covers different models. Oven vent C. Oven door lock latch H. CleanBake™ bake element (hidden beneath floor panel) E. Lower oven (on right mounting rail) Parts and Features not shown Oven lights Third oven rack (roll out rack) Roasting rack Temperature probe 4 Temperature probe jack (cavity with convection element and fan...

Use & Care Guide
Page 7
... Control Lock shuts down the set , only the number and start or stop the reminder tones. To Lock Control: Touch and hold START for only part of the oven(s). Oven Temperature Control IMPORTANT: Do not use of the Sabbath. Touch START to measure oven temperature because opening the oven door during...
... Control Lock shuts down the set , only the number and start or stop the reminder tones. To Lock Control: Touch and hold START for only part of the oven(s). Oven Temperature Control IMPORTANT: Do not use of the Sabbath. Touch START to measure oven temperature because opening the oven door during...

Use & Care Guide
Page 11
... left in approximately 30 seconds. The element(s) cycle on the oven display if the actual oven temperature is under 170°F (77°C). Ask for Part Number W10123240. ■ For proper draining, do not cover the grid with the longest side parallel to the door. The lower the temperature, the slower...
... left in approximately 30 seconds. The element(s) cycle on the oven display if the actual oven temperature is under 170°F (77°C). Ask for Part Number W10123240. ■ For proper draining, do not cover the grid with the longest side parallel to the door. The lower the temperature, the slower...

Use & Care Guide
Page 15
... broiler pan on dough type and quantity. 4. Follow steps 1 through 6 in , then close oven door. 2. Display will remain lit in the center of the thickest part of meat, poultry and casseroles with cooking spray. Touch OFF, UPPER OVEN OFF or LOWER OVEN OFF when finished proofing. Touch number keys to clear...
... broiler pan on dough type and quantity. 4. Follow steps 1 through 6 in , then close oven door. 2. Display will remain lit in the center of the thickest part of meat, poultry and casseroles with cooking spray. Touch OFF, UPPER OVEN OFF or LOWER OVEN OFF when finished proofing. Touch number keys to clear...

Use & Care Guide
Page 18
...-wool pads, gritty washcloths or some models) Cleaning Method: Rub in direction of grain to avoid damaging. ■ KitchenAid® Stainless Steel Cleaner and Polish Part Number 4396920 (not included) or KitchenAid® Stainless Steel Wipes Part Number 8212510 (not included): See "Assistance or Service" section to order. At high temperatures, foods react with...
...-wool pads, gritty washcloths or some models) Cleaning Method: Rub in direction of grain to avoid damaging. ■ KitchenAid® Stainless Steel Cleaner and Polish Part Number 4396920 (not included) or KitchenAid® Stainless Steel Wipes Part Number 8212510 (not included): See "Assistance or Service" section to order. At high temperatures, foods react with...

Use & Care Guide
Page 21
...and maintenance procedures. ■ Accessory and repair parts sales. ■ Referrals to KitchenAid with : ■ Features and specifications on our full line of a service call the KitchenAid Customer eXperience Center toll free at www.kitchenaid.com and click on "applianceaccessories.com." Outside ... phone number in your area, you can write to local dealers, repair parts distributors and service companies. Our consultants provide assistance with any questions or concerns at : KitchenAid Brand Home Appliances Customer eXperience Center 553 Benson Road Benton Harbor, MI 49022...
...and maintenance procedures. ■ Accessory and repair parts sales. ■ Referrals to KitchenAid with : ■ Features and specifications on our full line of a service call the KitchenAid Customer eXperience Center toll free at www.kitchenaid.com and click on "applianceaccessories.com." Outside ... phone number in your area, you can write to local dealers, repair parts distributors and service companies. Our consultants provide assistance with any questions or concerns at : KitchenAid Brand Home Appliances Customer eXperience Center 553 Benson Road Benton Harbor, MI 49022...

Use & Care Guide
Page 22
... appliance is operated and maintained according to instructions attached to or furnished with the product, KitchenAid will pay for Factory Specified Parts for the following information about your authorized KitchenAid dealer to determine if another warranty applies. Expenses for travel and transportation for in -home... purchase, when this appliance is operated and maintained according to instructions attached to or furnished with the product, KitchenAid will pay for Factory Specified Parts for other damage to the finish of your major appliance, to replace or repair house fuses, or to ...
... appliance is operated and maintained according to instructions attached to or furnished with the product, KitchenAid will pay for Factory Specified Parts for the following information about your authorized KitchenAid dealer to determine if another warranty applies. Expenses for travel and transportation for in -home... purchase, when this appliance is operated and maintained according to instructions attached to or furnished with the product, KitchenAid will pay for Factory Specified Parts for other damage to the finish of your major appliance, to replace or repair house fuses, or to ...

Installation Guide
Page 2
...installations) ■ 1" (25 mm) drill bit (for wall cabinet installations) ■ Level Parts needed ■ UL listed or CSA approved conduit connector ■ UL listed wire connectors Parts supplied ■ #8-14 x 1" screws - It is , tell you how to potential hazards ... WARNING You can happen if the instructions are very important. If you don't follow instructions. INSTALLATION REQUIREMENTS Tools and Parts Gather the required tools and parts before starting installation. single oven (2), double oven (4) ■ Bottom vent (supplied on your appliance. Given dimensions ...
...installations) ■ 1" (25 mm) drill bit (for wall cabinet installations) ■ Level Parts needed ■ UL listed or CSA approved conduit connector ■ UL listed wire connectors Parts supplied ■ #8-14 x 1" screws - It is , tell you how to potential hazards ... WARNING You can happen if the instructions are very important. If you don't follow instructions. INSTALLATION REQUIREMENTS Tools and Parts Gather the required tools and parts before starting installation. single oven (2), double oven (4) ■ Bottom vent (supplied on your appliance. Given dimensions ...
Installation Guide
Page 4
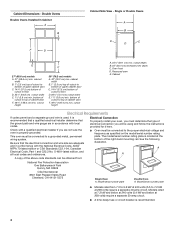
... path and wire gauge are in accordance with the National Electrical Code, ANSI/ NFPA 70-latest edition or CSA Standards C22.1-94, Canadian Electrical Code, Part 1 and C22.2 No. See the following illustration. cabinet width B. 1" (2.5 cm) top of cutout to bottom of upper cabinet door C. 14³⁄₄" (37.5 cm...
... path and wire gauge are in accordance with the National Electrical Code, ANSI/ NFPA 70-latest edition or CSA Standards C22.1-94, Canadian Electrical Code, Part 1 and C22.2 No. See the following illustration. cabinet width B. 1" (2.5 cm) top of cutout to bottom of upper cabinet door C. 14³⁄₄" (37.5 cm...

Installation Guide
Page 5
... the flexible cable conduit from oven should be provided. ■ If the house has aluminum wiring follow these instructions can result in back or other parts from the oven. 4. Remove junction box cover if it will no longer close to the unlocked position. UL listed or CSA approved conduit connector 5 ■...
... the flexible cable conduit from oven should be provided. ■ If the house has aluminum wiring follow these instructions can result in back or other parts from the oven. 4. Remove junction box cover if it will no longer close to the unlocked position. UL listed or CSA approved conduit connector 5 ■...

Installation Guide
Page 7
... into place. 9. Push oven completely into cabinet and center oven into cabinet. 3. Do not overtighten screws. On some models, the oven vent is an extra part, go and open and close. Replace oven racks. 7. Repeat for 5 minutes, feel heat or if an error code ("F" followed by a number plus "E" ... please reference the "Assistance or Service" section of the Use and Care Guide or contact the dealer from whom you have all of /recycle all parts are testing. 4. Check that you purchased your oven. If there is taped to the Use and Care Guide. Dispose of your tools. 3. When ...
... into place. 9. Push oven completely into cabinet and center oven into cabinet. 3. Do not overtighten screws. On some models, the oven vent is an extra part, go and open and close. Replace oven racks. 7. Repeat for 5 minutes, feel heat or if an error code ("F" followed by a number plus "E" ... please reference the "Assistance or Service" section of the Use and Care Guide or contact the dealer from whom you have all of /recycle all parts are testing. 4. Check that you purchased your oven. If there is taped to the Use and Care Guide. Dispose of your tools. 3. When ...


