Installation Guide
Page 1
ELECTRIC COOKTOP INSTALLATION INSTRUCTIONS INSTRUCTIONS D'INSTALLATION DE LA TABLE DE CUISSON ÉLECTRIQUE Table of Contents / Table des matières COOKTOP SAFETY 1 INSTALLATION REQUIREMENTS 2 Tools and Parts 2 Location Requirements 2 Electrical Requirements 3 INSTALLATION INSTRUCTIONS 4 Prepare Cooktop for Installation 4 Install Cooktop 5 Make Electrical Connection 6 Attach Cooktop to ...lectrique 13 Fixation de la table de cuisson au plan de travail 16 Achever l'installation 16 COOKTOP SAFETY Your safety and the safety of injury, and tell you what the potential hazard is...
ELECTRIC COOKTOP INSTALLATION INSTRUCTIONS INSTRUCTIONS D'INSTALLATION DE LA TABLE DE CUISSON ÉLECTRIQUE Table of Contents / Table des matières COOKTOP SAFETY 1 INSTALLATION REQUIREMENTS 2 Tools and Parts 2 Location Requirements 2 Electrical Requirements 3 INSTALLATION INSTRUCTIONS 4 Prepare Cooktop for Installation 4 Install Cooktop 5 Make Electrical Connection 6 Attach Cooktop to ...lectrique 13 Fixation de la table de cuisson au plan de travail 16 Achever l'installation 16 COOKTOP SAFETY Your safety and the safety of injury, and tell you what the potential hazard is...
Installation Guide
Page 2
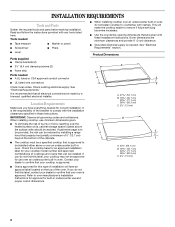
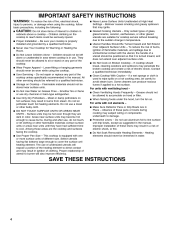
...16 42.1 cm) 30 77.1 cm) 36 92.3 cm) C. 2⁷⁄₈" (7.3 cm) B A C A. 22¹⁄₈" (56.1 cm) B. 16 42.1 cm) 30 77.1 cm) 36 92.3 cm) C. 2⁷⁄₈" (7.3 cm) 2 IMPORTANT: Observe all electrical connections be approved for use over an ...cooktop, use and proper cutout dimensions. ■ When installing cooktop over an undercounter built-in oven, do not find this label, contact your dealer to countertop with any tools listed here. See "Electrical Requirements." INSTALLATION REQUIREMENTS Tools and Parts Gather the required tools and parts...
...16 42.1 cm) 30 77.1 cm) 36 92.3 cm) C. 2⁷⁄₈" (7.3 cm) B A C A. 22¹⁄₈" (56.1 cm) B. 16 42.1 cm) 30 77.1 cm) 36 92.3 cm) C. 2⁷⁄₈" (7.3 cm) 2 IMPORTANT: Observe all electrical connections be approved for use over an ...cooktop, use and proper cutout dimensions. ■ When installing cooktop over an undercounter built-in oven, do not find this label, contact your dealer to countertop with any tools listed here. See "Electrical Requirements." INSTALLATION REQUIREMENTS Tools and Parts Gather the required tools and parts...
Installation Guide
Page 4
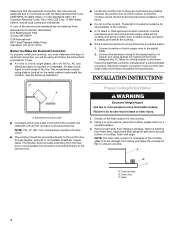
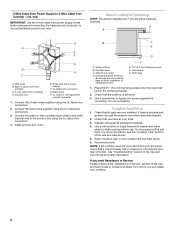
... and do so can result in back or other injury. 1. NOTE: The foam strip covers the underside of cooktop, flush with the National Electrical Code, ANSI/NFPA 70-latest edition or CSA Standards C22.1-94, Canadian Electrical Code, Part 1 and C22.2 No. INSTALLATION INSTRUCTIONS A A. Glass B C 4 Connect the aluminum wiring to the added section of...
... and do so can result in back or other injury. 1. NOTE: The foam strip covers the underside of cooktop, flush with the National Electrical Code, ANSI/NFPA 70-latest edition or CSA Standards C22.1-94, Canadian Electrical Code, Part 1 and C22.2 No. INSTALLATION INSTRUCTIONS A A. Glass B C 4 Connect the aluminum wiring to the added section of...
Installation Guide
Page 8
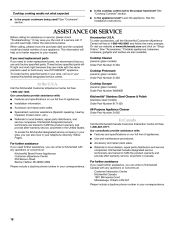
... UL listed wire connector G. Black wires H. Connect the green or bare cooktop cable wires to the neutral (white) junction box wire. Cooktop base C. Check that all your cooktop. 8 Check that the cooktop is an extra part, go back through the steps to Countertop NOTE: This section applies only if... listed or CSA approved conduit connector 1. If there is still level. 3. Attach Cooktop to see the "Cooktop Care" section of the Use and Care Guide or contact the dealer from whom you have all parts are using the UL listed wire connectors. 4. Connect the 2 red wires together ...
... UL listed wire connector G. Black wires H. Connect the green or bare cooktop cable wires to the neutral (white) junction box wire. Cooktop base C. Check that all your cooktop. 8 Check that the cooktop is an extra part, go back through the steps to Countertop NOTE: This section applies only if... listed or CSA approved conduit connector 1. If there is still level. 3. Attach Cooktop to see the "Cooktop Care" section of the Use and Care Guide or contact the dealer from whom you have all parts are using the UL listed wire connectors. 4. Connect the 2 red wires together ...
Use and Care Guide
Page 4
Do not repair or replace any part of the cooktop. Moist or damp potholders on hot surfaces may result in color. Among those areas are dark in a risk of electric shock, or fire. Never Leave Surface Units Unattended at High Heat Settings - Contact a ...cooking may penetrate the broken cooktop and create a risk of electric shock. s Do Not Soak Removable Heating Elements - s SAVE THESE INSTRUCTIONS 4 Be sure your cooktop is used to wipe spills on any part of the cooktop unless specifically recommended in area where cooktop is equipped with ventilating hood...
Do not repair or replace any part of the cooktop. Moist or damp potholders on hot surfaces may result in color. Among those areas are dark in a risk of electric shock, or fire. Never Leave Surface Units Unattended at High Heat Settings - Contact a ...cooking may penetrate the broken cooktop and create a risk of electric shock. s Do Not Soak Removable Heating Elements - s SAVE THESE INSTRUCTIONS 4 Be sure your cooktop is used to wipe spills on any part of the cooktop unless specifically recommended in area where cooktop is equipped with ventilating hood...

Use and Care Guide
Page 5
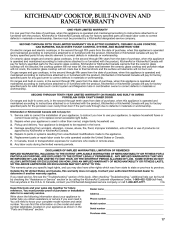
... function; melt and hold function; melt and hold function) F. Hot surface indicator lights F. keep warm function; triple-circuit element) Cooktops 36" (91.4 cm) Touch-Activated Electronic Control model shown B C D A H G A. Center rear surface cooking area (with ... (with dual-circuit element "bridge") F E G. Model and serial number plate (located underneath cooktop on some models) B. PARTS AND FEATURES TOUCH-ACTIVATED ELECTRONIC CONTROLS Control Panels 30" (76.2 cm) Touch-Activated Electronic Controls A B 36" (91.4 cm) Touch-Activated Electronic Controls C B A C D G F E D ...
... function; melt and hold function; melt and hold function) F. Hot surface indicator lights F. keep warm function; triple-circuit element) Cooktops 36" (91.4 cm) Touch-Activated Electronic Control model shown B C D A H G A. Center rear surface cooking area (with ... (with dual-circuit element "bridge") F E G. Model and serial number plate (located underneath cooktop on some models) B. PARTS AND FEATURES TOUCH-ACTIVATED ELECTRONIC CONTROLS Control Panels 30" (76.2 cm) Touch-Activated Electronic Controls A B 36" (91.4 cm) Touch-Activated Electronic Controls C B A C D G F E D ...

Use and Care Guide
Page 8
... rear surface cooking area E. Right rear control (simmer; Right front control (simmer; triple-circuit element) Cooktops 36" (91.4 cm) Custom Control model shown B C D A H G A. keep warm function; keep warm function; keep warm function; keep warm function; melt function) B. PARTS AND FEATURES - melt function; Hot surface indicator light E D C A. keep warm function; Left front control (simmer...
... rear surface cooking area E. Right rear control (simmer; Right front control (simmer; triple-circuit element) Cooktops 36" (91.4 cm) Custom Control model shown B C D A H G A. keep warm function; keep warm function; keep warm function; keep warm function; melt function) B. PARTS AND FEATURES - melt function; Hot surface indicator light E D C A. keep warm function; Left front control (simmer...

Use and Care Guide
Page 11
...with dual-circuit element "bridge") F E G. Left front control knob (triple-circuit element) Cooktops 36" (91.4 cm) Traditional Knob model shown B C D A H G A. Model and serial number plate (located underneath cooktop on light F. Right front surface cooking area 11 Left rear control knob B. Left front control... "bridge") C. Left rear surface cooking area C. Right rear control knob E D D. Power on light G. Ceramic glass cooktop (stainless steel models have metal trim) B. PARTS AND FEATURES TRADITIONAL KNOB CONTROLS Control Panels 30" (76.2 cm) Traditional Knob Controls...
...with dual-circuit element "bridge") F E G. Left front control knob (triple-circuit element) Cooktops 36" (91.4 cm) Traditional Knob model shown B C D A H G A. Model and serial number plate (located underneath cooktop on light F. Right front surface cooking area 11 Left rear control knob B. Left front control... "bridge") C. Left rear surface cooking area C. Right rear control knob E D D. Power on light G. Ceramic glass cooktop (stainless steel models have metal trim) B. PARTS AND FEATURES TRADITIONAL KNOB CONTROLS Control Panels 30" (76.2 cm) Traditional Knob Controls...

Use and Care Guide
Page 13
... (C): 1. Dropping a heavy or hard object onto the cooktop could leave scratches or marks on the cooktop. To use both Single elements and Bridge (A+B+C): 1. Turn on 36" [91.4 cm] models) The bridge element allows maximum flexibility in any part of white or biscuit ceramic glass to appear to touch any... form, clean up all spills and soils as soon as a cutting board. It is on the cooktop. Aluminum or copper bottoms...
... (C): 1. Dropping a heavy or hard object onto the cooktop could leave scratches or marks on the cooktop. To use both Single elements and Bridge (A+B+C): 1. Turn on 36" [91.4 cm] models) The bridge element allows maximum flexibility in any part of white or biscuit ceramic glass to appear to touch any... form, clean up all spills and soils as soon as a cutting board. It is on the cooktop. Aluminum or copper bottoms...
Use and Care Guide
Page 16
..., bakeware, cookware, gadgets and textiles are trained to KitchenAid with any questions or concerns at www.kitchenaid.com and click on "ShopOnline," then "Accessories." See "Cooktop Controls" section. s s s Cooktop Scraper (ceramic glass models) Order Part Number WA906B KitchenAid® Stainless Steel Cleaner & Polish (stainless steel models) Order Part Number 8171420 Installation information. Specialized customer assistance (Spanish speaking...
..., bakeware, cookware, gadgets and textiles are trained to KitchenAid with any questions or concerns at www.kitchenaid.com and click on "ShopOnline," then "Accessories." See "Cooktop Controls" section. s s s Cooktop Scraper (ceramic glass models) Order Part Number WA906B KitchenAid® Stainless Steel Cleaner & Polish (stainless steel models) Order Part Number 8171420 Installation information. Specialized customer assistance (Spanish speaking...
Use and Care Guide
Page 17
... due to defects in materials or workmanship. Replacement parts or repair labor costs for customers who reside in remote areas. 8. You will pay for any electric element to correct defects in materials or workmanship. KitchenAid or KitchenAid Canada warrants that the ceramic glass cooktop will not discolor, the cooktop pattern will not wear off, the rubber...
... due to defects in materials or workmanship. Replacement parts or repair labor costs for customers who reside in remote areas. 8. You will pay for any electric element to correct defects in materials or workmanship. KitchenAid or KitchenAid Canada warrants that the ceramic glass cooktop will not discolor, the cooktop pattern will not wear off, the rubber...

Parts Diagram
Page 1
COOKTOP PARTS For Models: KECC567RBL00, KECC567RWW00, KECC567RBB00, KECC567RSS00 (Black) (Pure White) (Pure Biscuit) (S.Steel) 36" ELECTRIC CERAN COOKTOP 9−05 Litho in U.S.A. (cre) 1 Part No. 8186290
COOKTOP PARTS For Models: KECC567RBL00, KECC567RWW00, KECC567RBB00, KECC567RSS00 (Black) (Pure White) (Pure Biscuit) (S.Steel) 36" ELECTRIC CERAN COOKTOP 9−05 Litho in U.S.A. (cre) 1 Part No. 8186290

Parts Diagram
Page 2
...Shield 17 311865 Screw Illus. DESCRIPTION 1 Literature Parts 8286066 Installation Instructions 8286430 Wiring Diagram 8286062 Energuide Label 8286067 Use & Care Guide 3191638 Safer Cooking Tips 9759133 Safer Cooking Tips 2 Cooktop, Glass 8286214 Black 8286213 White 8286215 Biscuit ...27 Seal, Switch 8285469 Black 8286596 Clear 28 8285708 Frame, Cooktop (S.Steel Mdl Only) 29 3196160 Screw 2 8186290 Part No. No. COOKTOP PARTS For Models: KECC567RBL00, KECC567RWW00, KECC567RBB00, KECC567RSS00 (Black) (Pure White) (Pure Biscuit) (S.Steel) Illus. No.
...Shield 17 311865 Screw Illus. DESCRIPTION 1 Literature Parts 8286066 Installation Instructions 8286430 Wiring Diagram 8286062 Energuide Label 8286067 Use & Care Guide 3191638 Safer Cooking Tips 9759133 Safer Cooking Tips 2 Cooktop, Glass 8286214 Black 8286213 White 8286215 Biscuit ...27 Seal, Switch 8285469 Black 8286596 Clear 28 8285708 Frame, Cooktop (S.Steel Mdl Only) 29 3196160 Screw 2 8186290 Part No. No. COOKTOP PARTS For Models: KECC567RBL00, KECC567RWW00, KECC567RBB00, KECC567RSS00 (Black) (Pure White) (Pure Biscuit) (S.Steel) Illus. No.

Parts Diagram
Page 3
No. Hardware Kit SPLICING WIRES−−25FT. DESCRIPTION FOLLOWING PARTS NOT ILLUSTRATED Miscellaneous 3172515 Mtg. LENGTH 4456028 Wire, Jumper 242828 Wire, Black 12 Ga. 150 C 242820 Wire, Black 14 Ga. 150 C 242822 Wire, Blue 14 ... C 242831 Wire, Red 14 Ga. 200 C 242826 Wire, White 14 Ga. 150 C 242827 Wire, Yellow 14 Ga. 150 C 242832 Wire, Yellow 14 Ga. 200 C CLEANER, COOKTOP 3191048 Cleaner, Glass WIRING HARNESS PARTS 8286468 Harness, Main 8286382 Clip, Harness 3196160 Screw, Ground 8286338 Conduit, Harness 8286238 Thermostat (100c−94c) 8186290...
No. Hardware Kit SPLICING WIRES−−25FT. DESCRIPTION FOLLOWING PARTS NOT ILLUSTRATED Miscellaneous 3172515 Mtg. LENGTH 4456028 Wire, Jumper 242828 Wire, Black 12 Ga. 150 C 242820 Wire, Black 14 Ga. 150 C 242822 Wire, Blue 14 ... C 242831 Wire, Red 14 Ga. 200 C 242826 Wire, White 14 Ga. 150 C 242827 Wire, Yellow 14 Ga. 150 C 242832 Wire, Yellow 14 Ga. 200 C CLEANER, COOKTOP 3191048 Cleaner, Glass WIRING HARNESS PARTS 8286468 Harness, Main 8286382 Clip, Harness 3196160 Screw, Ground 8286338 Conduit, Harness 8286238 Thermostat (100c−94c) 8186290...


